FiLMiC Pro: Every Single Setting Explained
In this article, I’m going to go through absolutely every single feature contained within this powerful app and explain what it’s for. FiLMiC Pro has a lot of great features. Most of the features are basic controls you would find in any camera. Some are specific to smartphone filmmaking. And some others are unique to FiLMiC Pro.
Oh, by the way, FiLMiC Pro might operate differently or just look a bit different depending on your device. This is especially the case with differences between iPhone and Android, as you’d expect.
DOWNLOAD a PDF of this Article as a convenient Reference Guide
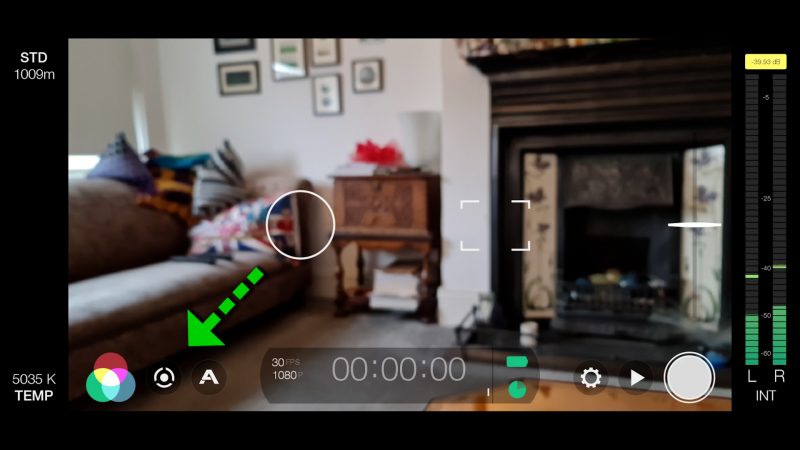
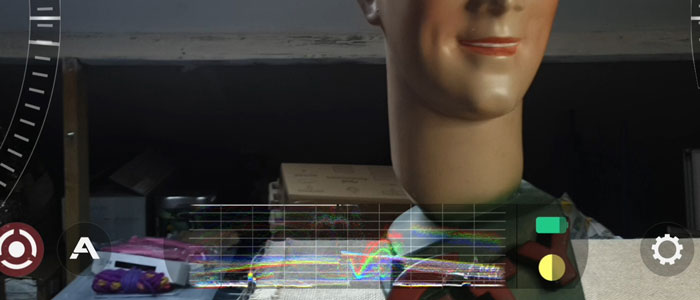
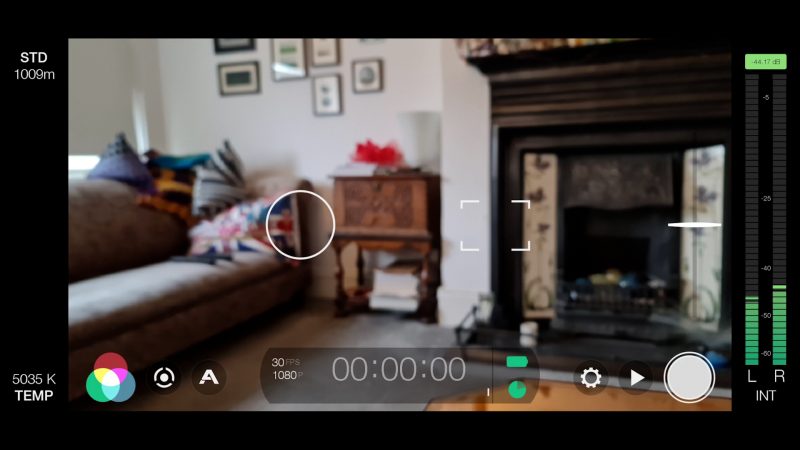
A Circle & A Rectangle
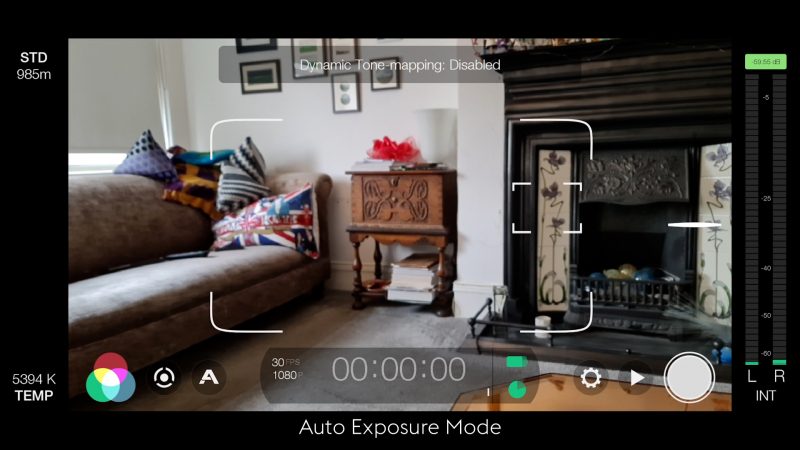
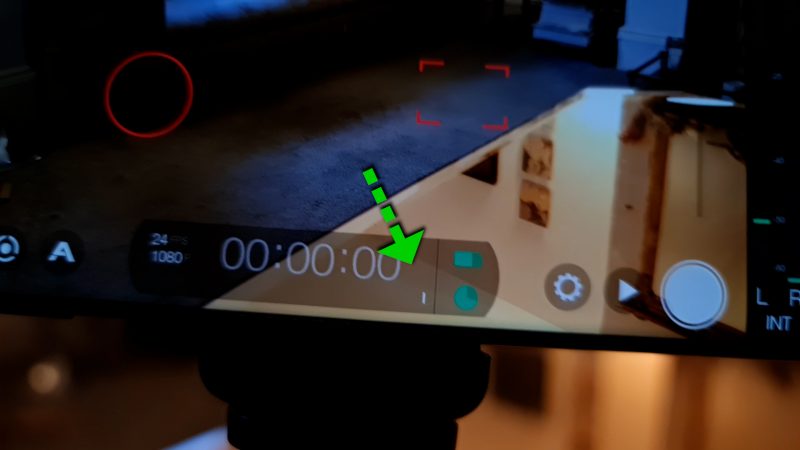
When you open up FiLMiC Pro, in the middle there’s a white circle and a white rectangle. FiLMiC Pro calls these reticles.
I’m not sure if I used the word reticle before I started using FiLMiC Pro. But a reticle is basically a series of lines or marks which form a measuring or locating aid for some kind of optical device. For example, like the crosshairs in a sniper’s sight.
If you don’t see one or both of these, or they’re red, then either you have one of the manual control wheels open or the reticle is locked. If you just tap this button here a couple of times, you should have both reticles – but they will be red.
FiLMiC Pro Reticles
So, the circle is your exposure reticle and the rectangle is your focus reticle. When they are white, they are unlocked. When they are red they are locked.
You can lock and unlock them just by tapping them.
In your native app you probably also have a reticle, which goes yellow when you lock it. But that reticle is for both exposure and focus. In FiLMiC Pro that reticle has been split into 2 reticles, so you can control them separately.
The reticles can be moved around the screen, just like the native camera app reticle. And they work the same way. Wherever you place the reticle, FiLMiC Pro will take the reading from that area of the screen.
BUT only if they are white unlocked. If they are red (locked) no change will take place.
Exposure Reticle
Just like with your native app, when you move the unlocked exposure reticle around the frame, it takes a reading from that area. So, the idea is, you choose the area of the frame you want the camera to expose correctly.
If the lighting is very even across the frame, it might not make much difference. But if there is a wide contrast, like say with a window in daytime, then one area might be over exposed or under exposed.
If you want to show what’s outside the window, place the reticle over the window. If you want to expose the room, place it over the room. Then, usually, we lock it before we start filming.
If you don’t lock the exposure reticle, the exposure will be on auto. So if you move the camera around, you can see the exposure adjusting live. If you start recording, it will continue to adjust live, just like with your native app on auto.
If you double tap the exposure reticle it changes mode. Rather than take the exposure reading for a point indicated by the reticle, it uses the whole frame.
Dynamic Tone-mapping
In a smartphone, dynamic tone-mapping is basically an HDR function. Software in the camera looks at different areas of the image and adjusts the exposure level not for the whole frame, but for different parts.
The most obvious example is when you are filming a landscape and the sky is way brighter than the land. The HDR software will try to even out the exposure so you can see both the land and the sky.
But this is not compatible with manual control. Because the tone mapping function wants to adjust ISO differently for different parts. The sky might be 50 ISO while the land is 500.
When you use FiLMiC Pro for android, it disables dynamic tone mapping. But when using it with an iPhone, it cannot be disabled. So you might lock exposure and parts of the image will continue to adjust.

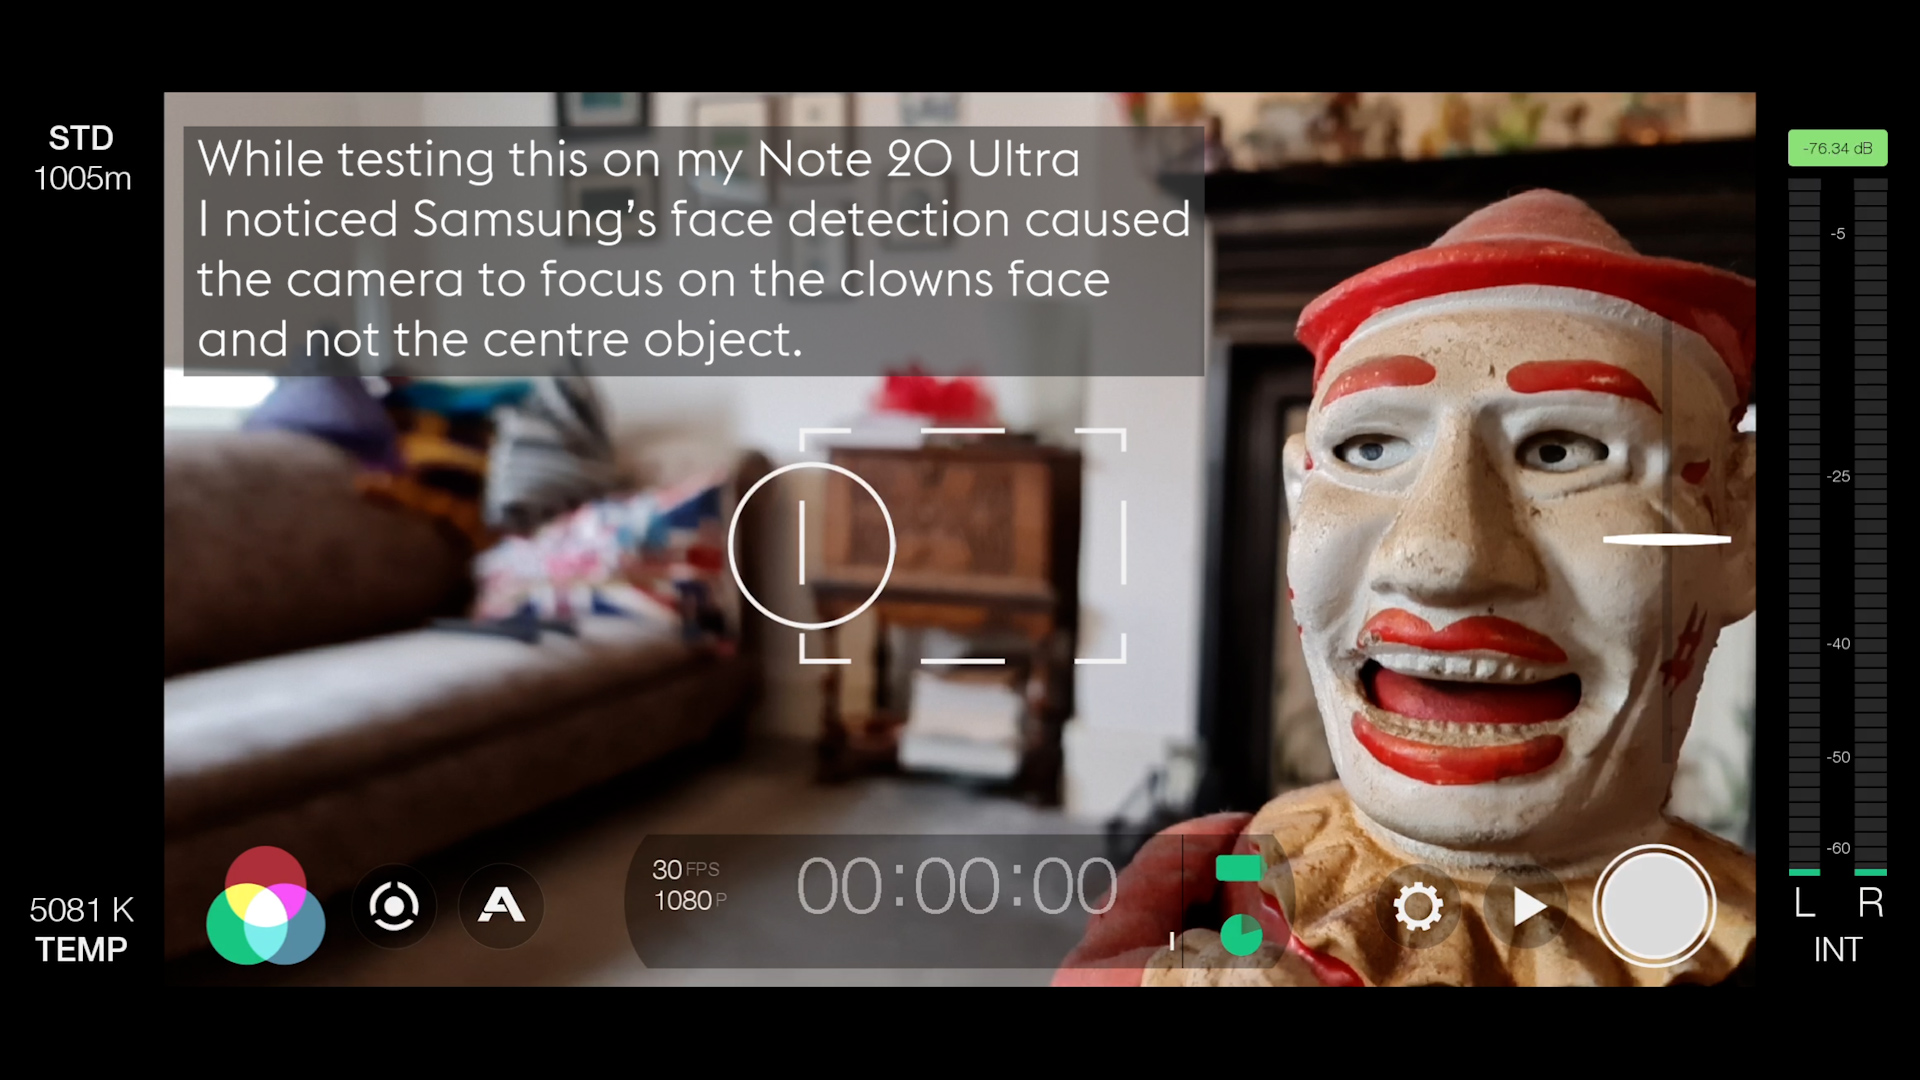
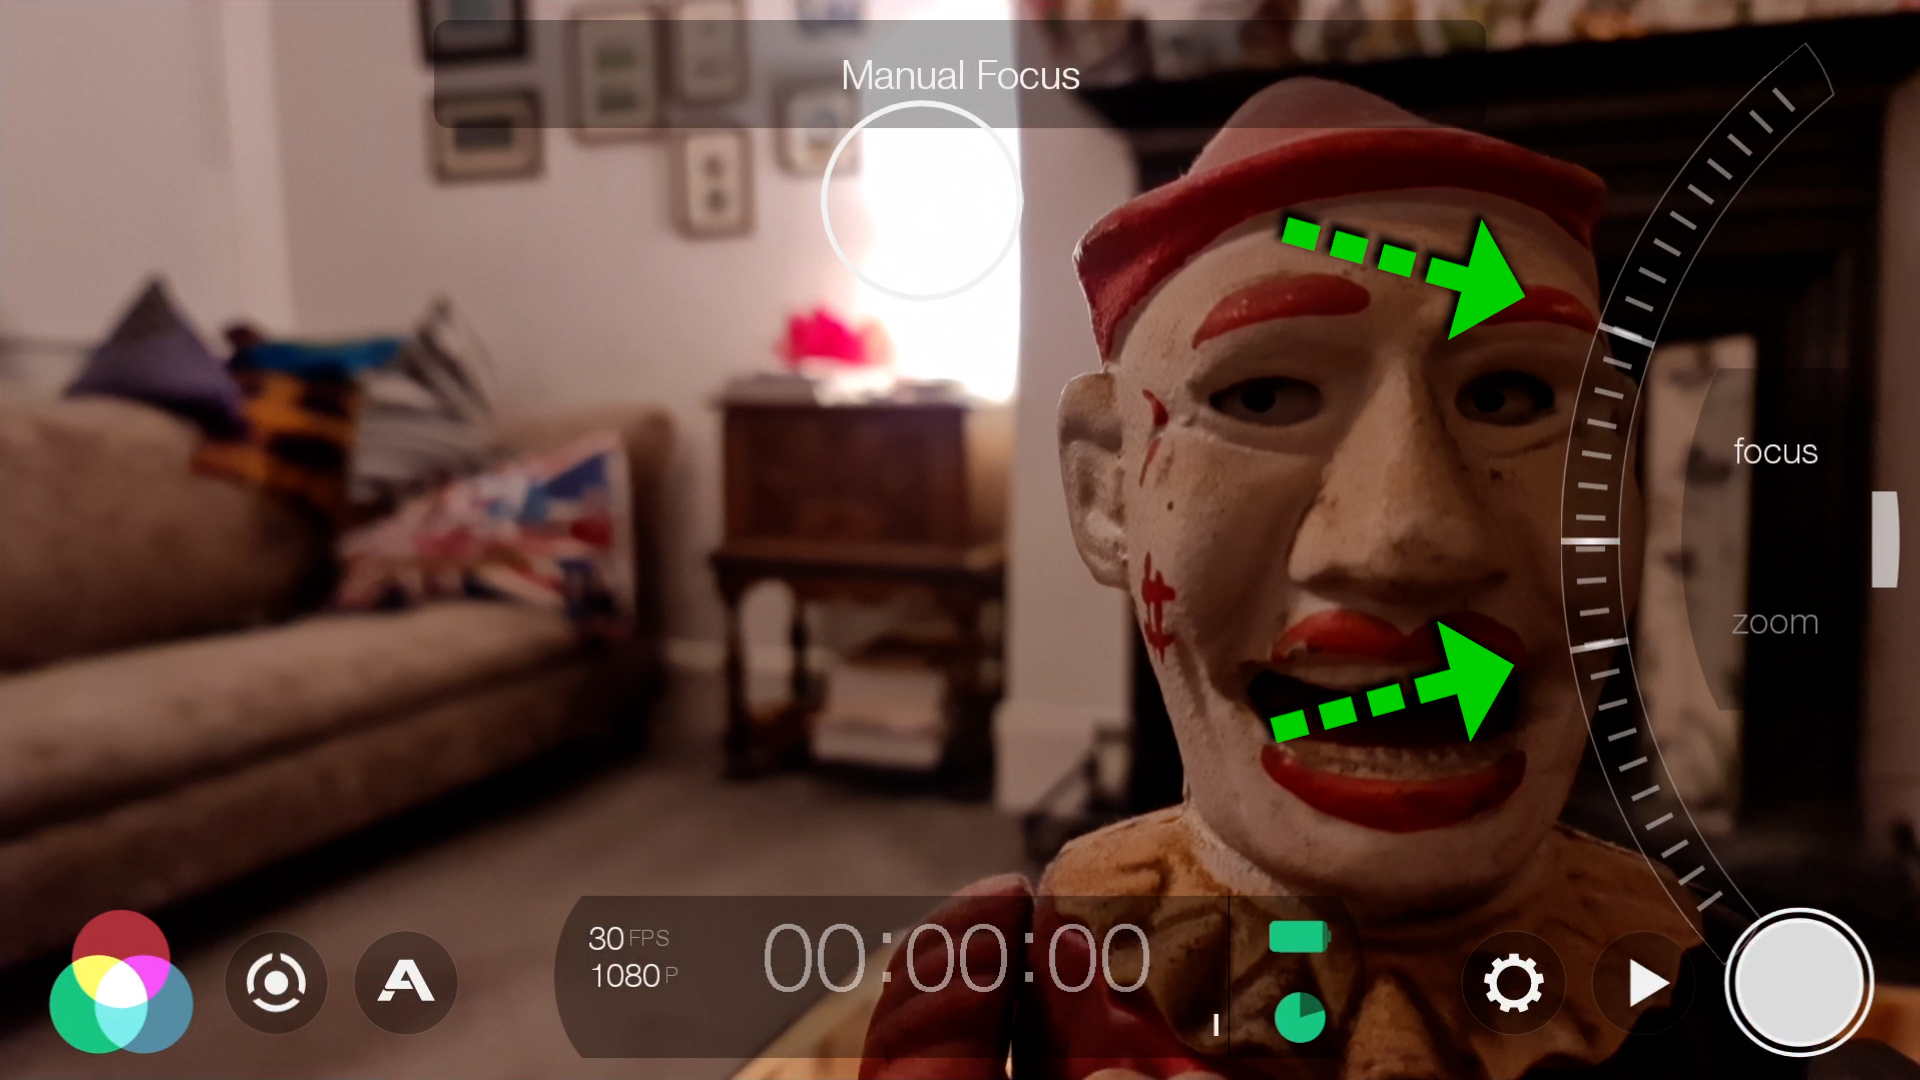
Focus Reticle
The focus reticle works similarly to the exposure reticle. Move it around to set focus.
But, in the Android version, the focus reticle is not in auto. If you move the camera around, the focus won’t change. You need to move the reticle.
Put something close to the camera so you can see how this works more clearly. Move the focus reticle over the close object, now over the distant object. You can see the focus change.
Again, normally we would tap to lock the focus reticle before hitting record.
Auto Focus
There is actually a way to set this to autofocus. Just double tap the reticle and it expands. This might be useful if you want the focus to adjust during the shot. For example, if you are vlogging or you just want to film live and you want the focus to keep adjusting.
When in autofocus mode, you cannot move the reticle. It simply takes the focus from whatever is in the centre of the frame.
The autofocus reticle can also be locked, the same way. To get back to manual, just double tap again.
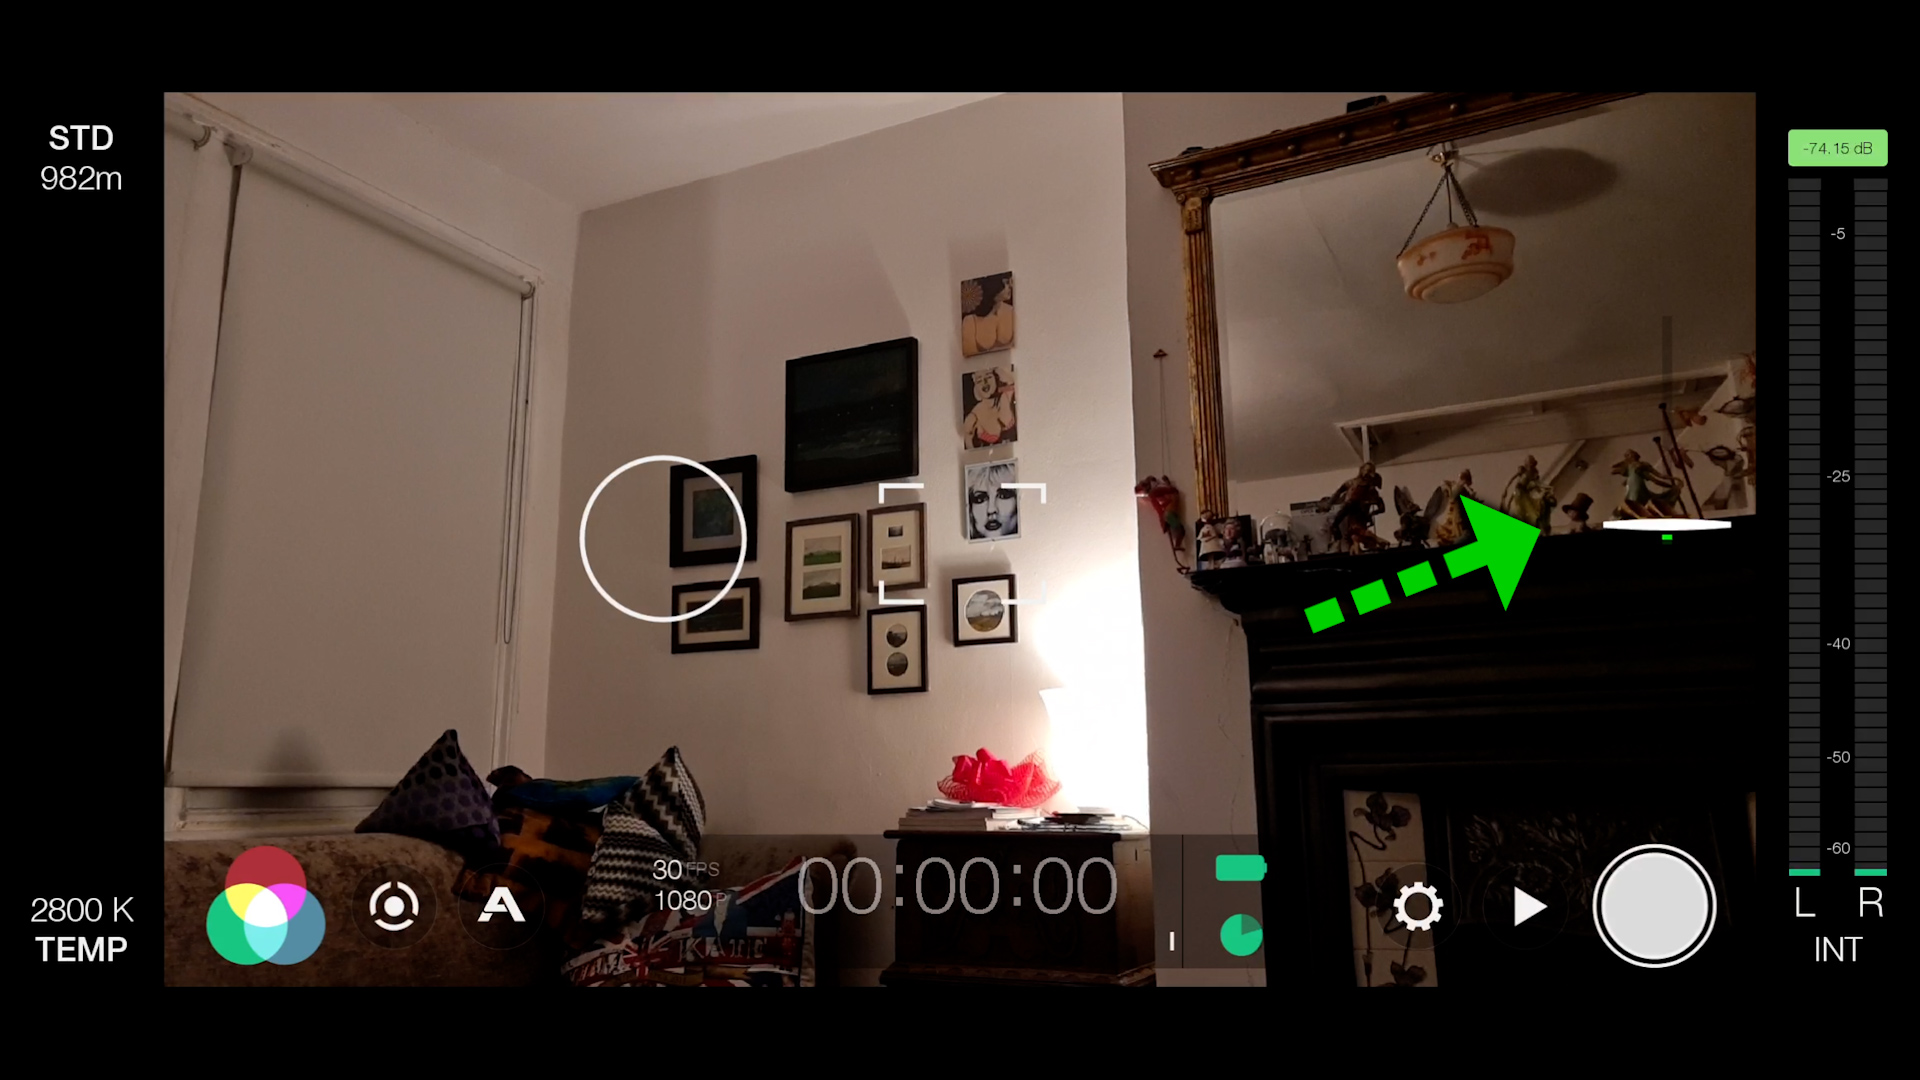
Zoom Control
The white line on the right of the interface is the zoom control. Slide it up to zoom in and down to zoom out.
I never really use this but I just noticed that when I zoom in the vertical slider line changes colour. It goes from green, to orange to red.
So my guess is that this is some kind of quality indicator when you are using digital zoom. When I use FiLMiC Pro on my Samsung Note 20 Ultra, I know it can’t access the tele lens. So this is digital zoom only. And with digital zoom, you can end up with a really pixelated image, if you zoom too far.
So I think FiLMiC is just telling you that green is fine, orange is not so good, and red is bad.
How to use FiLMiC Pro Manual Control
The main reason for using FiLMiC Pro is for the manual controls. They can be accessed in a number of ways.
The easiest way is to tap the manual control button, which is this circle within a broken circle. An exposure control wheel slides out from the left and a focus or zoom control wheel slides out from the right. Tap again if you want to send them away.
You can also tap and hold each reticle to bring out the corresponding control wheel.
In iOS devices, you can swipe from the left or right to bring out the wheel on that side. Swipe back to return it. I don’t know if this is only Samsung devices, but I find I can only swipe the wheels away and not bring them out using this method.
Not that in certain Android devices, opening manual control disables dynamic tone mapping.
Swipe up and down on a wheel to adjust the setting.
Setting Exposure
Moving the exposure wheel adjusts the exposure: down for darker, up for brighter. Both ISO and shutter speed adjust at the same time. Shutter speed is at the bottom and ISO at the top.
Most likely you will want to fix your shutter speed and leave the ISO flexible. So move the wheel up and down until you find your desired shutter setting. Next, tap to lock it and it turns red.
Now, when you move the exposure wheel only ISO changes. To avoid digital noise in the image, keep ISO as low as possible.
The 3 dots to the left of the exposure wheel are used to set your ISO bias. You can set it to low, moderate or high. If you set it to low, for example, FiLMiC Pro will do its best to aim for a low ISO number.
Personally I never use this feature. And sometimes when you’re trying to lock shutter speed you accidentally tap one of the dots and mess up your exposure. It would be great to have the option to toggle of this element of the interface.

Setting Focus
To set focus, swipe the focus wheel up and down.
This wheel also doubles as a zoom controller. Tap zoom to switch and now swipe the wheel up and down to zoom in and out.
DOWNLOAD a PDF of this Article as a convenient Reference Guide
Focus, Zoom & Exposure Pulls
Both wheels can be programmed to change during a shot from set positions.
Each wheel has these 2 tiny position markers. Move the wheel to the first position. Tap on this middle line and the marker will slide round to that point.
Move the wheel to the second position. Tap the middle line again. Hopefully the 2nd marker will move itself there.
To set the pull in motion, tap the marker point you wish to move to. If the markers are far enough apart, you get a little arrow. So you can tap that to start it instead.
There’s 2 slider controls at the left and right edge of the frame. The left one controls the exposure pull speed, the right one controls the focus or zoom pull speed.
I’ve personally never used an exposure pull. On the other hand, focus pulls can be very effective if done right.
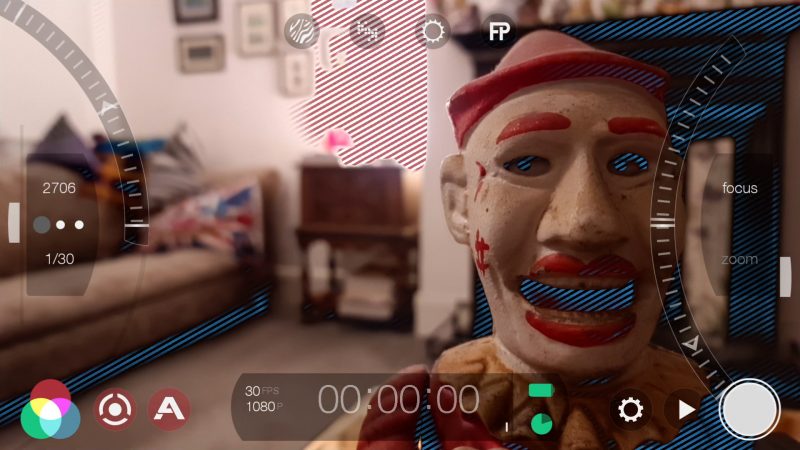
Live Analytics
While you are in manual mode, if you tap the live analytics button (A button) you will find that when you move the focus wheel you get a focus peaking overlay. The green lines indicate which areas are in focus.
If you move the exposure wheel, the Zebra Stripes overlay indicates which parts of the image are underexposed or overexposed. Blue zebras are underexposed and red zebras are overexposed.
More about FiLMiC Pro Live Analytics.
Permanent Overlays
To keep an overlay on permanently, you can select the required overlay from the 4 icons at the top. Top right is Focus Peaking while top left gives you Exposure Zebras. The 2 middle icons are Clipping and False Color overlays.
The Clipping overlay shows you which parts of the image are being lost due to over or under exposure. Red areas are blown out highlights, which will appear pure white in your video. Meanwhile, blue areas represent underexposed shadows, which will end up appearing black when played back.
The False Color overlay again shows blown out highlights as red and underexposed shadows as blue. But adds a green overlay for correctly exposed areas.
Audio Meter
In devices with smaller or different shaped screens, the audio meter does not appear on the right. For example, on my iPad Pro the audio level is at the bottom under the timecode counter.
We have left and right channels displayed here. At the top is a peak meter. This is a live indication of your audio peaks.
You can see when I click my fingers it creates an audio peak, marked by these 2 little lines at the top of the meters that remain there for a second or so. If either these lines or the indicator at the top goes into the red, then your audio might have overload problems.
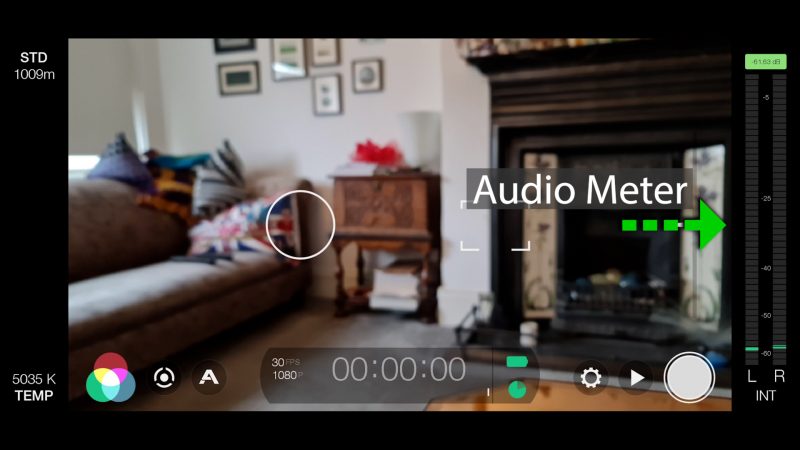
The maximum you can go to without distortion of the audio is zero. So that’s why audio is measured in negative numbers. -15db, -25db and so on (db stands for decibels).
Depending where you are outputting your video, you might want spoken voice to be at around -6db. When audio is mixed for a movie, for example, I believe spoken voice is set at around -10 or 12db.
Of course you can push up the level when editing. But if you record too low, when you push up the audio you will get more background hiss, which might ruin your audio.
At the bottom we have these letters, INT. This stands for “internal”. This tells you that FiLMiC is using the inbuilt mic of your device.
Article: How to Record Great Audio on your Smartphone.
Audio Level Control
Like I say, some devices will have the audio meter at the bottom. And all you get is a single level meter (no extra info). BUT you might also notice a tiny white line, at the right.
This white line is the audio level controller. You can swipe it left to right to set audio level.
If ever you find FiLMiC Pro is for some mysterious reason not recording audio, it might be that you’ve accidentally swiped this across. Which is easy to do. So keep an eye out for that.
Record Button
This big white circle here is the record button. Tap to record – it goes red. Tap again to stop recording – it goes back to white.
And that’s all you need to know about that!
How to use the FiLMiC Pro Gallery
To the left of the record button is a white triangle in a dark circle, like a play button. Tap this to open up the playback gallery.
All clips which are recorded with FiLMiC Pro should be here, until you delete or move them. When you record video, FiLMiC Pro stores the files in a special folder, which it creates when you install the app.
To play a clip just tap on it. Now it opens up in a bigger window and plays automatically.
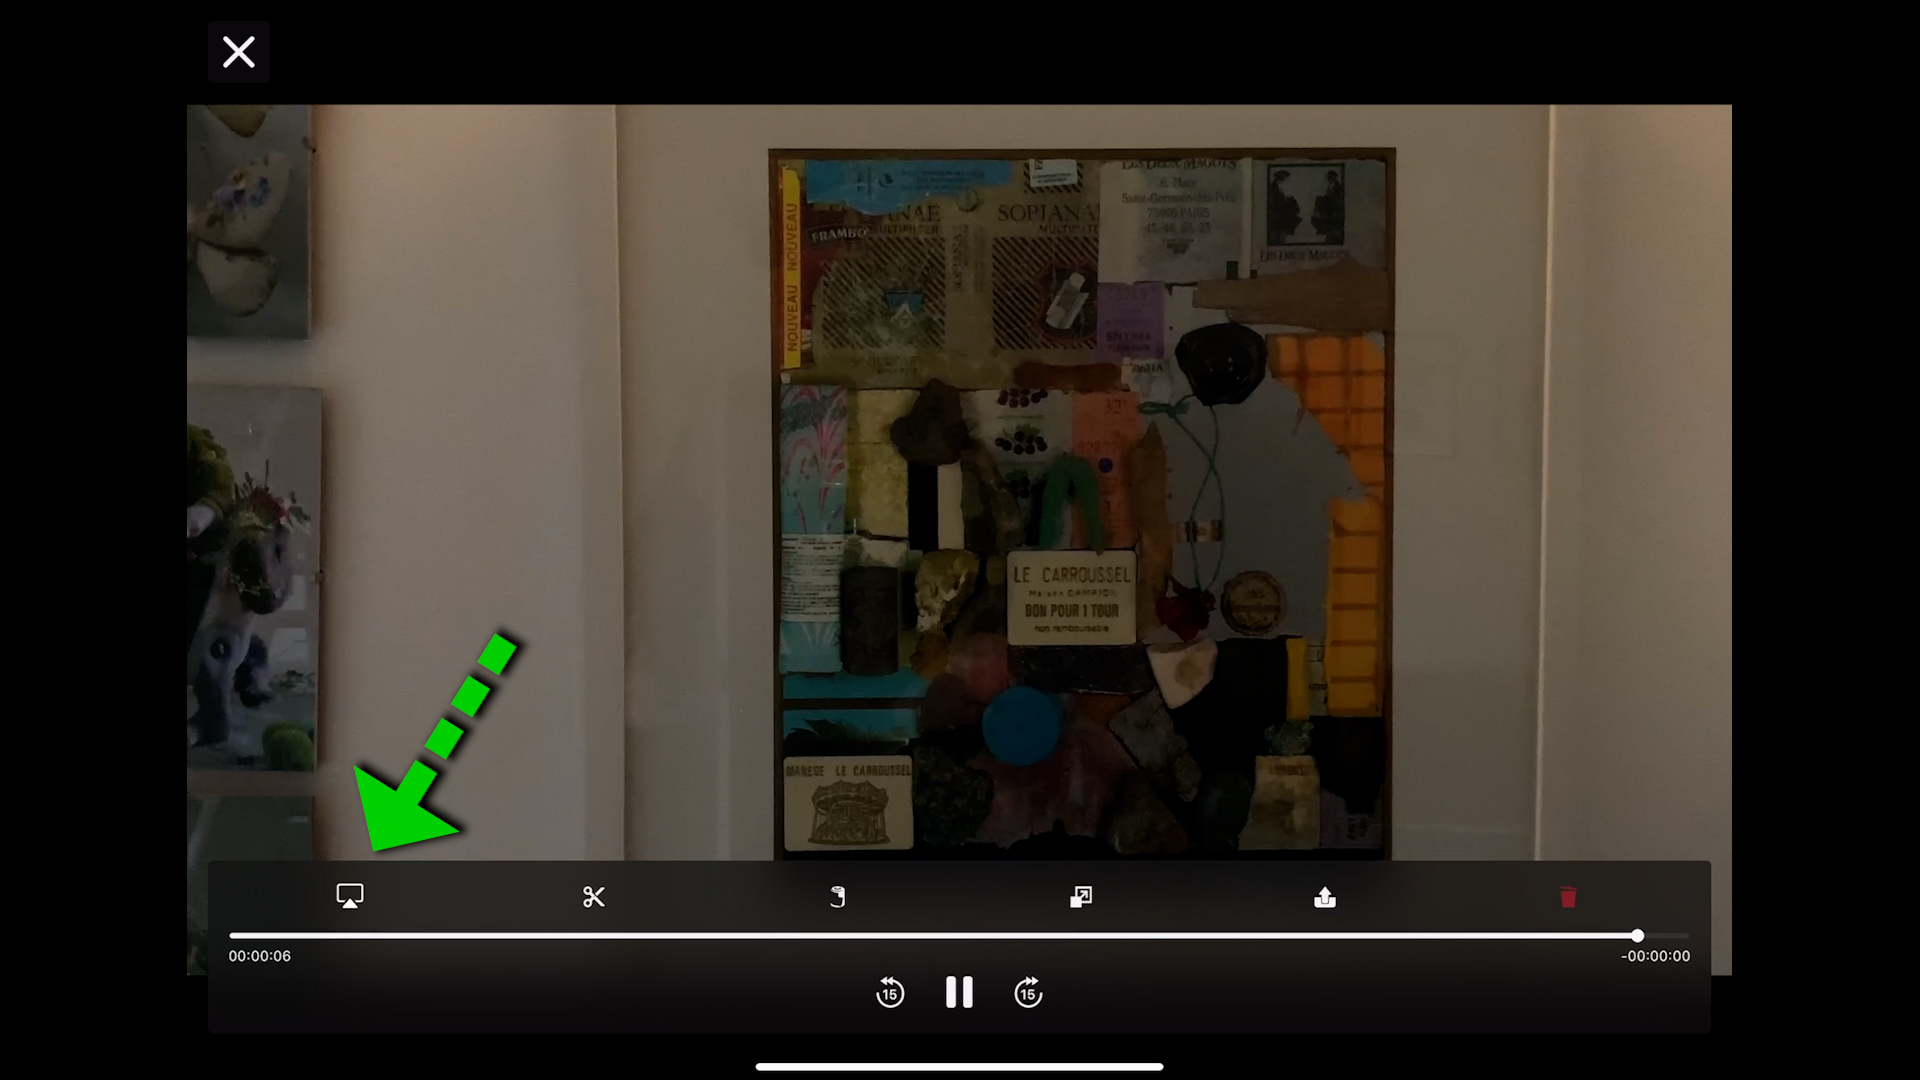
Play Window
If you want to watch the clip without the information overlays, just tap on the video away from the overlay. Tap again to bring it back.
On Android devices, there’s 5 buttons here, on iOS there’s 6 buttons. In iOS you have the additional AirPlay button which allows you to stream the video to compatible devices, like a monitor or TV.
Trim
The scissors button allows you to trim your clip. If there’s only a part of the clip you want to keep, save space by trimming it. Tap trim, move the handles at the ends of the clip to resize it and tap trim.
File Location: Move or Store Clips
The next button looks like a roll of film. So that gives you a clue what this is for. With an Android device, when you tap this you are asked if you want to copy or move selected clips. If you have a folder on your device you want to move or copy the clip to, use this button.
In iOS, this button allows you to save the clip to your camera roll. In other words, the clip will appear in your main iOS Photos app. However, FiLMiC say this can result in a loss of quality of the video, especially if the clip is a de-squeezed anamorphic shot.
Downsample
Next button allows you to downsample your video. Perhaps you shot it in 4K but you want to save memory space, so you can down sample it to HD, for example.
In iOS it gives you a choice of resolutions, but in my Android device it doesn’t – it merely lowers the bitrate to reduce file size.
Share
Next button is a share button. The iOS and Android versions look different. But they have a pretty similar function which is to share the clip to various places, like apps, social media, nearby devices and so on. In iOS you can use AirDrop to send a clip to a nearby Apple device, like a MacBook Pro for example.
I only recently tried this, between my iPad and my MacBook Air (M1 version) and wow it was fast.
The final button – the red trash can – deletes the clip.
To get back to the gallery, tap the X (in iOS) or the down arrow (in Android).
DOWNLOAD a PDF of this Article as a convenient Reference Guide
Gallery Information
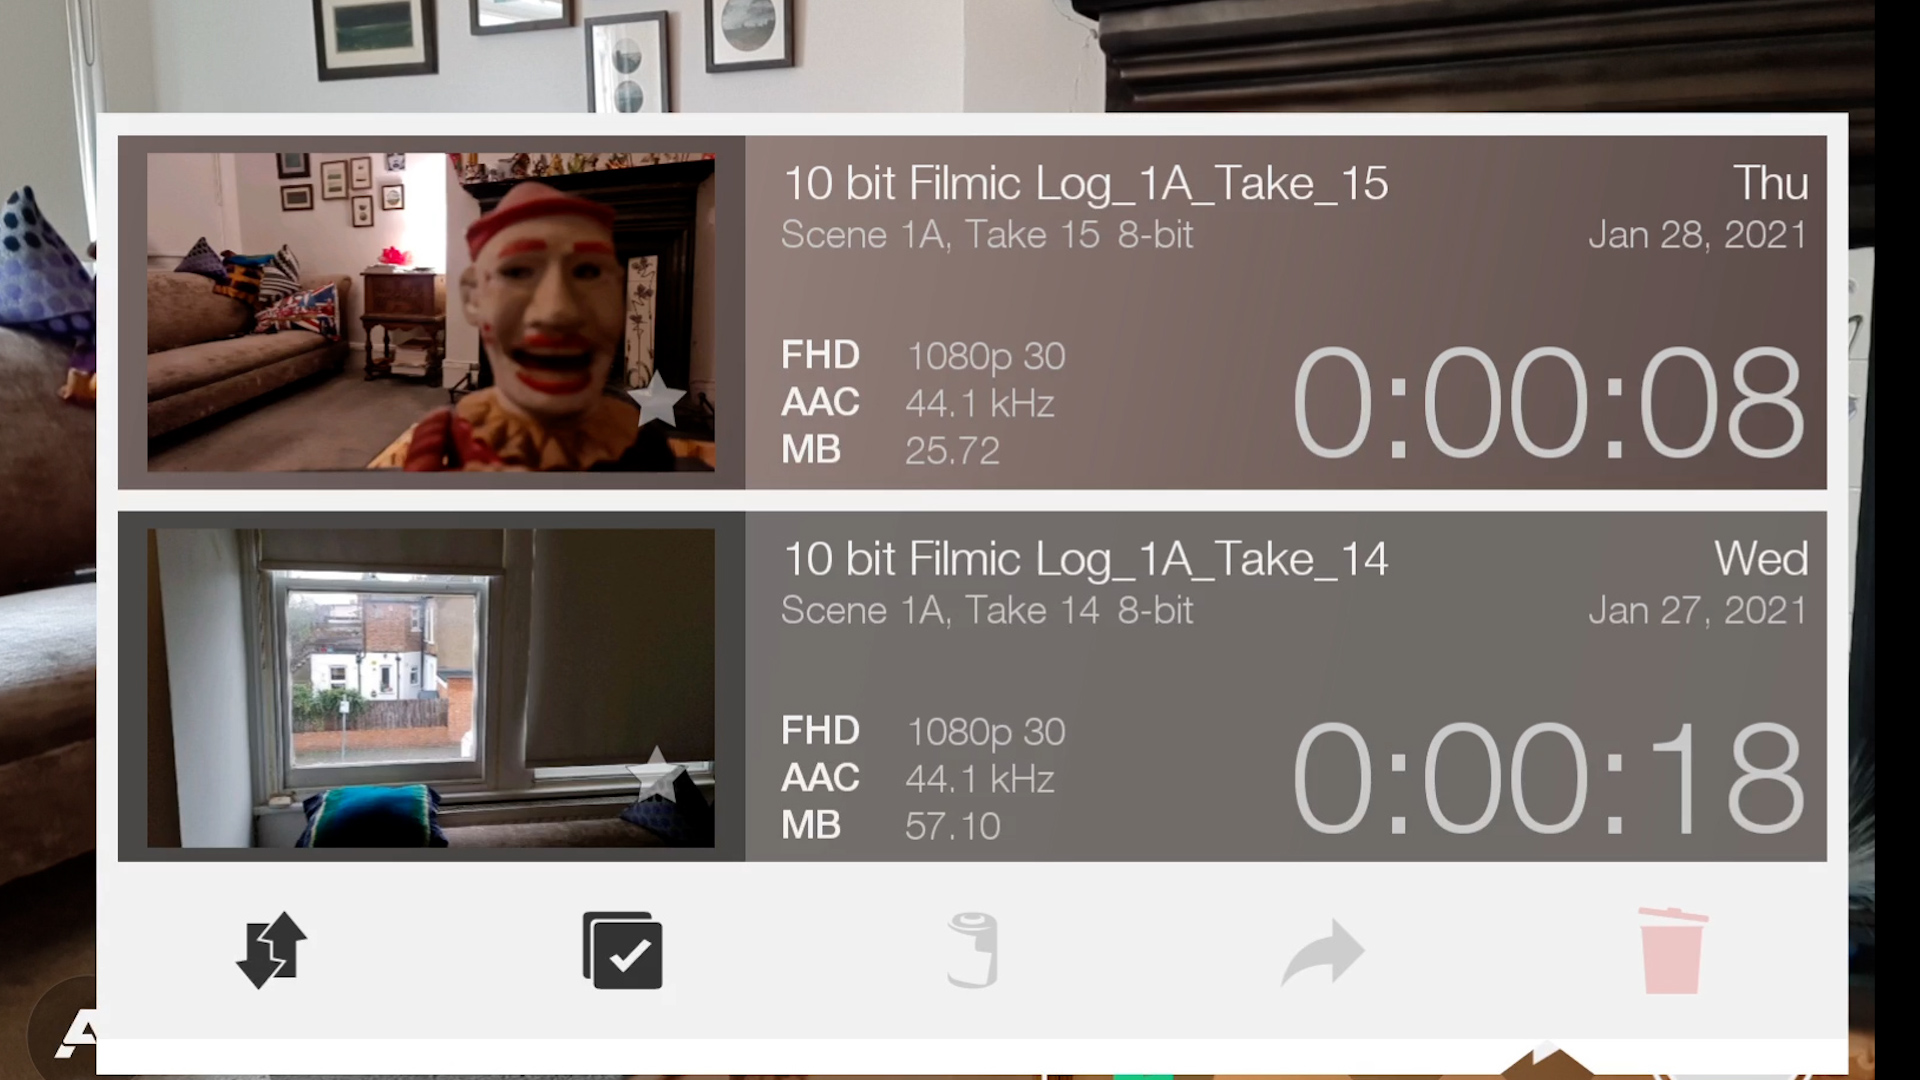
For each clip you get a ton of information displayed. At the top here is the title of the clip. If you have switched on content management, you will get a customised title. Otherwise you just get a series of numbers.
You get the duration of the clip, date when it was recorded, bit depth, resolution, frames per second, audio codec and bit depth, and file size.
Tap the star in the thumbnail to mark a clip as a favourite. This is useful if you have taken a load of clips and you want to select the best clips. Then, for example, if you want to transfer clips to another device to be edited, you need only send the good clips.
Notice also that the gallery uses the predominant colour of the clip. This just makes it a little bit easier to identify certain clips, if you have lots of clips to scroll through.
Gallery Buttons
At the bottom we have 5 buttons.
First is a filter button, which allows you to filter your gallery by different specifications. And if you have used that star to select your favourites, toggling on favourites here will remove all the other clips.
The next button is the select button – tap to enable. Now you can select certain clips. Mostly this will be so you can send the good clips to another device or delete the bad clips.
Once I select one or more clips, the next 3 buttons become available. Otherwise they’re greyed out. That’s because these 3 buttons concern sharing, moving and deleting clips.
These 3 buttons have exactly the same function as they do in the playback window: camera roll, share and delete.
There’s actually 2 other ways to delete clips (in Android). Tap and hold the clip or swipe to the left. In iOS you only have the swipe option.
To close the gallery, tap on the screen away from it.
Settings Menu
Next to the gallery button is a cog icon. Tap this to open up the settings menu. Or should we say settings menus (plural) because we’re presented with 15 labelled buttons here.
One tap on the relevant button will open up more options.
Resolution Menu
At the top of the resolution menu is a series of different sized rectangles. I know there’s a square and a square isn’t a rectangle – stop being pedantic.
These rectangles are used to set the shape of the frame. This is what we call aspect ratio. A frames aspect ratio is the ratio between the height and width of the image.
So the first, the default setting, is 16 wide by 9 high. 16 and 9 what though? Well, those numbers simply represent a ratio. In effect, it means for every 16 pixels of width there is 9 pixels of height.
For HD video, that comes out as 1920 pixels wide by 1080 pixels high. So now we have 17:9, 3:2, 1:1 and so on. So you can choose the shape of the video you want FiLMiC Pro to output.
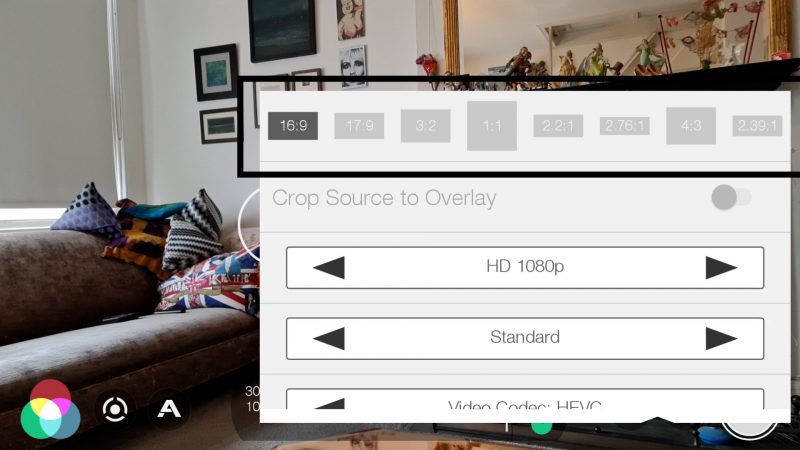
1:1 for Instagram for example. 2.76:1 is the aspect ratio of the old Ultra Wide Panavision movies. Some people think it looks cool, and I will not disagree with them.
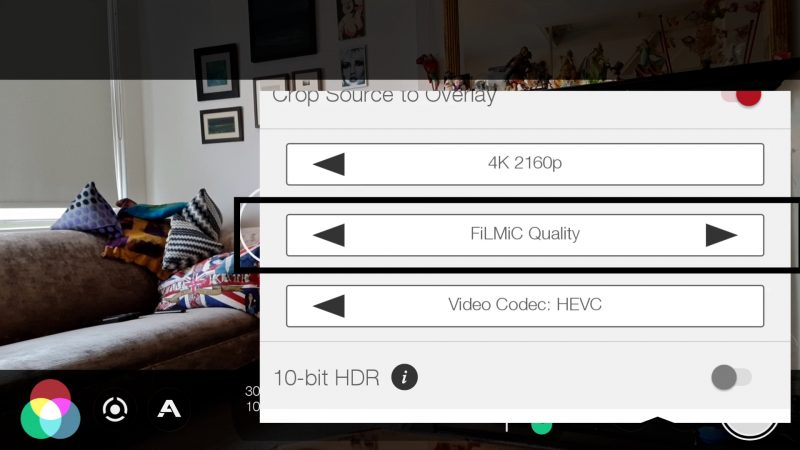
Crop Source to Overlay
Now did you notice? When you selected a ratio different to 16:9, the Crop Source to Overlay toggles on. What this means is, FiLMiC Pro will output a video at the selected ratio. If you toggle this back off again, now the overlay acts only as a guide.
Which one should you choose? Well, I would say the crop option is faster but removes part of the image. But, the non-crop option means you will get a 16:9 version of the video and you can crop it in your editor. So then the choice of ratio is just a guide.
Why would you do that? Because you might want to adjust the framing later and keeping the whole 16:9 image gives you that option. If you crop it, you will not get that option.
Let’s say you know that you are going to master your final video in the 2.39:1 ratio. Select that option and now toggle off the crop. Use the white lines as a guide for framing knowing you can adjust things a bit in post, if need be.
Resolution Setting
Below the ratio settings are 3 controllers with arrows each end.
The top one is resolution. On both my iPad and my Samsung Note 20 Ultra I can choose from SD 540p all the way up to 4K. If your device can’t shoot 4K then this option won’t be available.
My Note 20 can actually shoot up to 8K but FiLMiC Pro is not able to access that.
More on FiLMiC Pro resolution settings.
Bitrate Setting
Below resolution is the bitrate setting. You can choose from the lowest setting, Economy, up to the highest, FiLMiC Extreme.
Bitrate has a big effect on the quality of the video as well as the size of the video file and the demand on any graphics processor. When you choose bitrate you are balancing between having the best quality against your available storage space and processor power.
Quite often people push their settings on FiLMiC Pro to the max and wonder why their phone overheats and FiLMiC Pro crashes. Well, the answer is often that your device can’t handle what you’ve asked it to do.
If FiLMiC Pro designed a race car app and you installed it into your Honda Civic, you wouldn’t expect to be lapping Lewis Hamilton at the next Grand Prix. Just like with cars, there are physical limits to what your device can achieve.
Video bitrate is measured in megabits. Bitrates can vary quite a bit, depending on the device. But FiLMiC have given us a rough estimate, for 4K video:
- FiLMiC Extreme 120 mbps
- FiLMiC Quality 75 mbps
- Standard 50 mbps
- Economy 35 mbps
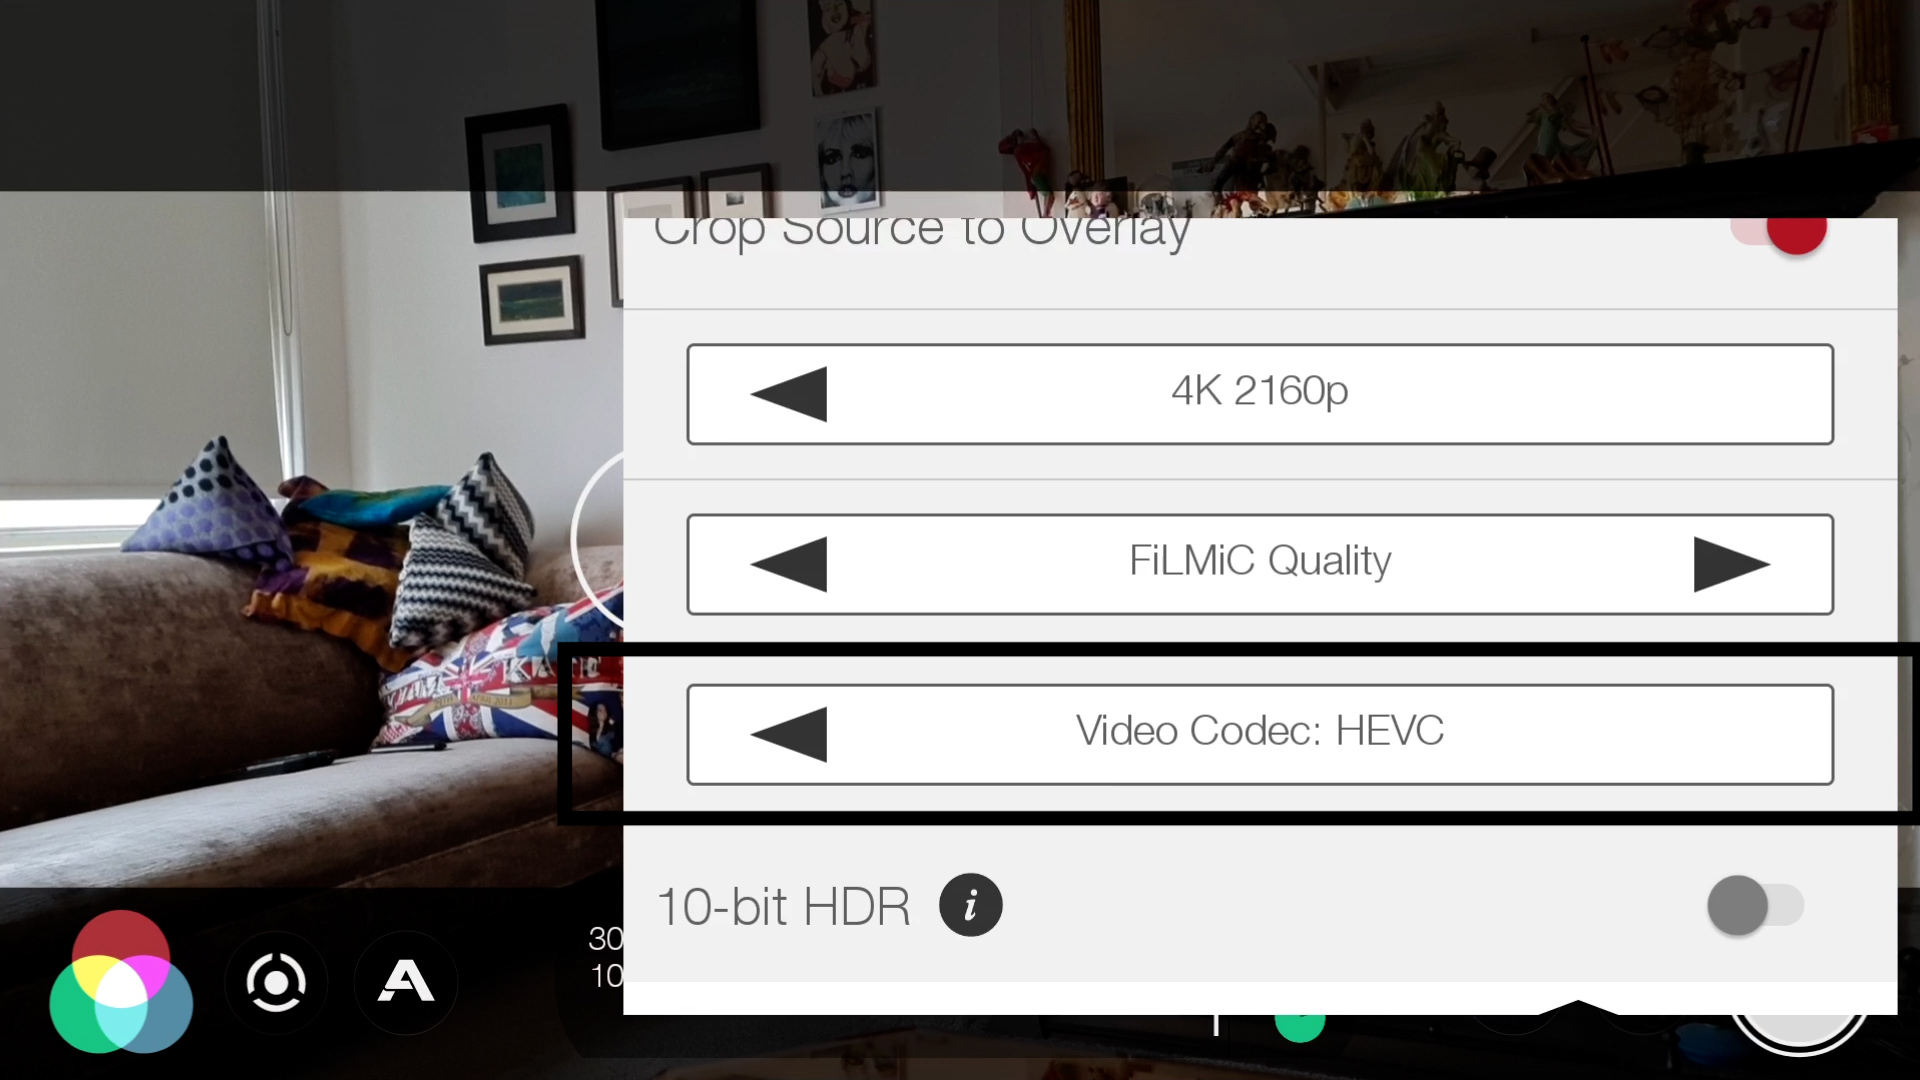
Video Codec
A video codec is software for compressing and decompressing video files. In fact, the word codec was created by combining the words encoder and decoder.
Many smartphones now allow you to choose between 2 codecs: AVC (otherwise known as h.264) and HEVC (otherwise known as h.265).
HEVC is the newer compression codec. As it’s better at compression it creates smaller files. However, the codec is still not compatible with all platforms and software. In addition, it also uses up more graphics processing power when playing or editing.
Note that the HEVC codec is required to shoot 10 bit video.
10-bit HDR
In compatible Android devices, below the codec setting is a toggle button for 10-bit HDR. In compatible iOS devices – ie: iPhone 12 and later – this appears above the codec toggle button.
By default, our smartphones shoot 8-bit colour. But if you want to shoot with a colour depth of 10-bit instead, switch this on.
Why would we want to shoot 10-bit? Video is currently only broadcast or streamed in 8-bit. But for colour grading, 10-bit gives you more digital information to work with. Which means you are less likely to get banding. The tonal gradations will be smoother.
If you want to use FiLMiC Pro’s 10-bit Log V3, then you need to toggle this on first.
In Android you just have 8 or 10 bit to choose from. But in iPhone 12, 8-bit is the default. Tap left for 10-bit or right for Dolby Vision.
Dolby Vision
While Android devices like Samsungs have HDR10+, Apple has worked with Dolby to include Dolby Vision with their latest iPhone 12 range. HDR10+ and Dolby Vision are 2 competing HDR systems.
Whereas FiLMiC Pro has a setting for Dolby Vision, there’s no equivalent setting on Android for HDR10+.
So if you have an iPhone, which should you choose: 10-bit, 10-bit Log or Dolby Vision?
Well 10-bit gives you more to work with when grading and 10-bit Log V3 promises you a flat profile which is said to be even better, in that respect. Meanwhile, Dolby Vision also works to give you a higher dynamic range using 10-bit colour, but using a different method.
If you want to export and edit Dolby Vision footage, you will need editing software which is compatible with that. But, from what I’ve seen, this could be an extremely powerful feature.
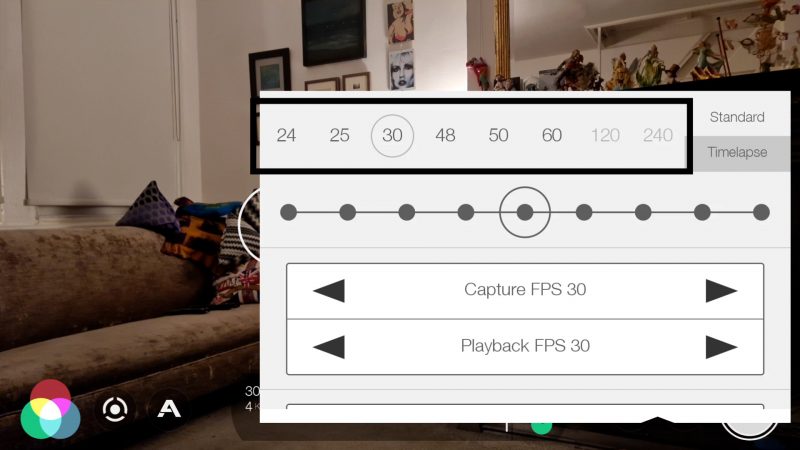
How to set Frame Rate in FiLMiC Pro
Next to resolution is frame rate. At the top we have a list of frame rates, from 24 frames per second up to 240 frames per second. To the right of that, you can choose between standard and timelapse mode.
You might notice that the 120 and 240 fps settings are unavailable. Currently, FiLMiC Pro will only allow those fast frame rates at reduced resolutions. In the manual it says 720p. But I found I can access those high frame rates at 1080p in my Samsung Note 20 Ultra.
Motion Slider
The line with dots along it is not a new London Underground line map. It’s what FiLMiC calls the Motion Slider. The idea is that you can tap and drag the grey circle to create different motion effects.
At first, I tried setting the record frame rate to 60fps, thinking that I would use the motion slider to set the playback frame rate. But it didn’t work and I tried on all my devices.
Then I tried starting with a 30fps record frame rate. And then it did work.
Frame Rate: Capture & Playback
Why is there a capture and a playback frame rate? Well, for example, if you shoot at 60fps and playback at 30fps you will get a slow motion effect.
To get this to work best, you should choose frame rates which work together. 30fps is exactly 50% of 60fps, so that should work. 24fps is exactly 40% of 60fps, so that should also work.
Auto Shutter
The last setting in the frame rate menu is to do with shutter speed and how artificial light can cause strobing.
Basically, ordinary artificial light has a frequency. And that frequency changes depending on where in the world you happen to be. In Europe, electricity is going at 50hz. In America, it’s going at 60hz.
So, if you’re having a problem with strobing lights, switch this setting to 50 or 60hz – depending on where you are.
How to shoot Timelapse using FiLMiC Pro
Timelapse videos are basically created by shooting with a very slow frame rate and then playing back faster. Normally, we would choose something like 24 frames per second or 30 frames per second. But, at the top of the frame rate Timelapse window, we have 1 frame per second up to 1 frame per minute.
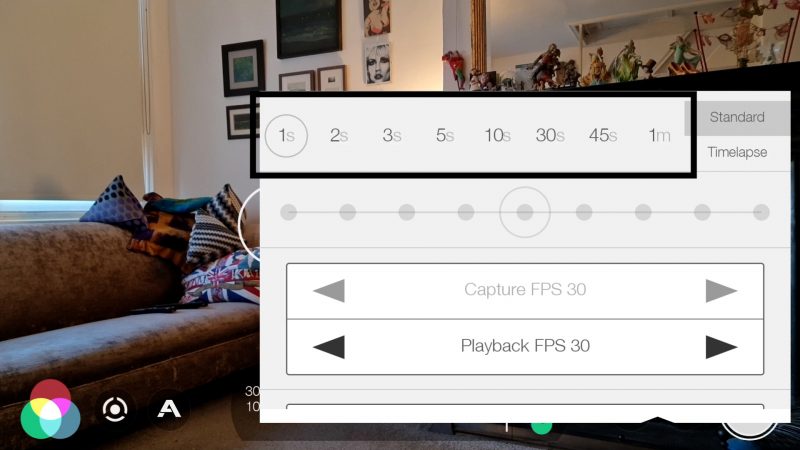
If we shoot at 24fps, that would be 1440 frames per minute. So shooting at 1 frame per minute, if we play back at 24fps, we will be making time pass 1440 times faster.
Using one of the middle settings here will give you a nice time-lapse, with clouds scudding across the sky. 1 frame a minute is really for long periods, like if you want to capture a whole day or many hours and compress it.
1 frame per minute filmed for 24 hours, then played back at 24fps, would give you 60 seconds of video. Correct me if I’m wrong.
So, set your frame rate, then set you playback speed. Make sure to lock your exposure before you start recording.
Audio
If you have an external mic plugged in, FiLMiC Pro should automatically choose that mic. But in this menu you have the option to switch them.
If you have an iPhone or iPad, there’s a lot more options. You can switch between available mics. Below that you can choose the audio codec.
Below that, you can set the audio quality. There’s 44.1 kHz and 48.0 kHz. There’s basically very little quality difference between them. FiLMiC says that with a supported external lighting mic you can get a 96.0 kHz option.
Toggle on video only if you want no audio to be recorded. If you toggle on Voice Processing, FiLMiC Pro will add a filter to enhance the spoken voice.
In Android, Headphone monitoring allows you to monitor the audio via a connected bluetooth headset.
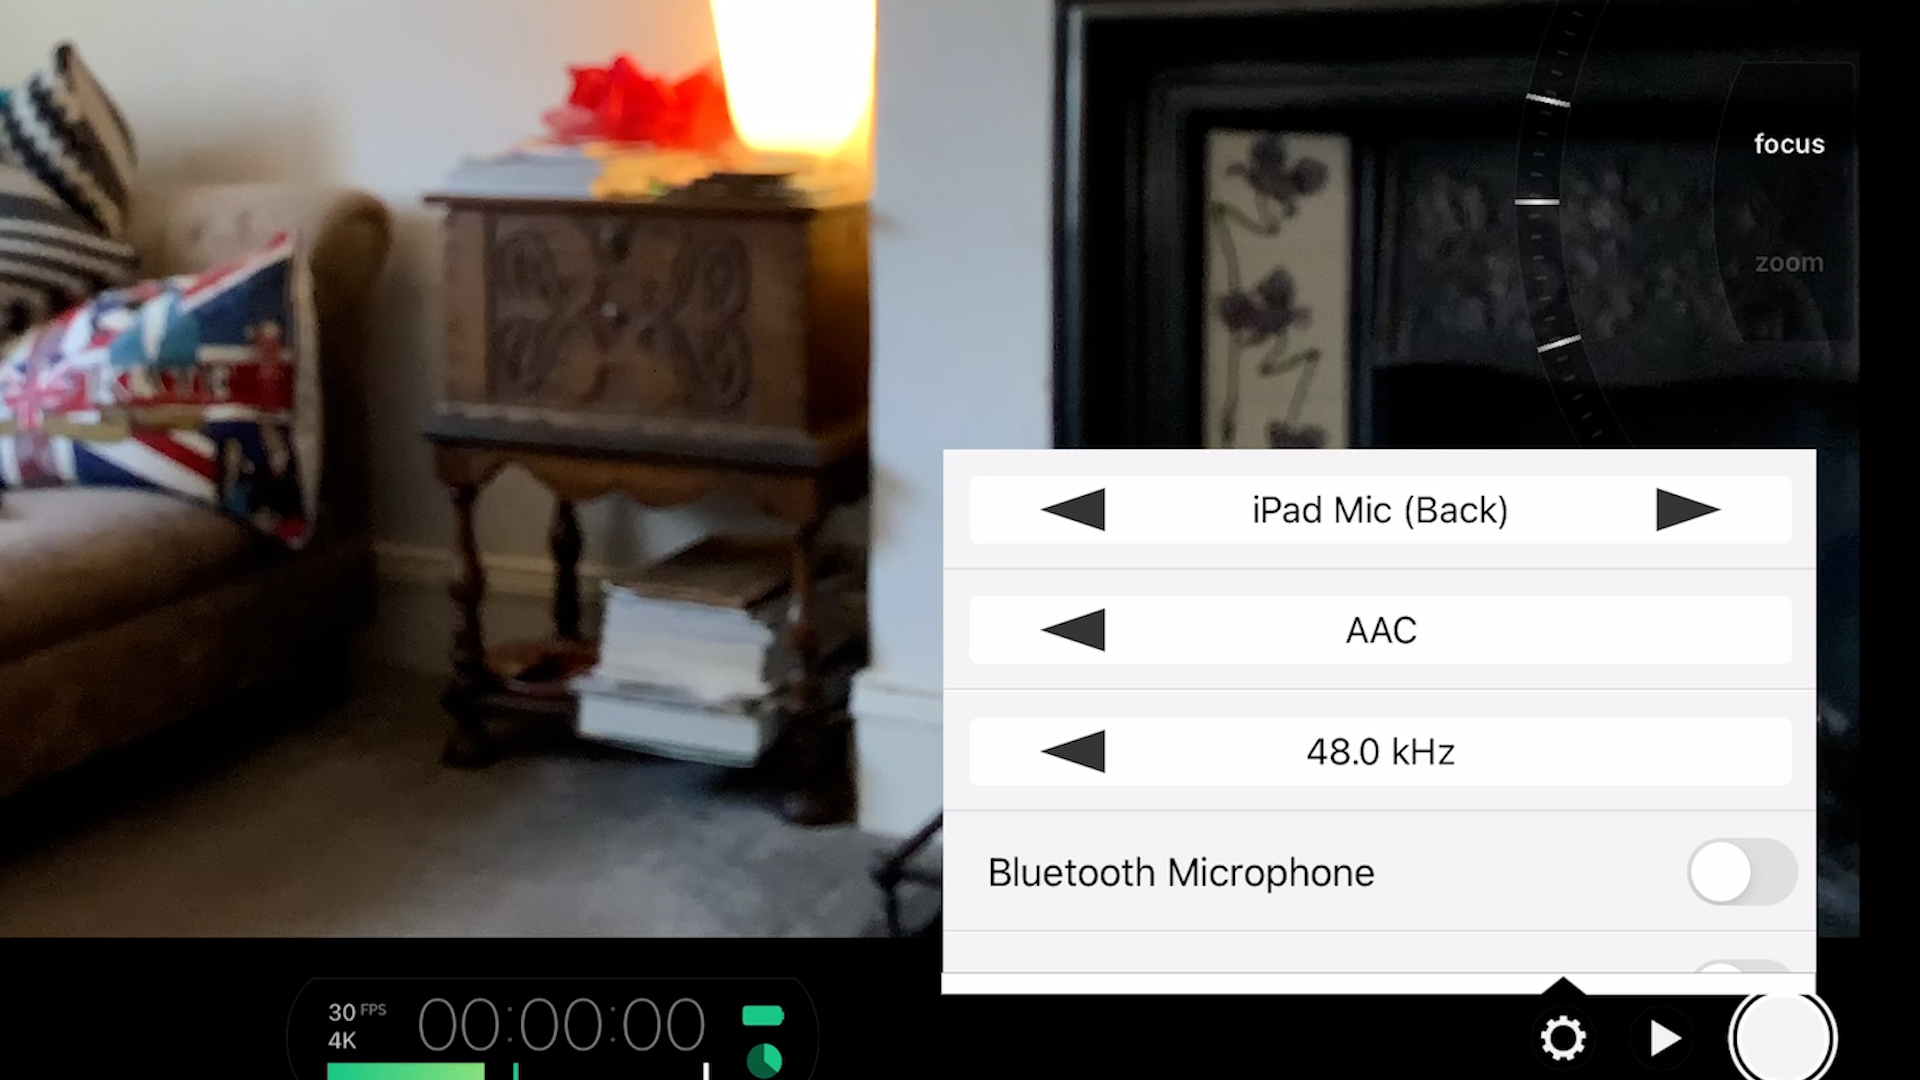
In iOS, you get the option to toggle on a Bluetooth microphone. When you toggle on Automatic gain correction your audio level will be adjusted automatically. If you toggle it off, then you cannot use the audio gain slider to adjust level.
FiLMiC says that with iOS devices, simply connecting a Bluetooth headset via your iPhone will automatically allow it to be used for monitoring. So, no need for a switch in iOS.
Device Menu
This menu looks pretty different depending on your device.
In iOS we have save to camera roll. As I said previously, this saves your clips to the Photos app section of your iPhone or iPad. However, FiLMiC recommends that save to the FiLMiC Pro folder rather than the Photos location.
Remote Control
Both Android and iOS have a Remote Control option. If you toggle this on, you can connect using the FiLMiC Remote app, which is a separate purchase. FiLMiC Remote allows you to monitor and control FiLMiC Pro from a second device, like another smartphone for example.
If you toggle this on in iOS, the Remote Preview Only option becomes available. Toggle this on if you only want to allow FiLMiC Remote to monitor your device but not control it.
This way, you will keep control of FiLMiC Pro on the first device and allow someone to watch via a second. For example, if you had a DoP operating the first device and the director watching via the second.

Orientation Lock
Both iOS and Android allow you to toggle on Orientation Lock. All this does is lock FiLMiC Pro in either landscape or portrait. So you can happily move the camera around without it switching.
Stitch Recorded Footage
Both iOS and Android allow you to toggle on Stitch Recorded Footage. So this enables you to pause and resume recording. Basically, it still records separate clips but then edits them all together into one clip.
With this switched on, you will need to long press the record button to stop recording. Otherwise it will just pause and resume.
Snap Focus (iOS)
In iOS devices you have a Snap Focus option. This makes the focus reticle more responsive. So if you want the focus to adapt more quickly to changes, perhaps when filming sports or live events, toggle on.
GPS Tagging (Android)
Android devices have a GPS tagging option. Toggle on to tag your clips with location information.
Hide Interface Options
Both Android and iOS have the option to switch off preview. This removes the preview from the screen. Why would you want to do that? Well, perhaps the light from the screen is spilling into a shot and disturbing the lighting of the location.
If you enable Tap to Hide Interface you can hide the interface to get a cleaner monitor. If hidden, you now get the option to hide the reticles as well, using the switch below.
Both iOS and Android have the option to hide the zoom rocker. If, like me, you rarely use it, then why not remove it and give yourself a slightly cleaner screen.
In Android, you can opt to mute notifications. Now when you are filming you won’t be disturbed every time someone likes your behind the scenes Facebook post.
Volume Keys Record
By default, both iOS and Android allow you to use the volume keys to start and stop recording. Disable this if you find yourself accidentally hitting it. Also, sometimes the volume keys get pressed by a clamp, like when using a gimbal. So switching this off would solve that issue.
Noise Reduction & Sharpness (Android)
Android now has 2 very useful settings not available to iOS: noise reduction and sharpness. If you want that soft film look, disable sharpness.
Some people also film with noise reduction completely off and then apply noise reduction in post. However, I usually have this set to Fast.
Note: if you switch it to Fast, FiLMiC Pro will prioritise frame rate over noise reduction. If you set it to High Quality, FiLMiC Pro prioritises noise reduction, which means your frame rate might suffer. Therefore, if you’re having frame rate problems, switch it to Fast (or off).
Saving & Loading Presets
In this setting, FiLMiC Pro allows you to save certain settings. Let’s say you were shooting at 4K at 24fps and you were using an anamorphic desqueeze, you can save it and recall it here. So that will save time if you have various settings you use a lot.
CMS (Content Management System)
On iOS devices, this menu is quite simple. First, there’s the Time Code Track toggle switch.
When enabled, the app embeds a timecode track into your video based on the time the clip is shot. This allows multiple videos shot simultaneously to be edited together quickly based on a common timecode track.
On Android devices, you get 3 different settings at the top.
If you have extra memory installed in your smartphone, like an SD card, you might want to have clips save to this card. Once installed, you should be able to tap where it says Internal Storage and switch to External Storage, which will be the SD card.
Toggle this switch on to limit clips to a maximum of 4GB. If you are recording and you go over 4GB, FiLMiC Pro will simply start a new clip. You can then stitch them together later.
I’m not sure, but I believe that some Android devices – particularly Samsungs – had a 4GB file size limit imposed. But presumably I wouldn’t have the option to turn this off if I could only record 4GB max on my Note 20.
SMB Network Backup allows your device to connect to a Samba network. So I believe this allows you to backup files. If your Android is connected to a samba network then it should appear here.
Once connected, toggle on auto backup to immediately share files to the network.
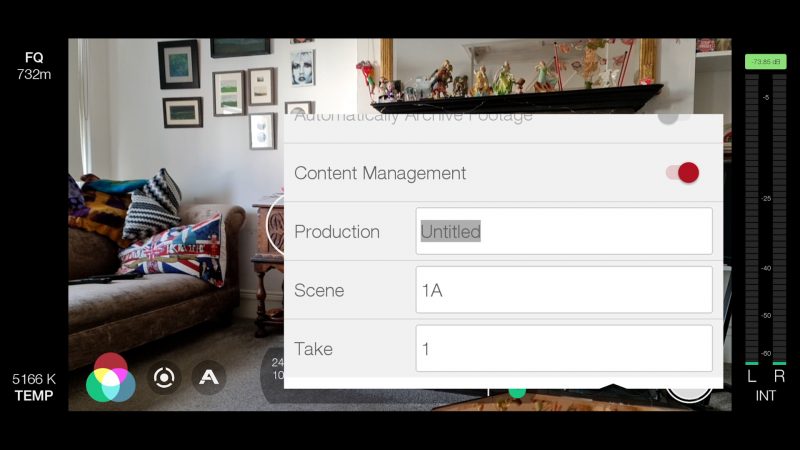
CMS
So the main purpose of this menu is Content Management. Toggle on and now you can set a name for the production, a scene name and a start number for takes. Then every shot you record will have these included in the name of the film.
Takes will automatically increase by one each clip.
By default, FiLMiC Pro uses date and time to create a series of numbers for the file. For example, ‘03022021_171425.mov’ would indicate a video file that was recorded on March 2nd 2021 at 5:14PM.
Hardware
The hardware menu gives you a bunch of settings related to any extra kit you have attached to your device. Lenses, drives, gimbals and so on.
Toggle Clean HDMI Out to output a clean video feed to an external display. You will need a compatible HDMI adapter to make this work.
For iOS you can also include audio in this feed.
This can be used for live streaming and broadcast. For example, you could have a number of devices connected via HDMI to some kind of multicam studio.
This isn’t good for recording video to an external drive, though. For that it’s best to stick with your internal drive or SD card.
FiLMiC Pro Gimbal Support
You will find options here to connect to supported 3 axis gimbals. Currently we have DJI Osmo, which should work for numbers 1-4, Zhiyun Smooth 4 and Movi Cinema Robot.
So make sure your gimbal is connected to your device via Bluetooth and then toggle on the appropriate switch. FiLMiC Pro should locate and connect to the gimbal. You’ll now be able to use the gimbal controls to operate FiLMiC Pro.
Find out how to use FiLMiC Pro with your DJI Osmo Mobile 3 or 4.
Anamorphic De-Squeeze
Below that we have 2 options to de-squeeze video when using an anamorphic conversion lens. These lenses give you a distinctive wide screen look, and work by squeezing a wider horizon into the regular 16:9 frame. Toggle on and FiLMiC Pro will desqueeze for you and save you having to do this in post.
If you would actually prefer to desqueeze in post, you can additionally toggle on the Preview Only. Now you can see that it will look like but keep the squeezed video.
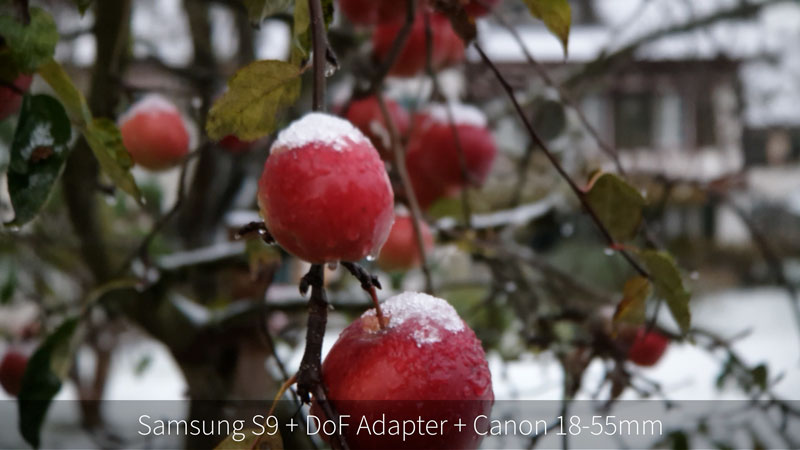
DoF Adapter
The 35mm Adapter setting flips the image vertically. You need this when using a DoF adapter like the ones from Ulanzi or Beastgrip, because they create an upside down image.
There’s also a horizontal image flip option. You might want to use this if you are shooting with a selfie camera, which usually reverses the image.
FiLMiC SYNC
You can use FiLMiC Sync to store and recover preset data. If you have some settings saved, they can be stored here and used later. Perhaps you might want to transfer them to one or more devices.
Any device you use, if you login with the same details, you will be able to access those stored settings.
Community & Firstlight
The Community button simply gives you access to FiLMiC’s website, links, social media and contact details.
Firstlight is an app by FiLMiC for shooting stills.
Stabilization
This simply switches stabilization on or off. FiLMiC Pro will use the highest level of stabilization available.
Camera
The Camera menu gives you access to your device’s lenses. So front and back, and in this device I also get access to the ultra wide lens. However, FiLMiC Pro does not give access to the telephoto.
Torch
The torch button simply turns your device’s flashlight on and off. With iOS you get a choice of brightness levels.
This might be useful for on the fly filming, such as interviewing people in the street.
Guide
The guide button toggles on and off some framing guides, which divide your frame into 3 sections. So you can use this if you want to apply the Rule of Thirds composition theory.
Information
The last button accesses links to a quick start guide, tutorials, user manual, support page and lets you know which version of the app you have installed.
So that’s the settings menu done. Let’s move on.
Time Code Counter
In the centre at the bottom we have this oblong shape with a few different meters and controls.
As I mentioned before, you can use the tiny white line to set audio level.
The 6 zeros are the time code counter. When you start recording this will start counting, letting you know the duration elapsed.
To the right we have the battery level indicator. Below that is the storage level indicator. If the memory on your device starts to get used up, slices of the pie get eaten, as well as turning the pie from green to orange and finally to red.
If it gets to red then you will probably need to move or delete files to make space.
On the left we have the current frames per second and resolution settings.
Histograms
If you tap the time code counter it switches to a luminosity histogram, giving you an indication of luminosity levels in the frame. White and highlights are on the right while black and shadows are on the left.
If you aim at a window, for example, you will get a spike in the light areas. If you aim at shadow, the dark levels are raised.
Tap again to get the same histogram, but split into component RGB levels.
One more tap and you get the waveform monitor. So this is like the RGB histogram we just saw, except it indicates levels along the width of the frame. If you move the camera left to right, the waveform moves with it.
This also gives you an indication of brightness. Black is at the bottom and white at the top. If the light is too bright for the sensor, it will blow out and you will see the levels pushed up to the top.
Anything beyond that top line is lost forever. Same with the bottom. If it’s so dark that it’s black, you will never recover image information from there.
Tap once more to return to the time code counter.
Imaging Panel
The button made up of 3 coloured circles opens the Imaging Panel. Then you have 3 further panels to choose from: white balance, tone (for log settings) and colour behaviour.
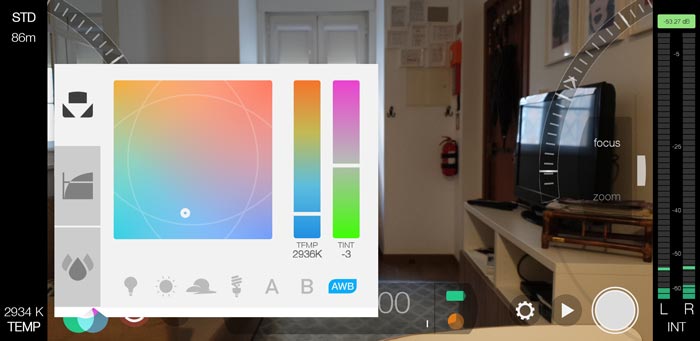
How to set White Balance with FiLMiC Pro
The top panel is for setting and locking white balance. The big square is a combination of white balance and tint.
What is white balance? White balance is what we deal with when we want our colours in the image to represent as close as possible the colours in real life. It’s called white balance because the camera uses white as a reference.
In other words, if you say to your camera “this is white” then the camera should be able to set the balance of hues correctly so that everything looks natural. Skin looks natural, the sky looks natural, grass looks green and not blue and so on.
If you use your native camera app in auto mode, the camera software takes a reading and usually does a pretty good job. Problem is, when you move the camera, the colour balance can change during the shot. Whereas a professional camera operator would set white balance and lock it before recording.
The big square has a dot located somewhere inside it’s borders that can be used to set white balance. If you tap and drag it around, you can see colours changing. This is actually a combination of colour temperature measured in Kelvins combined with a colour tint.
To the right you see these 2 values represented in separate columns. So you can use these columns to set temperature and tint separately.
White Balance Presets
Rather than set the white balance using the camera sensor, you can use a preset. There’s a row of 4 preset icons at the bottom: light bulb (tungsten), sun (daylight), cloud (cloudy sky) and what looks like a modern energy saving bulb (fluorescent).
If you are filming under those light conditions, you can try using these presets to get a good natural colour balance.
If you are using 2 or more cameras, you will probably want them set to the same white balance. So if you used the same preset on both cameras, that’s a quick way to make sure they’re both the same.
Custom Presets
To the right of the preset icons are 2 letters: A & B. These letters can be used to store custom presets. Hold your finger on the letter and an option to save the current settings pops up.
Lock White Balance
The final WB button is probably the most important. When it’s blue, it is in auto mode.
A tap makes it red, which is completely locked.
Tap again to switch to lock on record. This means white balance will be on auto until you start recording, then it locks for the duration of the shot. A good option for more professional footage achieved with less fuss.
Find out more about how to set White Balance in FiLMiC Pro.
How to use FiLMiC Pro’s Cinematographer’s Kit
The next tab down is the Cinematographer’s Kit. This is an in-app purchase, and if you haven’t paid for it then you’ll be prompted to do so. If you want to shoot with a log profile using FiLMiC Pro, this is where it happens.
With the introduction of 10-but recording, it now says whether you have 8 or 10 bit selected. If your device is capable, then you can switch to 10-bit colour in the resolution menu. I explained how to do that earlier in this video.
Log Curves
Using iOS devices, this tab has 4 curves to choose from. Natural, Linear, Hybrid Log Gamma and FiLMiC’s Log V2 or Log V3 (depending on whether you have 8 or 10 bit colour selected). Log V2 is 8-bit and Log V3 is 10-bit.
Using Android devices, these options may differ. On my Samsung Note20 Ultra, I have 5 curves. When 8-bit is selected, I have Native, Natural, Dynamic, Flat and Log V2. When 10-bit is selected, I have the same except Dynamic is now switched to Linear and Log V2 is Log V3.
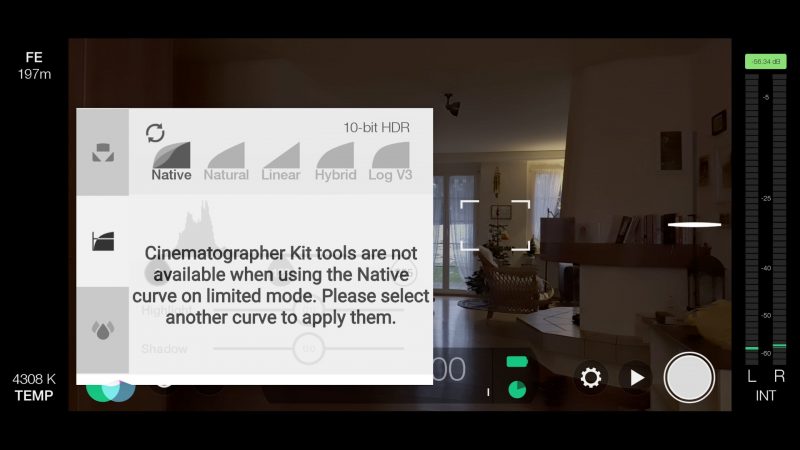
In Android, the Native curve uses dynamic tone mapping. And that’s why it says here that Cinematographer Kit tools are not compatible with that setting. As soon as I select one of these curves, that message pops up again: dynamic tone mapping disabled.
Natural is FiLMiC Pro’s standard colour profile. It seems to just switch off dynamic tone mapping, and nothing else. So you can click through all these options.
Does FiLMiC Pro Log Cause Extra Noise?
In the FiLMiC Pro manual it says, “For professionals performing color grading in post production the Log will offer the most aggressive capabilities, but at greater possibility of increased noise or other flaws.”
Truth be said, I often get questions about shooting in Log about the extra noise experienced compared to shooting with the native app. Sometimes even without the Log profile. What I would say is that when shooting in Log you have much less margin of error when setting your ISO.
Some users tell me they only use Log in daylight shots where they can reduce ISO to the minimum. So my tip is, if you want to be able to shoot with a higher ISO, therefore giving you greater flexibility, don’t shoot in Log.
Black – Mid – White Point Adjustment
Below the curves is a tool for customising each curve by adjusting the black, mid and white point. If I slide up the black point then blacks become grey. If I slide down the white point, then whites become grey.
Shadow Highlight Adjustment
Below that we have 2 sliders which allow further customisation by adjusting the highlights and shadows. For example, bringing down the highlights or pushing up the shadows would decrease contrast even further.
Finally, if you just want to reset everything, tap the 2 arrows in a circle button in the top left.
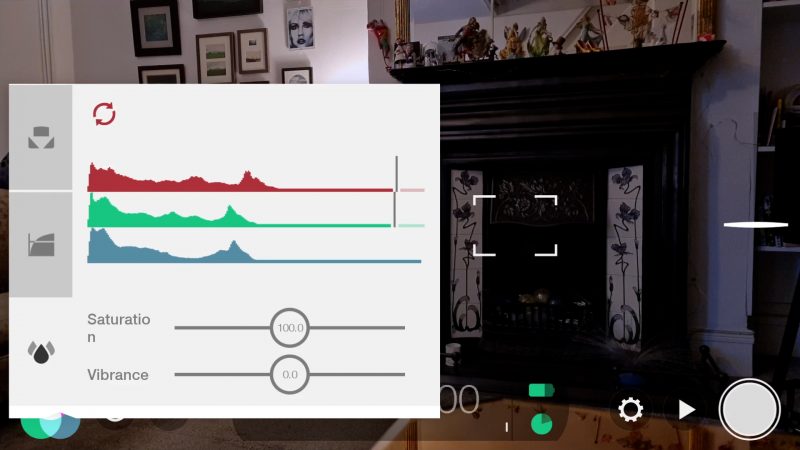
Colour Behaviour
In this panel you can customise the look of your video even further. This is like grading but before you shoot the video, rather than after.
First there’s 3 colour sliders: red, green and blue. You can adjust each of these, just slide along the colour left and right. By default, they are set to max, so it’s a case of removing an amount of whichever colour you work on.
If you pull back the red, things generally go a bit more blue. If you pull back the blue, the image becomes a bit warmer.
Then below these settings you have vibrance and saturation sliders. You might be more used to seeing these kinds of settings in an editing app.
What’s the difference between saturation and vibrance. Well, while saturation boosts colour in general, vibrance only adjusts the least saturated colours in the image. In other words, vibrance is a bit more subtle – it can be used to bring out otherwise dull colours.
And finally
So that’s just about it. There’s just a couple of little things to mention, to do with the interface.
If your screen allows, you might have this extra strip on the left. At the top we have some letters. And these indicate the bitrate setting.
Below that is a number. This is the amount of minutes of video you can record before your memory is full. This number will vary depending on your memory and video quality settings. Higher resolution and bitrate means less minutes.
And last of all in the bottom left corner is the current colour temperature in kelvins.
Smartphone Video – Beginner to Advanced
If you want to know more about smartphone filmmaking, my book Smartphone Videography – Beginners to Advanced is now available to download for members on Patreon. The book is 170 pages long and covers essential smartphone filmmaking topics:
Things like how to get the perfect exposure, when to use manual control, which codecs to use, HDR, how to use frame rates, lenses, shot types, stabilisation and much more. There’s also my Exploring the Film Look Guide as well as Smartphone Colour Grading.
Members can also access all 5 episodes of our smartphone shot Silent Eye series, with accompanying screenplays and making of podcasts. There’s other materials too and I will be adding more in the future.
If you want to join me there, follow this link.

This is exactly the sort of a thing us mobile filmmakers need. I finally have a range of mobile filmmaking equipment I’ve been building over the last couple of years and now I really want crack on with creating some quality content. Sometimes the amount I need to learn can be overwhelming so this resource (and your mobile filmmaking school) is perfect. Thank you.
thanks for your kind comment Paul. Glad to hear you are finding our resources useful!
HI, I am start using the Filmic Pro, and when I put the shutter speed to 1/48 on my Iphone X, the ISO goes from 15 to 480. What I try to understand is… I see on DSLR cameras that has a F 1.3 F 3….. what is the corelation in betwwen those numbers… hope you could explain… thanks… and keep the great work and contribution…
Here is ISO explained: https://momofilmfest.com/iso-for-video-the-basics-explained/
Here is shutter Speed explained: https://momofilmfest.com/shutter-speed-for-video-the-basic-explained/
Hello there. In Turkey. Your content is very good. I’m grateful… Thank you.
Is there a way to save this article for future reference in ipad library?
This is a great overview. No extra talk. Fabulous.
Great overview, but how do you pause while filming?
search the word “stitch” to find the relevant part of the article