How to Edit Video on iPhone & iPad: LumaFusion 2.3 Tutorial (2020)
This article is a beginner’s guide to LumaFusion, one of the most powerful apps for editing on iOS.
I’ll help you get started and take you through the main features of the app. I’ll be using an iPad Pro, a 2020 version, which I have found handles smartphone shot video really well. Bear in mind, the layout will be different on an iPhone.
The latest version of LumaFusion (2.3) has added some essential new features too, so I will talk about those a bit as well.
So, let’s get quick started…
LumaFusion 2.3 Quick Start
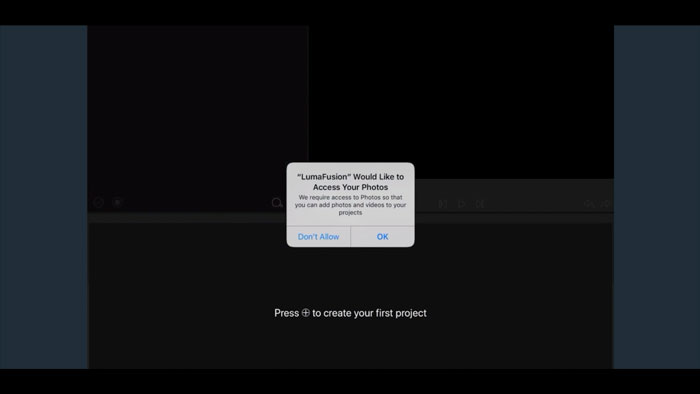
Open the app and give permission for the app to access your photos. The app needs this, otherwise it can’t import video files from the drive of your device. And now you are ready to start your first project.
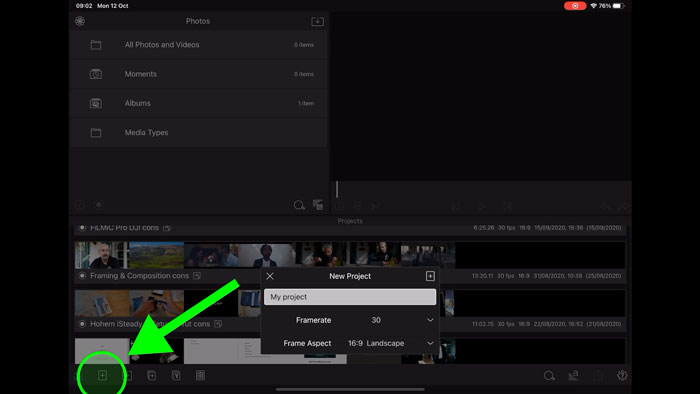
Until you start a project, there’s no timeline to drag your footage onto. To start a new project, tap on the plus button, either in the middle or at the bottom left of the screen.
New Project
Now a box pops up. At the top of this box you type in the title of the project. I’ll just call this “LumaFusion Tutorial”.
You can also choose the frame rate and the aspect ratio. The default from installation is 30fps frame rate and 16:9 aspect ratio.
Frame Rate
Best practice is to choose the same frame rate as the video you are going to edit. An exception to this is if you are creating slow motion. For example, you might have footage at 60fps but want it to play at 30fps so it plays as slow motion. In which case, choose 30fps here.
If you have videos with mixed frame rates, perhaps choose the most common frame rate. If most of it is 24fps but some takes are 30fps, choose 24fps.
When you playback footage at a different frame rate to the capture frame rate it can look jerky. It’s a question of maths. For example, 60fps should play back smoothly at 24fps, because 24fps is exactly 40% of 60fps.
Aspect Ratio
Aspect ratio is the shape and dimensions of the frame. 16×9 is common these days. But you might want a square 1×1 ratio or a widescreen ratio. There’s a brief description here to let you know what you’re choosing, too.
You don’t have to choose now if you are not sure, as you can change these settings later. So to start your project, click the plus sign again.
Lumafusion 2.3 Interface
So this is the LumaFusion 2.3 interface (as seen on an iPad Pro at least).
And here’s a handy little feature for those starting out. Actually, anyone – unless you have a photographic memory of the button layout: There’s a cog icon in the bottom right corner. That’s the Help and Settings button. Now if you tap and hold that, LumaFusion labels every button on the screen.
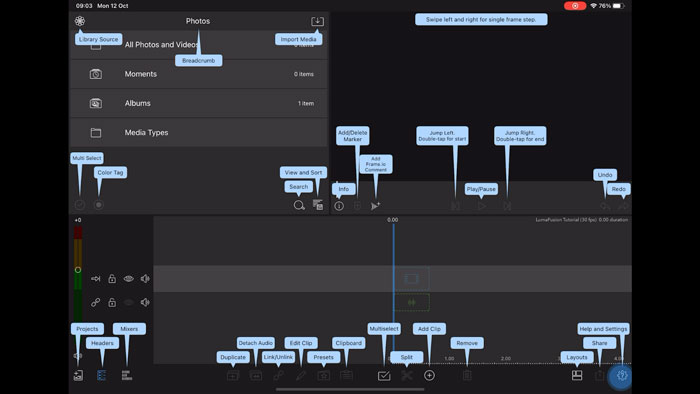
Like with many other editing programs, the video is laid out in strips on the top. While the audio is laid out in strips on the bottom. Video clips are blue and audio clips are green.
This blue line down the centre of the timeline tells you where you are. This is called the Playhead. At the top of the Playhead is a number, at the moment showing 0.00. And until you add some clips into the timeline, that won’t be able to move anywhere.
So let’s add some clips.
Importing Video & Audio in LumaFusion 2.3
First thing you need to do is import some media files.
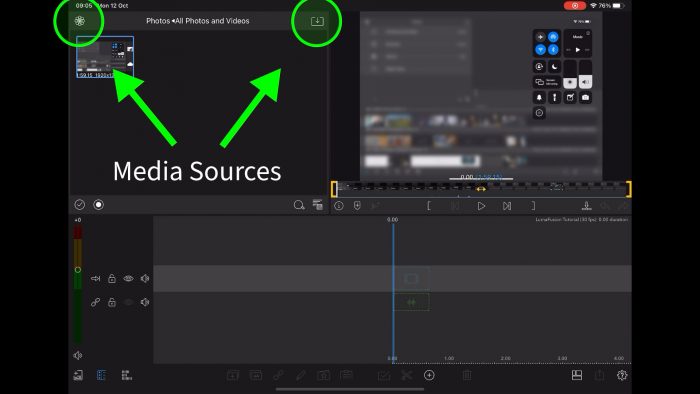
At the very top left of the screen is an icon which changes depending on which source you currently have selected. At first, you probably have this icon, which looks like a flower or something.
In fact, this is a line drawing of the iOS Photos app icon. When you tap this in LumaFusion 2.3, it opens up a window called “Sources”. Bear in mind, this icon will change depending on the Source selected – Files, Imported, Storyblocks and so on. Each has a different icon.
For the moment, all you need is the top item in the list: Photos. So tapping this takes you to the content in your Photos on the device you are editing on – be it an iPhone, iPad or some other iOS device.
Any video or photo here can now be played or dropped into your project timeline. However, in LumaFusion, media files can come from a number of sources. Basically, these 2 buttons at the top of the media files window give you access to all your media.
Add video clip to LumaFusion 2.3 Timeline
There’s a variety of ways to add a clip to your project’s timeline. The simplest way is to tap and hold the video clip. Now drag and drop it onto your timeline.
Another way to add video is to double tap it and the video drops onto the timeline wherever the Playhead sits. Either that, or you can use this Insert Clip button, below the preview window. And yet another way is to select the clip in the left window, tap and hold the video in the preview window, then drag and drop onto the timeline.
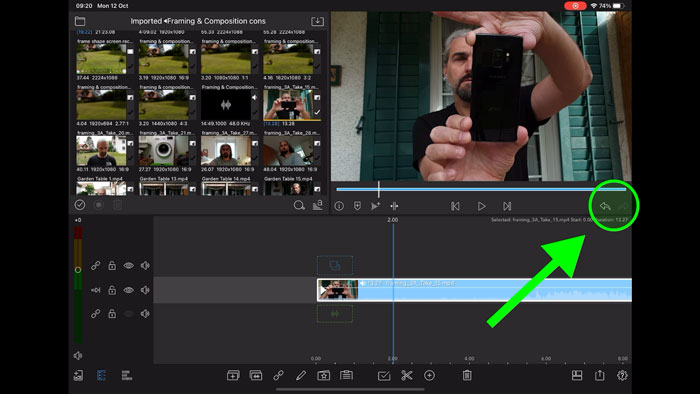
You’ll see that the video and audio combined appears on the timeline. The audio is still there, but it won’t appear on a separate audio track unless you unlink it from the video. This can be done by tapping this audio unlink button at the bottom here which moves the audio from the video into a separate track.
So now you can also see that the video appears in the preview window. And if you tap the play button, that video begins to play in the timeline, moving right to left. The time counter at the top of the Playhead starts to count.
Tip
The counter counts in minutes, seconds and frames. So the fractions of a second you see behind the point depend on the frame rate you have chosen. For example, if you have your project set to 30fps, when the counter gets to .29 it will move to the next second when you advance 1 frame.
Undo – Redo in LumaFusion 2.3
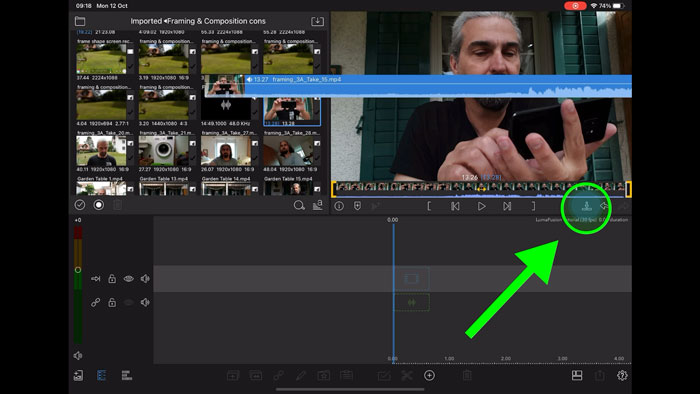
There are 2 curved arrow icons which are the undo and redo buttons. So, if you make a mistake and want to undo what you just did, tap the left-pointing undo arrow. If tapping undo was a mistake, and you want to redo it again, tap the right-pointing arrow.
You’ll probably find yourself using these arrows quite a bit. Luckily, they appear wherever you can change anything. But they appear in different places, so you have to look around for them.
Preview Window
The preview window either shows you the clip selected in the left window or the current position of the blue position marker.
If I select a video from the Photos folder and tap the play button, I’ll play that video. But if I tap a clip in the timeline and press play, I now play everything on the timeline.
Length Handles
When you select a video from the Photos folder, you get these little yellow brackets at each end. They’re called “handles” and they can be used to decide which part of the clip you want to move to the timeline.
Because, yes you can just move the whole clip. But most of the time you probably just want to use a portion of the clip. So tapping and holding a handle, you can move it left or right to mark the beginning. Then again to mark the end.
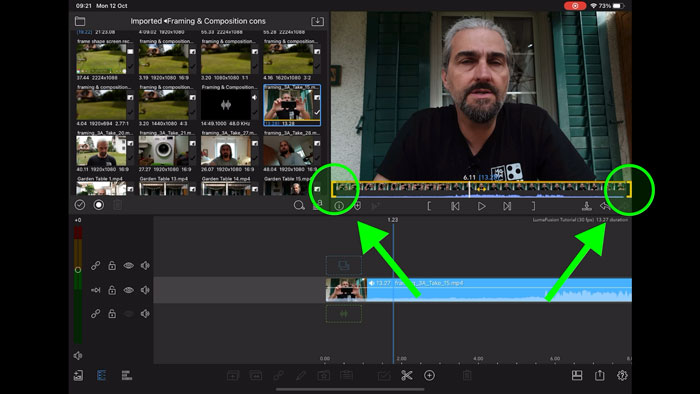
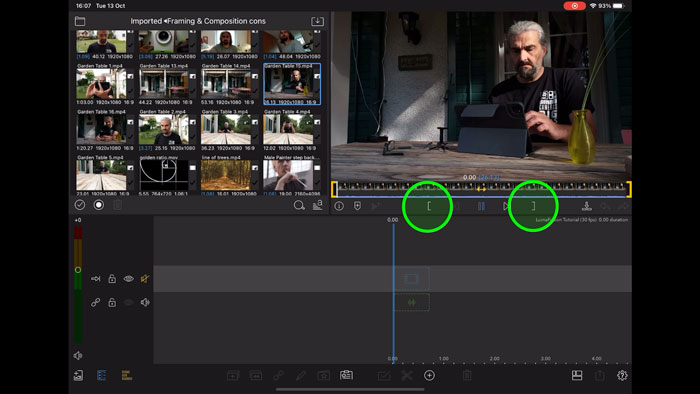
You can also use the in and out markers, located either side of the play button. So play the video, or move the white position marker to the point where you want the clip to start. If you tap in position button, it moves the handle to that position. Same with the right end handle.
You don’t have to be 100% accurate. Because of course you can adjust these start and end points once it’s on the timeline.
Tip
Thing is, while the main timeline can be zoomed in and out, the preview video can’t. So, if you have a long video clip in the preview window, getting an accurate in and out point can be tricky. In which case, what I do is get it approximately right in the preview and then fine tune it on the timeline.
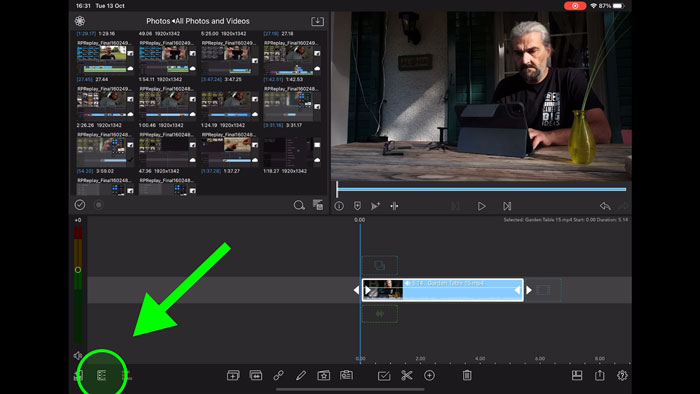
Track Headers
In the group of 3 buttons in the bottom left corner, the middle button is called Headers and opens up a few controls for each track.
Most of these controls you might be familiar with if you’ve used editing software already. Locking a track to make sure no changes can be made to it, the eye button to stop viewing a track, the mute unmute button – these are standard track controls.
Insert or Overwrite
With LumaFusion 2.3, you’re either in insert mode or overwrite mode. Insert or overwrite makes a big difference to how LumaFusion 2.3 operates when placing clips and trimming them in the timeline.
In insert mode, dragging a clip to the timeline inserts it between clips on the timeline. The later clips then slide along to make space.
Imagine you have a bunch of people sitting on a bench. Then someone else shows up and wants to sit in the middle so everyone has to move along to create room for them.
When I drag a clip and move it over the timeline, I get an insert symbol at the beginning of the clip. When I drop the clip, the later clips shuffle along so nothing gets deleted.
Using insert mode makes it easier to add clips to your timeline in the middle of what you have already edited, without having to select all the clips and move them out of the way manually. So that’s a really useful feature.
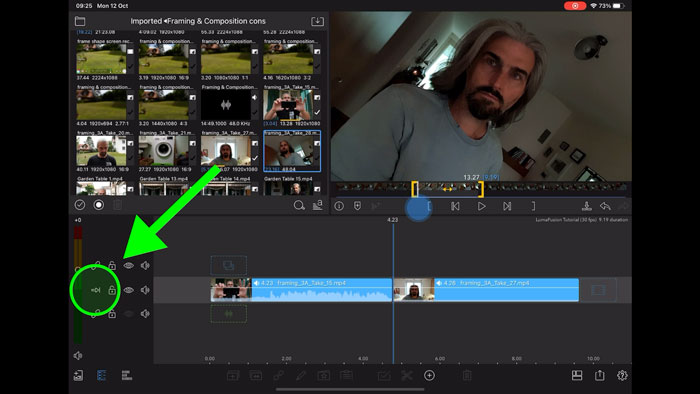
Switching Modes
When you switch to overwrite mode, you get the overwrite symbol instead. The insert-overwrite arrow turns yellow and points down instead of along. Also, note that the Headers button turns yellow too.
This means that if you close the headers by tapping the Headers button you can still quickly see which mode it’s in. Blue for insert, yellow for overwrite.
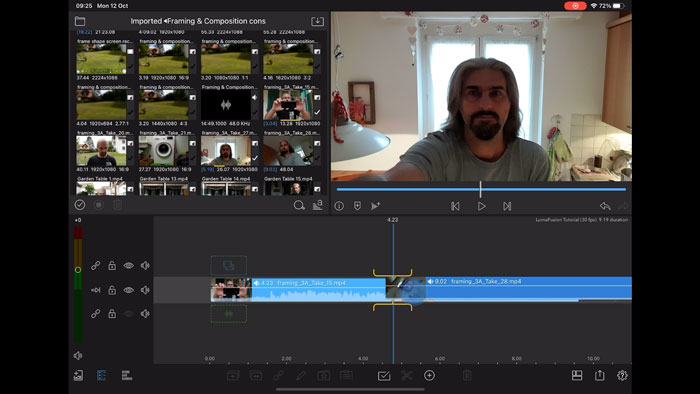
In overwrite mode, dragging and dropping a clip onto the timeline will delete whatever you drop onto. The clips don’t move to make space.
So, for example, if you’re editing and you decide you want to replace a clip because it’s working so well, pick a new clip, then drop it on top of the old clip to replace it. That’s if LumaFusion 2.3 is in overwrite mode.
Now, if the clip is a different length to the old clip you will be asked what you want to do. The first option replaces the clip and keeps the same length. Therefore the new clip will be cut to fit.
You might choose this option if you are happy with the timing of the clip, the rhythm of the edit, but you just don’t like the clip. Everything else you want to keep.
The second option keeps the new clip at the length it is and wipes over anything below.
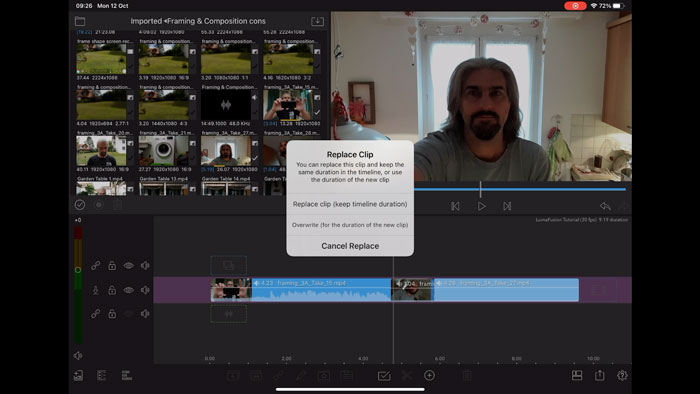
You might choose this option if you have a new clip and you have it at the exact length you need. So you want to replace a clip but you don’t want to keep the exact edit pacing.
So that’s the basics of the insert – overwrite mode. But this mode changes the way you adjust and trim clips on the timeline too.
Generally speaking, using insert mode when you trim or expand a clip, later clips are shuffled along to compensate. But in overwrite mode, they don’t.
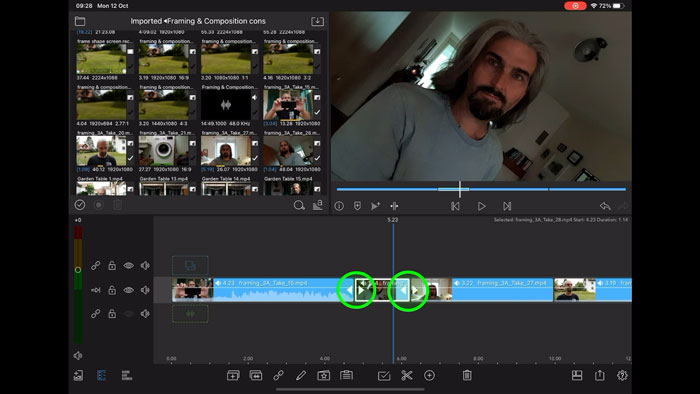
Trimming Clips on the Timeline
With a series of clips on the timeline, if I select one by tapping it I get a white border to show it’s now selected. Once you have selected a clip you can edit it, copy it and so on.
But there are now double arrows symbols at each end of the clip. If I tap and hold one of these double arrows, I can drag it backwards and forwards to change the length of the clip. But, if I’m in Insert Mode, the following clips adjust their position to compensate. It’s like they are stuck to that edit point.
However, if I switch to Overwrite Mode, when I drag one of those double arrows back and forth, you can see that the following clips stay where they are. If I move away from them, I leave a gap. If I move over them, everything below gets wiped out.
So these two modes are very useful and change how LumaFusion 2.3 operates. Most of the time when we’re editing, we are selecting, trimming, adjusting, swapping clips and so on. And getting familiar with insert and overwrite mode will really speed up your editing.
Tip
Sometimes we’re editing and we need to expand one part of the edit. Maybe we want to add a new section. Normally, this means selecting everything after that point and moving it aside, which is quite time consuming.
But with LumaFusion 2.3, you can use this insert-overwrite feature to save time.
In insert mode, tap and drag those double arrows to stretch out the clip. Everything after is moved along the timeline. Now switch to overwrite mode and drag the end of this clip back.
Now you’re created that extra space in the timeline, without having to select everything and move it.
Multiple Tracks in LumaFusion 2.3
So far we’ve just been looking at using a single track. And of course it’s possible to edit a simple video, just using one track. But LumaFusion 2.3, like other major editing programs, allows you to have media clips on multiple tracks.
LumaFusion 2.3 allows you to use up to 6 blue tracks and 6 green tracks. Remember, the blue tracks are video and audio, while the green tracks are audio only.
As with other editing software, the top clip is the one which is shown. So by placing the clip on a track above, you create an edit but without disturbing the clips below.
General editing practice is to edit using multiple tracks as this gives you the most flexibility. Especially for complex projects with lots of clips.
For example, if I want to try a new clip I can just drop it into a new track. See how it looks in the edit. And if I don’t like it, I can delete it or swap it and what I had before is untouched. Or I can move it, trim it and so on.
This way I can experiment without doing damage to what I’ve already edited.
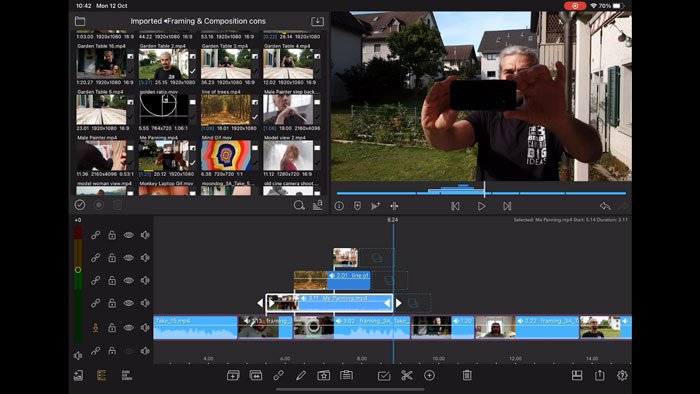
Linking Clips
When you drop a clip on a new track, immediately a line appears from the new clip to the clip below, at the start of the new clip. This is a link, locking the new clip to the older clip.
Now if you tap and hold that older clip, you will move that clip and the new linked clip together. However, if you tap and hold the new clip, it does not move both clips, only the new one. Moving the new clip breaks the link until you place it on the timeline again.
But if you don’t want these clips to be linked at all, you can tap the link button at the bottom (or in the Header menu on the left) and that linking line disappears. You can also use this button to link or relink clips together.
When you add more clips in the tracks above, these clips also link to the clip on the first track below it. So when you add more clips on more tracks, they all become linked to the base clip on the bottom track.
Audio Tracks
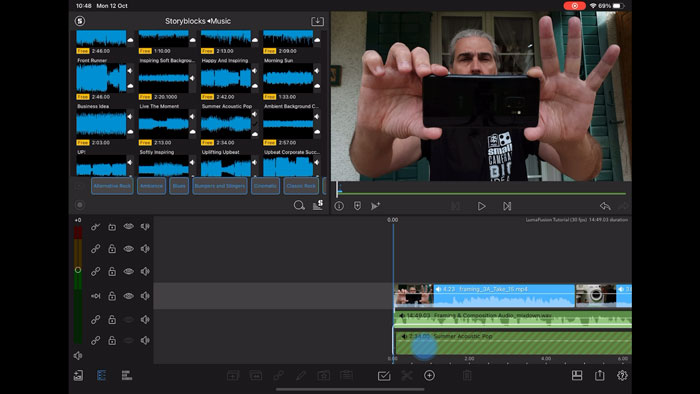
If you tap the sources button in the top left of the screen, you will open up the sources menu again. You should find Storyblocks about halfway down.
Tap this to open up the Storyblocks window. Now, Storyblocks offers all kinds of stock music, footage, sound effects and so on. Some of it is free and some of it will need paying for.
So click on the Music folder to open it. You will get a whole load of music to scroll through. The free ones are marked with a yellow FREE label.
If you try to use one that isn’t free LumaFusion 2.3 tells you you will need to subscribe to Storyblocks and how much per month or year that will cost you.
You can choose a free one by tapping and dragging it onto the timeline. The first time you choose a track of music this way, it needs to download first. The green audio track is striped until it’s finished downloading.
If we tap play now, the music plays along, underscoring the video.
Note, we can see the audio level of all the video and audio tracks represented visually. It looks a bit like a range of mountains. So the peaks of those mountains are the loudest parts of the audio.
Tip
When you have a music track, these peaks often represent the beats of the music. So this can help you to add punch to your edit by cutting to the beat of the music.
With this track you can see that it fades in and then – boom – the rhythm kicks in. And when I’m editing a YouTube video, I often use this part of the track to lead into the next section or add punch to some titles.
So, because I can see where the first beat is, I can line up my titles or montage section to start on that first beat.
Audio Linking
Now, you will see that once again, the audio track immediately links to the main video clip above, at the start of the audio clip. So again, if I move that video clip, everything linked will move with it, including audio clips.
Audio Ducking
If you are using music and spoken voice you will have them on separate tracks. Normally, when we are editing spoken voice and music together, we drop the level of the music to allow the spoken voice to be heard better. Then we raise it again once the voice ends.
This is a technique that’s been used in TV for decades called Audio Ducking and makes the video more polished and professional.
Like in other editing software, in LumaFusion 2.3 you can go into the audio and add keyframes, to fade the music up and down. But LumaFusion has a great feature which really makes this job so quick and easy.
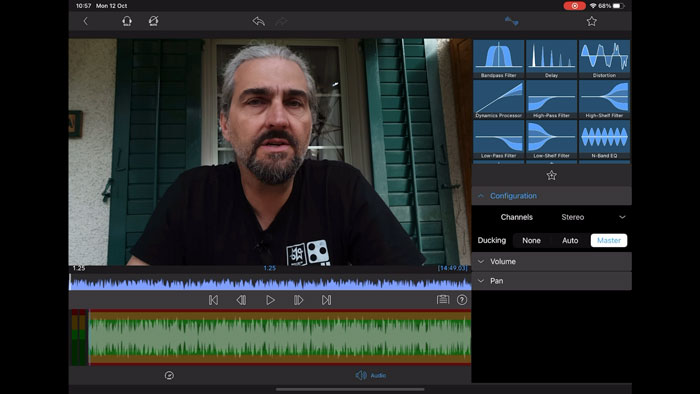
Select an audio or video clip which contains the spoken voice. Tap the pencil button to edit it. Now tap configuration and tap Master.
Any audio clip on the timeline which has been selected as master will cause other audio tracks laying beneath to “duck” down in audio level. So, this saves a lot of time and you don’t have to set any key frames. LumaFusion 2.3 does it all for you.
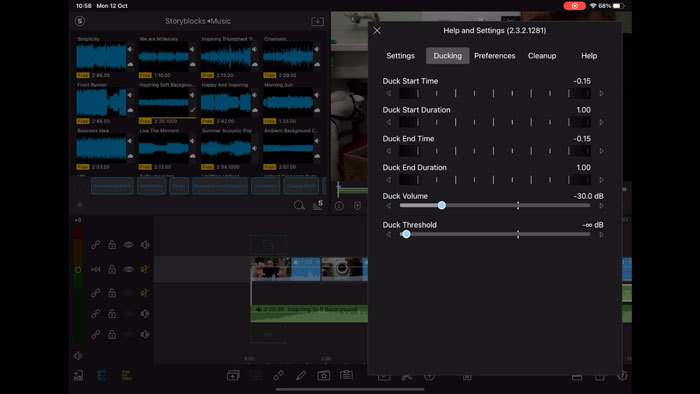
Adjusting Audio Ducking
In settings of the project, you can also adjust how the ducking works. So you can set how much of a drop in audio level happens each time a master clip comes in. You can also adjust how fast this fade occurs.
So tap the settings cog with the question mark in the bottom right corner of the screen. Now tap Ducking and you will get the ducking preferences screen.
I don’t usually change any of these settings except the Duck Volume. I try to keep the music a bit quieter when I do voice overs. So I drop this down to -25 or -30. If people are trying to hear you speak, better to be too quiet than too loud.
How to Split a Clip
The Playhead is also used to position a clip you want to split. Tapping the scissors button will split a clip along the line of the Playhead. You can also split a clip by tapping the clip simultaneously on either side of the Playhead.
Deleting a Clip
You can delete a clip by selecting it and then tapping the trash can button. Again, this works differently depending on which mode you are in. When in insert mode, the clip is removed and the following clips move to the fill the gap. But in overwrite mode, the stay where they are.
Add Titles
As well as media files, you can also add Titles from the sources menu. Tap Titles to open up a list of preset title templates. They’re all static but they can be animated using LumaFusion 2.3.
To use one, simply tap and drag the title onto a video track. If you want the title to appear over a video, drag it onto the video track above that video. If you want it to appear over black, then place it on a video track without any video below.
Editing Titles
To edit the title, once it’s on the timeline, tap the pencil button at the bottom. Or you can just double tap the title on the timeline.
Now you can see that this title is made from 5 different layers, listed on the right. To see what each one does, you can tap the eye button of each layer.
So two of these layers are text layers. These are the layers you will obviously want to edit to put your own text in there. To edit a text layer, double tap the text on the screen.
The text editor opens and you can see the text top right. When you enter this screen, the text will already be selected. So if you want to replace it, just start typing. Now tap done, bottom right, to return to the title editor.
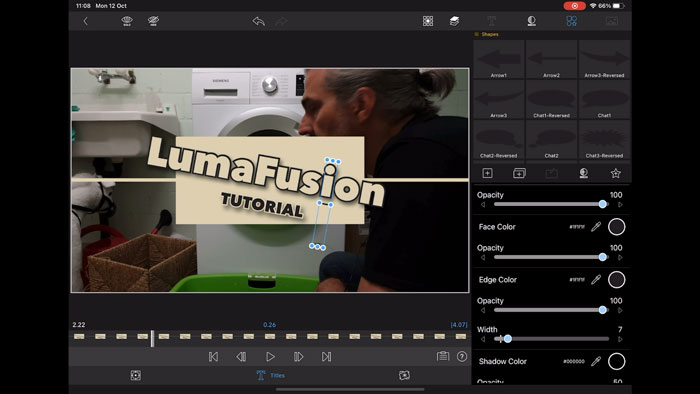
Back in the title editor screen, you can also edit the opacity, size, font and so on. Maybe this is a bit too big so let’s reduce the size of this text. Now that the text is smaller, some elements are out of place. So we can move those to fit the new text size.
Usually you can just tap each element on the screen to select it. Then you can move it around just by using the tap – hold – drag method. But you can also use the edit controls on the right.
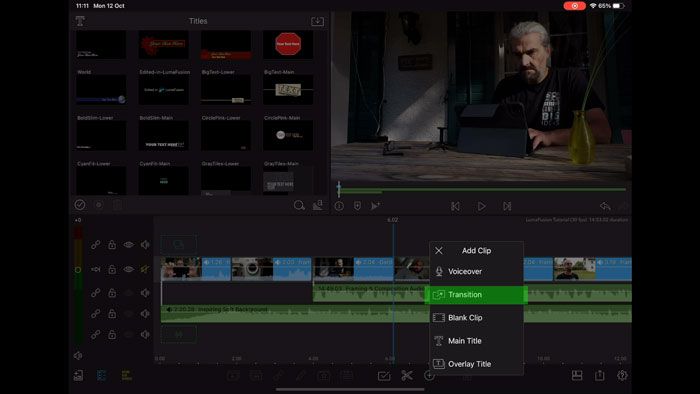
Another way to add a title is to use the add clip button at the bottom of the screen: a plus sign in a circle. Tap that button and then tap Overlay Title. This means the title will lay over any video at this point in the timeline.
Add Transitions
If you don’t want to just cut between clips, you can add a transition. In film or video, a transition includes such things as fading to black or fading one clip into the next clip. A simple fade is probably the most used and in LumaFusion 2.3 it’s really easy to add one.
Move to the Playhead to the join of 2 clips where you want the transition, tap the Add Clip button and then tap transition. LumaFusion will now add a fade between the clips.
If you move the Playhead away from the join, LumaFusion will add a fade to black from the point of the playhead.
Another way to add transitions is to use the Sources menu. Tap the Sources button and tap Transitions. There’s the cross dissolve and dip, which are the most commonly used. Then there’s a few other presets you can choose here, like Burst and Zoom Blur and more.
Tip
A cross dissolve only works if you have extra footage before and after the cut. In other words, you need enough video in both clips to cover the length of the dissolve.
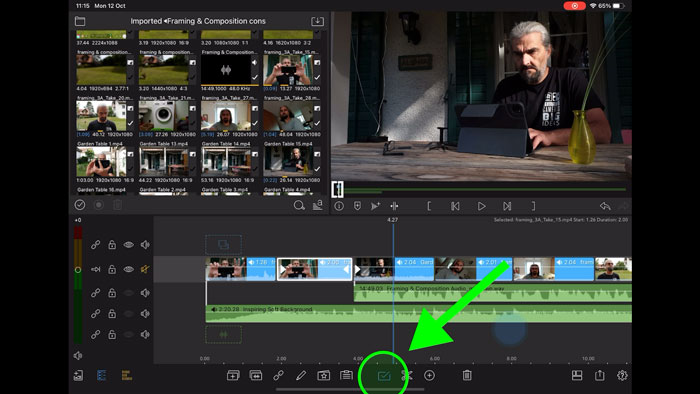
Multiple Select
One of the new features included in LumaFusion 2.3 is the multi select function. If you tap the button with the tick inside a box, you can now select multiple clips on the timeline. Either do this by tapping each clip or you can swipe across multiple clips to select them all.
Once selected you can drag them around or copy and paste them elsewhere in the timeline. So this is a really useful feature that enables you to really speed up your editing process.
How to edit a video clip
To edit a video clip, either double tap the clip on the timeline or select the clip and tap the pencil button, at the bottom.
There’s now 4 options to choose from: Frame & Fit, Speed & Reverse, Audio and Color & Effects.
With any of these, if it’s possible to add keyframes, you will see this symbol with a group of circles and a cross in the last circle. Enable this and any changes will be saved as keyframes.
So, just to go through them quickly…
Frame & Fit allows you to adjust where the video is in the frame, size, cropping. You can even animate these settings using keyframes. There’s a bunch of presets in the window top right.
Speed & Reverse allows you to slow down or speed up a clip. Remember, if you want to keep your video looking smooth, to try to match the frame rates correctly. For example, a 60fps video on a 24fps timeline needs to be slowed to 40% to match the frames correctly. Otherwise the video might look a little jerky.
Audio gives you some settings to use, as well as some effects like filters, EQs and delays.
In Color & Effects you can adjust the colour of any video. Either choose one of the presets or if you want to use manual adjustment, then choose original. Now you will see a group of color and hue adjustments. These also appear with the presets, if you want to start with one of those and adjust it to your needs.
A row of symbols at the top switches between various options. Add LUTs, Vignettes, effects, various blur effects, some more artistic effects, luma keys for using with green screen and the final button is where you can save any settings you have made so that you can apply them to other clips, without having to adjust every setting again.
File Organisation
One thing about LumaFusion is you can’t edit on an external drive, which is what I’m used to doing with my MacBook and Adobe Premiere.
With that setup I could have all my project files in a folder on an external drive, and none of those files ever needs to reach my MacBook’s hard drive. This makes collecting and organising files a lot easier than in LumaFusion, which is one of it’s weak points, I’m afraid.
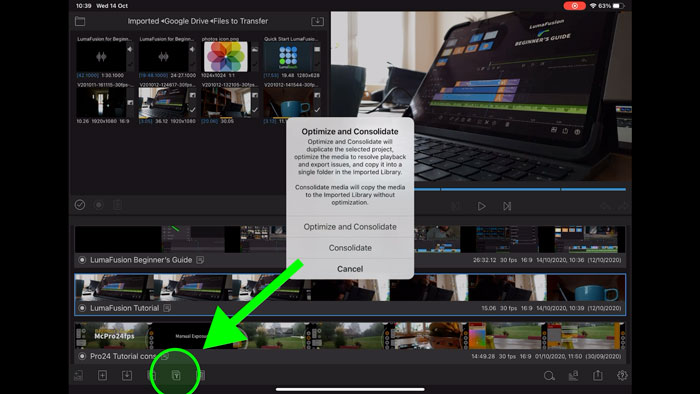
This isn’t made any better by the way Apple’s iOS stores image files. What happens is files end up all over the place, in different folders, here, there and everywhere. For that reason, I recommend that when you finish a project, you use LumaFusions project consolidation feature, which collects all the files used in the video and places them in one folder.
And once I have consolidated my project, what I do is go into the folders where I placed the files originally and delete them all. Otherwise, when you come to edit your next project, all the files from previous projects will mix in with them. And as you can imagine, the more projects you create the more files are going to pile up.
Eager to learn more?
Join our weekly newsletter featuring inspiring stories, no-budget filmmaking tips and comprehensive equipment reviews to help you turn your film projects into reality!