How to Edit Video with VN : VlogNow Tutorial : iPhone, Android & Desktop
VN (or VlogNow to use its full name) is a brilliant little app for both iOS and Android. In fact, there’s also a desktop version for Mac and Windows. Not only that, but it’s free and adds no watermark.
For a free editing app available on 4 platforms, it really does pack an awful lot of features. Both desktop and app versions will even allow export up to 4K resolution.
There’s also a sneaky way to add multiple video tracks, like you can with LumaFusion.
VlogNow: Setting Up
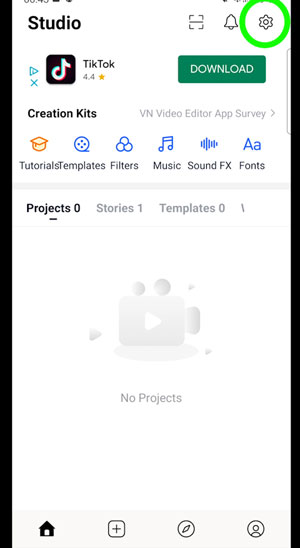
After opening VN editor, you find yourself in the Home window. There’s a few buttons at the very top, right corner. If you tap the settings cog you can set some basic export parameters.
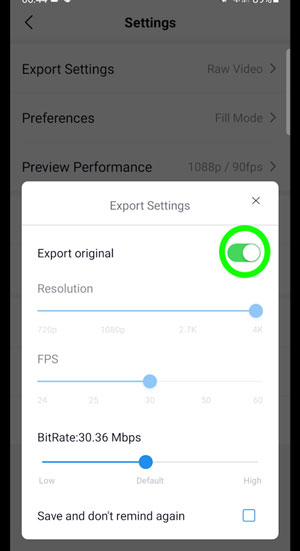
If you know you will mostly want to export in 4K, you can set it here, so it will do so by default. You can also set export frame rate and bitrate too. So 4K and high bitrate will give you the highest quality but will also take up much more memory on your device.
If you toggle on Export Original, VN will export the same settings as the video you used when editing. If you are editing a TikTok video, for example, that app can only show 1080p video so you may as well leave it at 1080p here.
About a third of the way down the screen is a row of buttons. These are for importing various resources like templates, filters for colour, music for adding to your edits, sound fx and fonts.
This big blank section here is where your edits will be saved, under various headings, depending how you decided to create your edit.
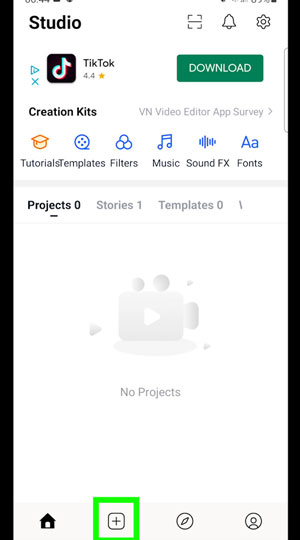
At the bottom, there is another row of buttons. The one we want for starting a new project is the square button with a plus sign inside.
VlogNow: Starting a Project
Start a new project by tapping that plus button.
We’re taken to a new screen where we need to choose 1 of the following 3 options: New project, Story or Template.
New project just launches the editor interface directly. Story gives you prompts to follow and then assembles the footage in the main editor for you to work on. Template uses a specific format so that you don’t have to do much editing work yourself.
If this is your first time with this software, just go with the basic New Project.
VlogNow: Importing Video
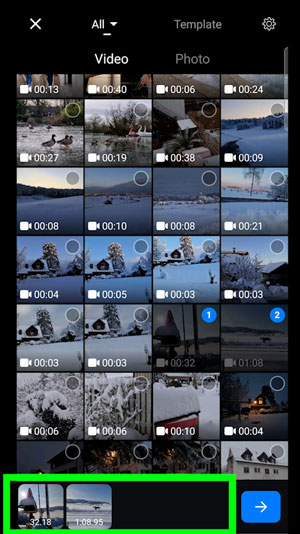
Once you choose New Project you are taken to a new screen which is basically the photo and video gallery on your device. At the top are 2 tabs, video and photo, and you just tap the one you want to select from.
You can always add more videos later, so really you can just choose 1 video here if you want. Then add other clips later.
The videos you select now appear at the bottom, with the duration of each clip inside the thumbnail. Click this big blue button with an arrow. Sometimes it will say processing, this means the video needs to be converted to be editable in VN.
Now you will find yourself in VN’s main editing window.
Main Editing Screen Overview
Let’s quickly look at the layout of the editing screen.
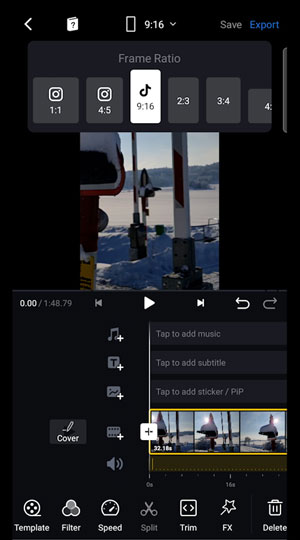
At the top in the middle we have a button which allows you to set your frame ratio. The default is original, which is square. So ok for Instagram.
But you can choose standard 16:9, for any video you want in that regular ratio. Like for YouTube, for example. If this is for TikTok or for any vertical format, like Facebook or Instagram stories, the button with the TikTok logo, which is 9:16.
If you want that cinematic widescreen ratio, choose 21:9. You can even choose to export your video with a circular crop.
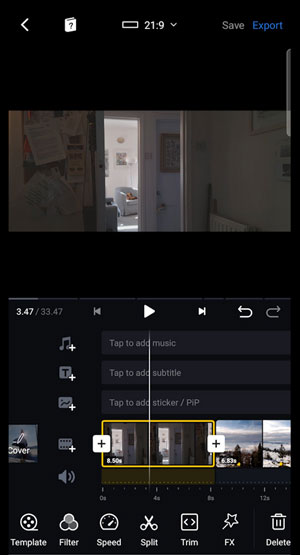
Well, I’m going to choose the cinematic 21:9. The ratio will change in the preview window, which is this area directly below the frame ratio button.
At the bottom of the preview window, you can see this thin grey line with breaks in it. This represents all the clips on your timeline. The breaks represent edit points between clips.
Below this line on the left is a time counter. On the left is the current playhead position. On the right is the total duration of all your clips together.
The 2 blunted arrows shuttle the playhead along to the next edit point. So if you want to move quickly to the start of a particular clip, it’s very easy to do so using these buttons.
Between those buttons is the play button. Tap to stop and start your video to preview your edit.
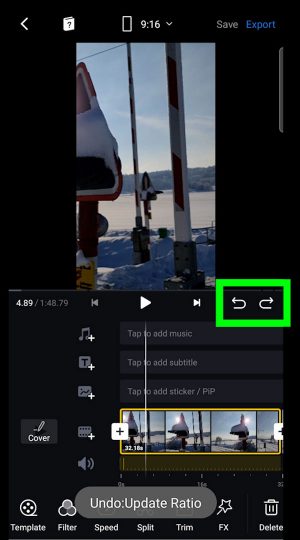
And on the right of this row of controls are the undo and redo buttons. If you went wrong and need to recover, tap the left one. If you decide after all you want to go ahead with those changes, tap the redo button.
Main Editing Window: Tracks
Next down is a row of tracks. At the top is the music track, next is the text track, then there’s the sticker track or PiP (which stands for Picture-in-Picture). Picture-in-Picture refers to an image placed on top or within another image.
Next track down is your main video track, where all the clips you imported at the start are now laid out. And finally, the bottom track is the audio track. This contains the audio connected to the video clips you imported.
So if you don’t really want the sound from your videos, for example, if you are just going to be editing a montage, then you can simply mute the entire audio track there. Then the only audio you will hear will be whatever you add in that top track.

You can shrink and expand the whole timeline by pinching with 2 fingers. This is useful if you want to zoom out to get a wider view or zoom in to see a section in more detail.
Splitting & Trimming
The first and most important thing to know is how to trim a clip. There’s 2 ways.
The first way is to tap to select a clip which then opens up a bunch of options. If you drag the end of the clip, you change the length of the clip. Drag from the front to cut off the beginning, drag from the back to cut off the end.
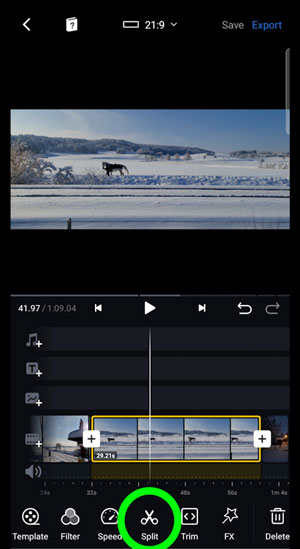
The second way to trim a clip is by using the scissor tool. Place the playhead line where you want to cut and tap the scissors button. Now your clip will be split at that point and one clip is now 2 clips.
Maybe you just want to keep one of those clips. So tap in the clip you want to get rid of and tap delete. In these kinds of apps, they don’t allow gaps in the edit with no clips. The clips automatically shuffle along to fill the gap you created by deleting a clip.
Trim Window
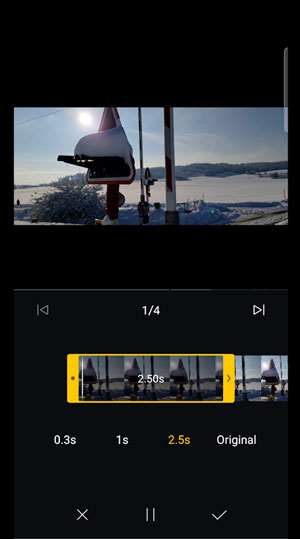
There’s actually another option for trimming clips. You can see next to the split button is a trim button. If you tap this it opens up a new trim window.
The trim window is less cluttered so it’s easier to see what you are doing. Again you can use these blunted arrows to skip between clips. Below the clip is a series of time duration choices.
This allows you to quickly select a duration. Original simply selects the entire clip.
Just like in the main editing window, you can drag the ends of the clip to resize it. The duration of the clip indicated in the centre of the clip will change accordingly.
You will see that as long as you have the window on play, VN will keep cycling around the selected clip. So once you have the length you want, you can now tap and slide the clip backwards and forward.
As you slide your finger, the clip slides position below the yellow box. So this is a great way to get the exact position in the video and get more accuracy in your edit.
When you are done, tap the done tick.
Reordering clips
If you want to change the order of your clips, it’s very easy. Just select and hold on a clip, all the clips now resize into square thumbnails. Then drag and drop the clip into a new position.
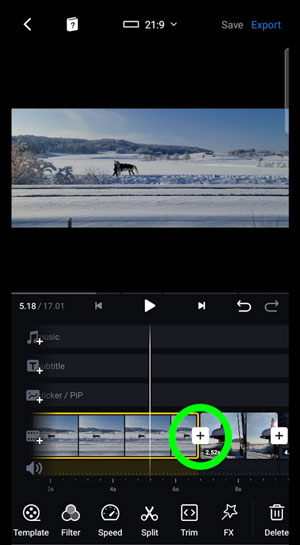
VlogNow: Add Transitions
It’s very easy to add transitions between clips in VN editor. Just tap the box between the clips where you want to add a transition. It’s a white box with a plus sign in the middle.
Now you will be taken to the transition window. Below the preview window there are 2 options for different types of transitions: Normal and Matte.
You can swipe along to check out all the available transitions under each tab. Matte transitions involve painting one clip over another using a preset mask animation.
You can select a transition and then adjust the length for the transition. If you want to create a very slow crossfade from one shot to the next choose Dissolve and then use the slider to make it really slow.
Some transitions allow you to apply to all. This is if you just want to quickly edit a bunch of clips and use the same transition each time.
Clip Controls
Let’s look at the control you have over each clip when it’s selected.
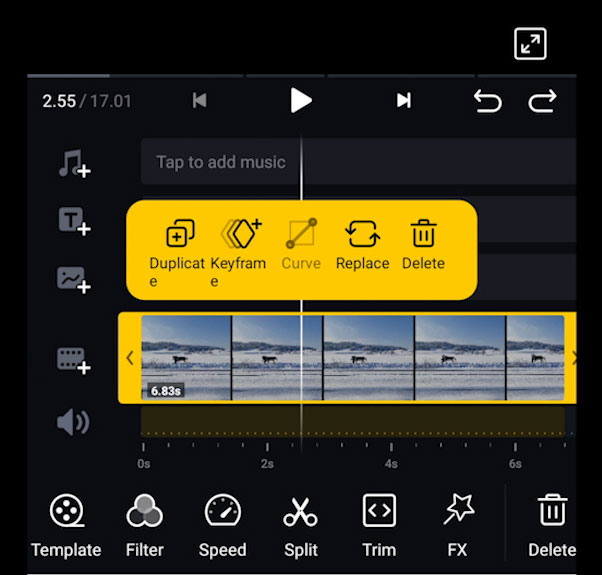
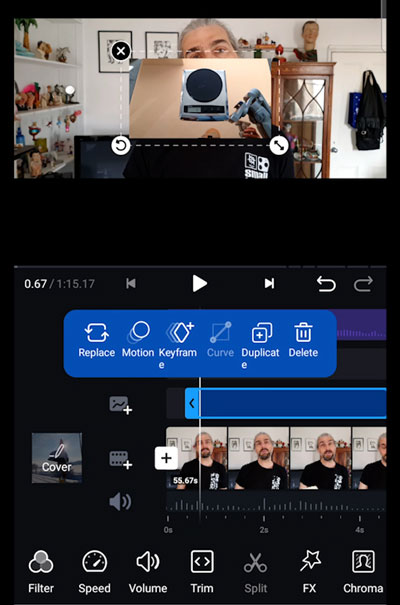
So when you tap on a clip, this yellow box opens up. You can delete a clip from here.
Duplicate adds another copy of the clip selected next to it.
Keyframes
Keyframes allow you to animate aspects of the clip. For example, you can create a zoom.
Drop a keyframe where you want the zoom to start. Move to the where you want the zoom to end and use 2 fingers on the preview window to expand the video. A new keyframe is created.
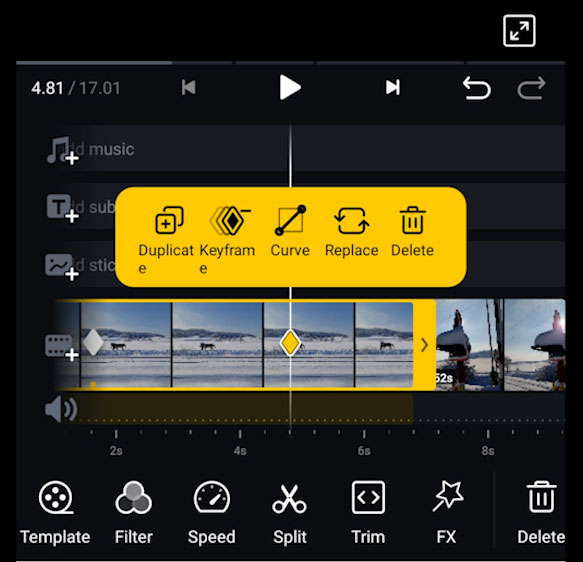
Once you have 2 keyframes you can add a curve. This makes the animation change speed during the action, depending on the curve you choose.
For example, if you want the zoom to start slow, speed up and then slow down as it comes to the end. Curves make your animation look much less robotic and more professional.
Replace allows you to switch the selected clip with another clip. Use this if you are happy with the length of the clip, but you just want a different clip. This means if you are happy with the pace of your edit, you don’t need to redo the edit just because you want a different clip.
How to Color Grade using VN VlogNow Editor
There’s a few more buttons at the bottom of the screen I haven’t yet gone over. On the left is Template. This simply puts your clips into a preset editing template as I mentioned at the start. This basically does the same thing.
Next to that is a button labelled “filter”. This is where you find VN’s colour controls. Tap this to open the filter window.
Whichever clip was under the playhead when you use the filter button will now be in the preview window at the top. And this is the clip which will have the filter applied to it.
Below the preview window are 2 tabs – Filter and Adjust.
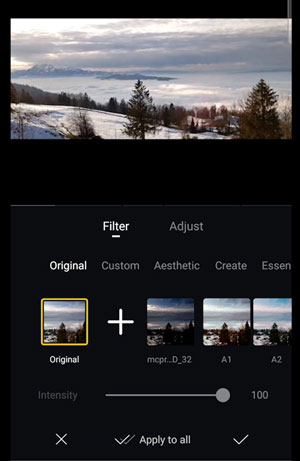
When in the filter tab, you will apply a preset filter. There’s a secondary set of tabs which allow you to select different preset filters.
Original is without any filter. So, if you want to reset your colour and delete any filter you have added, just tap here.
Swiping along the filter tabs to browse the presets. Just tap on the thumbnail to test it out. You can also use the Intensity Slider to adjust the strength of the filter.
If you like the look of the filter but want less of it, slide it down from 100 to your prefered level.
Tapping the X will remove the filter and return you back to the main edit window.
Tapping Apply to all will apply this filter to all the clips on your timeline.
This big white plus sign allows you to import new preset filters. So, if you have a LUT you want to use, this is where you import it. I’ll go into adding LUTs later.
You can also adjust the look of the clip manually. Tap the Adjust tab and now you have a bunch of settings to swipe through.
Adjust Colour with VN Editor
Let’s go through each of these hue and luma settings. Just swipe through and then use the slider control below to adjust the amount. Basically, within the range of plus or minus 100.
Exposure allows you to brighten or darken the image.
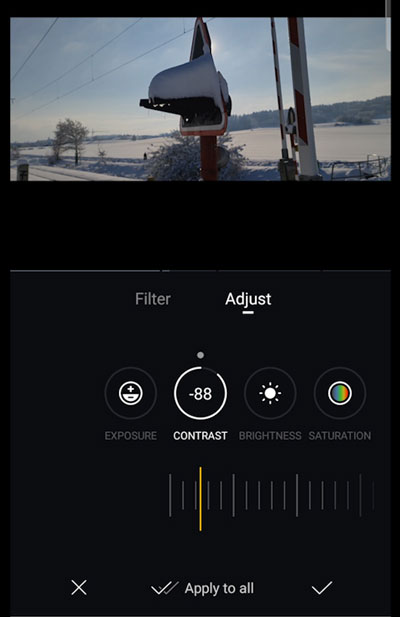
Contrast allows you to add or remove contrast. Now, as smartphone footage often has high contrast, it’s quite useful to be able to rescue it. You can actually bring back details from the shadows this way.
To my eyes, this clip has too much contrast. The shadows are crushed and look a bit ugly to me. So if I pull back the contrast on this clip, now these dark areas lighten a bit.
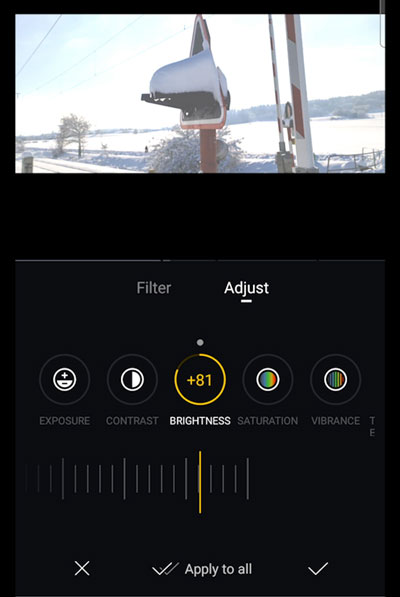
Brightness allows you to brighten or darken the image, like exposure. So what’s the difference between these 2 settings? Why do we need both if they do the same thing?
The difference is, exposure mainly works on the highlights. Whereas brightness works on the whole image. When I adjust Exposure, the dark area remains the same while the light areas change. See how the shadows are as dark as they were, even after I boost exposure.
However, when I boost brightness you can see now the shadows also boost and look more grey.
The next 2 settings are saturation and vibrance. Both these settings enhance the colour of the image and make red redder, blue bluer and so on. Again, these settings are similar so it might be confusing as to why we need both.
Well, there is a difference. Saturation boosts (or reduces) colour saturation in general. Vibrance on the other hand boosts (or reduces) only the colours which are underrepresented in the image. So the Vibrance setting is a bit more subtle.
Reducing Saturation to -100 gives you no colours (otherwise known as black and white). But reducing Vibrance to -100 only makes a subtle change.
Temperature is essentially blue at the bottom and red at the top and a mixture in between. If you want to cool off the image, move the slider to the negative. If you want to warm it, move to the positive.
Vignette adds a light or dark vignette around the edge. It’s not too subtle in this app, so not sure if I’d use that.
Sharpness allows you to sharpen the image. This means it will look harsher. In previous versions, they allowed you to reduce sharpness which is far more useful. Because a softer image is more filmic.
But for some reason the developers decided we can no longer be trusted with the mighty power of the softening of our video clips.
Hue is like temperature, except rather than going from cold to hot, it runs through a rainbow of hues and adds them to the image.
Highlight and shadow allow you to boost the highlights or shadows. In other words, you can brighten both. Again, the wise VN developers have decided not to allow us to darken the shadows or highlights. Which is pretty weird to be honest.
Being able to reduce the brightness of highlights would be such a useful feature (which is why it’s available on most editing programs).
Slow Motion & Speed Ramping
To access VN’s slow motion or speed ramping features, tap the speed button. This takes you into a new window.
I’m going to use this skateboarding clip I downloaded from Pexels. We need a clip with some more dynamic movement to show off these features. This clip is actually already slow motion, but we can still use it.
In the speed window, immediately it starts looping through the clip. There’s 2 options here: curve and regular.
Regular is when you want to speed up or slow down the entire clip. When you select the regular tab, you simply get a slider to adjust speed. 1x is normal. Move it left to slow down the clip or right to speed up the clip.
I’m going to speed this up to 2x to get rid of this slow motion. Because I want to create a speed ramp effect using curves.
Back in the Curve tab, it keeps the setting I set in Regular. So if you need to, you can use both these effects simultaneously.
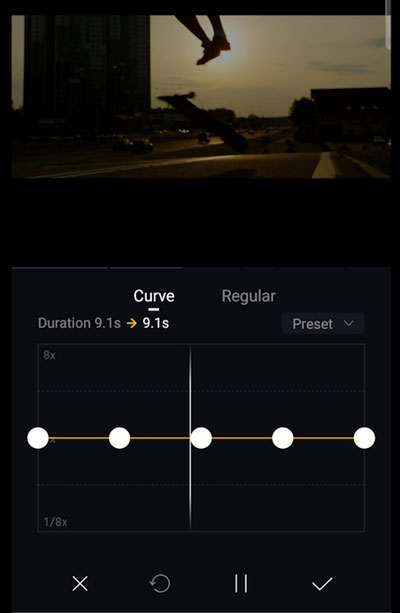
Speed ramping is when the speed of the clip changes during the clip. I’ll show you with this clip of a skateboarder here.
Let’s try to have the clip slow right at the moment he does the trick with the skateboard.
The white circles on this yellow line are points which we can drag up or down to adjust the speed, but only at that point. I’m going to pull down this middle one. Now when it loops round to the trick, it creates a cool effect to emphasise the action.
But the timing isn’t quite right. So now I will adjust these circles to fine tune the ramp. I think it’s slowing down too soon, so I’ll just drag the 2nd circle to the right. Also, I think the ramp is too long, so I’ll drag the 4th circle to the left.

If you long-hold on these white circles, you can delete them. So that’s basically how to do a speed ramp. There’s also preset curves you can use to speed up your editing process.
VlogNow: Adding LUTs
So now I will show you how to add a LUT (or Look Up Table) to your clip. A LUT is like a preset colour grading file. The idea is that a LUT file works on your clip a bit more scientifically to create a certain look for your clip.
In this example, I have a clip I shot using McPro24fps using the mLog100% log profile. You can see it is washed out looking. On the McPro24fps website they provide free technical LUTs. And these LUTs can convert your Log clips into Rec.709 which is an industry standard colour space.
Now I had a problem importing this LUT. Then I found out how to fix this bug. First, tap the filter button to open the filter window. Now tap the big plus button and then the top option in the next window, Import from File Manager.
So first I tried to import using Google Drive but I got this “unsupported files” message. Then I tried to download the LUT first. Now I navigated to the download folder on my phone, but again it said “unsupported files” message.
So this is what you have to do. Instead of going directly to the download tab here, go to the next tab down – this is the name of your device, whatever it is called on your device. Mine is called Simon’s Galaxy Note20 Ultra.
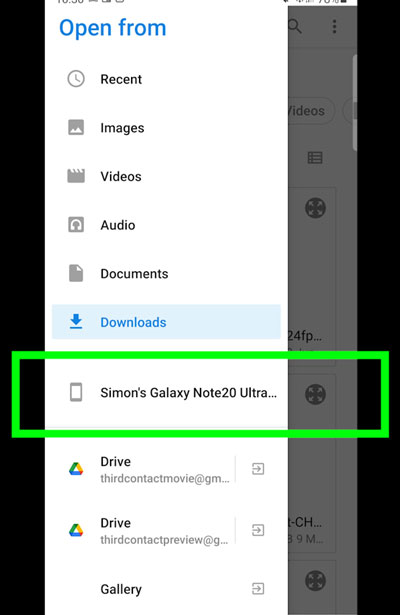
Now look for the Downloads folder. Open that and find the LUT. Open it and it should import into VN editor. You will see it appear here.
Now when you return to the filter window, you will find the LUT as one of the filter options. Just tap it and it will apply to your video. Use the slider again if you want to adjust the strength of the LUT.
Adding Music & Audio in VN Editor
To add music just tap the plus sign by the music note. Or just simply tap in the music track, which is the top track in the main edit window.
Now you get 3 choices: Music, Effect or Record.
VlogNow: Music
Tap music to open the music window. Now you can choose between using your own music, or music VN provides under 3 categories: Vlog, Pop & Dynamic. I don’t know for sure if these tracks are copyright free.
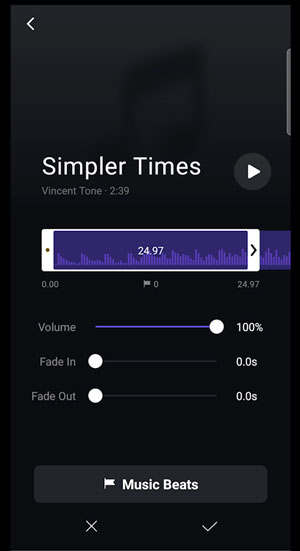
I’ll choose this, by tapping it. This opens up a new window where you can place the music and add a fade effect.
This white box here represents the duration of your edit. Because the music is longer than my edit, I can swipe left and right to choose which part of the track I want to use. I can adjust volume and add a fade in or out.
I’m just going to start from the beginning so I’ll click the tick to take it back to the main screen.
Now you can see the music clip appear in the top track. If I tap on it I get some options, like with the video clip.
If you are editing a montage, I always think it’s a good idea to edit to the beat of the music. I use the visual peaks of the music to find the beat to cut on.
Now I use the scissors to split the clip and delete the bit I don’t want. I’m just going to make a few edits here to show you how we can really create a punchy montage like this.
VlogNow: Effect
If you choose Effect, you get a series of sound effects to add. The first one says cartoon, but honestly they mostly all sound like cartoon effects. You can also add your own from folders on your device.
VlogNow: Record
If you choose Record, you get the voice over record window. Just hit record, wait for the countdown and start talking.
Adding Text with VN Editor
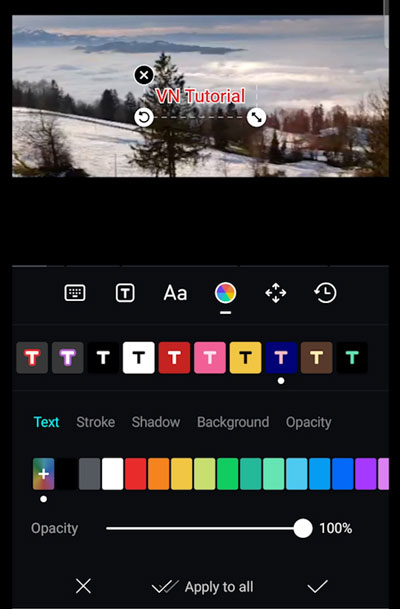
Tap the Text track or the T button by the track to open the text window. Choose standard or one of the preset animated text templates.
Now input your text. Change the font, change the size, change the colour, change the position. There’s really quite a lot of options here to play around with.
When you’re done, click the done tick.
Now you can add keyframes to your text. Just select, add the first keyframe, move the text which automatically creates the 2nd keyframe. Now add one of those curves to make it more pro.
Add Multiple Video tracks (stickers & PiP)
Finally we come to the last track. Tap and choose between video / photo or sticker. So this is how we sneakily add multiple video tracks.
Tap the video button. Choose a video or photo from your gallery. But if you want that extra video track, add a video.
Now it opens up the video on top, but smaller. Drag the resize button bottom left and fill the frame, if you wish to have multiple video tracks.

Now you can edit this clip just like the clips in the main track. In fact, you get more options, because you can also add motion effects.
If you tap the plus sign to the left of the track, you can keep adding more videos and more tracks. You can use all the filters and other buttons at the bottom.
Advantages of Multiple Video Tracks
But why would we want all these video tracks? Well, it depends what you are editing and how you like to edit. When I’m editing something complicated in Adobe Premiere, I will have 2 or more video tracks. At least at the start when I’m blocking out the edit.
Let’s say my main video track has me talking to camera. Now I want to add some B roll shots over my voice over. But it’s much quicker to have a separate track, which allows me to drop a clip in without having to cut holes in the main track and mess about trying to get the right timing.
Also, using VN editor, if I cut in some B roll it will cut out the audio as well. So by adding this as a clip on top, I preserve the original audio. So basically, perfect for vlogs, tech reviews and so on.
By default, the audio from one of these clips is muted. But if you want the audio from the clip as well, all you have to do is select the clip and tap the audio button and slide the volume up.
Last few features…
So that is how to edit using VlogNow editor. There are a few other controls such as FX, Crop, Mirror, Flip. Use Freeze to add a freeze frame into a clip. You can reverse a clip so it plays backwards. Zoom allows you to add various movement effects to a clip, like zoom in, zoom out and so on.
The Forward button here is useful, as it allows you to move a clip from the main timeline up onto a timeline above.
And that’s pretty much it.
Smartphone Video – Beginner to Advanced
If you want to know more about smartphone filmmaking, my book Smartphone Videography – Beginners to Advanced is now available to download for members on Patreon. The book is 170 pages long and covers essential smartphone filmmaking topics:
Things like how to get the perfect exposure, when to use manual control, which codecs to use, HDR, how to use frame rates, lenses, shot types, stabilisation and much more. There’s also my Exploring the Film Look Guide as well as Smartphone Colour Grading.
Members can also access all 5 episodes of our smartphone shot Silent Eye series, with accompanying screenplays and making of podcasts. There’s other materials too and I will be adding more in the future.
If you want to join me there, follow this link.

Hi, thank you for your article. Is there a way to select and move/copy/paste multiple clips at once (video and audio?). Also is there a way to quickly link audio to video clip once you have it synced up so you can move both together?
Nice app
Love your article it’s so helpful ! I’m new to all this but have produced 2 vlogs that I want to put up on YouTube, but it won’t accept the VN Projects as they are not supported !!! .VN format won’t convert in movavi either.
How can I sort this please
Export the video, upload to YouTube
is there a way to adjust the length of all frames at once, instead of dragging/trimming one by one? thank you.
Hello, In my pc ios windows 11 vn editor, after exporting my video , output video is coming reversed ( means mirrored or opposite of video footage) please help to resolve the issue.. I’m using vn through blue stacks app
Hello, Do you know how I can debug a problem by using the slow draft export to locate and investigate the specific problem? Support from VN Team told me I need to debug a problem I’m having with VN Editor.