How to Get the Film Look: Open Camera Tutorial
Shooting video on our smartphones is convenient. We can just open our camera app and hit record. But if we want it to be more professional looking, we have to work a little bit harder.
Since digital cameras were invented, filmmakers have tried to make them shoot video that looks more like film. Film can have a more dreamy, more artistic look to it than digital video.
To get digital video to look like film, there’s a few little tips and tricks you need to know. And it can all be done using only your smartphone.
In this article, I’m going to show you how using the free camera app Open Camera and free editing app VN (or VlogNow).
Camera2 API
Once you have installed Open Camera, the first thing you need to do is switch on Camera2 API.
Google introduced the so-called Camera2 API to give camera app developers better access to more advanced controls of the camera, like manual exposure (ISO, shutter speed), focus and so on. And when you first install Open Camera, Camera2 API is disabled.
This means, when you try to adjust shutter speed or focus manually, the option is not there.
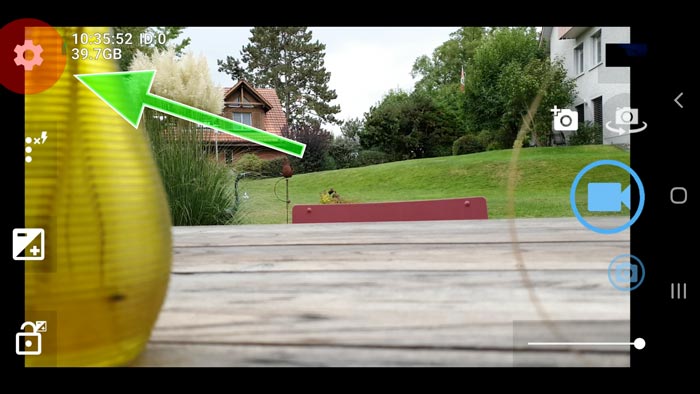
To switch Camera2 API on, tap the cog icon and scroll down until you reach Camera2 API. Tap it and select the bottom option.
Now, when you return to the main interface of the app, opening focus control allows you to switch to manual exposure and focus.
24fps
Film cameras used for shooting movies for many decades would normally shoot at 24 frames per second. This was partly down to the physical restrictions of shooting film. But it is what gives film the look it has. A look which digital filmmakers have been trying to mimic for the last few decades.
So, the next thing to do is to set Open Camera to shoot at 24fps.
Tap the cog icon. Scroll down to Video Settings. Open that and scroll down a list of settings until you get to Video frame rate.
Open this and select 24.
You’ll see that Open Camera tells you this frame rate is approximate and that the frame rate might not be achieved.
One reason for the approximate frame rate is that all smartphones shoot what is known as VFR, or Variable Frame Rate. And this is a form of compression which enables high quality video files to take up less space.
Manual Controls?
In a camera built to shoot film, there is a mechanical shutter. This shutter is limited in how quickly it can open and close. Normally it would be set to 180 degrees, which would allow light to hit the film stock for half the time.
For example, shooting at 24 frames per second, the shutter would be open for 1/48 of a second, 24 times per second. This setup came about due to physical restrictions of cameras and film.
Faster frame rates would produce smoother movement but were hard to achieve and used up too much film. Slower frame rates produced motion that was a bit jerky, which is why old black and white films from the early days of cinema often have that look.
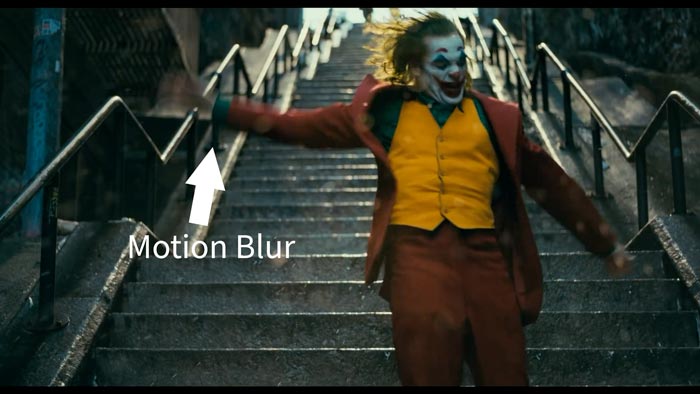
The result is a look which has a certain amount of motion blur. This means any movement will blur slightly in each frame. This blur makes the final film or video appear nice and smooth.
Because digital cameras don’t have this physical restriction, they can produce very high shutter speeds. Using Open Camera, my Samsung S9 can produce a shutter speed of up to 1/10000 of a second. This would be impossibly fast for a movie camera with a physical shutter.
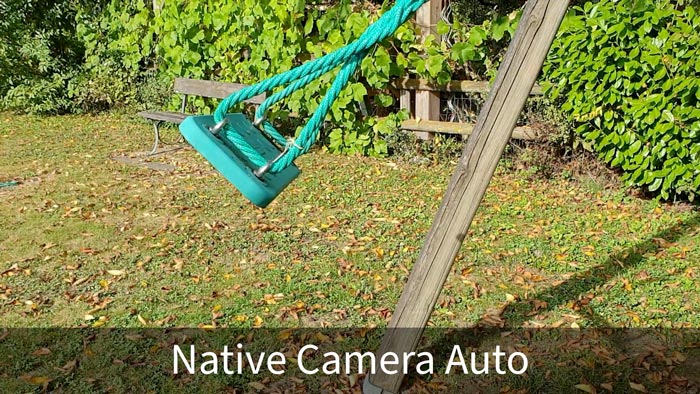
So, if you leave your camera shooting in auto exposure mode, in bright conditions the camera will set shutter speed very high. While this is great for controlling the exposure, and means you can shoot in daylight with no problem, there’s no motion blur and so the final video looks harsh.
Keep ISO Low & Shutter Speed Slow
To achieve a nice smooth look, a general rule is to keep the ISO low and the Shutter Speed slow.
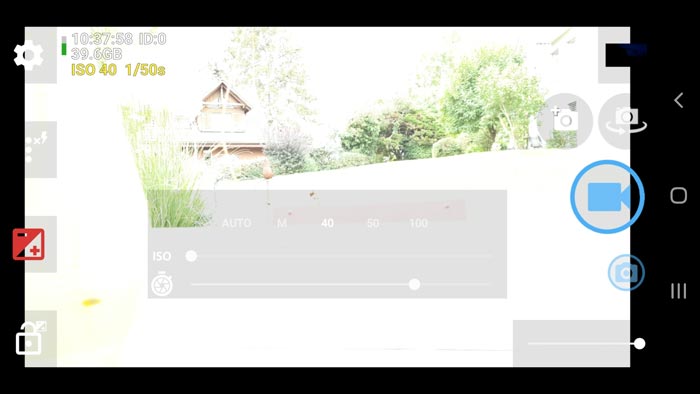
Tap the plus and minus exposure icon on the left. As Open Camera is still in Auto mode, there’s only one slider which can be used to adjust exposure, lighter or darker. So no tap the M letter, which stands for Manual control.
You will now see 2 sliders, one for ISO and one for Shutter Speed. These are your key exposure settings when using manual control.
ISO
The general rule here is to try to keep ISO at the lowest possible level. In low light conditions, this can be a challenge. But when you move this slider too far, digital noise will begin to appear in your image.
If possible, keep ISO at the lowest setting. However, with my S9 I usually find I can go up to about 100-200 ISO (as long as noise reduction is switched on).
Shutter Speed
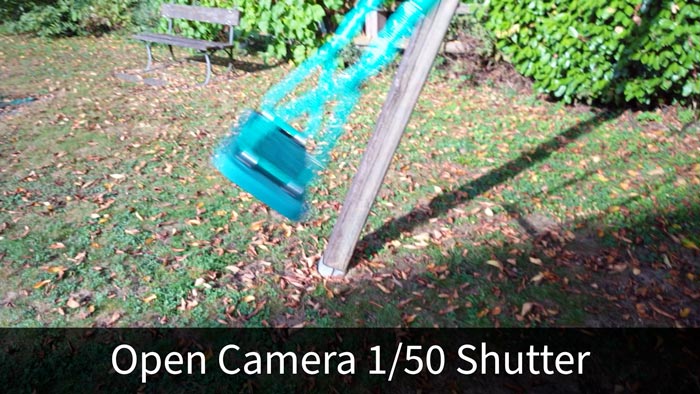
To achieve motion blur similar to that you get when shooting film at 24fps and a 180 degree shutter, set shutter speed to 1/48. This is not a fixed number that you must absolutely stick to, but a general guide.
For example, in countries which have a 50hz electricity supply, a 1/50 shutter speed is needed. Otherwise you can get a strobing effect in the video. But the difference between 1/48 and 1/50 is tiny in terms of motion blur created – you will not notice the difference.
As it happens, you cannot set exactly 1/48 shutter speed in Open Camera. But 1/50 or 1/45 will create very similar motion blur.
Overexposure in Daylight
Now if you have your ISO at rock bottom and shutter speed around 1/48, if you’re shooting outside in daylight, your video is going to be overexposed.
Pretty much the only way to get past this problem is to place an ND (neutral density) filter over your lens. This is a low cost Neewer set of filters which includes a variable ND filter. Cost me about £25. Basically, this is like putting sunglasses over your lens – it stops down the light so you can lower your shutter speed.
I made a video about how to use this, so go check that out if you haven’t already.
Underexposure in Low Light
Too much light is a problem, but not enough light is also a problem. When there’s not enough light, we have to push ISO up and this creates digital noise in the image.
While you can reduce or remove digital noise later using software, there’s a limit to what can be done. Too much processing can make your video look as if everything is made from plastic.
You know those beauty mode functions some smartphone apps have? Where your face is smoothed out, and your wrinkles and blemishes are removed. That’s the same process as noise reduction.
The only other option in this situation is to add light to the scene you are shooting.
Noise Reduction
To help reduce the digital noise created in low light situations, you can set your smartphone to apply noise reduction.
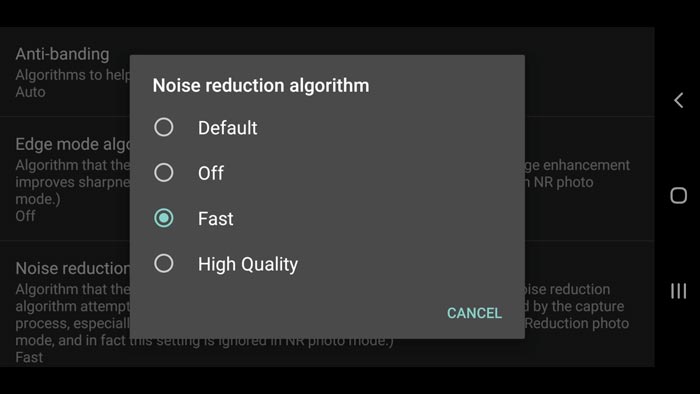
Tap the cog to open settings. Scroll down and tap processing settings.
Tap noise reduction algorithm. This might not be available, depending on your device.
I usually set this to fast as this uses less processing power. You can set it to High Quality if you want. Bear in mind that if you ask too much from your smartphone’s processor, it can overheat and become unreliable.
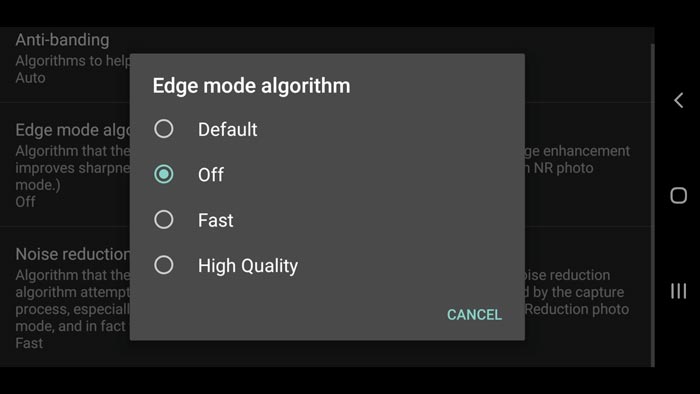
Edge mode
While we are here, we can set the sharpness. So now tap Edge mode algorithm and choose off.
This setting controls how much sharpness your smartphone adds to the image. Now you might think extra sharpness is a good thing. In fact, physical film tends to be rather soft. Therefore, one of things which makes our videos look harsh and digital is this edge sharpening.
If you don’t have this setting, don’t worry, we can remove some of this sharpness later.
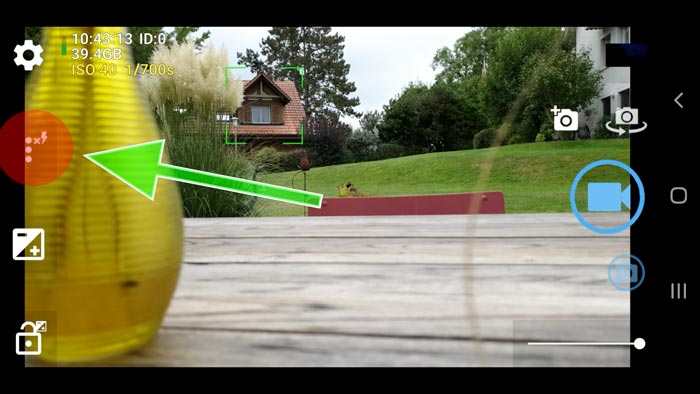
Focus
So now Open Camera should be set up to shoot with a cinematic “film look” style. I just wanted to mention manual focus, because it’s often ignored. We tend to just set our focus and start recording.
But using focus during a shot is something professional cinematographers do all the time. So this is how you can use Open Camera for manual focus.
Tap the icon with the 3 dots on the left. Now tap the M icon in the row at the top. This switches focus to manual. So now focus is controlled using the slider at the bottom of the screen.
A nice touch to add to your video is a focus pull. Set your frame so there’s an object close in the foreground. Set focus on this object. Hit record and now move the slider slowly until a more distant object is in focus.
Moving the slider nice and slow and smoothly will give you a polished result.
Quality Control
When shooting with digital, you can never have too much quality. As long as your storage and smartphone processor can handle it. Using Open Camera you can set your resolution and bitrate as high as possible.
Tap the settings cog, then scroll down and tap video settings. Tap video resolution (On my Samsung S9 I can shoot up to 4K).
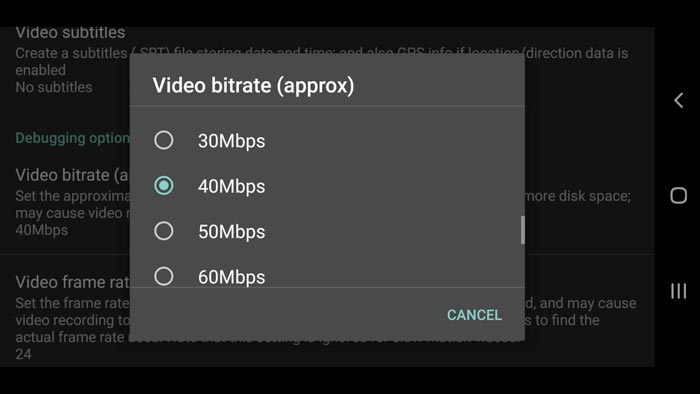
So select your preferred resolution and tap away. Now scroll down further and tap Video bitrate. You will see again that like frame rate, bitrate is variable. Again, variable bitrate is what smartphones use to keep file sizes lower.
With my Samsung S9, I can select up to 200mbps (megabits per second). That is a pretty high bitrate and probably more than I need to shoot nice looking video. Anything above 30mbps is high quality.
Post processing
So now you’ve shot your video using these settings and achieved the film look. With good lighting, framing and camera movement, that’s enough to create some awesome cinematic footage.
That said, there are some extra adjustments you can make in post processing, too. I’m using this free editing app VN for android, which allows some basic image adjustments. It’s actually a pretty cool little app with a lot of features included in the free version.
One thing we have to bear in mind is that smartphones shoot using a format which is really a delivery format. In other words, it’s very compressed. So if we try to do too much post processing, the image loses a lot of quality.
But we can still make some small adjustments to help create this nice soft film look.
So open up the VN app and tap the plus sign and start a new project. Choose the clip or clips you shot using Open Camera. Tap apply.
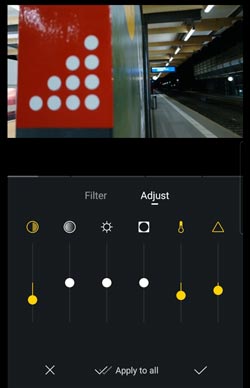
Now tap the filter icon in the row of icons at the bottom. You can start with a preset or use Custom. I’ll choose Custom this time and now tap Adjust.
This brings you to a series of basic colour and tone adjustments.
Reduce sharpness
First, we can reduce some of that digital sharpness. So if you set sharpness at a minus figure, the image will be softened to look more like film. Somewhere around -20 should be enough.
Reduce Contrast
Another thing you can do is to reduce contrast a little bit. This will bring a few extra details out of shadows. And again it softens the look a little bit.
Adjust colour
We can also tweak the colour slightly to reduce the red and create a bluer look.
This app even has a bunch of presets here you can try out. So select
Different film looks
Of course, there is not one look for film. Each film stock has a different look and can be treated differently to change the look as well, like we do with digital.
So really, how you colour the video is up to you and is down to your vision – what mood are you trying to create.
Widescreen
If you want that cinematic widescreen look, you can change the aspect ratio at the top. Choose 21:9 to crop your video with a widescreen aspect ratio.
Read my full article on how to use VN editor.
Smartphone Video – Beginner to Advanced
If you want to know more about smartphone filmmaking, my book Smartphone Videography – Beginners to Advanced is now available to download for members on Patreon. The book is 170 pages long and covers essential smartphone filmmaking topics:
Things like how to get the perfect exposure, when to use manual control, which codecs to use, HDR, how to use frame rates, lenses, shot types, stabilisation and much more. There’s also my Exploring the Film Look Guide as well as Smartphone Colour Grading.
Members can also access all 5 episodes of our smartphone shot Silent Eye series, with accompanying screenplays and making of podcasts. There’s other materials too and I will be adding more in the future.
If you want to join me there, follow this link.

Hey! Simon Horrocks, What a great tutorial on Open camera app. I like the way to explain.
thanks Kunal! Glad it was useful
You are just awesome, thanks for this sir
Thank you for detailed information.
That’s why I linked to this awesome Article on Backdroid.
Please sir do another article on how to use the VN editor
🙂 https://momofilmfest.com/how-to-edit-video-with-vn-vlognow-tutorial-iphone-android-desktop/
Unfortunately on my phone it sets the shutter speed to 30FPS every time I start the recording. How can I make it stick to 24FPS?
What a nice article buddy.
It seems recording video with the onboard camera on an Android phone will produce surround sound emulation with output on 4 speakers (front and back), that is for those with a 5.1 systems. Open Camera will not, or at least I haven’t located a setting to enable. I’ve looked researched this and have only found channel setting for stereo (2 channel), mono, or default. Would you know if this is somehow possible in Open Camera? Thanks!