How To Use a Lavalier Microphone
Are you recording sound for a film, documentary, interview or vlog? We talked about how to use a shotgun mic on a boom for recording sound, but this is mostly for “fiction” filmmaking. Ie: if you are making a short (or long) film with actors.
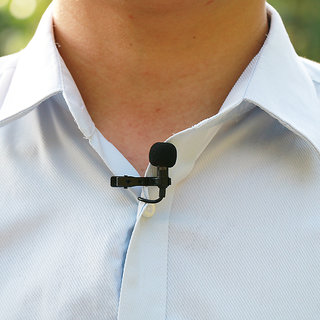
As opposed to holding a microphone on a pole over the head of an actor, lavalier microphones are very small mics which are usually clipped to the person speaking. They are also known as “lav”, “lapel mic”, “clip mic”, “body mic”, “collar mic”, “neck mic” or “personal mic”.
A lavalier mic can be connected via a direct cable or you can use the more expensive wireless version. They are useful as external mics for DSLRs, television, theatre, smartphones, iPhones, public speaking, newscasters, sports anchors, interviews, product reviews, general filmmaking and much more.
What are the advantages of a lavalier mic?
Lavalier mics are small and can be clipped to the speaker, so that you don’t have to have someone holding a shotgun mic (or other type of mic). There are many advantages over a boom mic.
The main advantage is that once the mic is clipped to the speaker and a good sound set up, you can pretty much forget about the mic while you focus on other stuff.
The clip on mic will always be in a consistent position in terms of distance from the speaker’s mouth. This means the sound quality will be consistent. With a boom mic, the boom operator will have to constantly move the mic to get the best sound. Sometimes this results in missed audio as the operator struggles to keep up with the movements of the actors (or speaker/s).
Lav mics are condenser microphones which allows them to have parts small enough for their purpose..
What are the disadvantages of a lavalier mic?
The biggest problem I have encountered with lav mics is the noise you get from clothes rustling or from the speaker knocking the mic accidentally.
In an interview situation, this is probably less likely to be a problem as the interviewee is most likely stationary and not waving their arms around, or doing anything active like running (unless the interview went really badly). That’s why these mics are awesome for interviews or for presenters talking to camera. You can also get away with having the mic visible to camera, as people watching expect to see a mic in shot.
If you use the wireless version of a lavalier mic – which is most often the case when filming with actors – you also have signal and connection issues. This is why the more expensive lav mics are more reliable as they have multiple frequencies. If you get interference, you can switch between different frequencies until you find a clean one.
With the cheaper wireless lav mics, I’ve heard of problems such as the mic using the same frequency as WiFi which then causes issues. With a mic connected by a direct cable you don’t have these issues, but you also don’t get the versatility of the lav mic.
Direction and Placement
Lavalier microphones work best when clipped close to the speaker’s mouth. They are “omnidirectional”, so they pick up sound from every direction, no matter which way the mic is pointing. This is the exact opposite of the shotgun mic, whose job is to pick up sound from a very narrow channel directly in front of it.
The lavalier mic really needs to be close to the speaker’s mouth. If the speaker turns their head to the side while speaking, you can lose a little audio quality with lavs. The closer the mic, the less likely this is to be an issue.
Hiding the Mic
For filming with actors (or if you just don’t want people to see the mic in shot for some reason) you need to disguise or hide the mic. ways of hiding the mic include:
- clip the mic to the shirt, but have another layer of clothing over the top (if the layer is really thick it may muffle the sound)
- tape the mic to the inside of the shirt.
- double-sided “stickies” are purposely made for lav mics. Add an “undercover” to reduce clothing noises
- attach the lav mic to skin using medical tape
Check out 7 Ways to Hide a Lavalier Microphone (is there literally a numbered list for everything you can imagine?)
It’s been said before so let’s say it again: respect to actors or speakers when placing mics. Nothing starts a shoot off worse than a groping incident. Discuss with the actor or speaker how best to hide the mic on their body or clothes and maybe let them place the mic.
Placing the Transmitter
If you are using the wireless version of the lav mic, on the other end of the cable will be a transmitter. This transmits the audio signal to the receiver.
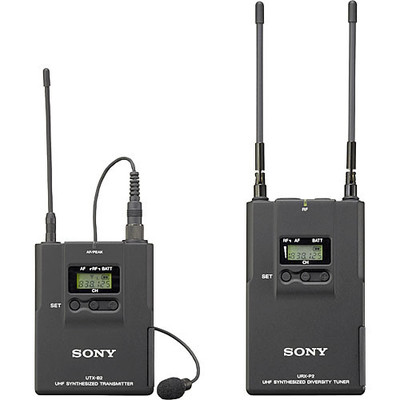
In this picture above, the device on the left is the mic + transmitter. On the right is the receiver. This means the mic + transmitter has to be hidden on the body or within the clothes of the actor or speaker.
Meanwhile, the receiver will be connected to whatever you are recording sound on. This might be direct to your smartphone, iPhone or DSLR. Or it might be to a dedicated audio recorder.
If you are using more than one mic, you will need some way to input those mics at the same time. Some digital recorders have mixers inbuilt. Or you can get a dedicated mixer. A mixer will allow you to “mix” the audio from multiple microphones.
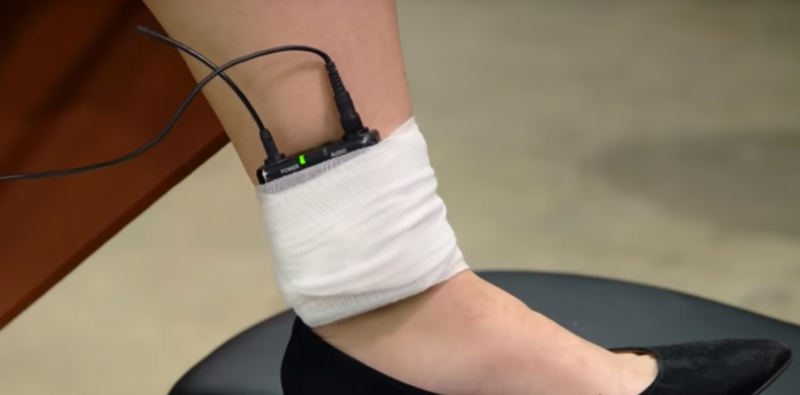
You might need to get inventive when hiding the mic and transmitter. The pic above shows the transmitter being wrapped to the actor’s leg using a bandage.
Use the set
If hiding the mic on the body of the actor is not working out, you can try using the set to hide things. Behind a cushion, inside a cushion, behind a tree, inside the garden gnome… you get the idea. Obviously it depends where you are filming and what your set looks like.
Monitor the sound
Just like with any form of on set audio recording, you should monitor the sound as you film. Either do it yourself with some headphones, or have a sound recordist who handles this job.
The reason this is important is there can be issues with the audio which are only obvious to someone monitoring. For example, an actor knocks the mic, there’s wind, or a background sound only the person with the headphones on notices.
These audio issues can come back to punish you later when you’re editing. It’s pretty hard to avoid ALL noises, hums and bumps, but to reduce them will save you hours or days fixing audio in post.
Use a boom mounted shotgun mic at the same time
When filming actors in particular, you can record sound from lav mics and from a boom mic at the same time. This gives you extra options when editing the audio later.
When we filmed episode 2 of Silent Eye, we had lav mics for all the actors (5) and a boom mic – and only one sound recordist handling everything. After filming, I received all 5 lav mic audio racks separately plus the boom mic audio. So, for some scenes when all actors were talking, I had 6 audio tracks to play with.
This can help when you get one of those bumps as an actor hits the mic for some reason. Because you have the boom mic audio to fall back on.
Here’s Seven Common Reasons for Wireless Mic Problems
I’m just off to read this really interesting article on the 8 Ways To Pick Your Nose Inconspicuously…
Eager to learn more?
Join our weekly newsletter featuring inspiring stories, no-budget filmmaking tips and comprehensive equipment reviews to help you turn your film projects into reality!
[…] How To Use a Lavalier Microphone January 15, 2019 […]
Hi there, all the time i used to check blog posts here early
in the morning, because i like to find out more and more.
Welcome to MoMo. Glad you are enjoying the posts!
You might add a third category besides a boom mic or a wireless lav.
Some digital recorders are smaller than a wireless transmitter, and can be carried directly in the talent’s pocket or belt. Not so easy to monitor the sound quality live, but it works.
Also, by recording two separate lav mics on a stereo recorder, any rustling or bumping noises on one channel can be removed by using the other channel at those moments.
Also, with a lav mic on each shoulder, when the speaker turns or moves their head, the voice is still recorded at full volume without fading problems.