How to use Shutter Speed for Cinematic Video: FiLMiC Pro Tutorial
In this article I’m going to talk about the creative and technical aspects of using Shutter Speed to make your films look more cinematic and polished. I’m going to use FiLMiC Pro to show you how you can achieve great looking video with your smartphone and a low-cost camera app.
Shutter Speed is a very important setting when shooting video or film. Different settings create different looks, as well as presenting different challenges, mainly with exposure. The shutter speed – in combination with frame rate – can also be used to overcome strobing when filming with artificial light.
What is Shutter Speed?
Shutter Speed: Basics Explained
Put simply, shutter speed is the length of time the shutter of your camera is open, for each frame exposed. Therefore, shutter speed controls the amount of light reaching your camera’s sensor.
FiLMiC Pro, like other camera systems, measures shutter speed in fractions of seconds. So a setting of 1/48 means your shutter will be open for 1/48th of a second. And if you set your camera’s frame rate to 24fps, then your shutter will be open for 1/48th of a second, 24 times per second. Simple maths then informs you, your shutter will be open for half the time and closed half the time.
A Brief History of the Camera Shutter
Most of the manual settings available to use on our digital camera originated from when cameras were very much mechanical devices. In the very early days of photography, a camera’s shutter was actually the lens cap. The photographer would remove the lens cap allowing light through the lens, then replace the cap after the required exposure time had elapsed.
To give you an idea of how far we have come, the oldest surviving photograph is now thought to have had an exposure time of several days. This photograph was taken in the year 1826 or 1827 – approaching 200 years ago!
In these early years, the light-sensitive material used for image capture reacted so slowly that the “shutter” speed had to be extremely slow, too. Indeed, so slow that moving objects were impossible to capture.
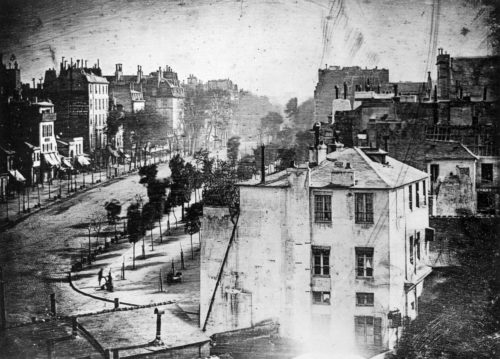
The photograph below is the oldest existing photo containing people. Named the “Boulevard du Temple“, it’s a daguerreotype made by Louis Daguerre in 1838. The exposure time was so long, none of the traffic or pedestrians remained in the frame long enough to leave a mark. Except for 2 men, one having his shoes polished by the other.
Inbuilt Shutters
The very first true shutters were actually separate accessories. Meanwhile, inbuilt shutters only became common by the end of the 19th century. In 1888, George Eastman developed his first camera and called it “Kodak”. The device was a very simple box camera with a fixed-focus lens and single shutter speed.
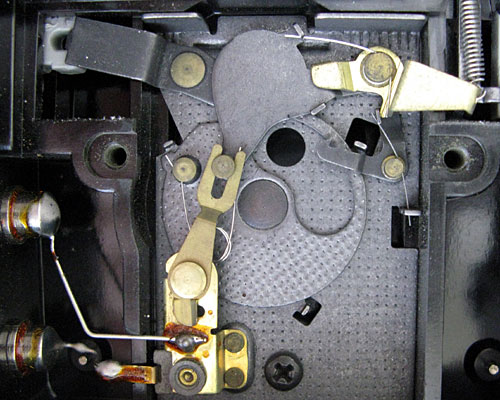
Much like smartphone cameras today, this Kodak camera was designed to be simple to use. Thus the camera appealed to the masses and George Eastman went on to make his fortune. Here’s an old box camera equipped with a rotary shutter…
These days, even consumer cameras offer shutter speeds of 1/16000 of a second. This is only possible due to the modern development of highly sensitive light sensors, which need far less light to capture an image. So so much higher shutter speeds are possible.
Shutter speed in film
Motion picture cameras used in traditional film cinematography employ a mechanical rotating shutter. The shutter rotation is synchronised with film being pulled through the gate, hence shutter speed in a movie camera is derived via frame rate and shutter angle.
With a traditional shutter angle of 180°, film is exposed for 1/48th of a second at 24 fps. And this is why this frame rate + shutter speed combo is often recommended for video shooters trying to emulate the “film look”.
Electronic shutter
Rather than a mechanical shutter opening and closing, smartphone cameras have electronic shutters. Essentially, FiLMiC Pro will tell the camera sensor to expose a frame for a set amount of time. The sensor then records the light information, in lines of pixels. And it does so from the top of the sensor to the bottom.
And, even though there’s no actual physical shutter involved, this setting is still known as shutter speed.
How do we set shutter speed in FiLMiC Pro?
Setting Shutter Speed using FiLMiC Pro
- Open FiLMiC Pro
- Open Manual Controls
- Move Exposure Wheel to set the desired Shutter Speed
- Click on the Shutter Speed to lock it (it goes red)
Note, the left wheel (exposure) controls both shutter speed and ISO at the same time. However, by locking either ISO or shutter speed, the wheel can then be used to control the non-locked setting alone. As shutter speed has more effect on the look than ISO, I usually lock shutter speed first and then use the wheel to control the ISO.
How does shutter speed change the look of video?
Basic Shutter Speed Rules
The faster you set the shutter speed the darker the image.
Also…
The faster you set the shutter speed the less motion blur your get.
But…
The slower you set the shutter speed the lighter the image.
Also…
The slower you set the shutter speed the more motion blur you get.
What is motion blur?
Motion Blur
Again, put simply, your camera’s shutter speed controls the amount of motion blur appearing in each frame. And more or less motion blur changes the way your video looks. While a few online explainers claim motion blur is more realistic, this is not exactly correct. So let me explain why…
First thing to remember is that the human eye does not see the world as a series of still frames.
However, humans discovered that by flashing a series of still images at a certain speed onto a screen, the illusion of movement could be created. Before digital video, the practical task of capturing a series of still images fast enough to maintain this illusion (24 frames per second) involved a complex mechanical device that we know as a cinema camera.
The 24fps Compromise
Without going into the entire history of camera technology, suffice it to say many compromises were involved before 24fps became standard for movies. For example, Thomas Edison insisted 46fps would be the perfect frame rate and easiest on the human eye. But shooting at 46fps was simply too much to ask for movie cameras and film stock at the time.
Therefore, after a series of experiments with other frame rates, they had to settle on 24fps. This turned out to be the best compromise between what looked smooth to the eye, as well as not costing too much. But if Edison had had his way, the film look would now involve a faster shutter speed and much less motion blur.
What this all means is, while motion blur does not exist in reality and digital cameras no-longer restrict us to 24fps and 1/48th shutter speed, the desire to create motion blur remains. Albeit as a purely artistic choice.
So, what are the artistic uses of motion blur?
Motion Blur Uses
Increasing motion blur helps to create smoother looking video that feels more like how we see the world. Alternatively, as you reduce motion blur, those still images flashing before our eyes 24 times per second become more distinct.
Remember, moving images are an illusion. An illusion created by a series of still images, presented one after the other, so that our minds our tricked into seeing movement. And what motion blur does is further assist that illusion by smoothing and blurring the jump between each frame.
The 180 Degree Rule
Just to confuse everyone, filmmakers decided one 180 degree rule simply wasn’t enough and so invented two. Therefore, while one 180 degree rule refers to camera angles, the other refers to shutter speed + frame rate.
While stills cameras use what’s known as a “focal-plane” shutter, movie cameras use a rotary shutter. Now, when this rotary shutter is set to 180 degrees, the frame is exposed for half the time. Therefore, a 24fps frame rate in a movie camera with the rotating shutter set to 180 degrees would expose each frame for 1/48th of a second.
So far, so clear…
OK, so the 180 degree shutter rule is pretty simple and could be applied to all frame rates, shouldn’t it? For example, when shooting at 240fps you would need a 1/480th of a second shutter speed to mimic the film look, right?
Well, let’s think about this.
The 180 degree rule isn’t so important at higher frame rates, and this is down to the difference between film and digital video. While short explanations on achieving the film look are easier to digest, a deeper understanding will lead to better looking videos. So let me go over why I think the 180 degree rule is best used as a general guide when using FiLMiC Pro.
Why do we need the 180 degree rule, anyway?
The reason filmmakers talk about the 180 rule is down to the desire to make their videos come out looking more like film. And most of this is to do with motion blur created when setting your shutter at around 1/48 or 1/50. But once you start to increase your shutter speed above 1/50 you start to movie away from the level of motion blur we are familiar with from 24fps film.
So, to be more specific, motion blur assists the illusion of moving images when shooting at around 24fps. But, at higher frame rates, less motion blur is required (or even possible). Certainly, shooting with a shutter speed of 1/480 will produce pretty much no visible motion blur.
Film and High Frame Rates
Generally speaking, digital cameras can more easily shoot at higher frame rates than film. Whereas digital cameras only need to switch a sensor on and off, film cameras are restricted by the practical need to expose physical film.
Few (if any) shooting film would use 60fps to capture and then play back 60fps. Because the only reason to shoot at a higher frame rate (and therefore faster shutter speed) with film would be to produce slow motion.
Film was (and still is) expensive and shooting 60fps would use up much more film than at 24fps (over twice as much). For example, when Shane Carruth shot his debut micro-budget movie Primer (2004), he was so desperate to save film he used an extremely low shooting ratio of 2:1. ie: half the footage he shot ended up in the film.
Now, take the popular Arriflex 535 movie camera, a favourite of Oscar winning cinematographer Roger Deakins. The Arriflex 535 only shoots at a maximum of 60fps. A speed cinematographers would use only for special shots (slow mo).
If the light is too bright, what do we do?
ND Filters to Keep Shutter Speed Slow
If we are filming in bright conditions, and our ISO setting is at it’s lowest, we sometimes find ourselves unable to slow shutter speed to the 1/48 or 1/50 setting. This usually happens when filming in daylight, outside. The answer to this problem is to use a Neutral Density filter.
ND filters are like sunglasses for your camera. They block some of the light hitting the sensor, thereby allowing you to set a slower shutter speed. ND filters come in different strengths. Alternatively, adjustable ND filters are an all-in-one solution.
What happens when you use fast shutter speeds?
When to Use High Shutter Speeds
Of course, if you are filming at a high frame rate, you will need a faster shutter speed. But what happens when you film at 24fps or 25fps but with a shutter faster than the 180 degree rule dictates?
As motion blur is reduced the individual frames become more obvious to the eye. Therefore, movement begins to look “staccato”. In other words, as edges of moving objects become more defined, they appear harsher and less pleasing.
While most of the time, filmmakers seek to avoid this, there are notable exceptions. The most famous being the fast shutter speed used for filming some shots in Saving Private Ryan (1998).
Director Steven Spielberg and cinematographer Janusz Kaminski decided to try to make their action scenes look a bit different to standard Hollywood war scenes by using a faster shutter speed. As they were shooting with film, this meant adjusting the rotary shutter from 180 degrees to 90 or 45 degrees. Therefore, shooting at 24fps, a 90 degree shutter would create a 1/96 shutter speed and a 45 degree shutter would create a 1/192 shutter speed.
And Janusz Kaminski stated they did this to make the World War Two battles scenes more realistic.
Wait… what?
Hang on, isn’t the 180 degree rule supposed to make our shots look more “realistic”? Yet, a legendary film director and his cinematographer chose to shoot using 90 and 45 degree shutters to create a look that is more… uh… realistic. Both can’t be true, right? So what is going on?
What this shows you is that filmmaking is not as simple as learning a rule and sticking to it. Luckily, filmmaking is still about making creative choices. Yes, a 180 degree shutter at 24fps might be more appropriate for a romantic scene or when creating polished shots. But when when we want to depict terrified soldiers fighting their way across the living hell of Omaha Beach in 1944, then fast shutter speeds help convey the reality those soldiers were going through.
You see, shutter speed creates a more or less realistic look, depending on the feeling you want to convey to your audience. And, if you want to create something less comfortable on the eye but which carries greater gritty realism, then you might choose a faster shutter.
Shutter Speed Standardisation
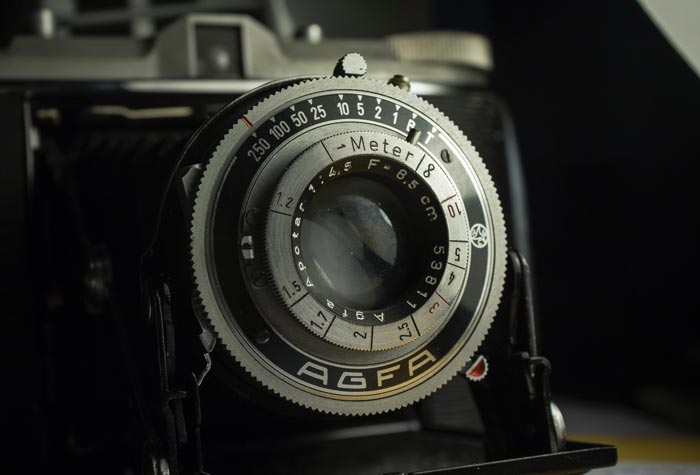
While a mechanical shutter works using moving parts, a digital shutter is basically nothing more than your sensor being switched on and off for a set amount of time. However, digital shutters are usually set using the same standardised shutter speeds and FiLMiC Pro uses similar numbers.
You can see in this picture of an old stills camera the shutter speed is set using a metal ring which circles the lens. The camera has a shutter speed set to 1/250th of a second.
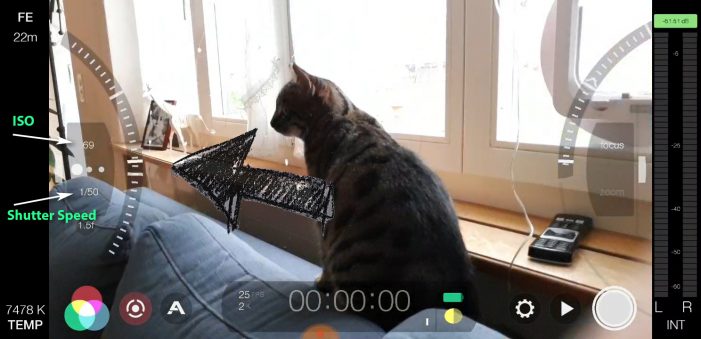
And you’ll see that FiLMiC Pro uses similar numbers. In this screen grab of FiLMiC Pro, the shutter speed is set to 1/50th of a second.
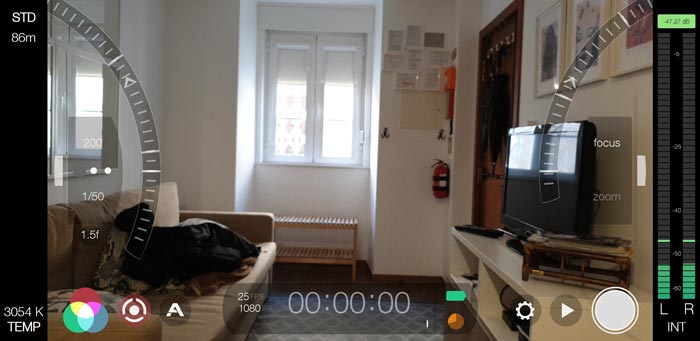
Now, the shutter speeds available in FiLMiC Pro depend on the frame rate you set, perhaps to help us achieve the 180 degree rule. For example, with my frame rate here set to 25fps, shutter speeds available start at 1/25 and go up in doubles each time. So:
- 1/25 – 1/50 – 1/100 – 1/200 – 1/400 – 1/800 – 1/1600.
But if I set the frame rate to 24fps, the shutter speeds available are now:
- 1/24 – 1/48 – 1/96 – 1/192 – 1/384 – 1/768 – 1/1536 – 1/3072.
At 30fps:
- 1/30 – 1/60 – 1/120 – 1/240 – 1/480 – 1/960 – 1/1920 – 1/3840
At 60fps:
- 1/60 – 1/120 – 1/240 – 1/480 – 1/960 – 1/1920 – 1/3840
At 120fps you get the same choices, but starting at 1/120. And at 240fps the same again but starting at 1/240.
So it’s interesting to note, the highest shutter speed is not available at 25fps.
Camera Apps Do Their Own Thing
While FiLMiC Pro seems to follow the 180 degree rule, other camera apps and digital cameras do it differently. For example, some DSLRs can shoot at 24fps but have no 1/48th shutter speed available. Meanwhile, free Android app Open Camera allows me to set shutter speeds from 1/5 up to 1/10000, in increments that appear to be unique to the app.
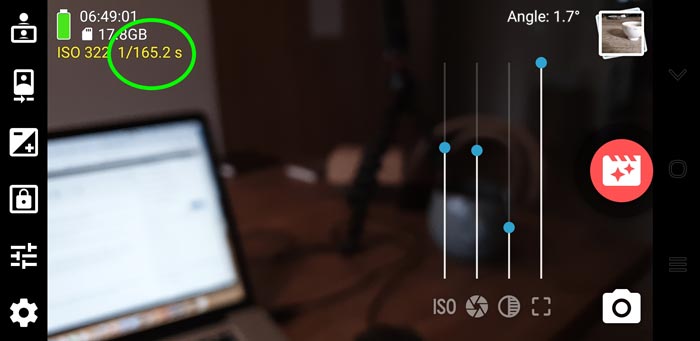
And the Open Camera app clone, HedgeCam 2 dispenses with whole numbers altogether, allowing shutter speed to be adjusted to a decimal point of a fraction of a second. In the screen grab below you can see the shutter set to 1/165.2.
So this illustrates one difference between digital and mechanical shutters. While a mechanical shutter needs to work around the engineering of metal and plastic, digital sensors can be switched on and off for whatever length you desire. And we can assume the only reason FiLMiC Pro restricts us to certain shutter speeds is down to ease of use and familiarity of standardised shutter speeds.
180 Degree Rule as Guide
So what this all leads us to conclude is that the 180 degree shutter speed rule doesn’t need to be adhered to strictly. All we need to understand is that at slower frame rates, motion blur is normally desirable. But shutter speed doesn’t need to be exact. For example, 24fps and 1/50 shutter speed would be perfectly acceptable for the film look.
Because the difference between 1/48 and 1/50 is only two hundredths of a second and no human will see the difference.
What else do we need to consider with shutter speed?
Artificial Light Strobing
When you are shooting video with FiLMiC Pro, you might notice artificial lights start to strobe. This looks like waves or pulses of light, from bright to dark. This is because artificial lights flicker, and they do so at a rate depending on where in the world you are shooting video.
For example, in the USA electricity supply of 60hz means lights flicker at 60hz. But a shutter speed of 1/60th (or multiples of 1/60th) should solve the problem. In Europe electricity supply comes at 50hz and therefore 1/50th (or multiples of 1/50th) should also solve the problem.
Using FiLMiC Pro, you can see this in action by aiming at a scene containing strobing lights and adjusting the shutter speed. You should see the strobing effect increase, reduce and disappear as your shutter speed moves into and out of sync.
Rolling Shutter
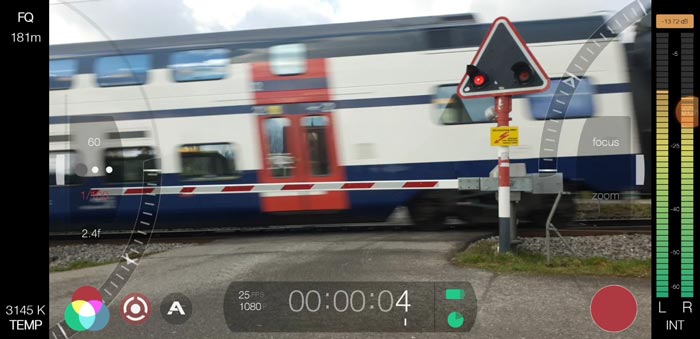
Ever shot video from a car or train window? Did you find everything in the image slanting across the screen? Did supposedly straight objects such as building now look like they’re made of long grass and there’s strong wind blowing?
Welcome to the phenomenon created by the “rolling shutter” in your smartphone camera. In fact, it’s not just smartphones but other digital cameras too.
Not only can this effect look ugly or distracting, but it can also be a nightmare for any VFX work that needs to be done to the image in post. If you want to track motion and/or replace parts of an image, it doesn’t help at all if the image is bending and distorting all over the pace.
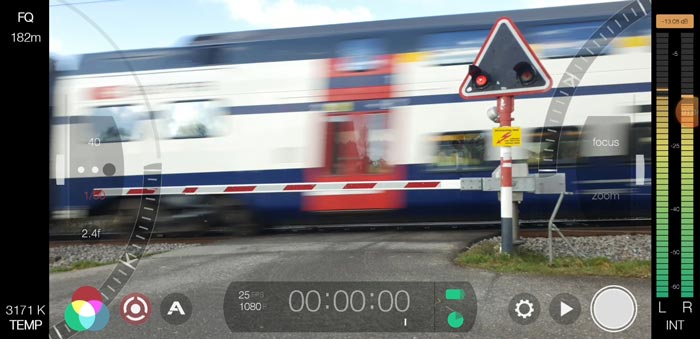
In the two images of the passing train above, we can also see the rolling shutter effect. As it happens, the trains are going in opposite directions. So you can see one train leans to the left, while the other leans to the right.
What causes it?
Cameras that shoot using good old physical film don’t have this rolling shutter problem. That’s because the whole frame is exposed to light at the same time.
However, smartphones and some other digital cameras have CMOS sensors and these sensors scan the exposed frame one line at a time, from top to bottom. Therefore, there’s a very slight time difference between when the top line is captured and the lines beneath.
Normally, you won’t notice anything. But when something is move fast either right to left or left to right across the frame, things start to look a bit strange.
That’s because the top of this object was filmed slightly before the bottom.
CMOS Sensors
As it turns out, most smartphones carry CMOS sensors. On a positive note, smartphone camera sensors are small, which generally show less rolling shutter distortion than larger sensors with higher in resolution.
The alternative to a rolling shutter is something called a “global shutter”. As mentioned before, this exposes the frame in one go and negates any slanting or wobbly-looking objects.
So why have these rolling shutters if they cause problems?
Well, rolling shutters have advantages over global shutters. Generally speaking, the rolling-shutter sensor causes less noise and allows a wider dynamic range, whilst it also generates less heat.
Fixing Rolling Shutter
There are ways to reduce or fix rolling shutter issues in editing software. However, perhaps it’s not such a big problem anyway.
Taking the example of the moving train, perhaps the rolling shutter effect adds an extra sense of motion to the train. In a way, it’s like a cartoon train leaning forward as it rushes ahead, like an Olympic athlete stretching for the finish line.
Remember, filmmaking is above all a creative process. Remember also, things like lens flares, light leaks and jump cuts were all once considered flaws in filmmaking but are now used artistically to add character to a scene or shot. So who is to say rolling shutter might can’t also be used creatively?
Smartphone Video – Beginner to Advanced
If you want to know more about smartphone filmmaking, my book Smartphone Videography – Beginners to Advanced is now available to download for members on Patreon. The book is 170 pages long and covers essential smartphone filmmaking topics:
Things like how to get the perfect exposure, when to use manual control, which codecs to use, HDR, how to use frame rates, lenses, shot types, stabilisation and much more. There’s also my Exploring the Film Look Guide as well as Smartphone Colour Grading.
Members can also access all 5 episodes of our smartphone shot Silent Eye series, with accompanying screenplays and making of podcasts. There’s other materials too and I will be adding more in the future.
If you want to join me there, follow this link.
