MASTER your iPhone Camera – EPIC Tutorial & Full Guide
This is the article where you learn everything you need to know about your iPhone camera.
Since the iPhone camera revolutionised photography 15 years ago, many new and powerful features have been added. Multiple cameras, 4K recording, Dolby Vision, Cinematic Mode, Apple ProRes and much more. This is a photo and video studio in your pocket!
Maybe you’ve just switched to an iPhone or you’ve had one for a while but haven’t fully got to grips with it. Either way this article is for you, because I’m going to take you from the very basics of using the iPhone cameras to more advanced methods.
If you want to learn how to shoot & edit amazing videos with your iPhone camera you can join us on Patreon.
First, let’s start at the beginning: the iPhone camera app.
How to Use iPhone Camera App
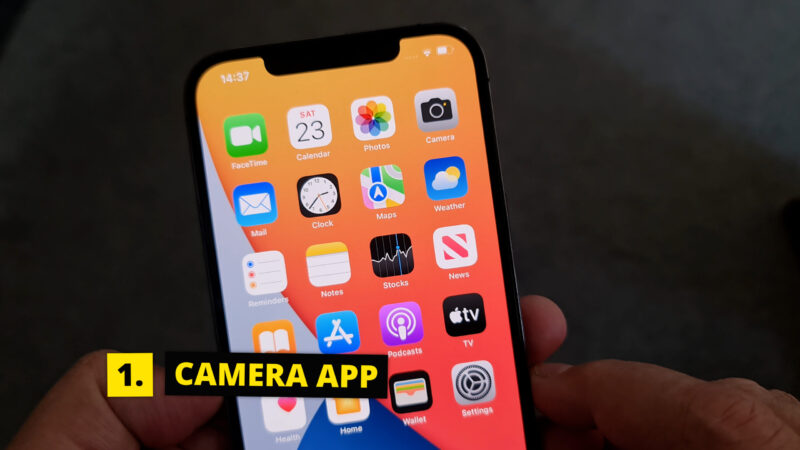
When you open your iPhone for the first time you will find these 2 apps together: the Photos app and the Camera app. The Photos app, with petals of colours like a flower, is where you will not just find photos you have taken, but videos as well.
I’ll come to the Photos app later, because there’s some important settings to make sure the app isn’t over-compressing your media. But let’s look at the Camera app first.
The Camera app has this image of a regular camera, like an SLR or a DSLR or mirrorless camera. Tap it to open the camera.
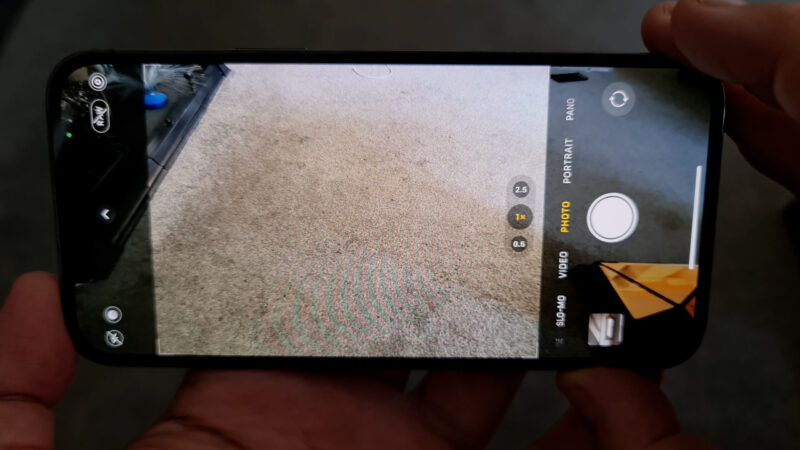
The screen of your phone is now taken over mostly by the view from the camera. Around the edge, you have the settings controls and of course the big circle, which is the shutter button.
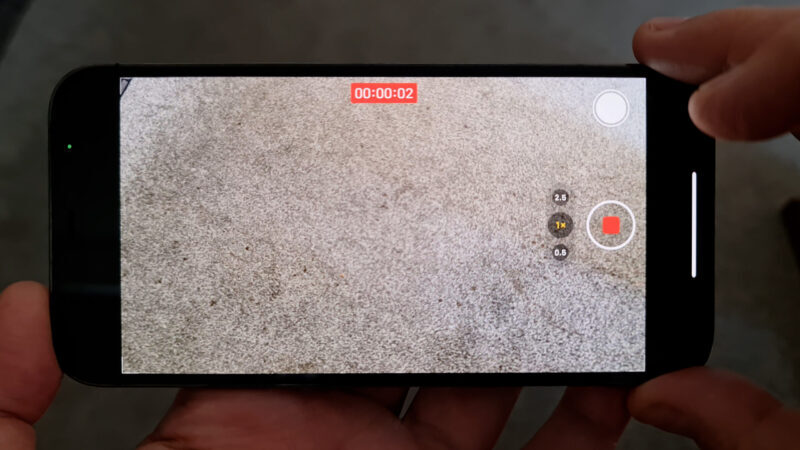
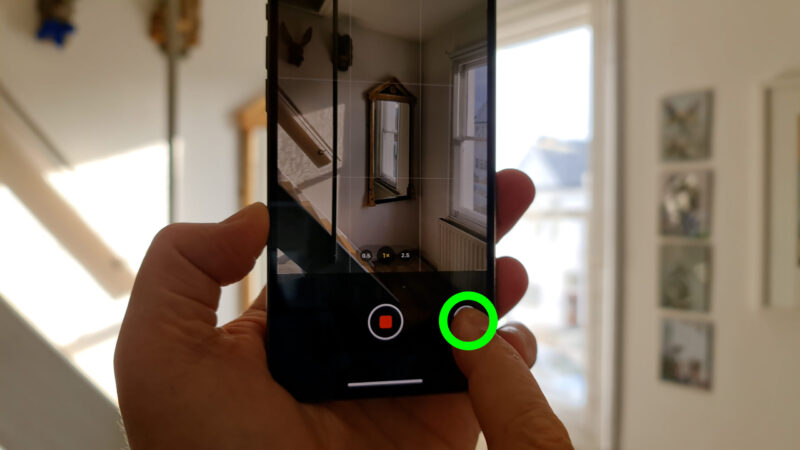
When the camera is in Photo mode, this button is white. But when you switch to Video mode, this button goes red. So that’s a quick way to know whether you are in a photo or a video mode.
In Photo mode, tap the shutter button to take a picture. In Video mode, tap it to start recording.
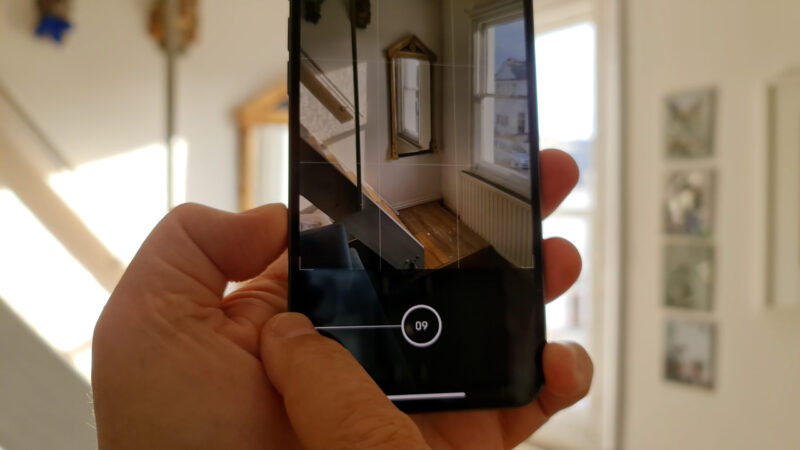
When recording, the red circle turns into a smaller red square and the counter tells you how long you’ve been recording. Tap the shutter button again and it stops recording.
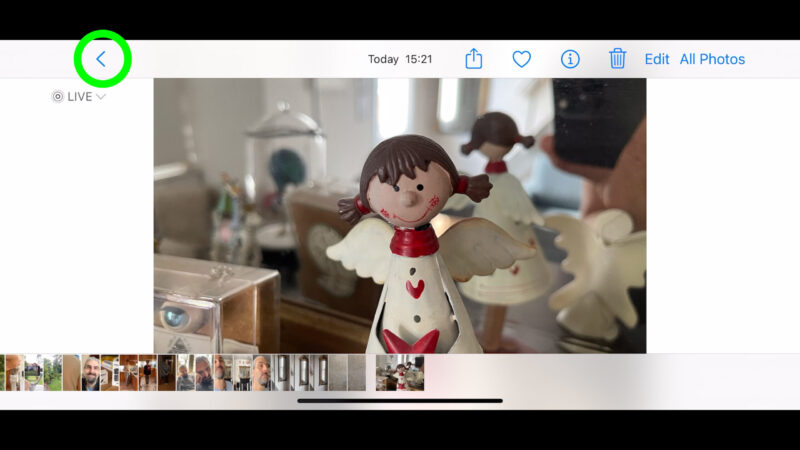
Whether you capture a photo or a video clip, it will now be stored in the media gallery. The media gallery is this square beside the record button. You will see the thumbnail here change after you captured some new media.
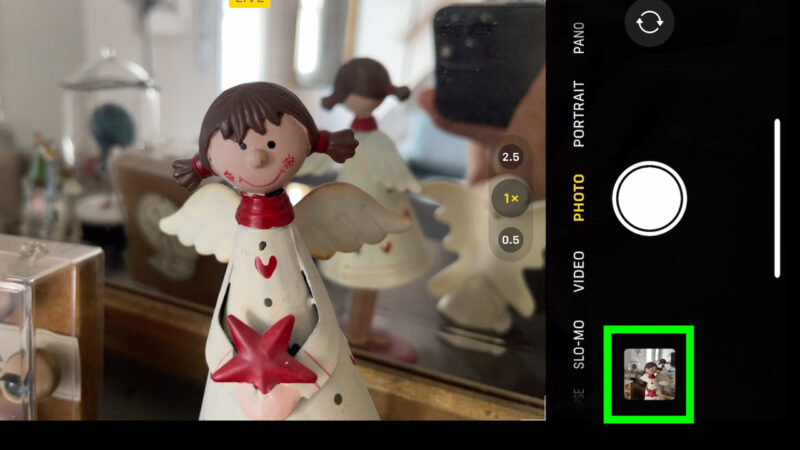
If you tap this, it opens up the gallery, which is in fact that Photos app I mentioned earlier. So this square button is like a shortcut from the Camera app to the Photos app. To quickly return to the Camera app, click the small arrow in the corner.
Delete iPhone Media
To delete media, open it in the Photo gallery and tap the trash can button.
But what if you accidentally deleted a photo or video which you wanted to keep? Don’t worry, when you delete media your iPhone just removes it from the gallery and stores it somewhere else, ready for properly deleting at a later date.
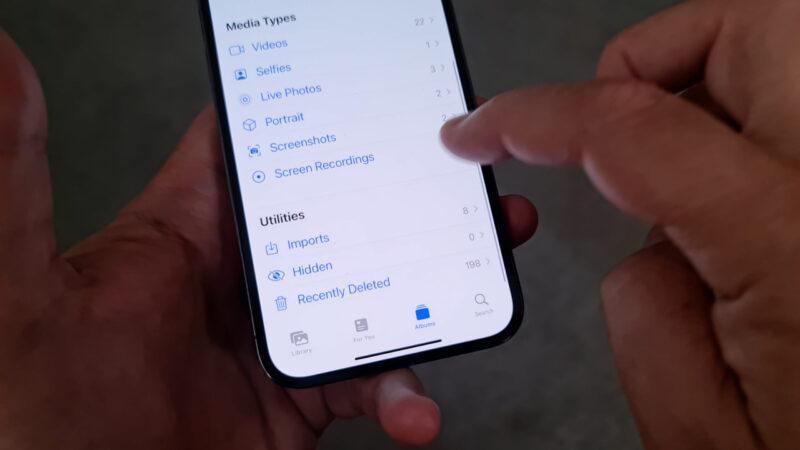
To restore deleted media, open the Photos app, click Albums, scroll to and click Recently Deleted, tap select, select all the media you want to put back and finally tap Recover.
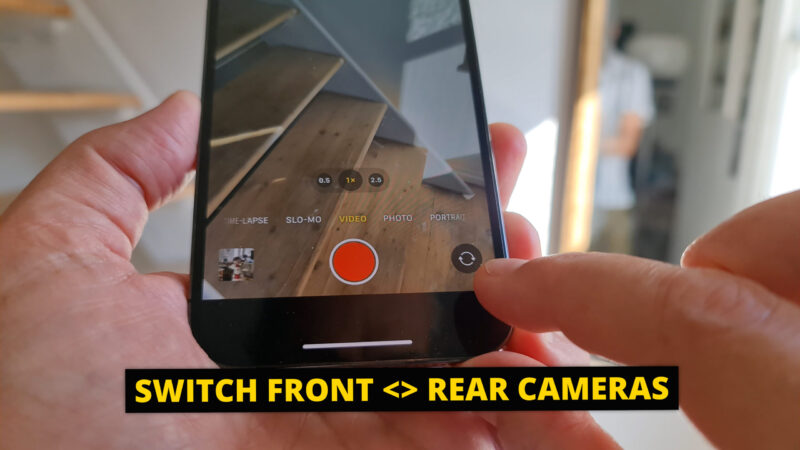
Switch Between Rear & Front Cameras
On the other side of the record is this circular arrows icon. Tap this to switch between rear and front facing cameras.
There’s various different ways you can set up your iPhone camera app but we’ll look more at that later. First, let’s look at the different cameras that come with your iPhone.
iPhone Cameras Explained
All iPhones now have at least 2 cameras. So whichever model you own, you will have at least 1 camera on the back of the phone – called the rear camera or cameras – and one on the front, the same side as the screen. This camera is often called the selfie camera.
A selfie is a photo or video you capture yourself of yourself, and any friends or family around you.
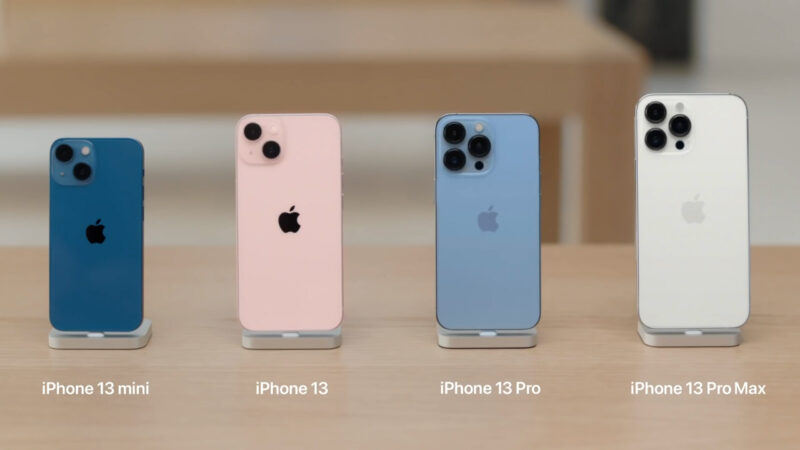
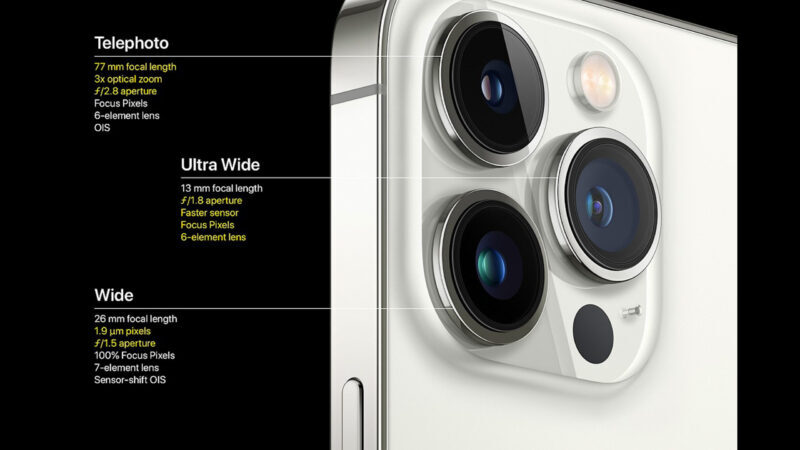
Depending on your iPhone, you will have 1, 2 or 3 rear cameras. Even a basic iPhone 12 or 13 has 2 rear cameras, while the 12 and 13 Pro or Pro Max have 3 rear cameras.
If your iPhone has 2 rear cameras, one will be the regular wide lens, while the other will be the ultrawide lens. If your iPhone has 3 cameras, the extra camera will be the telephoto camera.
In recent iPhones, all cameras have sensors with 12MP. That’s front and rear cameras, wide to telephoto. Megapixels is the number of pixels contained within the sensor area. More pixels gives you more detail, but that doesn’t necessarily mean better quality.
Using Different Cameras
The cameras on your iPhone provide you with a range of options when it comes to capturing photos or videos.
If you are capturing video for a project which uses a number of clips edited together, then it’s a good idea to make use of all the rear cameras available to you.
The wide, ultrawide and telephoto cameras each have a distinctive look. Try to use them to capture a variety of shots, with contrasting character. When you come to edit your video, using different looking shots enhances the overall feel of the finished work.
Main Camera
The main rear camera, which is really the default camera, has the best sensor and generally performs better, especially in low light. As well, the larger aperture and bigger sensor mean that this camera has the shallowest depth of field. In practice, that means the background is more blurred compared to the other cameras.
The main camera has a good balance in terms of field of view. But the biggest advantage is the superior performance of the sensor and the wider aperture.

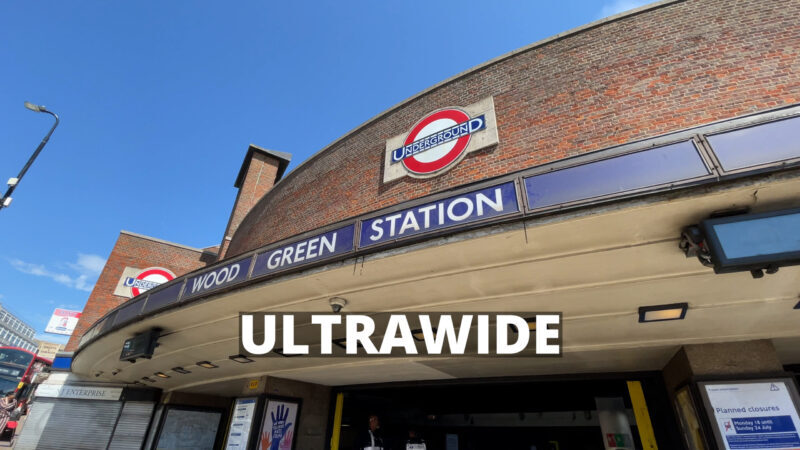
Ultrawide
The Ultrawide camera gives you an even wider field of view. For example, the iPhone 12 and 13 range of phones have an Ultrawide camera with a 120˚ field of view. By comparison, a GoPro Hero10 has a max field of view of 148˚.
Using the Ultrawide for photos or videos can make those images stand out. Put simply, the ultrawide makes things look different. This wide angle can make things look more epic; landscape views can look more magnificent, buildings can look more impressive.
Is the Ultrawide More Stable?
Normally, the physics of lenses dictates that the wider a lens is the less camera shake will be observable. And often you will get advice saying the ultrawide creates smoother video than the other cameras. But is this true?
Well, in fact, when using an iPhone 12 or 13 model, this is not true. This is because the main sensor has amazing stabilisation that the ultrawide sensor doesn’t.
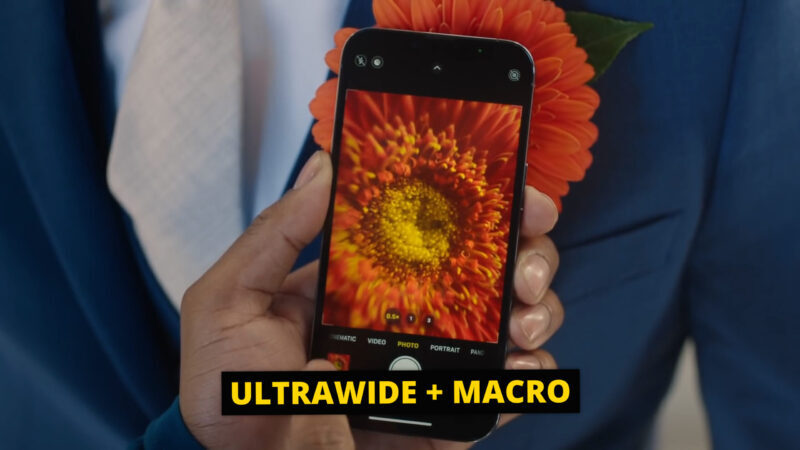
Macro
Now, if you have an iPhone 13 model or later, the Ultrawide camera is also a macro camera. This allows you to capture video and photos very, very close up.
The downside of the ultrawide lens is that you can get more obvious distortion in the image. At 120˚ we are halfway to that fisheye look, which doesn’t look natural. That’s not to say it’s wrong, because it can look cool if that’s the look you want.
That said, if you want to remove this distortion, go into camera settings, scroll down to Lens Correction and make sure it’s switched ON.
Telephoto
The telephoto camera is like the opposite of the ultrawide camera – it narrows the field of view. At the same time, it zooms in closer to the subject of the image you are capturing.
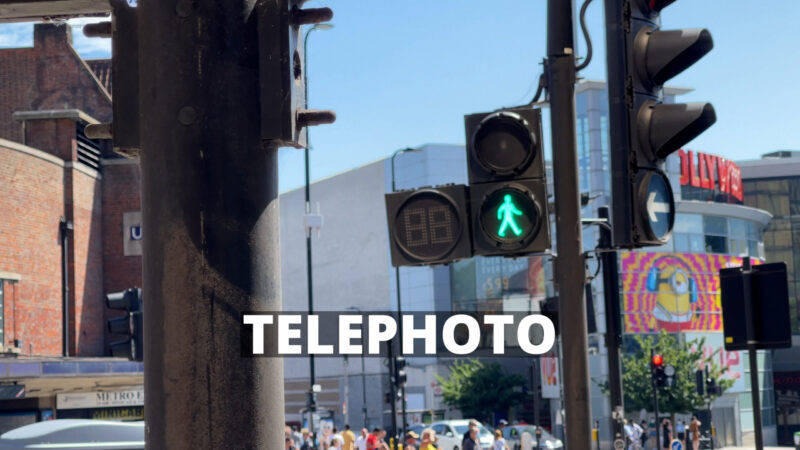
The telephoto cameras allow you to zoom in optically, which usually creates a higher quality image than zooming in digitally. For example, the iPhone 13 Pro telephoto lens gives you a 3x optical magnification which means the camera will show objects 3 times the size when compared to the main camera.
The telephoto lens allows you to examine objects closer without having to get physically closer. This is useful when you are filming a subject and you want to get a closer shot, but you don’t want to draw attention to yourself or put them off by getting too close to them.
When you are editing a video, close up shots really add value to your final work. Just like in life, if we find something interesting we want a closer look. Use the tele lens to pick out certain details that you want to show your audience.
The main disadvantage with the tele lens is that it exaggerates camera movement. But to minimise the shaky camera as much as possible, we can use a more stable grip.
How to Hold your iPhone Camera
When we are shooting video, it’s quite natural to hold the phone in our fingers. But this is pretty unstable and you are more likely to get shaky footage. Shaky footage is ok in the right context, during a fight scene for example, but even then some viewers will complain.
The easiest way to reduce shaky footage is to hold your iPhone camera more securely. There are different ways of doing this, but my method is to hold my right hand flat against the back of the phone. Using this grip, moving the camera around is still pretty easy but it’s much more stable.

iPhone Camera App Basics
Let’s go back to the camera app and look at some of the most important controls. Depending on your device, this screen can look a little different. But the essential controls should be the same.
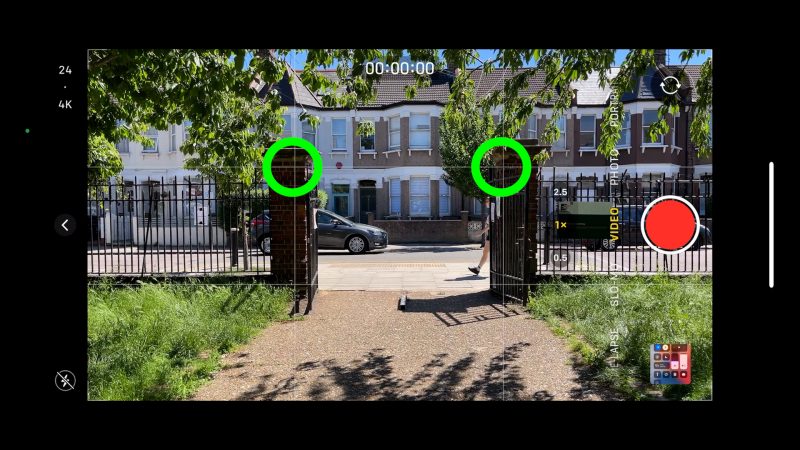
Beside the shutter button is a menu of shooting modes. Swipe left and right to select a mode or just tap on the name of the mode. You can also swipe left and right on the middle of the screen.
The most important modes are video and photo. Apple has cleverly put these in the middle, because all the modes on the video side of the menu are video modes, while all the modes on the photo side are photo modes. This makes it a little easier to navigate the modes.
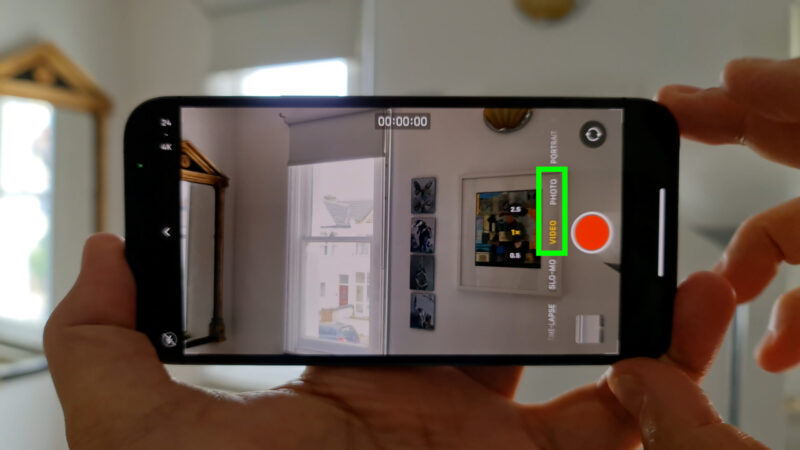
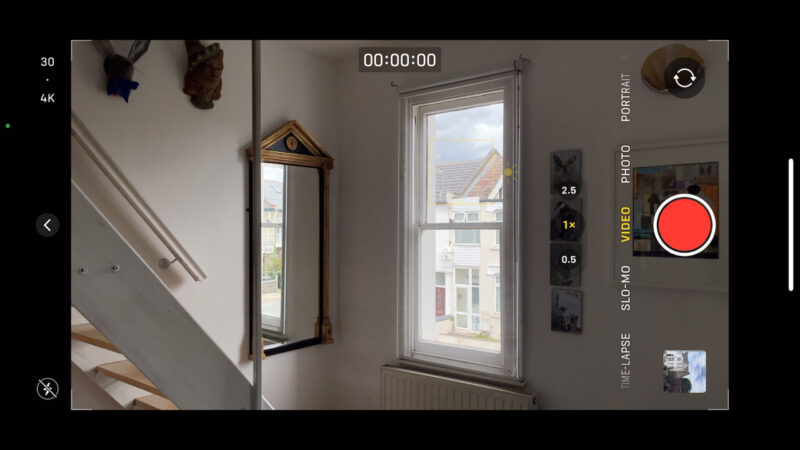
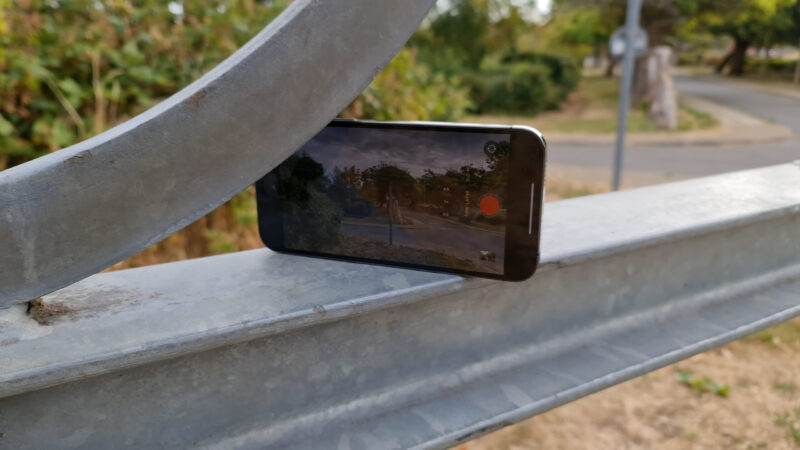
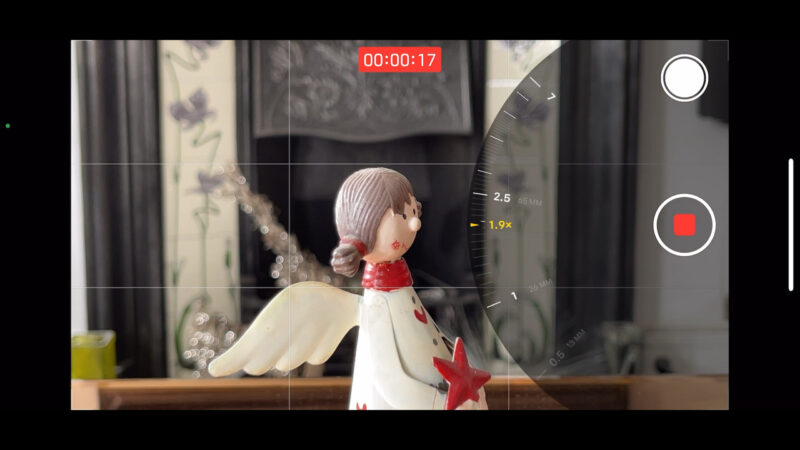
Next to the modes menu is the lens selector. In the middle is the main camera labelled 1x. Below is the ultrawide camera, labelled 0.5x. Above is the telephoto camera, in this case labelled 2.5x (because this is an iPhone 12 Pro Max).
Just tap to switch between cameras. If you tap and hold instead, you get a zoom wheel. Swipe up and down to zoom in and out smoothly. You can also change cameras while you are recording video, so you don’t need to stop recording to zoom in or out this way.
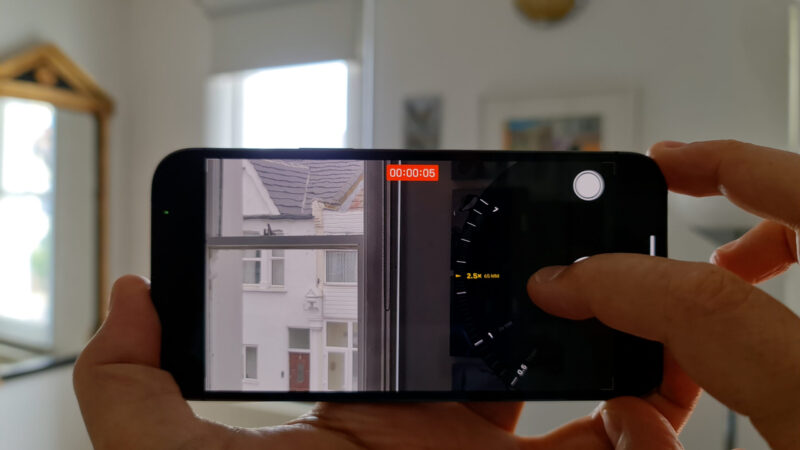
You will notice that on the iPhone 12 Pro Max you can zoom in beyond the 2.5 optical zoom. That’s because once you go past the 2.5 optical limit, the camera will zoom in digitally. When you zoom in digitally, you reduce the number of working pixels, which is why you start to see nasty artefacts appearing in the image if you zoom too far.
Personally, if I’m trying to capture high quality images, I never go beyond the 2.5 optical zoom.
iPhone Exposure & Focus
If you do nothing but hit the shutter button, the iPhone Camera app will set exposure and focus automatically. When you’re shooting a photo, auto mode will usually do a great job. But when you are shooting video, you are more likely to need to control these settings to some degree.
When objects move within the frame during the shot, or when you move your iPhone, exposure will keep adjusting. This can sometimes look a little messy, especially if you use longer takes. With short clips, for a fast paced montage for example, you can usually get away with auto mode.
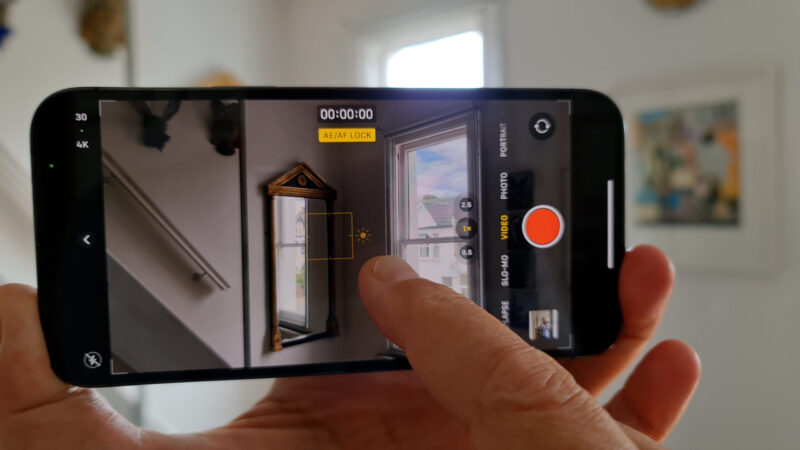
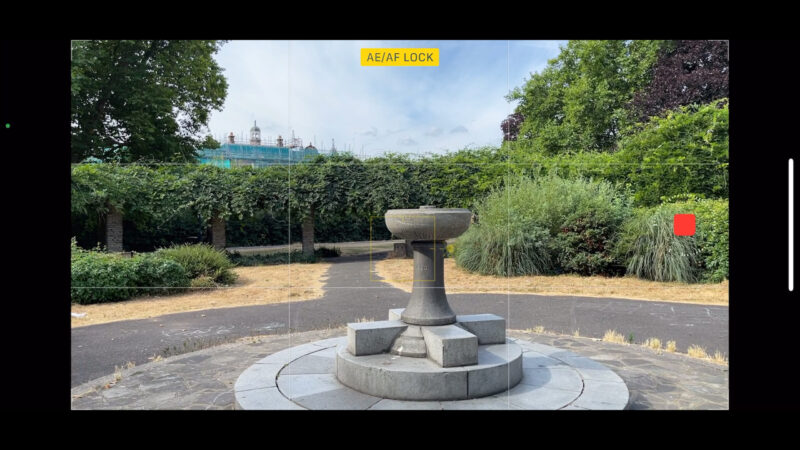
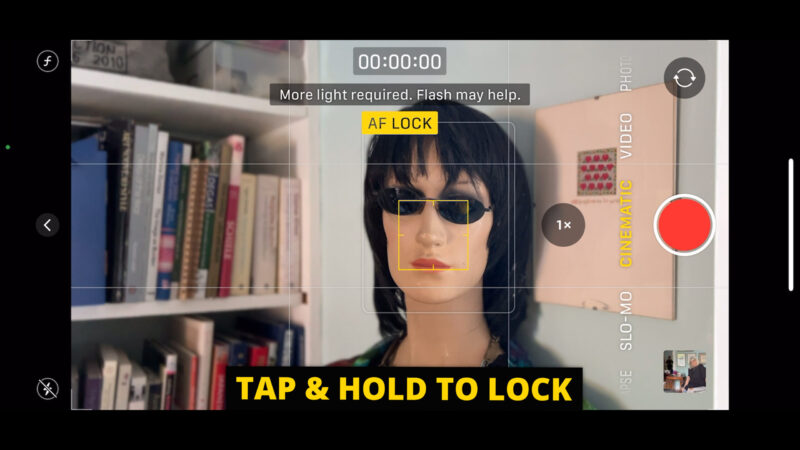
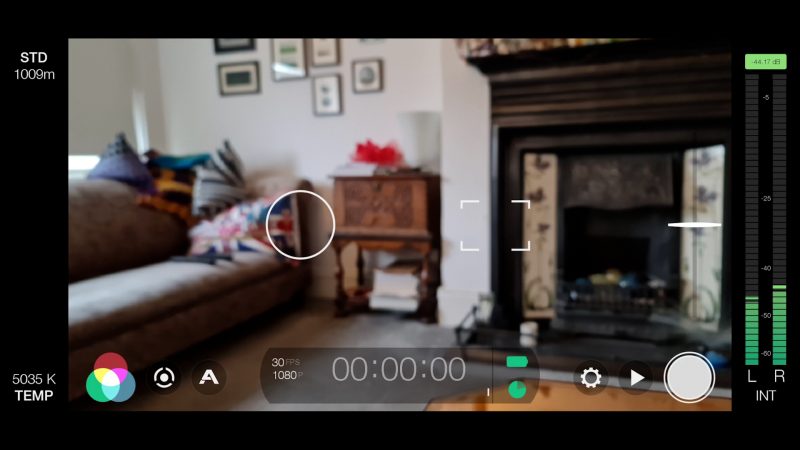
To lock exposure and focus with the Camera app, touch and hold on the screen until the yellow square makes this expanding and contracting movement. At the top it now says AE/AF LOCK. That’s Auto Exposure and Auto Focus.
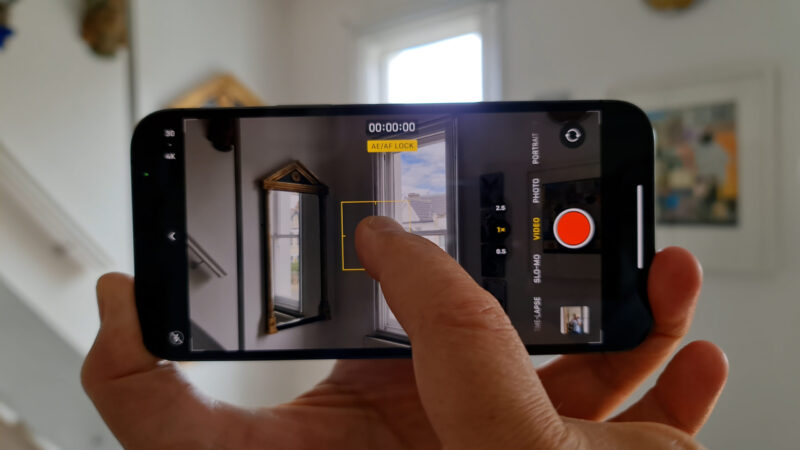
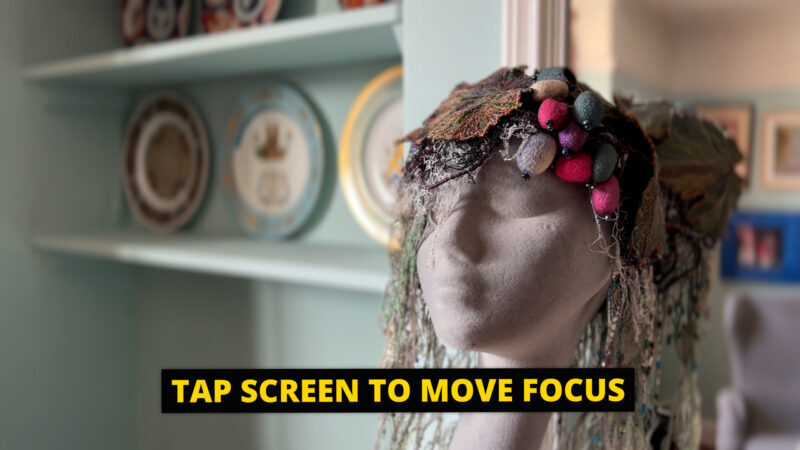
The Camera app uses the point where you touched the screen as a reference to set exposure and focus. So if I tap on the room, it will expose the room correctly. But if I tap on the window, which is brighter, it will set exposure and focus there instead.
Once locked, the yellow square is now constantly visible. At the side of the square is a sun or light symbol. If you drag this up and down you can adjust the overall exposure.
Now, when we move the camera around, the exposure won’t change. Or will it? Well, actually iPhones have a thing called dynamic tone mapping which means you can never fully lock exposure with an iPhone (unless you have a very old one).
iPhone Dynamic Tone Remapping
Recent iPhones have a reputation of producing a dynamic range rivalling professional cameras, which cost ten times and weigh ten times as much. So how does Apple achieve this?
The answer is that they use computational methods, and the main one is called dynamic tone remapping. Put simply, this process allows different exposure levels to be set for different areas of the frame.
Let me show you what I mean by using a smartphone with dynamic tone mapping switched off.
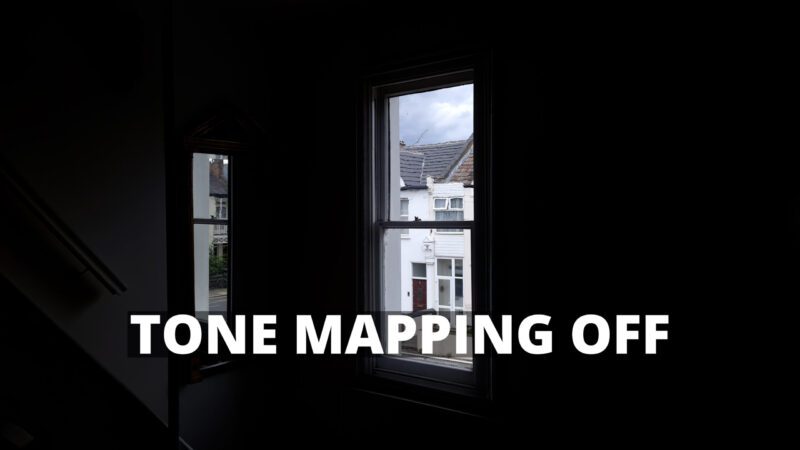
In Pro Mode on my Samsung, this process is completely disabled. If we look at this image we can see the windows are much brighter than the rest of the room. When I adjust the exposure for the windows, the room gets very dark. But when I adjust the exposure for the room, the windows become overexposed.
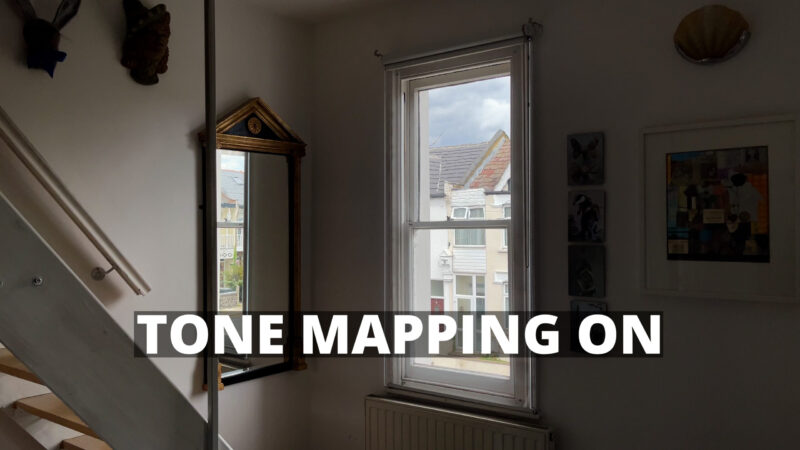
Now, if I switch the iPhone Camera app, if I tap on the window they now become exposed properly. But the room is also pretty well exposed. That’s because the Camera app is in effect setting exposure for the windows and the room differently.
And it’s because of this process, and because Apple has decided that it cannot be switched off, that you can never fully lock exposure using a modern iPhone.
This means exposure can continue to adjust even after locking, in certain circumstances. So, locking exposure will mostly remove exposure adjustments but not completely. But it’s locked enough that you might not notice it changing unless you look for it.
However, once you become aware of this process going on, you can actually use it to your advantage. While you can just forget about it and let the Camera app do the thinking, often you can do an even better job by helping it out a bit.
If I just start recording now, the window will be blown out. But if I tap on the window first, we prompt the app to use tone remapping to fill in the window. The room becomes a little darker, but to me this is a better looking image overall.
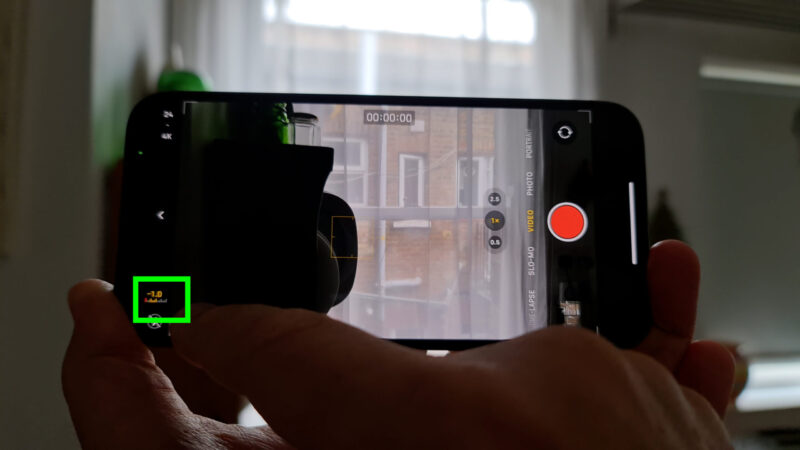
Exposure Slider
When you lock exposure and use the exposure adjustment slider by the yellow box, when you click away that adjustment is forgotten. If you want to keep this exposure adjustment, you can set it a different way.
Swipe on the screen away from the shutter button a little and it opens an exposure adjustment button – a circle with a plus and minus sign. Tap that and now use this slider to move exposure up and down.
In horizontal mode, we also have this little arrow which we can tap to open the exposure slider instead.
I’m going to adjust it down by 1 to minus 1. Now every video I record will have this -1 adjustment. What that means is the Camera app will set exposure automatically, but adjust it down.
In the corner of the screen, there is now an exposure adjustment indicator. This indicator tells you the exposure setting.
Apple says that this remains until the next time you open the camera, but I’ve found it’s still there even after I close and reopen the camera. However, I’ve also found exposure resets after you close the camera and wait a short while.
Horizontal or Vertical
Like every smartphone ever made, your iPhone can shoot horizontal video and vertical video. As you most likely know, just hold your iPhone horizontal or vertical, depending on what you want. In the app, you will see some of the settings rotating as you do so.
Now, you might find that you wanted horizontal video, but it’s come out vertical. That’s because when you press record your iPhone sticks to whatever mode it was in at that time. So when you open the video in the gallery, now you find it’s a vertical video.
But don’t worry, this is easy to fix. Open the video, tap edit at the bottom, tap the cropping icon (with 2 curved arrows), now tap the icon at the top: a square with an arrow. Keep tapping until the video is the way you want it.
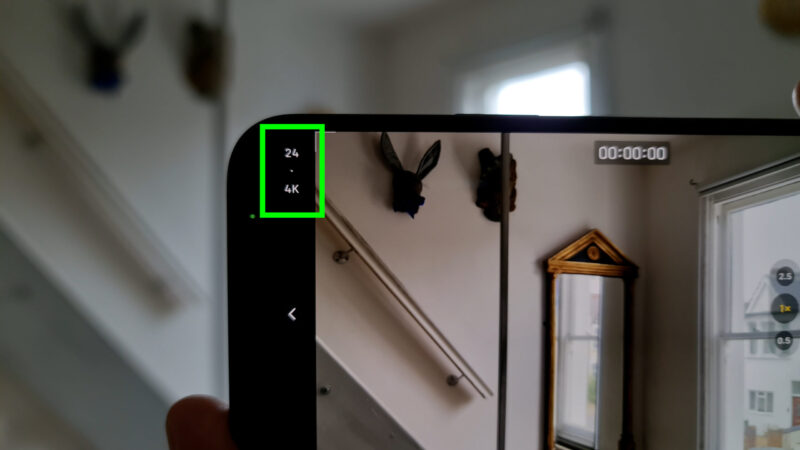
Resolution & Frame Rate
When you’re going to be editing video clips together, and you want it to look polished and professional, pretty much the most important settings are resolution and frame rate.
In the corner of the app, you can see the resolution and frame rate the app is currently set to. Right now it is 24 frames per second and 4K. You can tap these to change them. With this iPhone I can go up to 4K at 60fps.
These days, I rarely shoot anything in a lower resolution than 4K. Even if you intend to output at a lower resolution, starting higher will mean you will end up with something better looking. This is all down to video compression applied at various stages of shooting, editing and uploading a video to a platform like YouTube.
Put simply, quality gets eroded during this process. But if you start with more quality, you will usually finish with more quality.
Grid
Go into camera settings and scroll down to find this one called Grid. If you toggle that on, go back to the camera app and now you will have 4 lines crossing the screen, vertical and horizontal. These are guides which help you compose a frame.
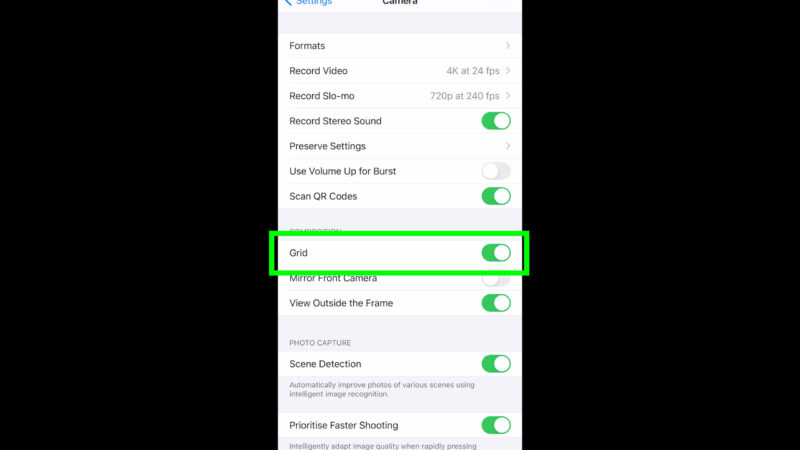
In art and photography, there is a method of creating a composition called the Rule of Thirds, which is related to something called the Golden Ratio. And that’s what this grid is about.
One way to use the grid is to use the middle box to centre things. This can be useful when shooting a hyperlapse, for example. Or if you just want to make sure your frame is perfectly symmetrical.
Another way to use the grid is to place important objects on the intersection of the lines.
Basic Photo mode Controls
Swipe away from the shutter button to reveal a menu of buttons. Swipe to reveal yet more buttons.
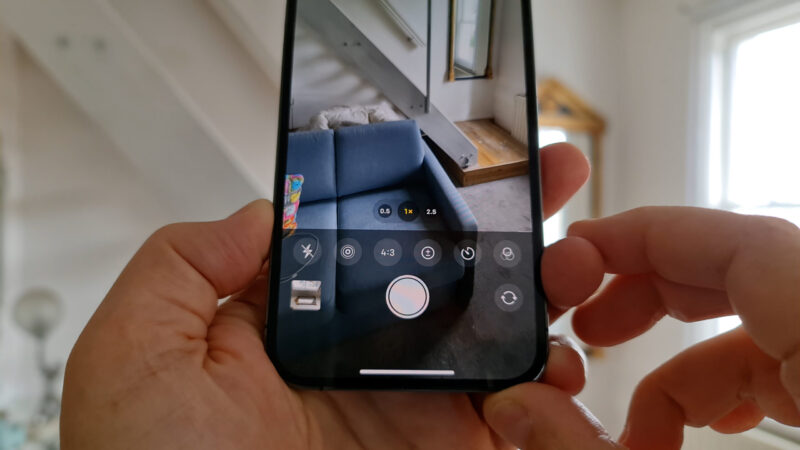
The first button switches the flash between auto, on and off.
Next button switches Night mode on and allows you to set the amount of time the mode uses for each photo.
Then this button switches Live photo between auto, on or off. A Live photo is actually a very short video clip. This allows you to choose the exact frame you want later as well as add other effects like a slow shutter effect.
Next button allows you to choose the frame ratio.
Then this button allows you to adjust exposure up and down.
Next button switches Timer between off, 3 seconds or 10 seconds. Press the shutter and get a delay before the camera takes a picture.
This button allows you to add a preset colour filter.
Finally, here you can switch on or off RAW photos.
Why is My iPhone Video Overexposed?
Have you shot some video and when you open it in the Photos app it looks great only to find that when you edited the video, the footage suddenly looks very different and very wrong?
If you have a recent iPhone – any model since the iPhone 12 – these devices have the capability to shoot a format called Dolby Vision. This format adds extra dynamic range to the video. But to view this format correctly, you need a monitor which supports it. And to edit this format correctly, you need to set your editing software’s colour space correctly.
The problem is, for all iPhones since the 12, Apple has set this to the default video setting. So if you just take your iphone out the box and start shooting video, you’re shooting Dolby Vision.
Why has Apple done this, when this format is not universally compatible? Well, my guess is because it looks beautiful on your iPhone. Any Apple product made since the iPhone 12 is going to be compatible with Dolby Vision.
For example, on my 2020 iPad I can view Dolby Vision in all its glory. On my 2020 MacBook Air I can view Dolby Vision. YouTube even supports Dolby Vision. Perhaps your TV supports it too.
The problem is, if you want to show your video to the masses, there’s a question mark around whether they will be viewing it wrongly, and it has this overexposed look.
For this reason, most people are not shooting Dolby Vision with their iPhones, except by accident because it’s the default setting.
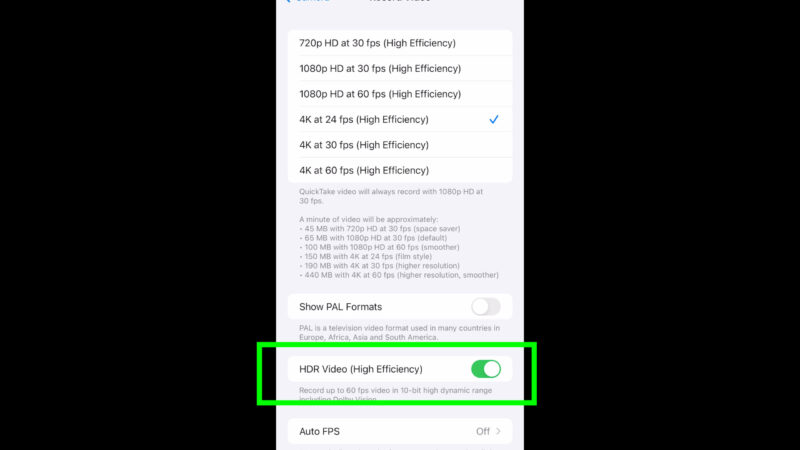
To turn this off, go into settings, camera settings, record video, and then toggle off HDR video.
Now that we’re here, we may as well look at some other camera settings.
Camera Settings
In this same screen, at the top we have all the resolution and frame rate combinations available. One thing you might notice here is that there are 2 different HD settings. One is 720 and the other is 1080. That’s because there are 2 official types of high definition video.
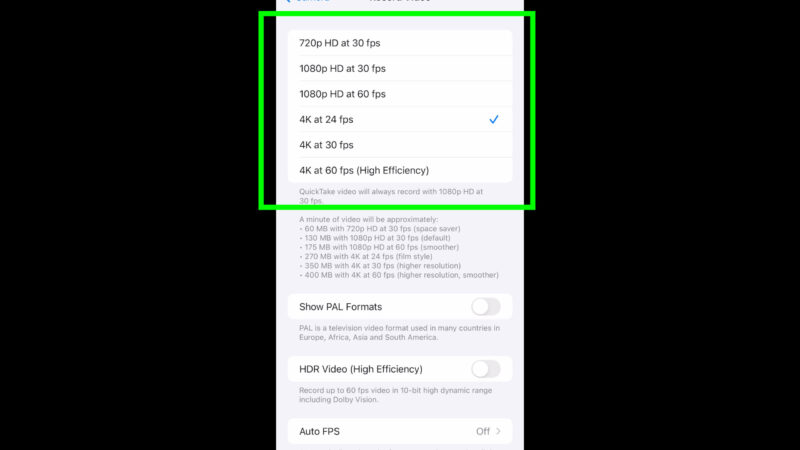
So 720 HD is known as Standard High Definition, whereas 1080 HD is known as Full High Definition. And this number refers to the height of a horizontal video. Meanwhile, 4K horizontal video is 2160 pixels high.
Your iPhone will shoot a horizontal 16:9 ratio by default, which means you will get 1280×720, 1920×1080 or 3840×2160 at 4K.
For reference, an old DVD video plays standard definition video which is only 720×480 pixels, which gives you some idea of where we’ve come with our smartphone cameras.
If you tap one of these combinations, you get a tick beside it. This now becomes your default video setting. So when you open up your camera, it will automatically be set to this combination. Of course, you can change this in the app, as I showed you.
I have this set to 4K and 24fps. 24fps is the standard frame rate for movies and dramas on TV. If professionals want that cinematic, film look, they will shoot and playback at 24fps.
For slow motion, my personal preference is to shoot 60fps. So I will play back those 60fps clips at 24fps, which is exactly 40% of the speed.
Below these settings is a little hint guide. Obviously there’s a lot more to learn about frame rates and resolution, which I talk about in my ebooks and video lessons on Patreon, if you want to go deeper.
PAL
Below that we have the show PAL formats setting. Put simply, if you toggle this on you will now get a 25fps option. Why might we want to shoot at 25fps?
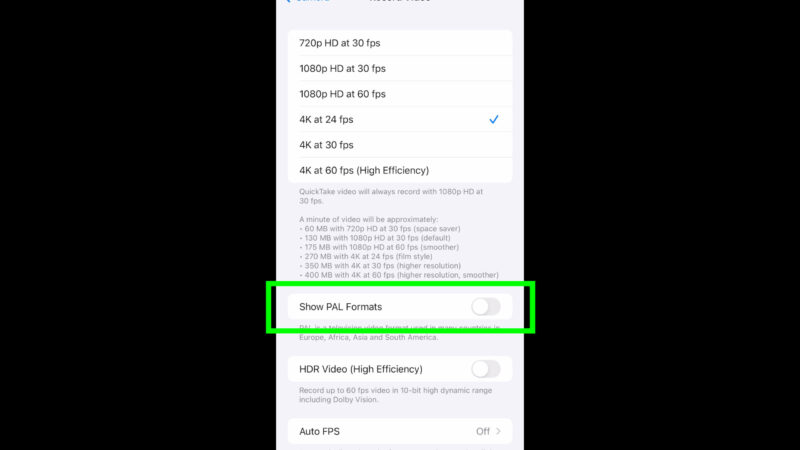
25fps is the standard frame rate for TV in certain regions of the world. As you can see here it says Europe, Africa, Asia and South America. When might you need to shoot 25fps?
One reason is if you need to deliver a video in 25fps to a client. For example, a TV company in one of those regions listed. And the reason 25fps is used in these regions is to do with strobing of artificial light. If you notice that lights are flickering or strobing, you can try shooting at 25fps.
Personally, even though I live in Europe I don’t usually shoot at 25fps. Because frame rates of 24, 30 and 60 all fit together nicely when editing. Again, if you want to go deeper into this, you can join us on Patreon.
iPhone Auto FPS
The setting below allows us to toggle on an Auto frames per second feature. With this on your video will be shot at 60fps unless there is not enough light. In which case, it will automatically switch to 30fps.
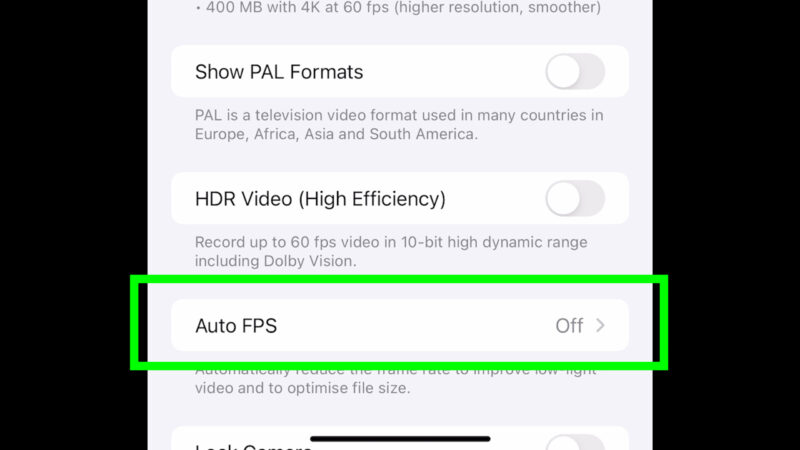
For me, this is what I would call a “home movie” setting. It’s good if you don’t want to think about frame rates, but personally I want to set frame rates myself. Different frame rates have a different quality, so if you are editing clips together you might get a noticeable change in quality as you switch between 30 and 60fps.
Lock Camera
This final setting stops the camera switching lenses automatically. Again, it’s another “home movie” setting. If you are shooting video and your iPhone decides to switch lenses in the middle of the take, it looks ugly and unprofessional.
That’s why I have this setting enabled.
Let’s go back out of this screen and look at other important camera settings.
Formats
If we click on Formats, here we can choose between High Efficiency and Most Compatible. The top option is more advanced and is the latest version, which uses less storage space. The down side is possible compatibility issues.
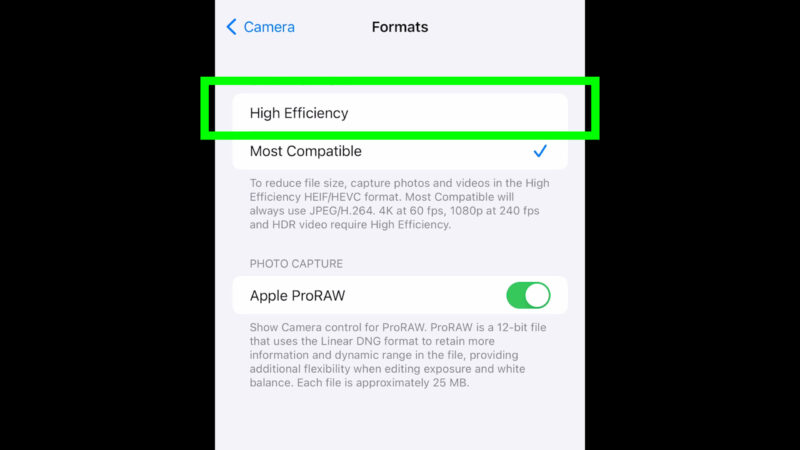
There’s no separate option for video and photo, so if you pick High Efficiency you will get h.265 codec videos and HEIF photos. If you pick Most Compatible, you will get h.264 videos and jpg photos.
These days, I have this set to High Efficiency because I have a fairly recent laptop to edit on with updated software. Note that if you shoot in Dolby Vision, it has to use High Efficiency.
Lastly, you can toggle on Apple RAW photos. This format retains a much larger amount of colour information but also creates bigger files. But it’s good if you want to work on the colour of your photos later.
Apple ProRes
If you have an iPhone 13 or later model, you will have the option to choose to shoot video in Apple ProRes. This is a professional video format which preserves more detail and colour information than the h.264 or h.265 formats normally used.
The big advantage of this codec is when it comes to colour grading, as you should be able to adjust the image further before you start getting artefacts. Another advantage is your editing system will usually have an easier time with ProRes compared to the more compressed codecs.
The big downside of this codec is the huge file sizes.
In my opinion, I would only use this codec if the project really demanded it. Otherwise, the inconvenience of the file size is not worth what to my eyes is only a minimal quality improvement.
Record Slow-mo
In the camera app, if we swipe along from basic video mode we get slow motion video mode. If you have an iPhone 13 model or later, you will also have Cinematic mode here.
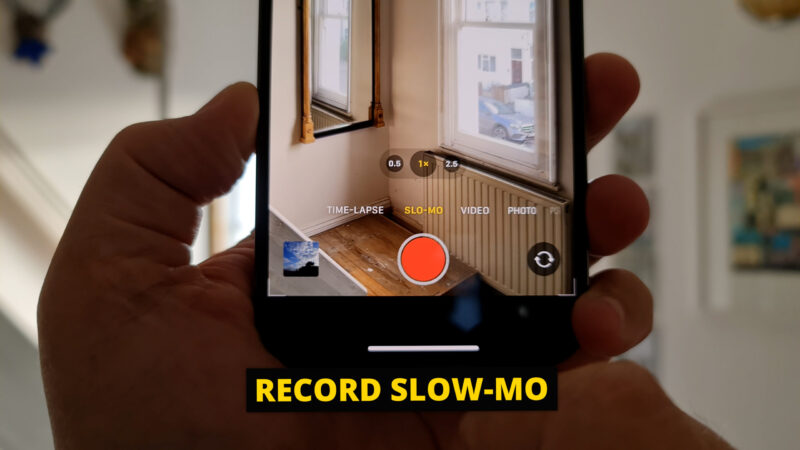
Using slow-mo mode means the camera will record video at a high frame rate and then play it back at a slower frame rate, in this case 30fps.
If your model of iPhone is capable, you will find you have 2 recording speeds. Back in camera settings, we can find Record slow-mo, tap that to open up options.
When I have the format set to Most Compatible, I have 3 slow mo options: 1080p HD at 120fps, 720p HD at 240fps or 1080p HD at 240fps. The last option will automatically record in the High Efficiency codec.
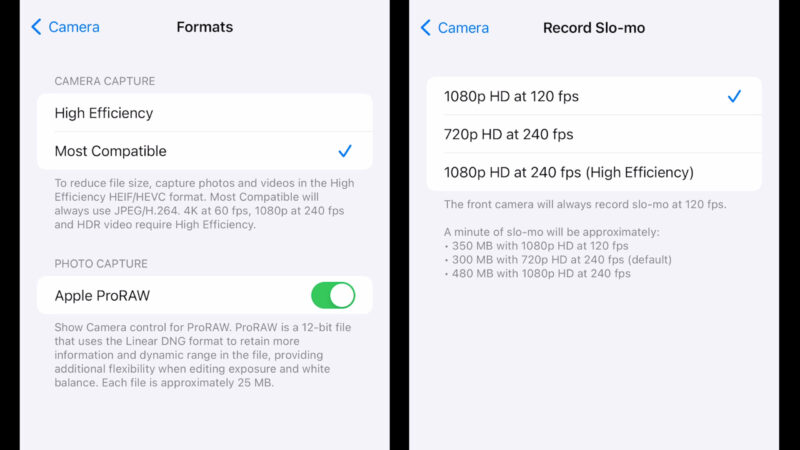
But if I have it set to High Efficiency, then I have 2 slow mo options here.
240fps slowed to 30fps will be twice as slow as 120fps slowed to 30fps. Whatever you select here, you will get when you switch to slow-mo mode in the camera app. But again you can switch this setting within the camera app itself, as we do in normal video mode.
Personally, if I want to shoot slow motion I will just use the 60fps option and slow to 24 or 30fps. For me, the 120 and 240 options are more extreme than I usually need, plus I really like to have 4K video.
But there are times when you really want that very slow slow-mo. When you play back your slow-mo video, you might notice that the slow-motion effect does not start immediately. If you want this to start immediately or at a different point, you need to use the edit function.
Editing Slow-mo
Open the video in the gallery, tap edit.
Below the video you can see 2 timelines.
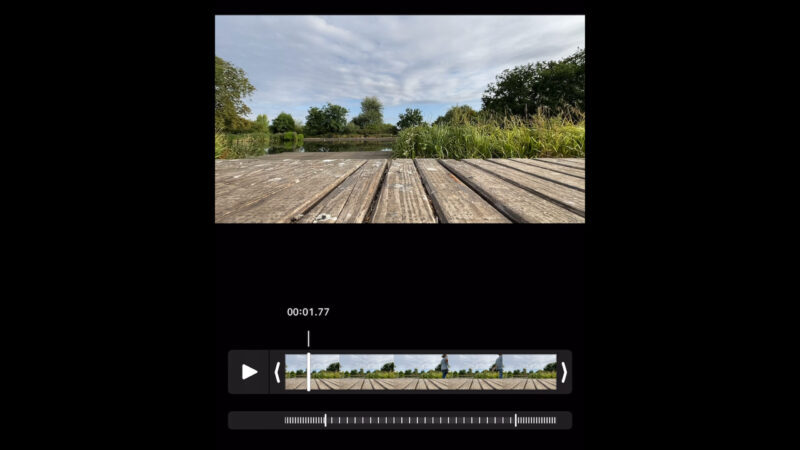
The top one you will see when you edit any video. This one allows you to trim the ends. Slide the ends to where you want the video to start and stop and then click done.
The bottom timeline shows you where the slow-motion effect starts and where it ends. All you have to do is slide the start and end points to where you want them and then click done.
You can either save as a new clip or save over the original clip. Unless you know you have the edit exactly as you want it, it’s usually best to save as a new clip that way you get to keep the old clip in case you want to change your edit or create more than one new clip from the original clip.
So this can be used to create that speed ramp style effect, where the slow-motion only kicks in at a key dramatic point in the video. It might be when a tennis player strikes the ball or when a skateboarder performs a trick. You get the idea.
iPhone Time-lapse
The final video mode within the iPhone camera app is called time-lapse. You can think of this like the exact opposite of slow motion. A time-lapse is fast motion with any movement speeded up.
Usually, a time-lapse feature allows you to choose how fast you want to speed up time. In my Samsung, the time-lapse feature allows you to choose different speeds: from 5 times faster to 45 times faster.
However, the iPhone does this differently and it’s actually quite clever. As you can see, there’s a record button and a camera selector and that’s it.
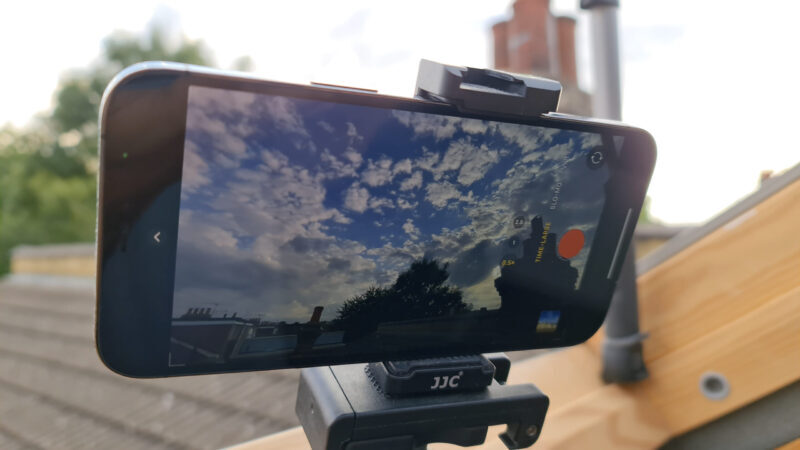
Basically, Apple wants to make shooting time-lapses as simple as possible. They’ve made it so all you have to do is press record and let the iPhone do the thinking. No matter how long you record for (within reason) the iPhone will output a 30fps video between roughly 20 and 40 seconds long.
So what they’ve done is use the length time you record for to decide how fast to speed things up. The longer you record the more your iPhone will compress time to fit into a 20 to 40 second clip. When you think about it, it makes sense.
For example, if you record for 5 minutes you will get time speeded up 15 times faster than normal. If you record for 10 minutes, you will get a video going 30 times faster. I actually found a cool little online calculator which lets you see how your iPhone is calculating things.
If you want to record a time-lapse you will need to mount your iPhone to something steady. A tripod would be best, but you could also rest your iPhone somewhere. If you hold it in your hands, you will get a messy time-lapse.
You can get very cheap mini tripods for smartphones, which fold up very small. Or simply add a clamp to a regular camera tripod.
Another tip is to lock exposure before you start recording, by tapping and holding on the screen until it’s locked. For example, if you want to record a sunrise time-lapse, you will probably need to lock exposure and then pull it right down to allow for the sun to rise, which will obviously be brighter.
Recording a sunset time-lapse is easier because it’s getting slowly darker, which creates a nice fade out look.
If you don’t lock exposure, then each time the iPhone captures a new frame, it will reset exposure. So this can make your time-lapse look less smooth.
iPhone Hyperlapse
Another use for this feature is to shoot hyperlapse videos. The difference between time-lapse and hyperlapse is that with time-lapse your camera is motionless, whereas with hyperlapse your camera moves.
Hyperlapse shots can be captured when you’re walking, riding a bike, driving a car or some other method of travel. For a walking shot, use the steady grip method and move at an even pace.
These shots look more interesting if you have interesting buildings around you or people moving around. Basically, you want your audience to have something to look at.
As you are moving along, try to keep the camera aimed at something to stop it wobbling around too much. If you switch the grid on, that will help you. If you have a cool landmark you can circle round it, by placing it in the middle of your grid.
How to Use iPhone Shutter Button
As we’ve seen you can simply tap the shutter button to capture videos or photos. But it can also be used in other ways. One of those features is called QuickTake Video.
How to Shoot iPhone QuickTake Video
In Photo or Video mode, tap and hold the shutter button. While you are holding down the button, the Camera app starts recording video. Lift your finger to stop recording.
A padlock icon appears to the side of the shutter button. Slide across to the padlock and the Camera app will continue recording video, as if it was in Video mode. Just tap the shutter button to stop.
The downside of shooting video this way is that you will always get 1080p at 30fps video. There’s no option to change settings. If you want high quality video, you need to switch to Video mode.
2 Shutter Buttons
By now, you’ve probably noticed that when you start recording a video, a 2nd shutter button appears. Tap this to take a photo. This means you can capture videos and photos at the same time.
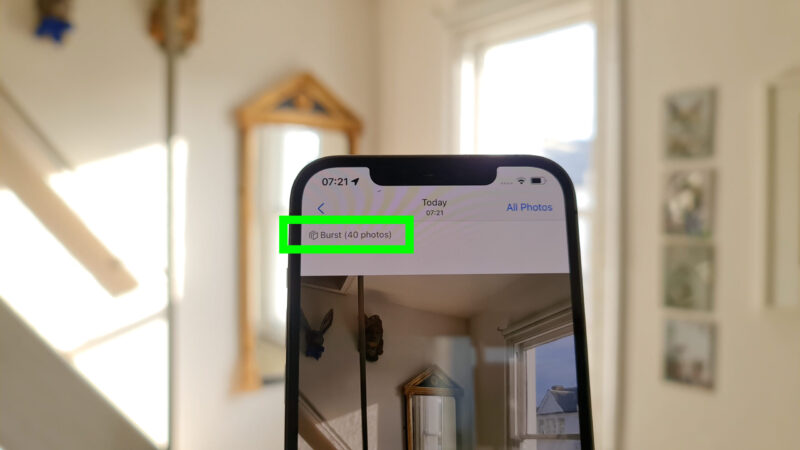
Burst Mode
Burst mode allows you to take lots of photos one after the other very quickly. Instead of tapping the shutter, swipe it to the side. As long as you hold it, it will keep taking photos.
This is good for a variety of situations, like sports or events for example.
Open the photos you just took in the Photos app. Each burst of photos is kept in one place. At the top, it says burst and how many photos you took in that burst. Click Select and now you can browse the photos within that burst and select the ones you want to keep.
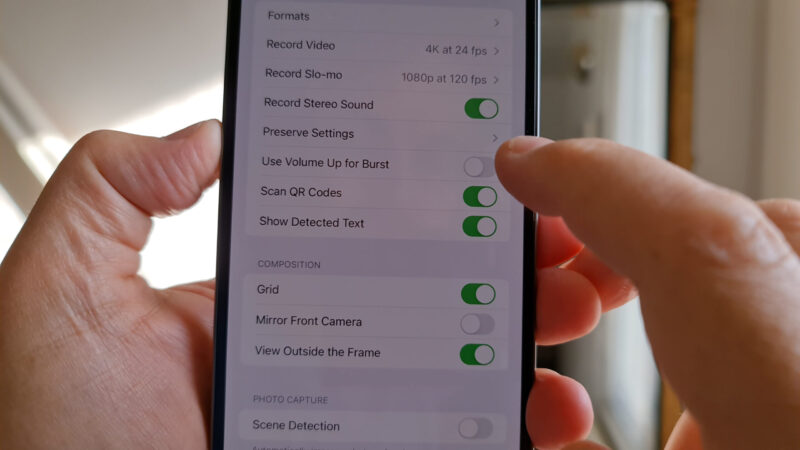
Volume Shutter Buttons
When you have the Camera app open, the volume buttons of your iPhone act as shutter buttons. So you can use them to take photos or start and stop video recording.
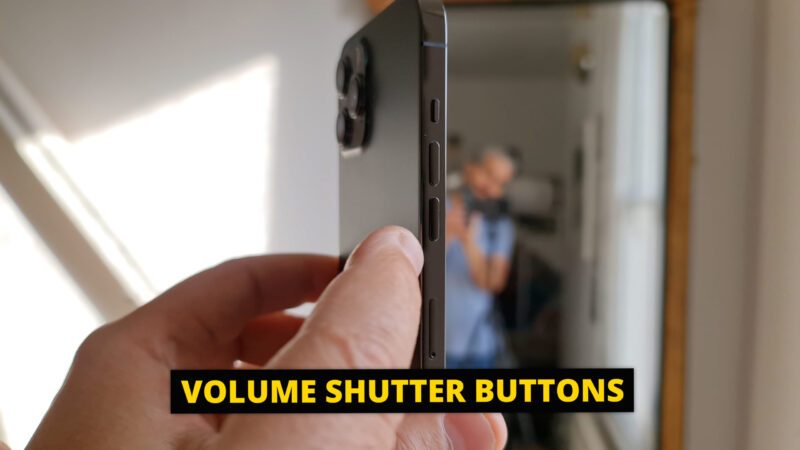
If we go into Camera settings, we can toggle on Volume Up for Burst. Now the top volume button will start your Camera app shooting photos in Burst mode. Just hold down for as long as you want. The number tells you how many photos you’ve taken.
How to Shoot iPhone Cinematic Mode
If you have an iPhone 13 or later model you will have the option to shoot in Cinematic Mode. This mode adds a fake blurry background to your image. What we might call a bokeh effect.
If you’ve watched movies or seen professionally shot photos, you will probably have noticed the background is very out of focus in some shots. This is a great way to create separation between the subject and the background, especially when we want people to focus on the subject without getting distracted.
Normally, to create this effect takes 3 things – a large aperture, a large sensor and a long lens. All of these things are pretty much impossible in a smartphone.
At the moment, this mode is not 100% perfect. it does quite a good job, but you will see strange blurry artefacts in places, especially things with lots of fine detail like hair.
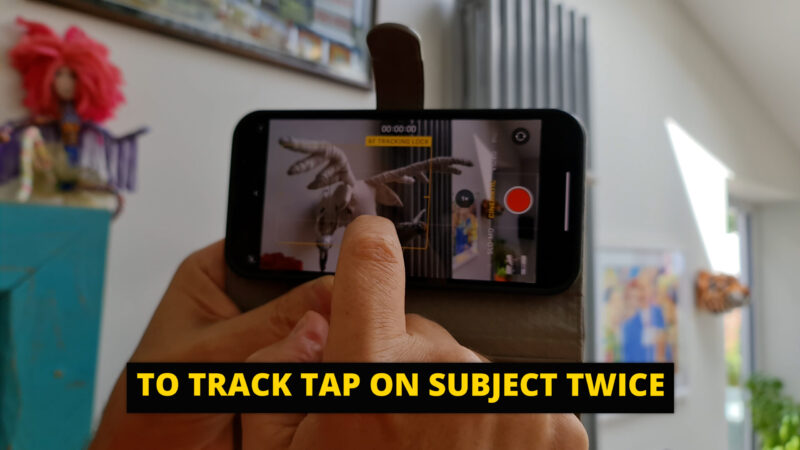
This mode allows you to lock onto a subject to track them, then try to keep that subject in focus. You can also lock exposure and focus like in regular Video mode. You can also adjust the f number, which represents the aperture of the lens. The lower the number, the bigger the aperture it’s trying to mimic and therefore the blurrier the background will be.
You might find you get the best results by avoiding a very blurry background. If you just add a little bit of blur, the places where the computational effect does less well, like around the hair, will be less obvious.
Another downside of the Cinematic mode is being limited to 1080p HD and 30fps.
How to Shoot a Dolly Zoom Shot with an iPhone
Here’s a fun trick you do with the zoom wheel. The dolly zoom is shot which has been around in cinema for decades. If you get it right, the subject remains the same size while the background expands or contracts.
To achieve this shot, simply zoom in on the subject while you move away from the subject. Or zoom out while you move towards the subject. It takes a bit of practice to get right, but it can be a fun shot to get and use in your edits.
Everything I’ve talked about so far can be done with your iPhone straight out of the box. But if you really want to improve the quality of your video, you should think about buying a camera app which gives you more control.
iPhone 3rd Party Camera Apps
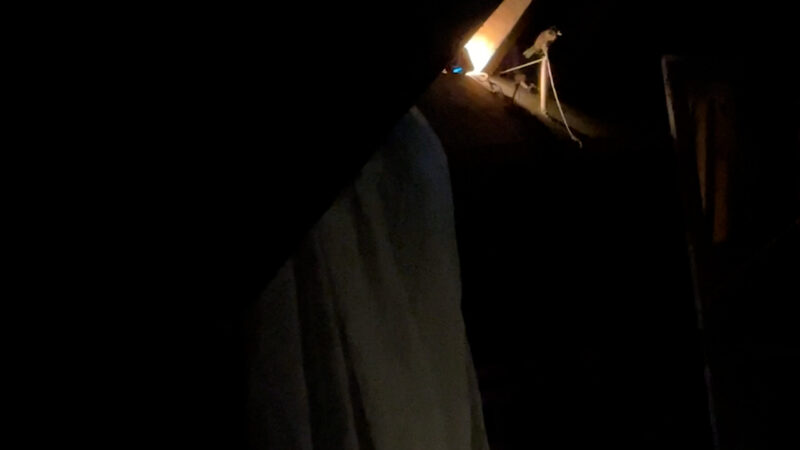
This is a video clip I shot for a documentary I made using smartphones. This frame was captured in low light and if I zoom in you can see there’s a lot of ugly noise in the shadows.
Now here’s a frame from similar clip, but this time I used an app called FiLMiC Pro. If I zoom in, you can see there’s much less noise in the shadows.
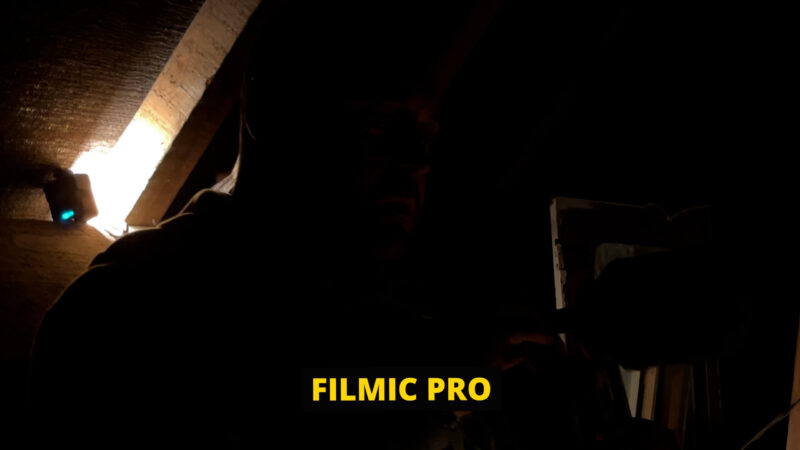
So using this app I was able to shoot higher quality video with my iPhone for my documentary. The film is called Hobgoblin – The Making of a Smartphone Filmmaker and it’s available to watch for members on my Patreon.
There are other apps with similar features to FiLMiC Pro, but I still prefer this app. Well known feature films like Tangerine, Unsane and High Flying Bird have been shot using this app.
The app gives you controls similar to those that you get using a regular camera. The one thing that is missing is aperture control, because iPhones (and nearly all smartphones) have a fixed aperture.
Using FiLMiC Pro you can set and lock your shutter speed, for example. Shutter speed has an effect on the appearance of your video, so that fast shutter speed makes your video look less smooth. The problem is, that even if we use an app like FiLMiC Pro, in bright conditions we cannot reduce our shutter speed enough for smooth looking video.
How to Shoot Smooth iPhone Video
One option for smoother video is to shoot at 60fps and playback at 60fps. The problem is video played back at 60fps can look less cinematic and more digital looking. Another problem is that 60fps causes more problems in low light situations.
Why can’t we just switch between 60fps, 30fps and 24fps depending on the light? Because we’ll have problems when we come to edit those clips together. If you join my Patreon you can download my ebooks and video lessons, which go into all this in more detail.
Another option for reducing shutter speed in bright conditions is to use an ND filter. There’s all kinds of options for adding an ND filter to your iPhone. Companies like Moment, PolarPro and Sandmarc make various products to use with your iPhone.
iPhone Camera Photo Modes
Apart from regular photo mode, there’s 2 other photo modes. Portrait and Pano.
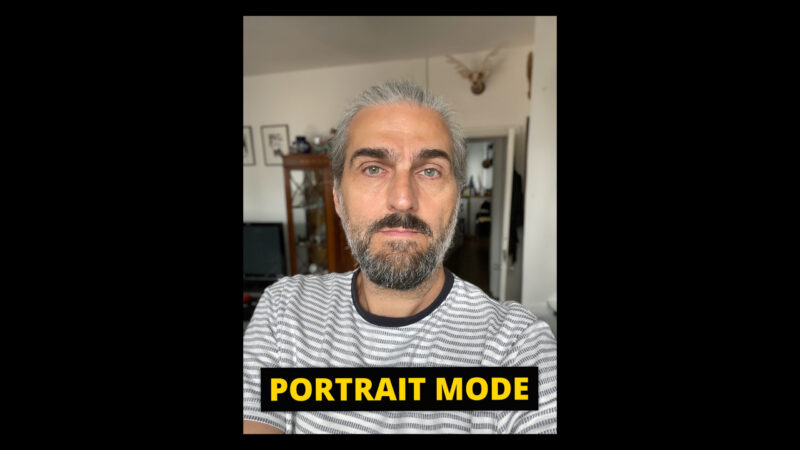
Portrait mode
In portrait mode you can create a fake blurry background in your photos. The app analyses the image and tries to work out where the subject is and then blurs everything behind. Portrait mode for photos tends to look better than Cinematic mode for video, because it’s only capturing 1 frame.
In Portrait mode you can use the main camera, the front selfie camera and the telephoto camera. The rear camera lens picker is now in the corner.
In the middle you can choose the type of portrait effect you want to apply. Tap and hold to bring up a wheel which you can use to select the desired effect.
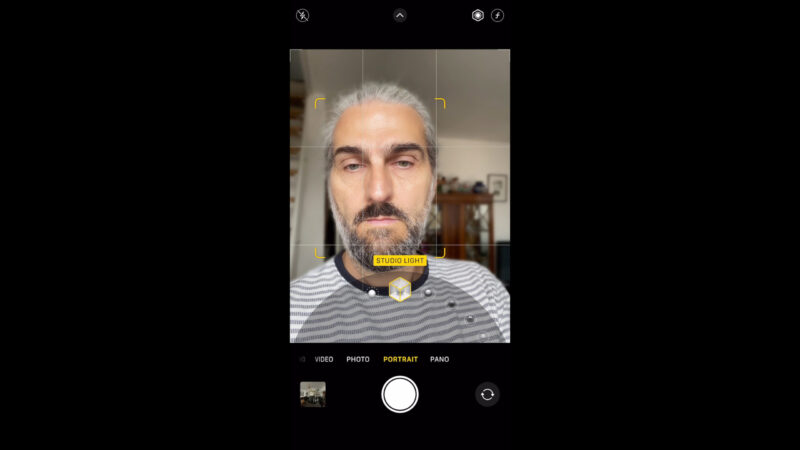
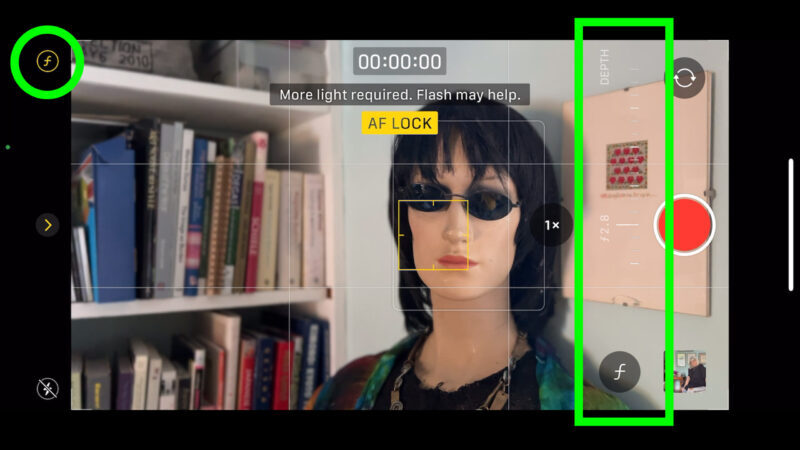
If you are trying to add a blurry background but you think it looks a bit too fake, try reducing the F number. The f number refers to the control of the size of the aperture in a regular camera. Your iPhone has a fixed aperture, so this is all done by computational methods.
Tap the F in the corner and swipe here to select the amount of blur. The lower the F number the more blur will be applied. You can also get to this by swiping away from the shutter to bring up the effects menu and tapping the F.
You can also adjust this F number you have taken the photo. Open the photo in the gallery, tap edit, tap F and swipe as before. Now tap done.
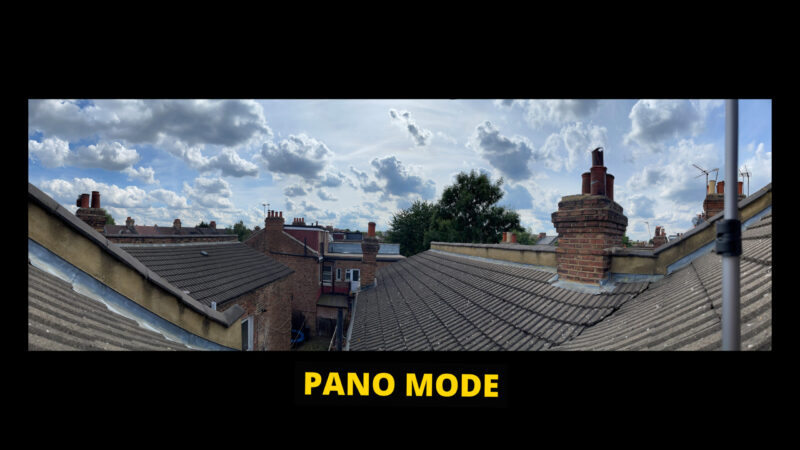
Pano mode
In Pano mode you can create very wide panorama photos. Great for landscapes and other situations where you want to capture a wide vista.
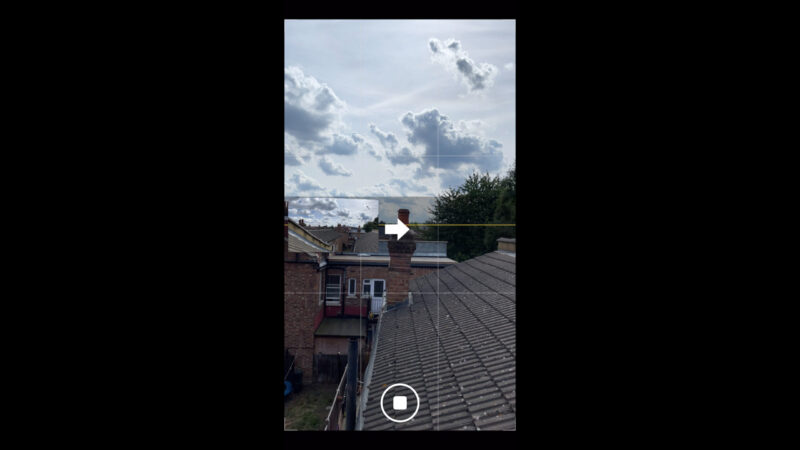
Hold your iPhone vertically, tap the shutter and slowly pan left to right. These shots might not work so well if you have lots of moving objects within the frame. If you go too fast, it will tell you to slow down so keep a lookout for that.
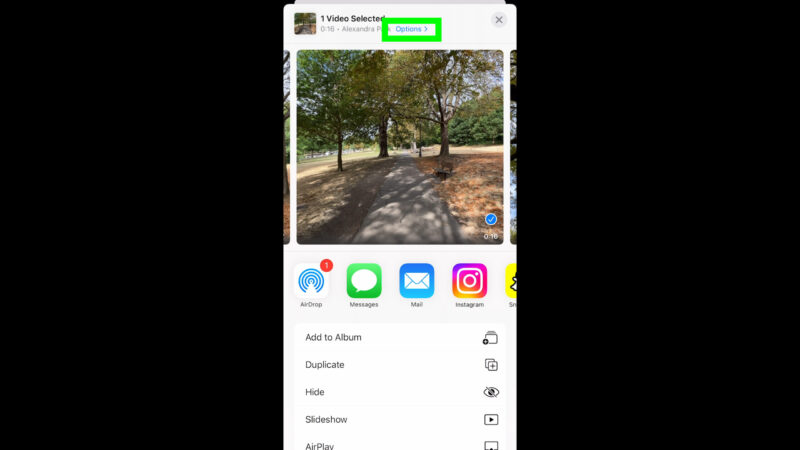
How to Export Full Quality iPhone Photos & Videos
AirDrop is great for quickly sending photos and videos to other Apple devices. However, sometimes your iPhone will compress the media before sending it, reducing the quality.
I have noticed this mostly when sending videos that were shot with a 3rd party app, like the Insta360 or Zhiyun Cami app. If you see a message saying “preparing” before the video is sent then it might be compressing the video.

To stop your iPhone doing this there are 2 settings. In settings, go into settings for the Photos app. At the bottom, select “Keep Originals”. Secondly, before you share a video using AirDrop, tap here where it says Options and then toggle on All Photos Data. Now your file will be sent without compression.
Smartphone Video – Beginner to Advanced
If you want to know more about smartphone filmmaking, my book Smartphone Videography – Beginners to Advanced is now available to download for members on Patreon. The book is 170 pages long and covers essential smartphone filmmaking topics:
Things like how to get the perfect exposure, when to use manual control, which codecs to use, HDR, how to use frame rates, lenses, shot types, stabilisation and much more. There’s also my Exploring the Film Look Guide as well as Smartphone Colour Grading.
Members can also access all 5 episodes of our smartphone shot Silent Eye series, with accompanying screenplays and making of podcasts. There’s other materials too and I will be adding more in the future.
If you want to join me there follow this link.

This is such great information, Simon. Thank you for posting it. I’m a documentary director by background but these days I teach camera and directing and interviewing through various organisations and I am often asked to talk about smartphone filming – so I keep a close eye on everything online. I’m a bit bamboozled now that Filmic Pro has gone to a subscription model for new users so I’ll have to find a free equivalent.
[…] Moble Motion: Master Your iPhone Camera Epic Tutorial Beginner to expert guide with great tips […]