Samsung Camera App – Every Setting Explained – Pro Video, Pro Photo and more
In this article, I’m going to go through every single camera setting in my Samsung Note20 Ultra and explain them. These settings and how they work might vary depending on the Samsung smartphone you have. Older models or models with lower specs are more likely to have less capability, when choosing frames per second and resolution for example.
That said, many of the settings work the same throughout the range of Samsung smartphones.
Download the PDF of this guide for easier reference.
Getting Started
When you first open the Samsung camera app you will most likely find yourself in basic photo mode.
Obviously the most basic feature is this big circle which is the shutter button. Tap that to take a picture. And basically, whatever mode you are in this button will take a picture or start & stop recording.

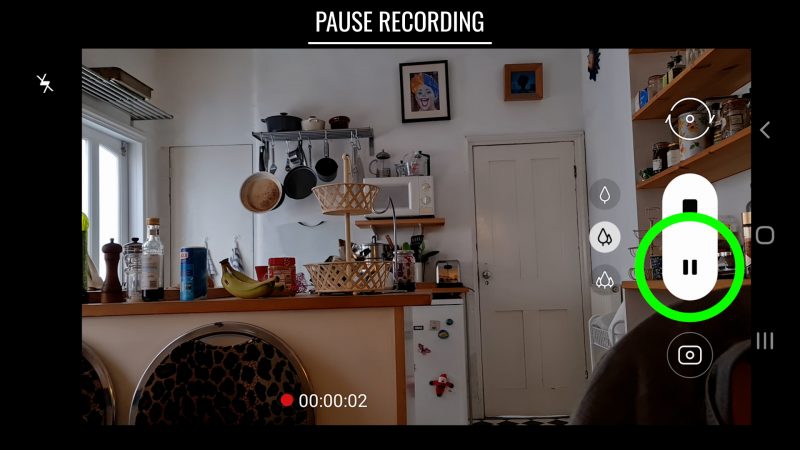
How to Pause Video Recording
Your Samsung camera lets you pause when recording video. When you tap the shutter button, a pause button appears beside it. Tap to pause and restart.
In practice, this means the clips will be stitched together into one file instead of separate files.
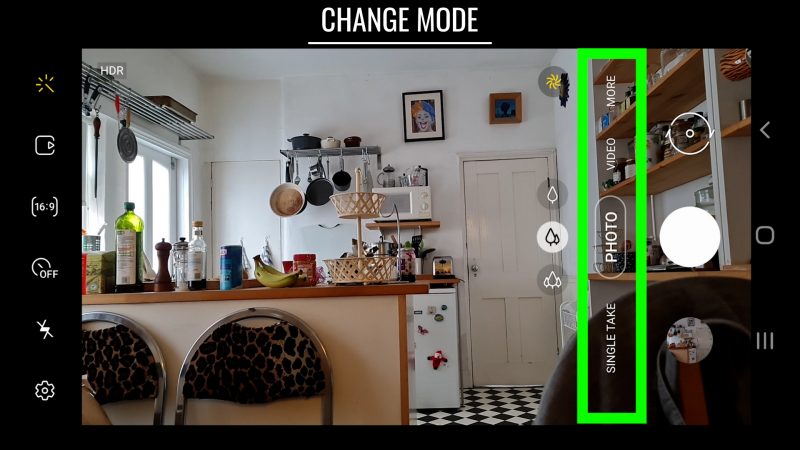
How to Change Camera Mode
To change mode, just swipe up and down where it says “photo”. There’s Single Take, Photo, Video and More to choose from. If you select More, this takes you to lots of extra camera features, including Pro Mode and Pro Video Mode.
How to Change Cameras
My Samsung Note20 Ultra has 4 cameras. On the rear there is the main camera, an ultra wide and a telephoto. On the front, the selfie camera.
By default the camera is set to use the main lens. This camera has the best sensor of all the lenses, so I advise you to use this camera if you want the best quality photos and videos.
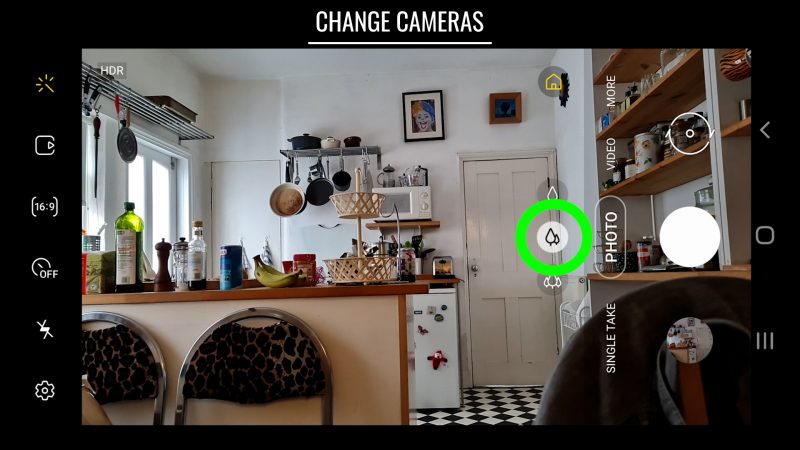
How to Use the Telephoto or Zoom Lens
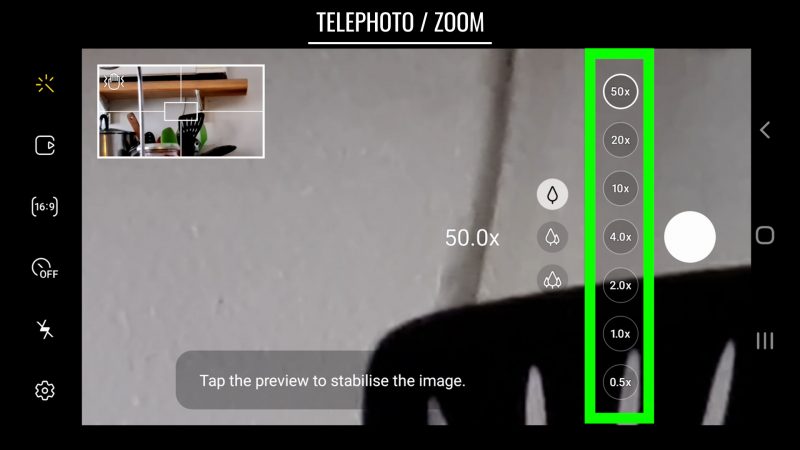
To switch to the telephoto, tap the icon with the single tree-shaped object in it. On my device, this immediately uses the optical 5x zoom. At the same time, a menu of other zoom strengths opens up.
In my case, I can go up to 50x zoom. But anything over 5x will be digital zoom. And digital zoom can get very pixelated when you set it to this high level.
After a few seconds the zoom strength selector slides away. But you can open it again by tapping the tele lens button again.
You can also zoom in and out using 2 fingers in a pinch and unpinch movement on the screen. Now you get a slider, which you can use to swipe up and down for more precision zooming.
If you are zoomed in and you want to reset to the 1x main sensor, just tap the middle icon with the 2 tree-shapes. This also switches back to the main lens, of course.
If you are zoomed in more than 5x you can reset to 5x by tapping the telephoto lens selector again.
When you zoom in very close, a guide pops up in the top left corner. This allows you to see around the frame to help you frame your shot. This also lets you know when the camera stabilisation has steadied the shot by turning white to yellow.
Wait until it’s yellow now take the photo.
How to Use the Ultra Wide Angle Lens
To select the ultra wide angle lens, tap the button with the 3 tree-shapes in it.
Again, the zoom selector appears allowing you to switch zoom levels more easily.
Once you have selected the ultra wide angle lens, you can pinch in and out for fine adjustments to your framing. It starts at 0.5x but you can zoom in to 0.7x for example.
As soon as you reach 1x the phone will automatically switch to the main camera.
So this means there are 3 ways to switch cameras. The 3 buttons, the zoom selector and pinching in and out with your fingers on the screen.
How to Use the Front “Selfie” Camera
To switch to the front – or selfie – camera, tap the button above the shutter button, with the 2 arrows in a circle. Another way is to swipe left to right or right to left on the screen.
How to set Focus & Exposure
In any camera mode, when you tap the screen the camera will try to focus and set exposure correctly using that point as a reference. You will see a white circle appear.
If you want to make sure these settings are locked, tap and hold that white circle until it turns yellow and the little padlock symbol closes.
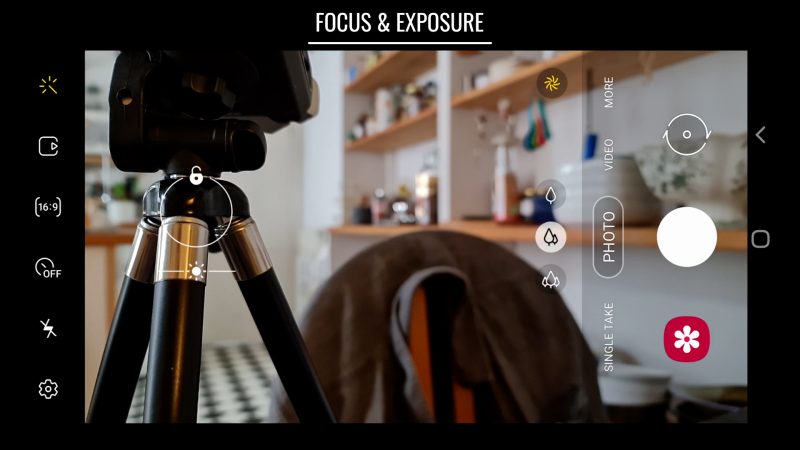
Now if you move the camera, the exposure and focus are fixed and will not change to adjust to different light and objects.
Whether exposure is locked or not, you can adjust exposure by swiping left and right below the circle. This moves a small slider – this dot on a line – to indicate your current exposure adjustment setting.
To unlock exposure and focus, simply tap on another area of the frame.
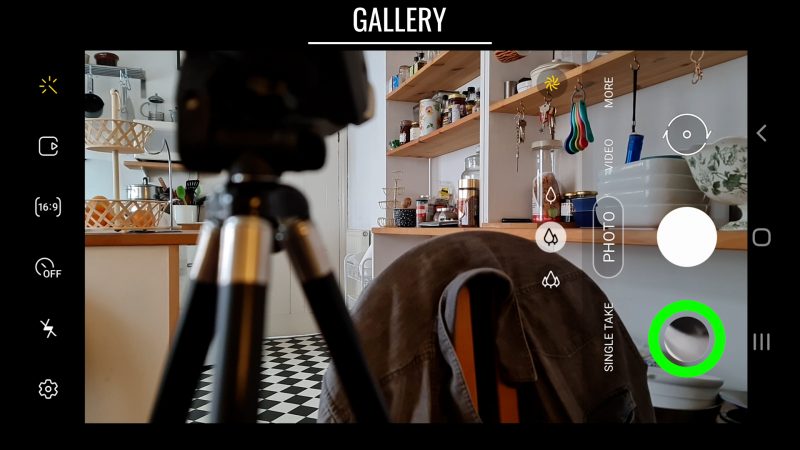
How to View Photos and Videos
Below (or to the side of) the shutter button is the gallery button. Tap this to open up your gallery. Swipe left and right to view.
On Screen Settings
There’s a row of buttons down the left side of the screen (or at the top if you are holding the phone vertically). These buttons change depending on which mode you are in.
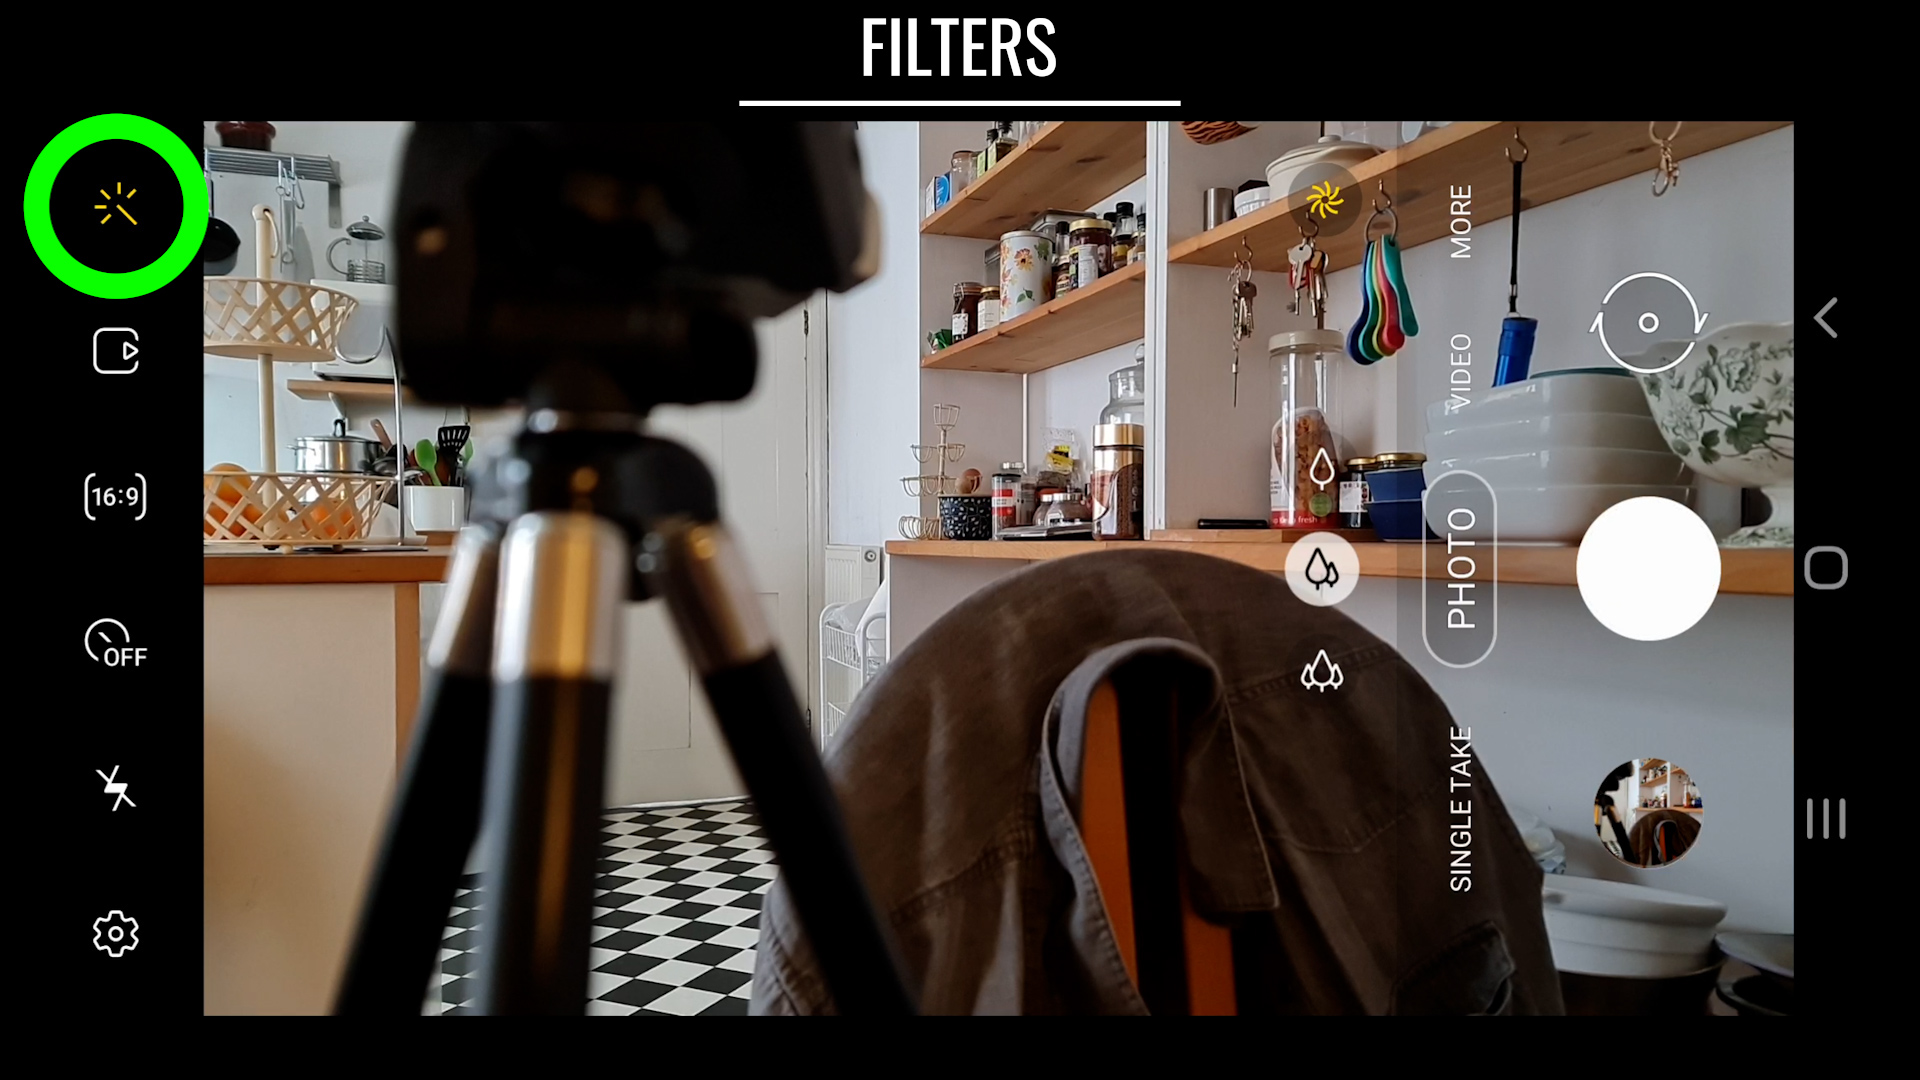
Filters
Starting from the top we have a button that looks like a magic wand. This is a filter button. This is available for both photo and video mode. Tap this to access various filters to change the look and tone of your image.
There’s 3 options to choose from. Face gives you a bunch of beauty mode settings. Tap the face to enable this and now adjust the settings to your needs from the list below. You can adjust eye size, jawline, tone and smoothness.
Smoothness simply smooths out your skin.
Filters opens up a menu of various preset colour filters to apply. Swipe through and then use the slider to adjust the strength.
In My filters you can create your own custom filters based on a photo from your gallery. Tap the square with the plus sign and choose a photo from your gallery. A filter based on the look of this photo will now be automatically created.
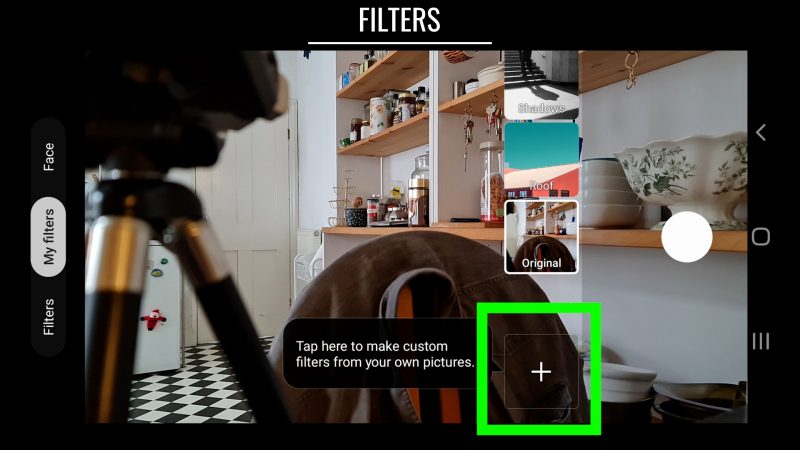
This might be useful if you want to create a series of photos with a consistent feel and look. Tap where it says Filter 1 (or whatever number you have) to rename the filter. Then save and the filter will now be stored for later use.
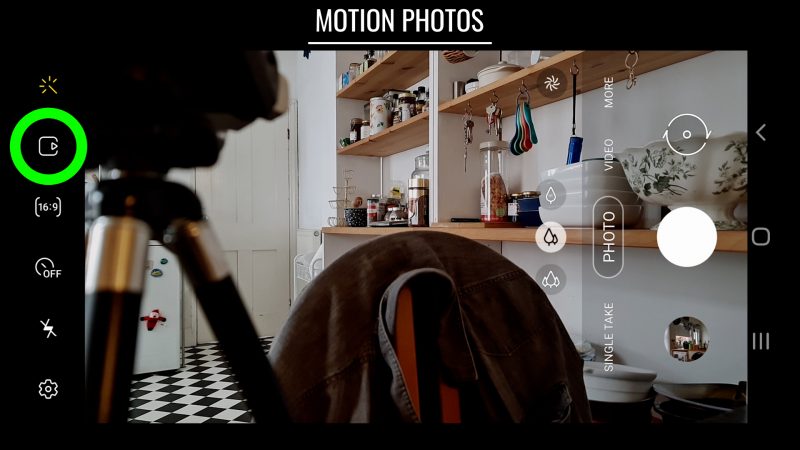
How to use Samsung Motion Photo
Below the filter button is a button with a square and a small triangle. Tap this to enable Motion Photo. What motion photo does is essentially shoot a short video instead of a single frame photo. The video will start capturing before you press the shutter button.
 For example, if you are taking a photo of something live like sports, Motion Photo will make it easier to capture the exact moment a goal is scored or someone crosses the finishing line. This is pretty similar to burst mode.
Take a photo with Motion Photo. Open the photo in the gallery. Tap “View motion photo” and now you can see your photo as a video clip.
Swipe to the best frame. Tap this square button on the left to select that frame. You can also turn this clip into a GIF using the 2nd button.
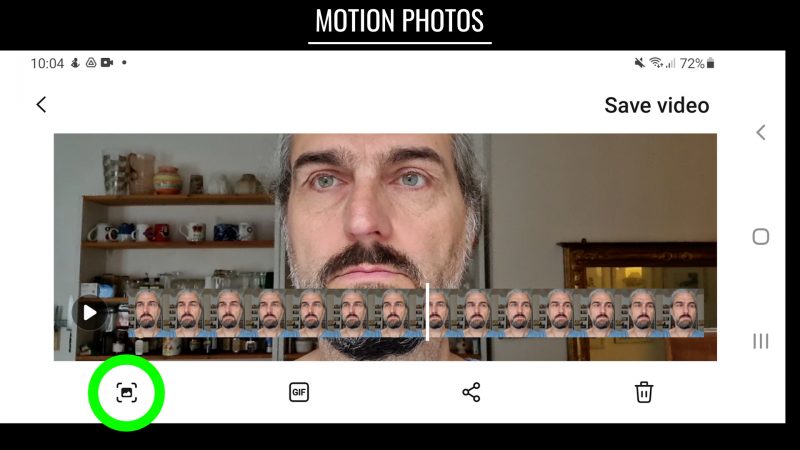
By the way, you can also choose a still frame from any video clip. Here’s a video clip I shot a few days ago. Stop the video on the frame I want to capture and press this button here. A still photo from that frame will now be saved into your gallery.
How to Select Frame Ratio
In photo and video mode, you get a frame ratio selector button on the left (or top).
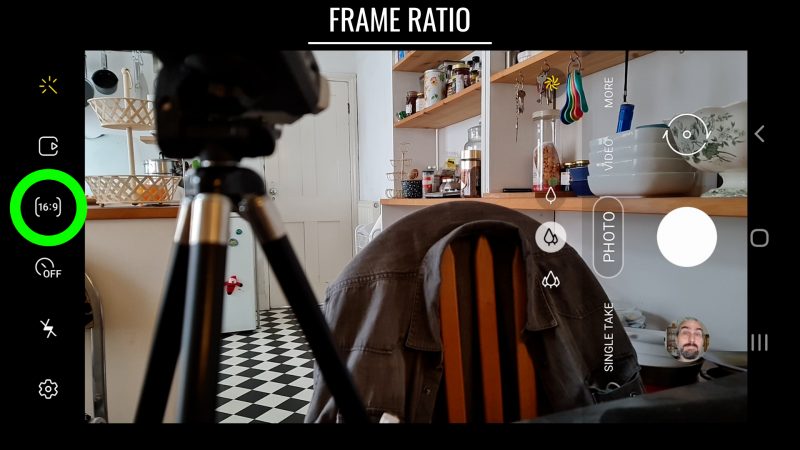
In this device (Note 20 Ultra) the choices I have are Full (which uses the full screen), 1:1 (which is square), 16:9 (which is a common ratio), then there’s 4:3 and 4:3 108MP.
If you choose the 108MP option, the photo taken uses the entire main sensor of your camera. When I choose this ratio, you will notice that the ultra wide and telephoto lens options are no longer available. That’s because the 108MP sensor is the main sensor, while the other cameras use smaller sensors.
In Video Mode the options I have are Full, 1:1 and 16:9.
But if I switch to Pro Video mode I now get a 21:9 widescreen option as well.
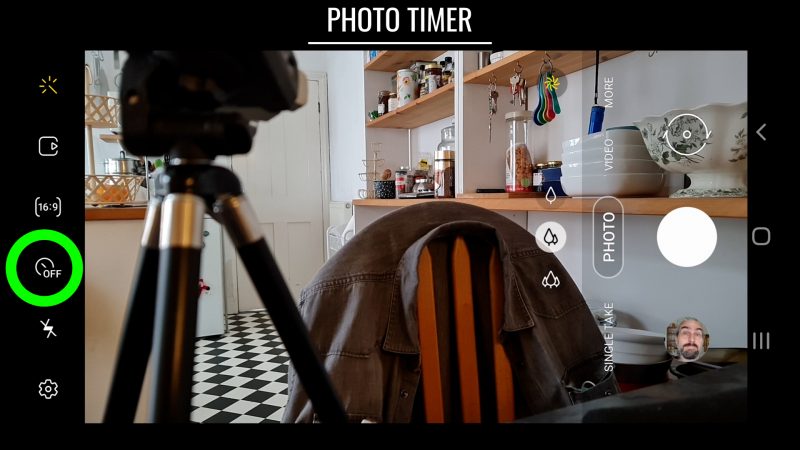
How to Set Photo Timer
In Photo mode the next button down is the timer function. Just tap and select from 4 options – off, 2, 5 and 10. Now when you tap the shutter button, the camera will count down the selected number of seconds before taking the photo.
I’ve found that when using this mode, the camera will not adjust focus once you have set the timer going. So, if you want to take a photo of yourself by pressing the shutter then moving into frame, you might find yourself out of focus.
How to Set Camera Flash
Next button down is the camera flash. Tap to open up 3 options, always off, auto and always on. Auto will only use the flash when there’s not enough light.
How to Use Super Steady Video Stabilization
In Video Mode, below the ratio picker button is a button for enabling Super Steady stabilization. This uses extra digital stabilisation to make your videos come out even smoother.

The downsides are more limited frame rates and resolutions, as well as no telephoto camera option. Once Super Steady is enabled, the frame rate and resolution picker becomes disabled.
You might also notice a different cropping than without. When it’s enabled, it automatically switches to the ultra wide lens, but cropped in. You can choose the main (better quality) camera, but that will also be cropped in.
Video Mode: How to Set Camera Resolution & Frame Rate
In Video Mode and Pro Video Mode, it used to be that you had to go into settings to change resolution and frame rate. But now Samsung has created a selector menu on the main screen.
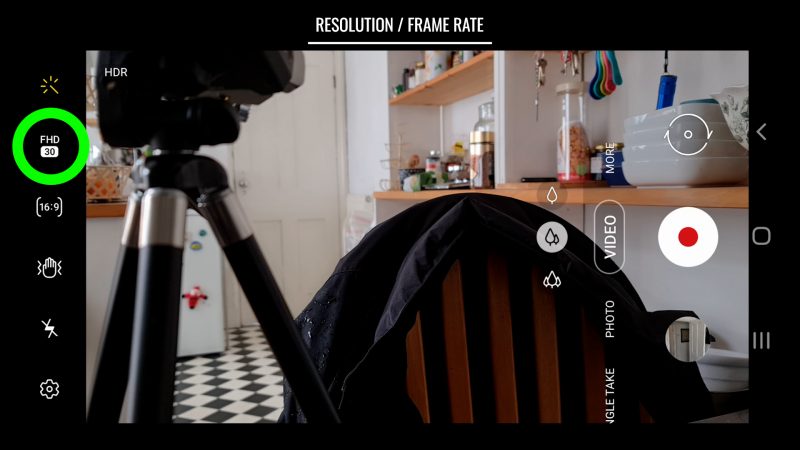
This button here displays the current selection. At the moment, my camera is set to shoot Full High Definition or FHD (which is 1080p) at 30fps. So just tap that to get a list of options.
In regular video mode you can go from HD @ 30fps up to 8K @ 24fps.
In Pro Video Mode there are more choices here. There’s a 24 fps option for FHD and UHD. There’s also a FHD @ 120fps option. Again, the options available will be dependent on the capability of your device.
In older devices (such as my S9) to change resolution and frame rate you need to go into settings as before.
Samsung Camera Settings
In the bottom left corner is a cog icon. Tap this to navigate to the camera settings menu.
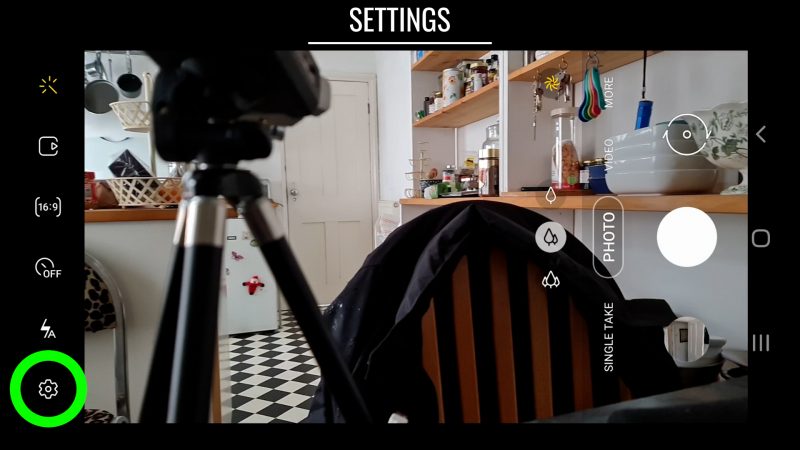
If you tap this cog in Photo Mode, you find the photo settings at the top of the screen. If you tap this cog in Video Mode, you will find video settings at the top of the screen. It’s actually the same menu, but it starts you at the most relevant section to the mode you are in.
That said, if you are in Video Mode and you go into settings then scroll up, the top section is greyed out (because these settings are relevant to Photo Mode only).
Samsung Scene Optimizer
The top setting for Photo Mode is Scene Optimizer. This feature is available from S9 and later models. With this toggled on, the camera will analyse the scene and make tone and colour changes.
You can leave this on because when taking a photo, you get the option to switch it off anyway. Back in the camera view, a little icon in the top right of the frame indicates the type of scene detected.
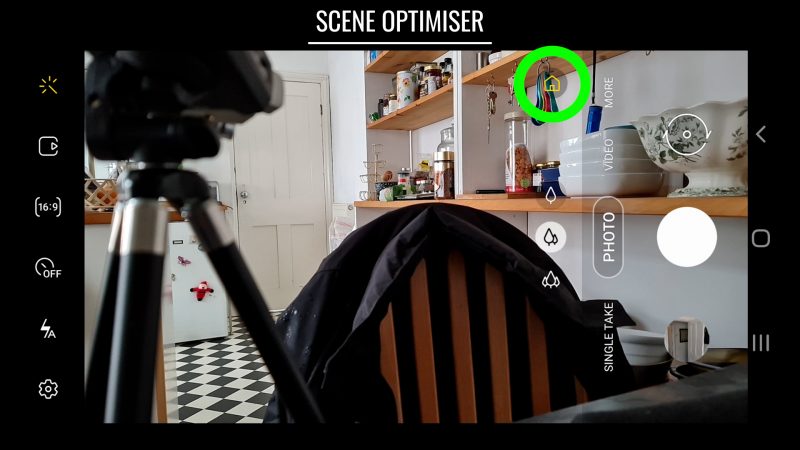
If it doesn’t detect anything, it will just be like a twirly symbol that looks a bit like a firework going off or something. There are up to 32 different types of scene that can be detected.
The modes are: Face, Baby, Person, Dog, Cat, Food, People, Beaches, Sky, Mountain, Sunset, Sunrise, City, Snow, Waterfall, Watersides, Scenery, Stage, Vehicles, Drinks, Flowers, Trees, Greenery, Animal, Shoes, Backlit, Indoor, Text, Clothes, and Night view.
At the moment, my guess is this house symbol stands for Indoor mode.
How to Use Samsung Shot Suggestions
Below Scene Optimiser is a switch for Shot suggestions. If you switch this on and go back into camera view, software will analyse the composition and suggest a better place to position the camera.
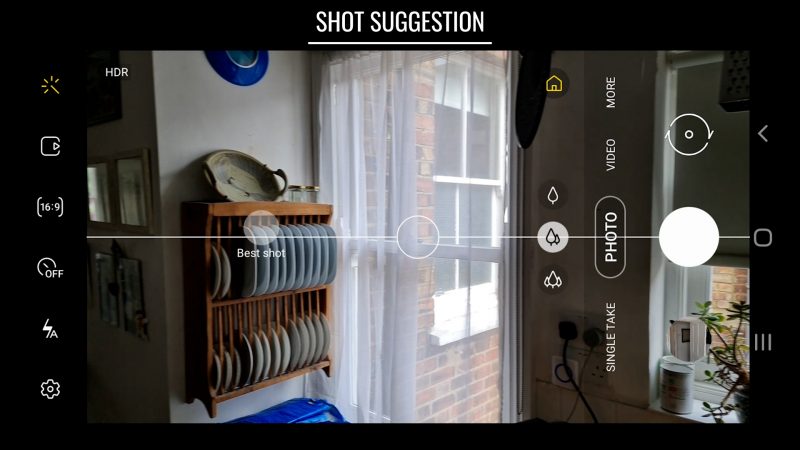
There’s a white line and a circle and after a few seconds, a white filled-in circle appears. To use the suggestion, move the empty circle over the filled-in circle. Now the line and circle go yellow to indicate this is the best framing in the opinion of the AI software.
Personally, I’m not sure if it really helps. I would say my own framing is better than the suggestions offered. But perhaps if you really feel lost when it comes to composition, this might be useful.
How to Scan QR Codes
If you need to scan a QR code, toggle this setting on here. Once you return, any QR code within the frame will enable you to follow any link from the code.
How to Take Burst Shot or Record a Gif
Next setting down allows you to set what you want to happen when you swipe the shutter button to the right. You can choose between taking a burst shot or recording a GIF.
Back in the camera screen, swipe the shutter button to the right and hold for as long as you want the burst to continue. You will see the frames counting up for as long as you hold.
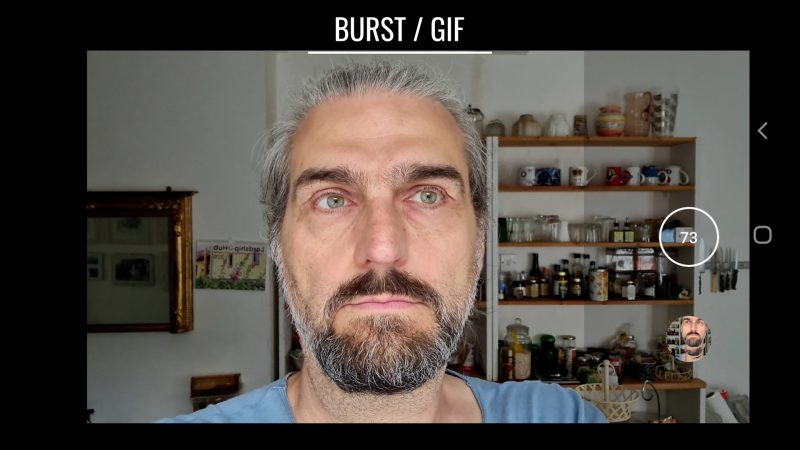
If you switch to record a GIF, back in the camera, again swipe right and hold. The counter starts, but this time you get a GIF. You can do this in selfie camera mode as well.
A burst takes lots of frames and allows you to choose the best. This is useful when you have an action taking place and you want to make sure you get the perfect frame. For example, a bird taking flight or people posing.
Like when you take a photo and someone has their eyes closed. If you use a burst, you will get several photos and probably a good one to choose from, where everyone’s eyes are open.
Format and advanced options
Next setting down is headed Format and advanced options. Tap to open a menu with 3 toggle switches.
HEIF Pictures
HEIF stands for High Efficiency Image Format. It can also be known as (or indeed confused with) HEIC which stands for High Efficiency Image Container.
In fact, if you Google HEIF you will likely be shown results for HEIC, as if they are the same thing. But in fact there is a slight difference.
HEIF is a file format for storing individual images and sequences of the image, while the HEIC file can store both image and video files.
This format uses better compression and keeps file sizes lower, however it might not be as versatile when it comes to sharing pictures online or with other people.
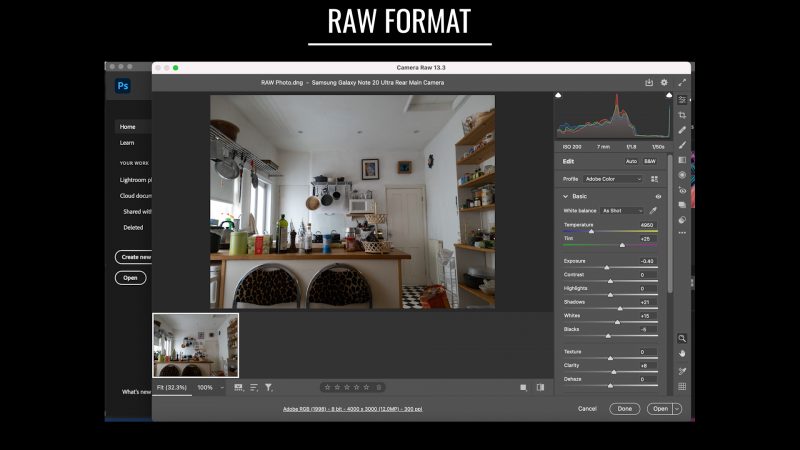
RAW copies
Toggle this on if you want to create a RAW copy of any photo taken using Pro Mode. What is RAW? A RAW image file is basically unprocessed so it retains much more information. So, if you intend to work on your photos using colour grading software, a RAW photo file will give you more to work with.
Bear in mind, viewing these files won’t be as easy as viewing a standard jpg file. To view a RAW image file you will need some kind of photo editing software, like photoshop for example. RAW files will also take up more memory than a compressed jpg file.
Ultra wide shape correction
Wide lenses distort straight lines. The most obvious example of this is when using a fisheye lens. Generally speaking the wider a lens, the more distortion it creates.
So if you want your Samsung device to correct these distortions when using the ultra wide angle lens, then make sure this is toggled on.
Samsung Selfie Settings
Next on the menu is a group of 3 settings for taking selfies. They are pretty self explanatory, but you might not know they exist if you haven’t crawled through the entire camera setting menu.
First, if you want the selfie camera to switch to the widest angle when it detects 2 or more people in the frame, toggle this on.
Next, if you want to keep selfies as you see them when you take the selfie, keep this switched on. However, the image you get is a mirror image of reality. So, text will be backwards, for example.
If you would rather flip the selfie so it displays as if someone took the picture with the rear camera, then toggle this off.
Finally, Selfie colour tone allows you to choose between 3 settings for your selfies. Warm, original or cool.
Video Settings
Now we get to some settings for video. Tapping Advanced recording options opens a new menu of three toggle switch options.
High efficiency videos
Toggling on High efficiency videos means your videos will be recorded in the more efficient HEVC format. HEVC stands for High Efficiency Video Codec and is better at compressing video than the old AVC format. These formats are also known as h.264 and h.265.
The downside of HEVC is that some platforms or devices may not be compatible, which means this format is less versatile. If in doubt, toggle it off.
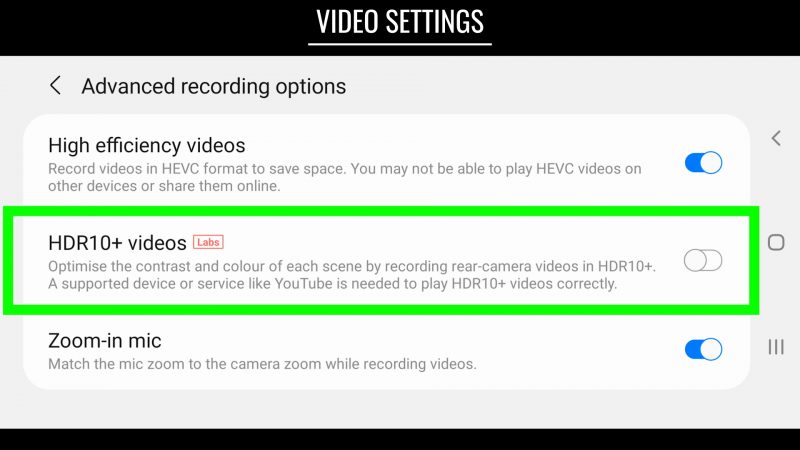
HDR10+ videos
HDR10+ is a video format that adds dynamic range by embedding dynamic metadata into the video file. A HDR10+ compatible display uses the dynamic metadata to apply dynamic tone mapping.
HDR10+ supports 10-bit colour (over the normal 8-bit colour) and up to 8K resolution. Like with the iPhone’s new Dolby Vision, shooting video in this format adds extra complication when it comes to editing and playback.
For example, YouTube supports HDR10+ but if someone watching the video via YouTube doesn’t have a compatible monitor, at best they will get a toned down version. At worst, colours and tones might be distorted.
Zoom-in mic
If you have the Zoom-in mic enabled, zooming in while recording results in the mic also “zooming in” the audio on the subject of the video.
The idea is that if you are filming someone talking, zooming in on them should result in their voice being louder and the background noise becoming quieter.
Whether it actually works in a practical sense, is another matter.
Video Stabilisation
Back in the previous menu, there’s a toggle switch for stabilisation. It’s nice to have the option to switch this off, because sometimes stabilisation can cause problems. Like when using a gimbal for example.
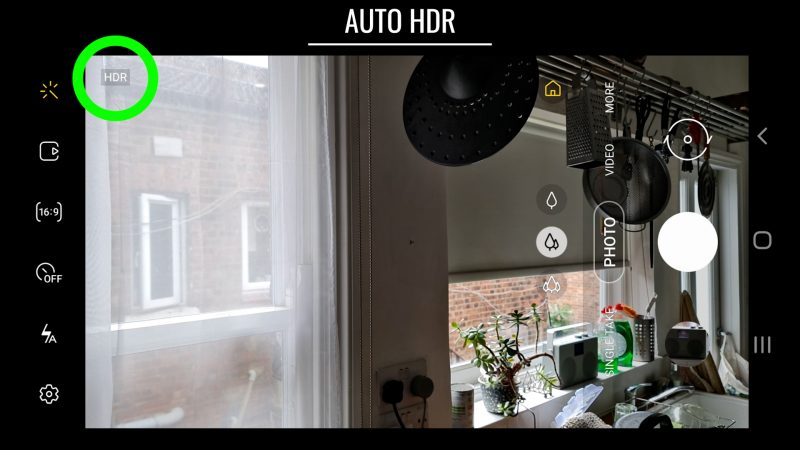
Auto HDR
Back in the main camera settings menu, the next features apply to photos and videos. Auto HDR is another kind of tone mapping feature, but this one does not create a different type of file, that may or may not be viewable, like HDR10+ does. Instead, the tone mapping is baked into the file.
Toggle HDR on and switch back to your camera. Now you will see HDR written in the corner, in both photo and video mode.
You might find that in video mode, in higher resolutions or frame rates, the HDR switches off. This is because your device’s processor cannot run all those things at the same time.
Bear in mind HDR is disabled when using Pro Video mode.
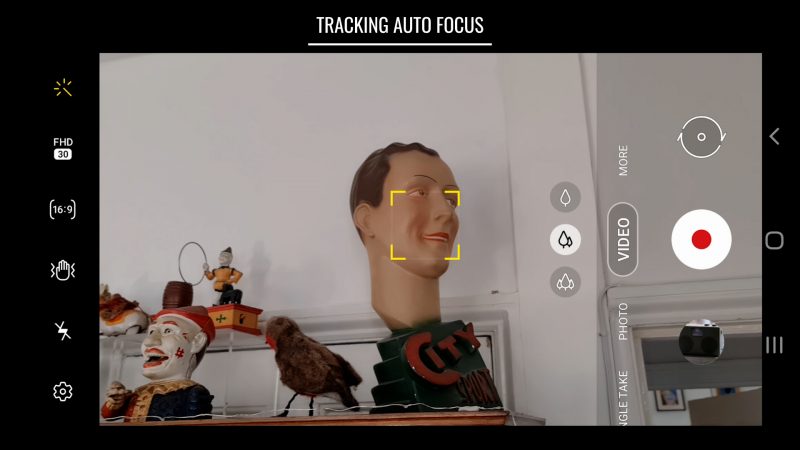
Tracking autofocus
With tracking autofocus enabled, go back into your camera. Tap on the screen on an object or person you want to stay in focus. Now you get a yellow box, indicating the object or person is being tracked.
If that tracked object moves (or you move the camera) the camera will try to keep them in focus.
This works in photo, video and pro modes as well. With this enabled, you won’t be able to lock exposure and focus by tapping the screen.
Grid Lines
Toggling on Grid Lines places a “rule of thirds” grid over the camera screen. This will be present in all camera modes.
Aligning objects or people with the grid lines or the line conjunctions can help you to create more aesthetically pleasing images.
Location Tags
Location Tags will add location information to your photos and videos.
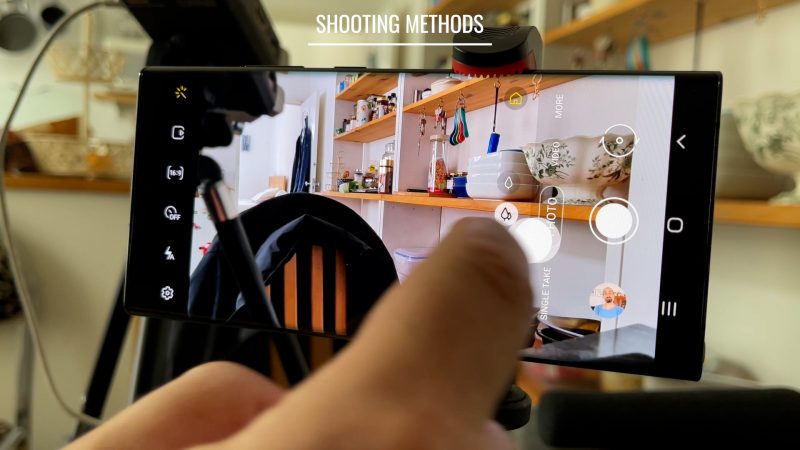
Shooting methods
Tapping Shooting methods opens up a new menu with 4 different options.
The first one allows you to assign a function to the volume keys on your phone when in camera mode. By default, they will take a picture or start and stop video recording.
You can choose to use them for zooming or keep them as volume control buttons.
Toggle on voice commands if you want to be able control your camera using certain spoken phrases. Well, saying “smile, cheese, capture or shoot” will take a photo and saying “record video” will do what you just asked.
Enabling the floating shutter button creates an extra button in a different position, which you can drag around the screen. However, you don’t need to go into settings to do this. Even with this switched off, you can just swipe the shutter button to the left and a floating button will be created.
Drag it back over the original shutter to get rid of it.
With Show palm enabled, you can use an open palm gesture to start recording or take a picture.
Settings to keep
Back in the main camera settings menu, tapping Settings to keep opens a new menu with 3 choices. Essentially, you can set your camera to remember certain settings rather than reverting to default settings when you close and reopen the camera.
For example, you can choose the camera to reopen in the last mode used, like video instead of photo. Selfie angle will keep the last choice and also will not automatically switch to a wider camera when it detects more than one person in the frame.
If you want a specific filter to apply and don’t want to have to keep going into filters to choose it, toggle Filters on.
Vibration feedback
If you want a small vibration when you take a picture, make sure this is toggled on. Otherwise, toggle off.
Reset settings
Now at the bottom, the final setting will reset all your camera settings to the default. The same as when you first got the phone.
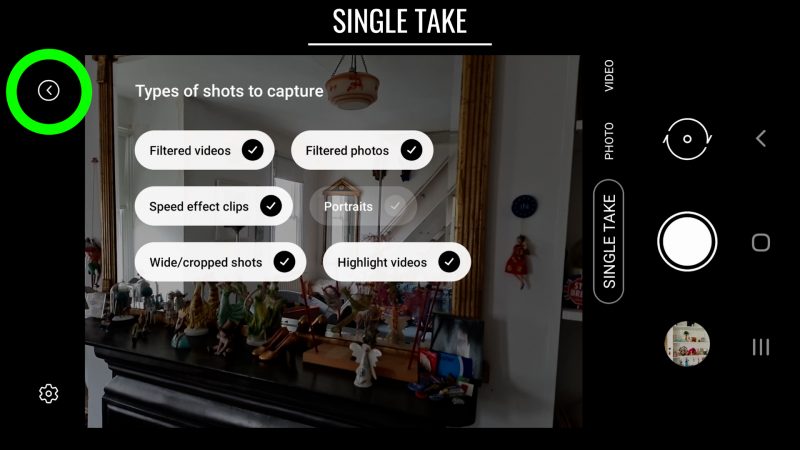
Samsung Single Take
Apart from photo and video mode, there is also the Single Take mode. The idea of Single Take is that you press the shutter and now move the camera to look at different things. The camera will keep recording for 10 seconds and then compile a bunch of different shots in different styles from what you collected.
If you tap the little arrow in the top corner, check or uncheck these buttons to customise the results to your tastes.
More
Now swiping along to the section named simply “more” opens up all kinds of stuff to play with. There’s 12 more camera areas to explore plus Bixby Vision and AR Zone.
If you ever feel the need to rearrange these buttons, tap the plus sign button. Now tap and hold the icons to switch them around. You can also add any button to the main mode selector.
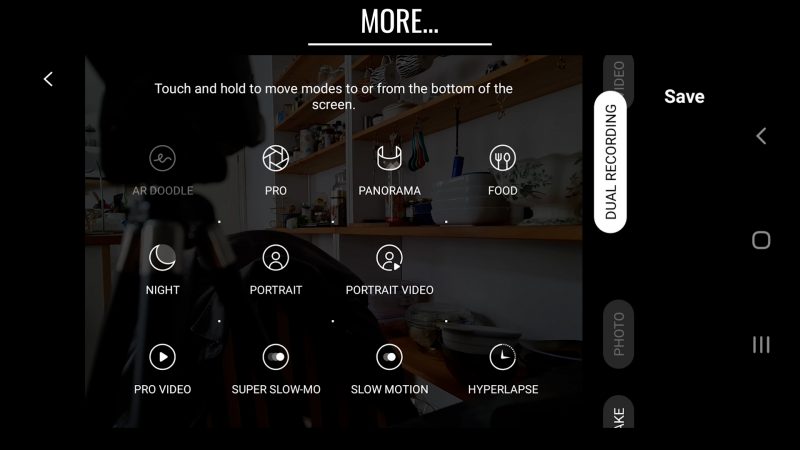
Tap the question mark and you get a brief description of each mode.
I’m going to cover the main camera modes first – Pro Mode and Pro Video Mode – before I look at the less used modes.
Pro Mode
Tap the button that looks like a mechanical camera shutter. The camera now enters Pro mode for photos. In this mode you can set focus, shutter speed, ISO and white balance manually.
So now you have a stripe of manual control buttons. Swipe up and down to see all of them.
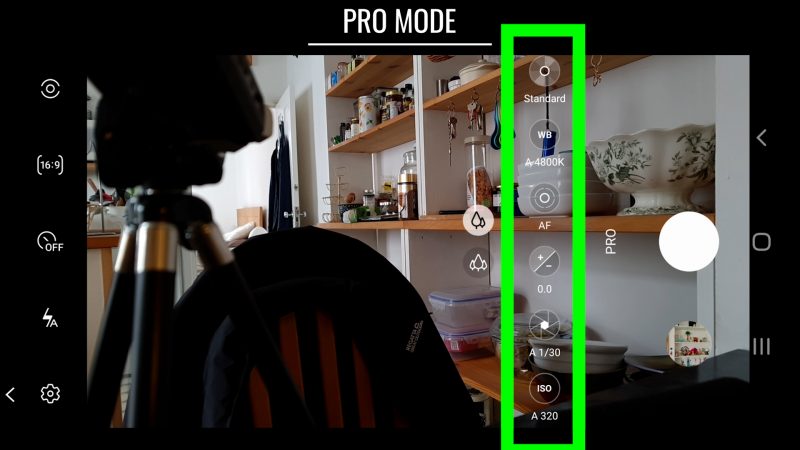
In Pro Mode and Pro Video mode, you cannot access the telephoto camera. Only the wide and ultra wide are available.
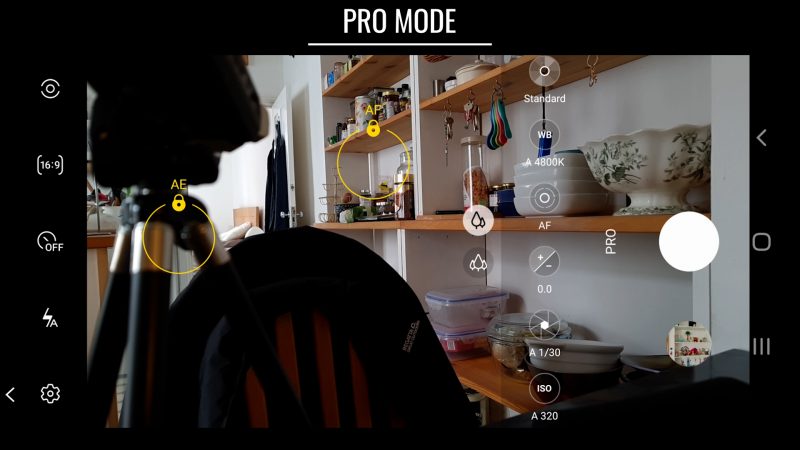
In Pro Mode (as well as Pro Video mode) if you tap the screen, you get the white exposure circle which can lock by tapping and holding. The difference in Pro Mode is that you can hold and drag this locked circle to create 2 circles.
This creates separate exposure and focus points and allows you to set them from different parts of the screen.
Metering
When in Pro Photo mode you can choose between 3 metering settings. Tap the button in the top left corner to get 3 choices: spot, matrix and centre-weighted.
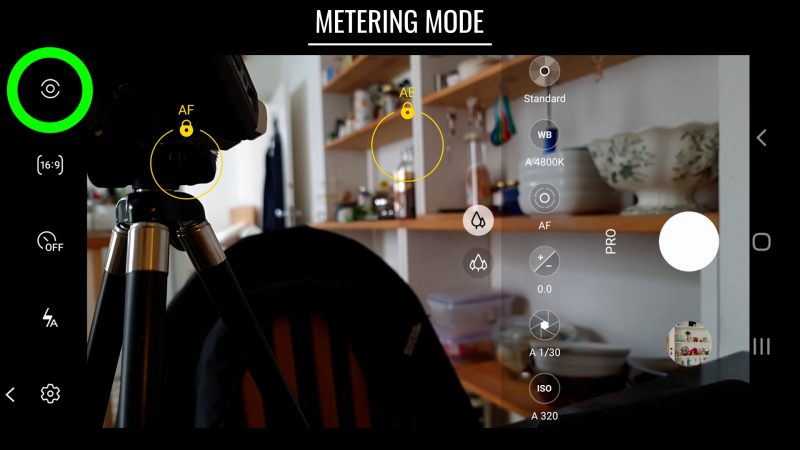
In the centre-weighted mode, the centre is used to determine the exposure. It evaluates the light in the middle of the frame and surroundings and ignores the corners.
In matrix metering mode, the camera divides a wide area of the frame into multiple segments and sets exposure based on a variety of information, including subject brightness and colour.
Finally, in spot metering mode, the camera determines the exposure not on the average brightness level of the whole frame, but just on one specific spot.
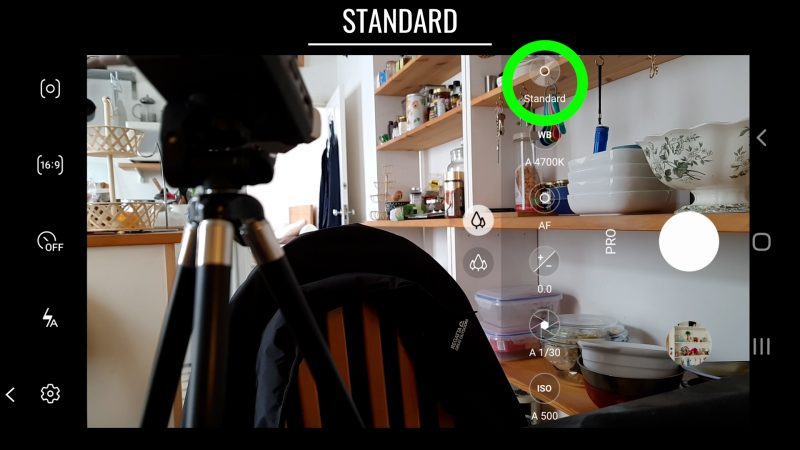
Standard
Tap the top button named Standard to open up some colour adjustments. From the top down you have Tint, Saturation, Shadow, Highlight and Contrast. To adjust each setting, use the slide control.
To get back to the previous buttons, tap the back arrow.
White Balance
Tap the WB or white balance button to open the slider control. In yellow it says auto. Tap that to switch to manual. Alternatively, just swipe up and down on the slider control.
Now you can see your white balance setting which is measured in Kelvins.
In photography, this is known as colour temperature. Different types of light have different temperatures. So if you want your camera to record that light so that it looks natural, white balance needs to be set correctly.
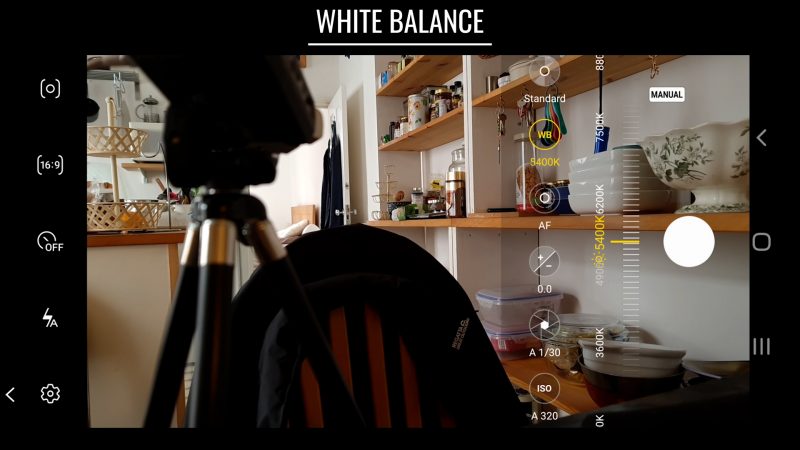
So candlelight would be around 1000-2000 K while daylight with a clear sky would be 5000-6500 K. Usually the auto white balance does a good job. But if there’s a situation where you have 2 or more different light temperatures, then it might look off.
In that case, adjusting white balance manually could help you get better photos.
Focus
The next button down is focus. If it’s currently set to auto you will see the letters AF. If it’s set to manual, you will see MF.
Tap the button to open up the slider control. This time tapping auto does not switch to manual. You just need to swipe up and down on the slider.
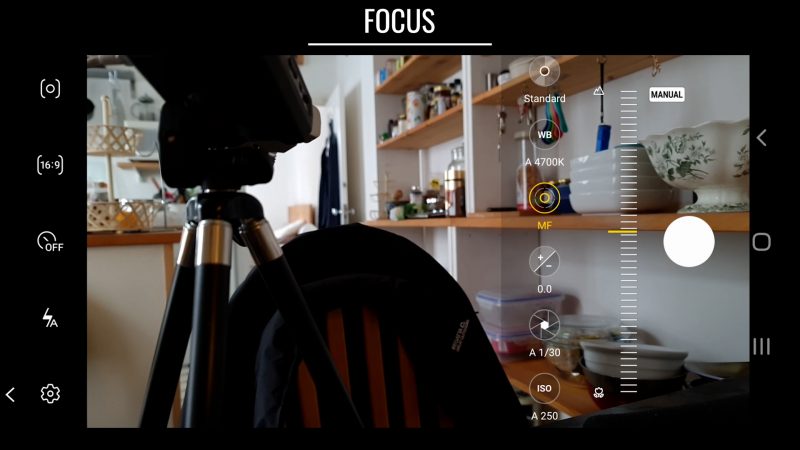
While you are adjusting focus, you will most likely see a green tinge appearing. This is the focus peaking feature which can be used to help setting focus correctly.
The green outline tells you what’s in focus.
Exposure Compensation
Next down is exposure compensation. Tap to open and then swipe up and down to set a negative or positive compensation value.
What this does is use whatever exposure settings you have – auto or manual – but adjust them to a brighter or darker value.
So, if you think the auto exposure setting looks too bright, simply stop it down here.
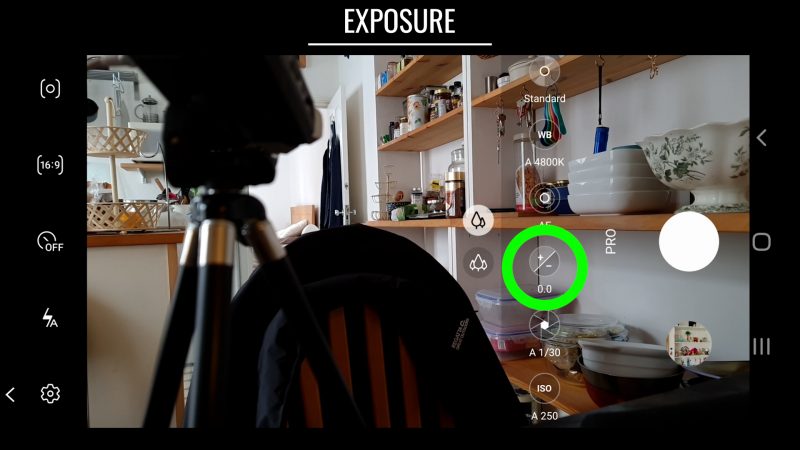
Below the exposure compensation button you can see a number. This is telling whether the camera thinks your frame is under or overexposed. The number 0.0 means correct exposure. A negative is underexposed and a positive number overexposed.
Shutter Speed
Below the Exposure Compensation button is the shutter speed button. Tap to open up the control and tap auto to switch to manual. Or just swipe up and down on the slider control.
Once the shutter is in manual mode, the Exposure Compensation button becomes disabled. However, the exposure value is still displayed. This way you can use this value as an exposure meter.
If the number is grey that is considered to be within a good exposure range. When it’s red your camera believes this to be badly exposed.
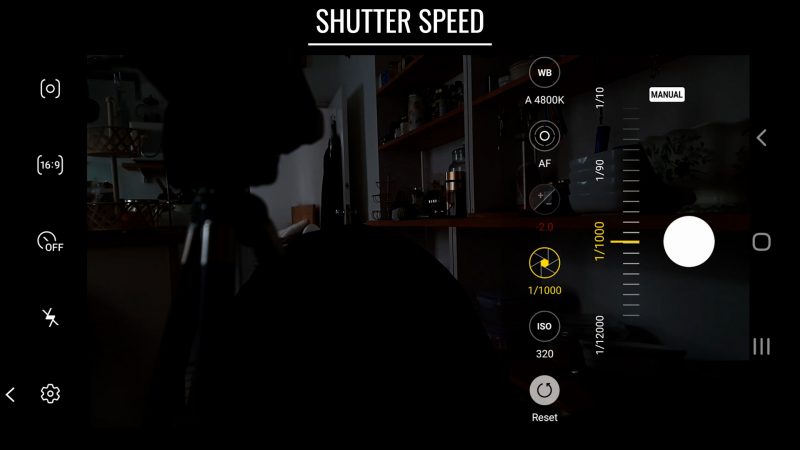
Using manual shutter control, you can set shutter speeds up to 1/12000 of a second all the way down to 30 seconds. As you can imagine, such slow shutter speeds are not to be used for regular photography. A slow shutter can be used to photograph the night sky and capture light that would otherwise not register on your camera’s sensor – such as stars.
You can also get slow shutter motion blur effects, such as streaking car headlamps and blurred cascading water. You will almost certainly need a tripod when taking slow shutter photos.
A regular shutter speed for photos would be somewhere around 1/50th of a second and upwards. The faster the shutter speed, the less motion blur you will get in the photo.
ISO
The next setting down is ISO. Tap to open up the slide controller.
If you leave shutter speed in auto, when you adjust the ISO the shutter speed will automatically adjust to set the correct exposure. Adjust the ISO and you can see the shutter speed changing accordingly.
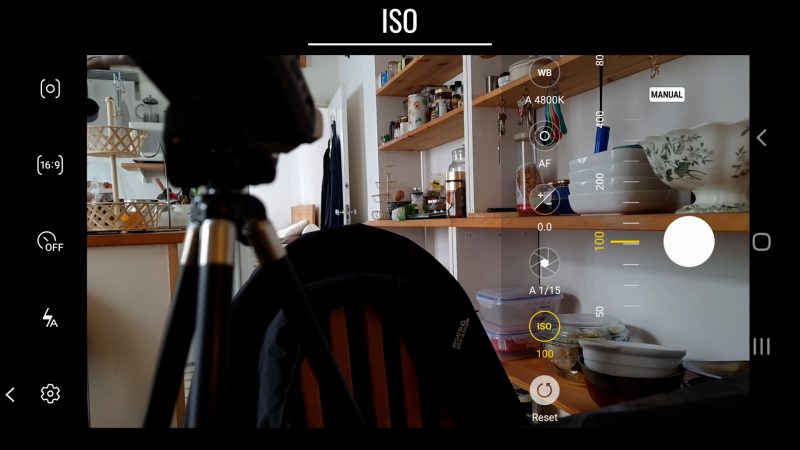
If the shutter is in manual mode, adjusting the ISO will change the brightness of the image.
Generally speaking, a low ISO is better as there will be less digital noise and pixelation.
Reset
If you just want to get back to auto settings, tap the reset button.
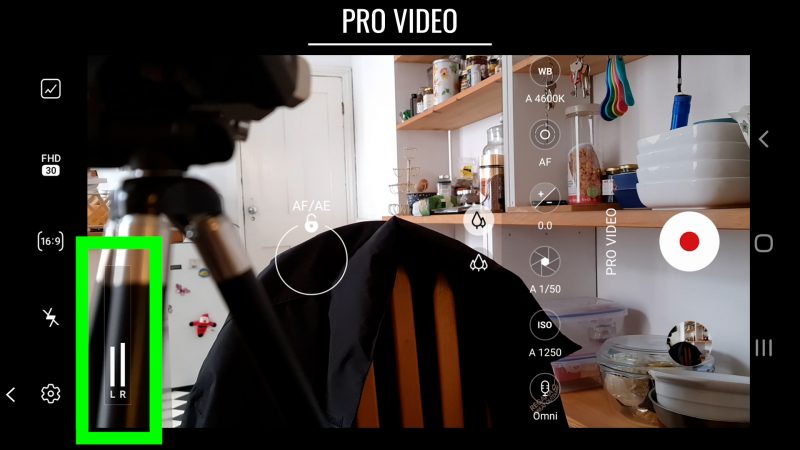
Pro Video Mode
Pro Video mode has very similar features to Pro Photo Mode, but there are a few key differences. Make sure to read the Pro photo mode part above, because I won’t be going over things like shutter speed, ISO and focus as they all work exactly the same way.
Like in Pro Photo mode, you can tap and lock exposure and focus and then drag the yellow circle to create 2 separate points for each. For example, I can set focus here and exposure here.
So let’s run through the differences. First of all, note there is an audio level meter on the left of the screen. You also have the option to enable an exposure histogram by tapping this button in the top left corner.
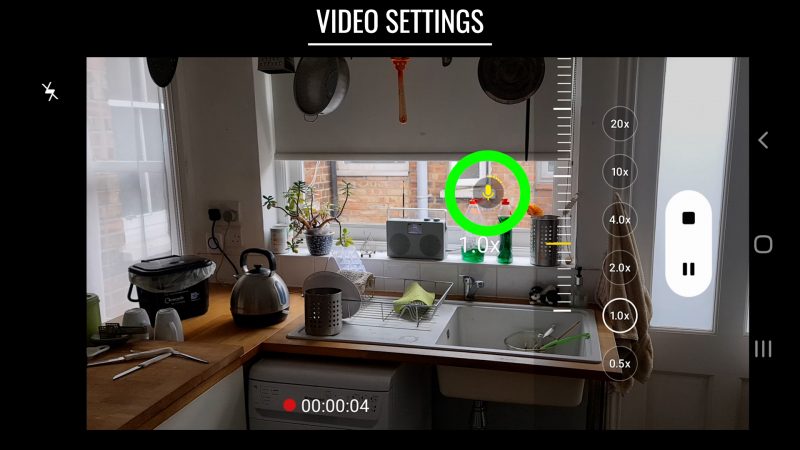
Zoom
Pro Video mode has a zoom control. Swipe to get the top button and tap to open the zoom slider control. This allows up to 10x digital zoom.
The difference between zoom in Pro Video mode and regular video mode is that the zoom control does not switch lenses. While in the main wide lens, zooming in and out will not switch to the ultra wide angle and vice versa.
You can also zoom by pinching in and out with your fingers on the screen and it acts exactly the same way as the slider control.
Shutter Speed
Shutter speed works exactly the same as in Pro Photo mode except the lowest speed is 1/30.
Microphone
Another difference from Pro Photo mode is the inclusion of microphone setting controls. The last button before the reset button opens microphone settings. But it also tells you the current setting.
At the moment it is set to use all microphones. But if I plug in a USB C mic then it automatically changes to record audio from that mic and tells you.
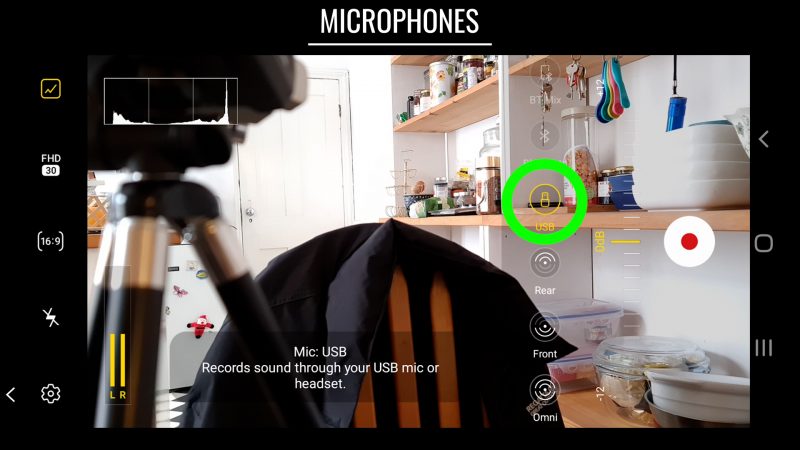
One thing to note is that if you have an external microphone plugged in and you tap the reset button, the audio resets to record from the device’s mics, even if you still have the external mic plugged in.
Tap the mic button to open up settings. You can now adjust volume level using the slide control.
You can also select from different mics available. If you have no external mic connected, you can choose between different internal mics (depending on your device). I have the option to choose omni (both rear and front mics combined) or just front or just rear.
On my device, I have USB, Bluetooth and BT Mix. BT Mix allows you to choose to mix mic input from a Bluetooth headset with others.
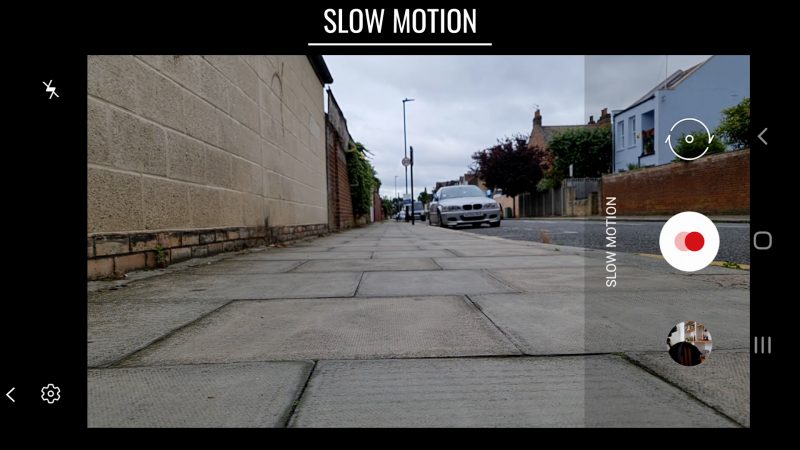
How to Shoot Slow Motion
Back in the previous menu, tap slow motion. You will see there are no options to choose resolution or frames per second. Shooting video in this mode produces HD 1080p resolution at 240 frames per second, which is then played back at 30fps.
Record a clip of slow motion video. Open the clip in the gallery. Now edit the clip by tapping the pencil button and you will see this strange looking line at the bottom of the frame. This controls where the slow motion begins and ends.
If you want the whole clip to be in slow motion, drag these little markers to each end. If you want the slow motion to begin and end at a key point, move the markers accordingly.
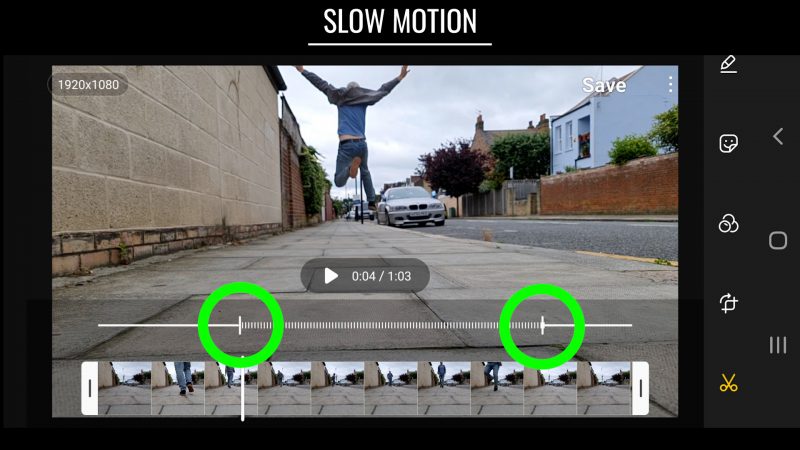
For example, you might have a video of someone running and jumping in the air and you only want the slow motion to begin as they jump and then end a few seconds later. This is quite a cool “bullet time” effect, easily created in your Samsung app.
When you are done, save the video and the app will create a new video and the slow motion is now embedded. So you can’t go into this new video and edit the slow motion again. However, you can go back to your original clip and redo the edit.
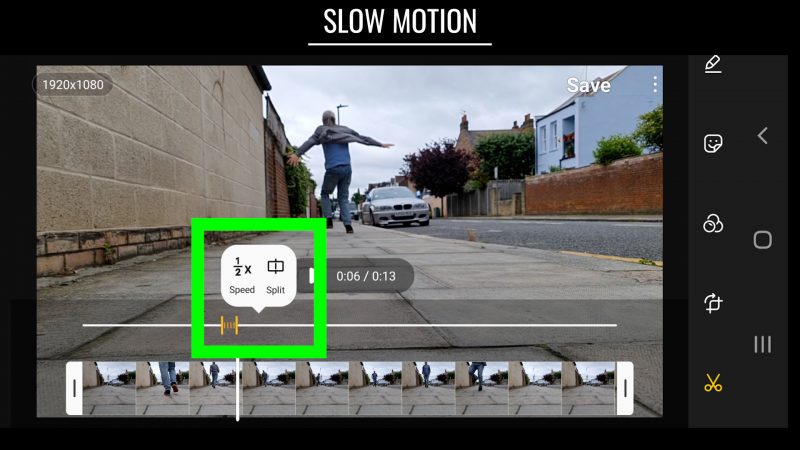
You can also change the speed of the slow motion when you tap on the slow motion area. Choose between 1/8, 1/4 or 1/2. As well, split allows you to create 2 slow motion areas. If you decide not to use one of them, you can just delete it.
How to Shoot Super Slow Motion
Back in the previous menu, select Super Slow Motion. Again there is no option to change settings. In my Note 20 Ultra, Super Slow Motion records at 1080p and produces footage as if recorded at 960 fps. I say “as if” because in fact it records at 480fps and then uses digital interpolation to slow it to 960fps.
The video produced will be at 30fps.
When you shoot super slow motion the camera shoots for about 1 second. So once you tap the shutter button you have to wait for it to finish.
Again, you can go in and move the beginning and end to choose where you want the slow motion to be in the clip.
So whereas with regular slow motion you can record as long as you like, with super slow motion you can only record for about a second. I think the exact time is 0.8 seconds.
How to Record a Timelapse or Hyperlapse Video
Back in the previous menu tap the hyperlapse button. If you want to shoot timelapse, then this is where you want to be. What’s the difference between hyperlapse and timelapse?
Timelapse is when the camera is still, fixed on a tripod for example, and hyperlapse is when the camera moves.
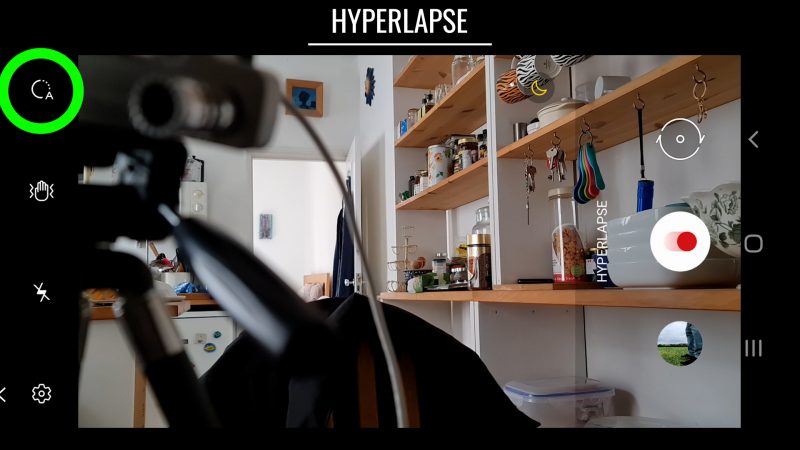
To choose the speed of the timelapse (or hyperlapse) tap the button in the top left corner. You can choose from 5x to 60x. When you select a speed, a message pops up with recommendations on which speed to use for a particular type of shot.
For example, they say 45x (night) is good for night shots with car headlight steaks.
You also get the option to enable super steady. So for hyperlapse shots where you are walking with the camera, it might be a good idea to use super steady for a smoother hyperlapse.
How to Use Dual Recording / Director’s View
Back in the previous menu, tap the Dual Recording button. You should now see a Picture-in-Picture or PiP for short. The main screen shows your main camera while the PiP screen shows your selfies camera.
When you record, you will now record a video exactly as you see it, with your selfie camera embedded. You can drag the PiP screen around to reposition it. And if you do this while recording, the movement will be recorded too.
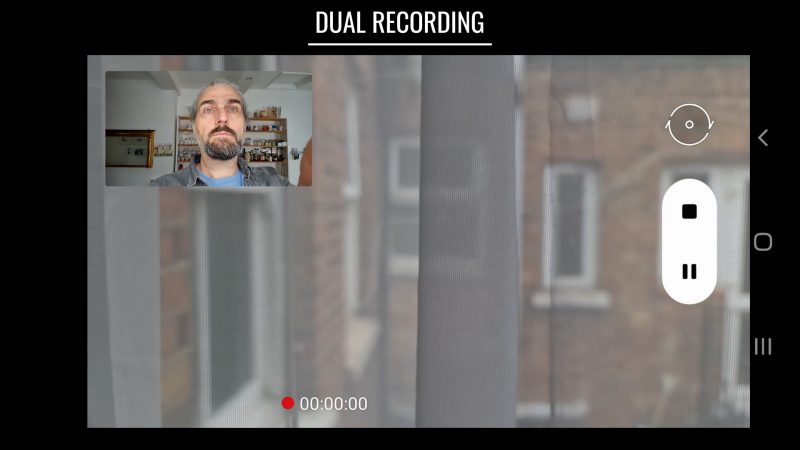
Tap the icon in the top left corner to change the mode to split screen between main camera and selfie camera. Again, in this mode what you see is recorded into a single video.
If you have a later Samsung device like one of the S21 range, instead of Dual Recording you will have Director’s View, which is basically the same, except it gives you more options for layout here and more camera options.
How to use Portrait and Portrait Video
Back in the previous menu, Portrait and Portrait Video allow you to separate the background from the subject using software. Portrait is for photos and Portrait Video is obviously for videos. I think we can say it works better in photos than in videos.
But here’s how to use it. The most common use of these modes is to add a blurred background, similar to that shallow depth of field effect from a more pro camera.
In Portrait modes there is no option to use the telephoto lens. Options are front selfie, wide and ultra wide for photos and main camera and selfie for videos.
Aim and at the subject and wait for it to say it’s ready. If you are too far from the subject, or move too far during the shot, the mode might stop working.
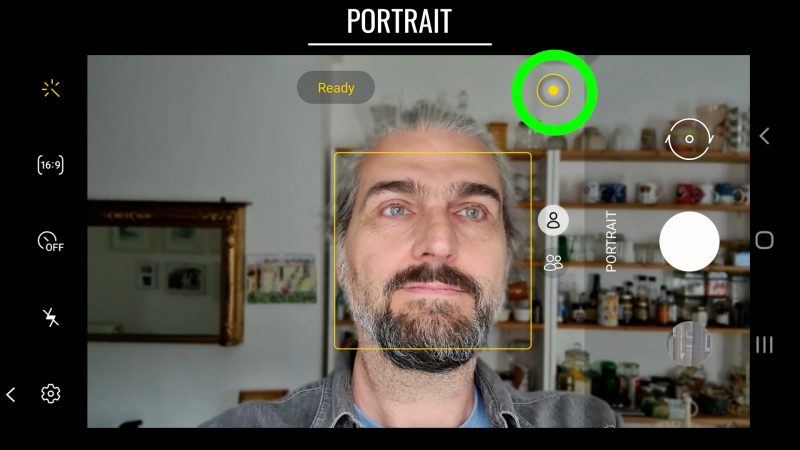
Tap the effect picker – a yellow circle around a yellow dot – if you want to select a different background effect. Big circle is for creating those big round bokeh effects, so this might look nice if you have lights behind the subject.
Note that Portrait mode for photos and Portrait Video have different effects. For example, Big Circle is only available in Portrait Video.
Use the slider to increase or decrease the effect. Increasing the effect can make it look less realistic as you start to see the join. So my tip is to keep the effect to a minimum and you will get more pleasing results.
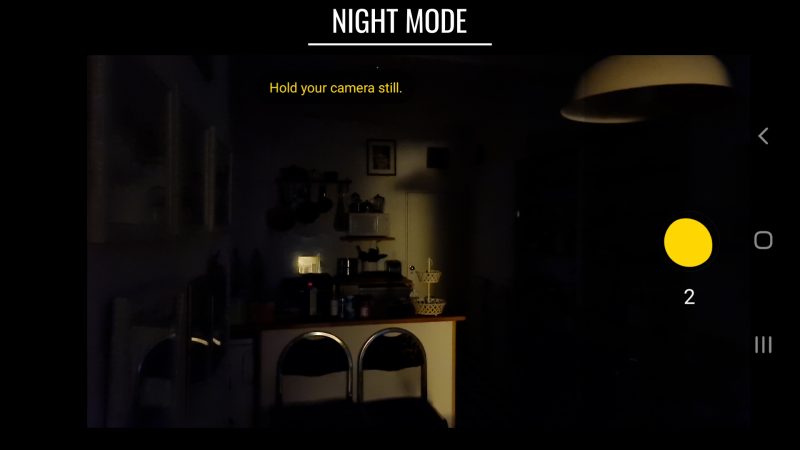
How to use Night Mode
Night mode uses multi-frame processing to combine 30 images into one clear photo. The extra light captured by the phone’s camera sensors will help your photos appear bright and enhanced.
Back in the previous screen, tap Night or the moon symbol. All cameras are available.
When you take a photo in Night mode, as the camera is taking 30 frames, you need to hold your camera as still as possible. It takes a few moments to process the photo before you can see the full result in the gallery.
How to use Food Mode
Back in the previous menu, tap the Food button with the fork and spoon symbol.
In the centre of the screen you see the corners of a square which represents the placements of a radial blur. Drag this around to reposition.
Tap and hold one corner to resize the radial blur effect. After a moment, the guide disappears so you can see what your photo will look like. Tap the drop icon to disable or enable this feature.
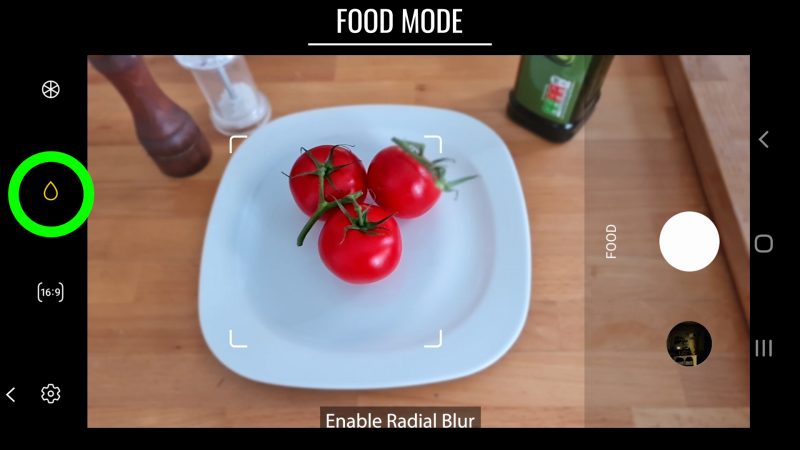
Tap the circle that looks like a wagon wheel to open a slider. Move this up and down to either cool or warm the photo. Down for cool, up for warm.
How to Shoot a Panorama Photo
If you want to take a picture of a very wide view, you can use the panorama feature. Back in the previous menu, tap the Panorama button.
You can now choose between the wide angle main lens or the ultra wide angle. The main camera is better quality, so you might want to choose this one.
One tip is to hold the camera vertically as it’s easier to hold. Tap the shutter and now start panning left to right or right to left, in a steady motion.
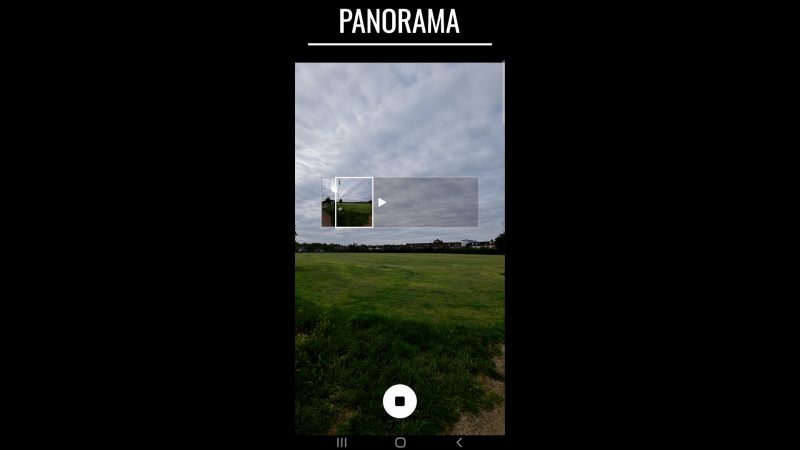
If you have objects moving in the foreground, they might not come out too well in the final image. So you might be better off using this feature when you have an unobstructed view and minimal foreground movement.
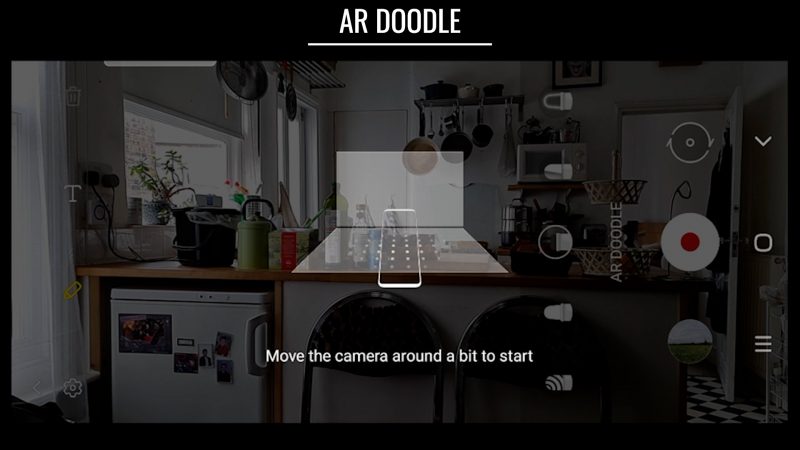
How to use AR Doodle
AR doodle allows you to add custom drawings, some preset images and text to a video. But whatever you add is rendered in a 3D space. So as you move the camera around, the images move as if they exist in that space.
Also, these objects are situated in a 3 dimensional space. So if you move the camera towards them, you appear to get closer or even move through them. The AR software will remember these objects, even if you move them out of frame. As soon as you move the camera back, the object reappears where you last saw them.
Tap AR Doodle and you are asked to move the camera around so the camera can map out the area. I found that sometimes it stays in the scan mode, but if I tap the screen you can start adding images.
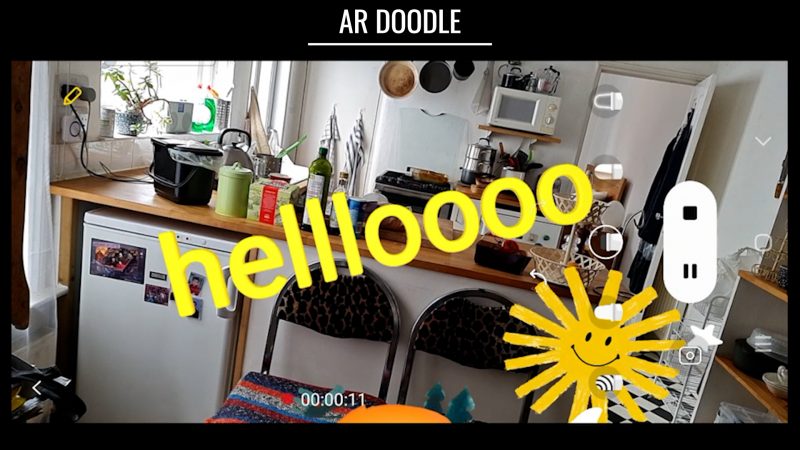
Now use the icons to select a pen, colour, images or text and place them on the screen.
With these pre-drawn images, if you keep tapping a new image will be dropped into the scene. You can combine different sets to create a 3D virtual scene, with clouds, trees, animals and so on.
You can drag, resize and turn text to reposition. But it seems you can’t do the same with your drawings.
It’s designed to be used in vertical mode but there’s no reason you can’t use it in horizontal mode if you want. After you have added all the images and text, just press record. Everything will be rendered into a single video which you can find in your gallery.
Smartphone Video – Beginner to Advanced
If you want to know more about smartphone filmmaking, my book Smartphone Videography – Beginners to Advanced is now available to download for members on Patreon. The book is 170 pages long and covers essential smartphone filmmaking topics:
Things like how to get the perfect exposure, when to use manual control, which codecs to use, HDR, how to use frame rates, lenses, shot types, stabilisation and much more. There’s also my Exploring the Film Look Guide as well as Smartphone Colour Grading.
Members can also access all 5 episodes of our smartphone shot Silent Eye series, with accompanying screenplays and making of podcasts. There’s other materials too and I will be adding more in the future.
If you want to join me there, follow this link.

Wow!! This is such a well put together explanation. Do you have a tutorial like this one for the Samsung Ultra 21 or 22. I currently have an S21 but have an S22 ordered.