How to Shoot an Interview with your Smartphone
Mobile journalism (or MoJo) has really taken off in recent years. Not surprisingly, as most smartphones now carry cameras capable of shooting broadcast quality video, they are small, light and obviously very portable.
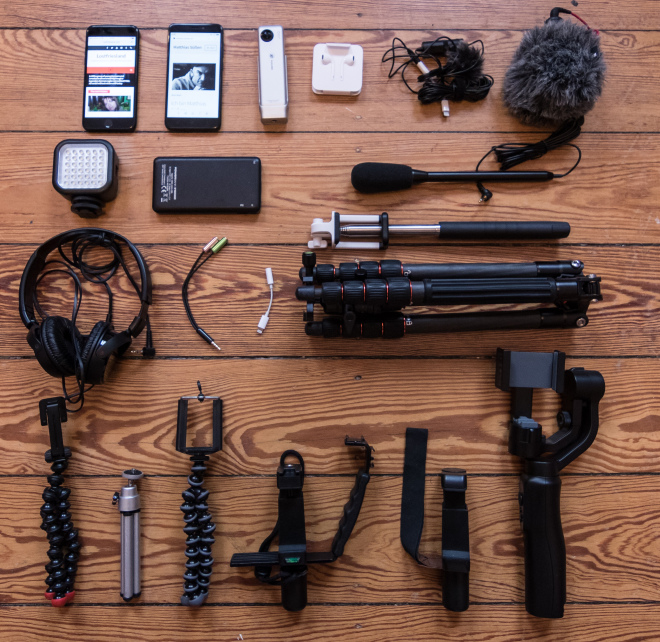
Mobile journalists can fit their equipment in a backpack: your phone, a lightweight tripod, a couple of clip-microphones and an external light and you are good to go.
A huge advantage for mobile journalists is the fact everyone is so used to seeing smartphones in people’s hands, you can often film discreetly without drawing too much attention to yourself. However, that isn’t usually a problem when filming an interview – so what are the challenges?
Firstly, before any film shoot with your smartphone you should do 3 things:
- make sure it’s charged
- free memory space by clearing videos (and possibly photos too) from the phone
- switch to flight mode so you don’t get messages and/or calls while filming
The Interview Space
Where will your interview take place? When shooting an interview, you generally want a space where you and the person (or people) being interviewed feel comfortable and relaxed. Being at a comfortable temperature obviously helps.
Knowing you are not going to be interrupted for the duration of the interview helps too. If you keep getting interrupted, your interviewee will be less likely to relax and therefore less likely to give the best interview.
Noise
Noise is the curse of all live filming situations. The problem with loud noise is it’s almost impossible to fix. If the room is dark, you can use lights. But if there’s building work going on across the street (this happened to me) it can be a nightmare.
With an interview, more than other filming situations, audio is absolutely key. You are there to record someone talking, after all. So make sure the noise level in your interview space is acceptable.
Light
Will there be enough light? Assuming that you don’t have a huge lighting set up, windows are great for free lighting and generally create a more attractive look than artificial lighting.
When an interview takes more than a few minutes, be aware of the sun changing position outside the window, changing the direction of the light. If you later want to cut between different parts of the interview, the sudden change of light position can look ugly.
When light from a window is too harsh, hang thin white curtains or cloth to soften the light. This also helps with a changing sun position.
Tip: shooting your subject side on to the window often creates the most pleasing look. Having them face the window can work too – their face will be all one shade which can make it easier to avoid blowing out part of their face. However, if they have their back to the window, either their face will be too dark or the window behind them will just be a big white block.
If you’re are filming with your smartphone, most likely you won’t have a big lighting rig. Therefore you need to make the most of the available light. Play around and test out different positions with the interviewee to find the most attractive shot. You can also use a small light and/or a photographer’s reflector to fill the subject’s face if it is too dark on one side.
Background
Unless you are using a plain background – maybe a curtain or a wall – the background can serve as an interesting backdrop to the interview. Perhaps the background is somehow relevant to the subject or it just looks interesting.
Again, play around with the position of the interviewee in relation to what is behind them. You can also re-arrange things in the background aesthetically. Lighting, including light from a window, will change the nature of the background too (remember, be careful of that changing sun position).
Tip: be careful of awkwardly placed objects behind the subject. A large pot plant which appears to be growing out of the top of the interviewee’s head can ruin your interview. Also, be careful that the background doesn’t distract from the subject – maybe move the subject further away from objects in the background if there’s space available.
Camera
Camera App
Using your phone’s native camera app can work well. But unless your inbuilt camera app has a lot of adjustable settings for video, I recommend using a dedicated camera app which gives you more manual control. Note, Samsung recently changed their native camera app (update: Pro mode restored for newer Samsung devices) so that it is no longer possible to fix exposure, frame rate, ISO and other essential camera settings.
Using your camera app, fix the exposure settings so that the auto exposure doesn’t keep adjusting the settings in the middle of the shot. If possible, make sure the ISO is low enough to avoid too much noise appearing in the image. Also, set the frame rate and shutter speed so that any movements will have a nice motion blur (without some motion blur movement looks harsh).
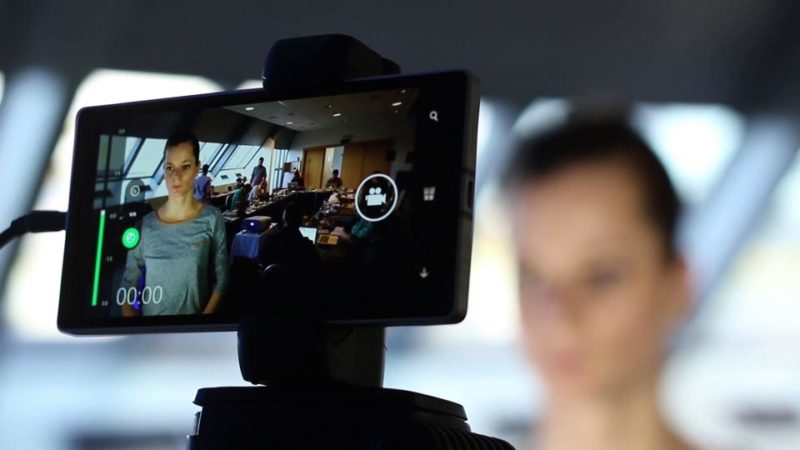
Framing
Make sure the subject is well framed. For example, if they are to the left of the frame, have them looking towards the right. However, make sure they are not looking too far to the right. Essentially, with the subject’s eye line set correctly, the audience feel part of the conversation. If they look to far left or right, the audience are wondering what they are looking at.
Having said that, you might want to create an awkward feeling by doing just that. Another option is to have the subject look directly into the camera, giving the viewer the feeling they are being talked to directly (in which case, the best position for the subject is most likely in the centre).
Most interviews set the camera at eye level, where it feels most natural for the viewer. However, again you can get creative and shoot from below up, or from above down. Generally, looking down on your subject makes them look small and vulnerable, while looking up at them makes them look more powerful.
Using 2 cameras simultaneously will give you an extra angel when you are editing. This will really help keep the interview fresh and also help you to cut from different parts without jump cutting. Remember to make sure both cameras have the same exposure setting so the shots edit well.
Resolution
what resolution options does your smartphone have? Many phones now shoot up to 4K. Your camera app will give you options in the settings to change the resolution. Using a 3rd party app like FiLMiC Pro gives you extra options your native app doesn’t give you.
Basically, the higher the resolution the more detail in the image. The upside of that is you can re-frame the image when editing. For example, you might have a head and shoulders shot. But you could zoom in in the edit and still retain HD quality, if you shoot footage above HD.
The main downside is that shooting higher resolutions takes up more memory space in your phone. If your phone runs out of memory space, then you need to stop the interview to dump the footage onto a drive.
So it all depends on your phone’s resolution capabilities and how much memory it has on board.
Tripod
For interviews, you generally want to have a stationary camera, so set your camera on a tripod or other stabilisation method. Affordable, lightweight tripods can fit into your backpack so there’s no need to encumber yourself with a heavy one.
To mount to a standard tripod, you will need a smartphone clamp. This allows you to easily and quickly clamp the smartphone into place. They can also be used to mount external gear like mics and lights, depending on the clamp.
Best tripods for smartphone filmmaking.
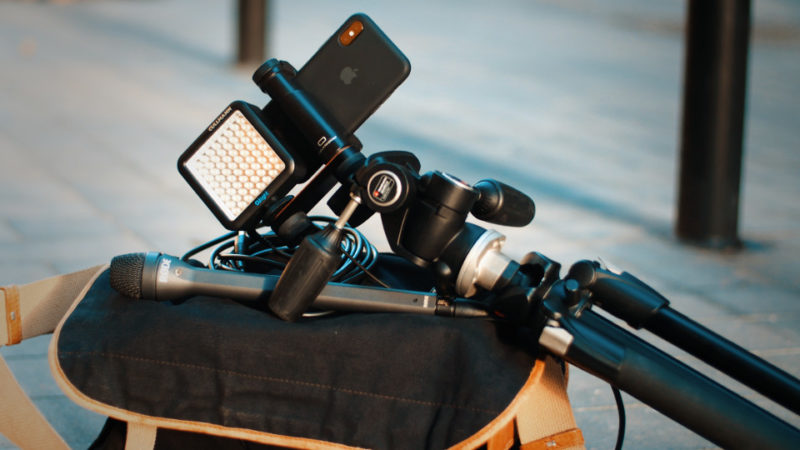
Microphones
As I mentioned above, the purpose of an interview is to record someone talking. So good audio is absolutely essential.
Depending on your smartphone, you can get very good inbuilt mics. However, they are not designed for recording interviews and you will not get great sound (unless the phone is very close to the subject’s mouth).
Best microphones for smartphone filmmaking.
Clip-on mics
The most common microphone used for smartphone interviews is the clip on (AKA lavalier) microphone. These mics plug into the headphone socket of your smartphone to allow you to connect an external mic. Note that camera apps like FiLMiC Pro allow you to switch between internal and external mics.
Clip-on mics are great for interviews as it’s not so important to hide the mic from view. Plus they fix the mic in position near the speaker’s mouth, so your audio will be more consistent.
Even a low-budget clip-on mic will improve the quality of your audio. You can get decent ones for as little as $15-20. We recently bought 3 BOYA BY-M1 lavalier clip on mics to record some interviews ourselves. For iPhones with lightning jacks there are mics such as the this affordable lavalier with Apple lightning connector.
There are also mini shotgun mics which clip onto your phone. These are fine if you have the subject close enough to the mic.
If you want to use more than 1 mic
Smartphones only have 1 mic input. So if you want to record more than one person at the same time, your 2 mics can be plugged into a dual adaptor like the Rode SC6. If you are on an iPhone, the Rode SC6-L adaptor removes the need for a lighting-to-3.5mm adaptor.
Alternatively, there are Dual-Head Clip-Mics which allows you to connect 2 mics into the single headphone socket on your smartphone such as the BOYA BY M1DM. If you add an audio mixer, like the Saramonic SmartMixer for example, you can add even more control over your audio. It all depends on how light you want your kit to be and how much you have to invest.
Of course, if you are shooting with 2 or more smartphones, you will be able to connect a mic to each phone without the need for extra kit. Another option is to use a handheld microphone held by the interviewer, which allows you to move the mic to whoever is speaking.
Smartphone Video – Beginner to Advanced
If you want to know more about smartphone filmmaking, my book Smartphone Videography – Beginners to Advanced is now available to download for members on Patreon. The book is 170 pages long and covers essential smartphone filmmaking topics:
Things like how to get the perfect exposure, when to use manual control, which codecs to use, HDR, how to use frame rates, lenses, shot types, stabilisation and much more. There’s also my Exploring the Film Look Guide as well as Smartphone Colour Grading.
Members can also access all 5 episodes of our smartphone shot Silent Eye series, with accompanying screenplays and making of podcasts. There’s other materials too and I will be adding more in the future.
If you want to join me there, follow this link.

Let’s not forget, switch on airplane mode or if streaming, ‘do not disturb’. So there are no pesky interruptions
ah good spot
[…] The MoMo site offers a solid guide to interviewing with a smartphone here. […]
[…] David Brewer Media Helping Media BBC […]
Hi, great short article, thanks for sharing!
quick question, I have a few interviews I am planning to do and I have 0 experience in this.
Using a Lavallier would guarantee better sound: does that mean I would need I phone for video and at least 1 more phone for audio? then combine the auido and video tracks together? which editing software would you recommend if that’s the case please? Would I need to switch off the sound taking mode in whatever app is used to record the video?
Thanks
Hi Alex. You should be able to record audio directly into your smartphone. How you do that depends on your smartphone. If you have a 3.5mm headphone socket, you can use that. Otherwise you will need a lav mic which is compatible with your device’s input or an adapter. But it’s much better to record straight onto the device as smartphone video can have sync issues, because they use variable frame rate.
Thanks Simon. So if I have myself and the interviewee, phone records the video, 2 lavalliers connected to the phone with the splitter you recommended in the article so as to avoid having sync problem when editing. is that corect?. (that seems like quite a bit of cable between the person and the phone though)
Thanks much!
Well it’s best to test things and see what works best for you. I’ve been through a lot or trial and error and each device or working method changes things. In the past when recording interviews we have used 2 smartphones (Samsung S9 and S8), each with a BOYA wired lavalier. That way you can get 2 people’s audio and 2 angles as well. If you only have 1 camera and 1 person is not on camera when talking, I would consider recording their voice separately. A downside of feeding 2 mics into one line is you won’t be able to alter the voice level later…
Thanks Simon, super helpful!
hi Simon
great overview! i have a question about smartphone lens angle. most average phones are stuck on very wide angle which obviously distorts subjects close to camera. do the better ones allow adjusting to more standard interview lens sizes (like 35-50mm)? or can that be done in third-party apps?
thanks
hi Marlowe. You can use a smartphone with inbuilt telephoto lenses or add a conversion telephoto lens
Do you also mic the interviewer? What would be the best way to mic an interviewer and two interviewees?
You only have to mic whoever is in shot. If you intend to have 3 people in shot at the same time, then you will need 3 mics and a way to record them. If the interviewer is in a separate shot, you can film that separately and edit it together. There are systems that allow you to record 2 mics, like Rode Go for example, and quite a few others. 3 is also possible, but it might get more expensive
another option would be to have a handheld mic, which is passed to whoever is speaking