Which Resolution Should I Use for Shooting Video: FiLMiC Pro Tutorial
In this article I’m going to talk about the technical aspects of choosing Resolution when shooting video. I’m going to use FiLMiC Pro to show you how you can achieve great looking video with your smartphone and a low-cost camera app.
Choosing resolution can be quite puzzling and there is a temptation to just to shoot the highest quality available, without first considering what the video is being used for. Some of the latest smartphones can shoot up to 8K resolution, which is higher than many DSLRs. Some new DSLRs are still limited to HD (1080p) resolution when shooting video.
But if you don’t have a basic understanding of resolution, terms like 8K, HD or 1080p won’t mean anything to you. So let’s go through the basics of video resolution before I talk about which one to choose.
What is Video Resolution?
Putting it simply, the resolution setting of your video camera (including FiLMiC Pro) controls the number of pixels within 1 frame of video.
Resolution can be written as the measurements of 2 dimensions: width and height. For example, 1024 × 768 – where the first number is width and the second height. Remember, a video in landscape will be wider than it is high while a vertical video will be higher than it is wide.
To work out how many pixels are contained within a frame, you simply complete that multiplication. 1024 × 768 = 786,432 pixels.
The pixel art in the windows in the photo below give you an idea of how pixels work. This art is created using just a handful of “pixels” and is reminiscent of old video games. Of course, we are now used to seeing many many more pixels in our modern computer, TV and smartphone screens.
Bear in mind, each camera has a maximum and minimum number of pixels it can use for each frame. FiLMiC Pro cam provide a range of resolutions, depending on your device. Note that in FiLMiC Pro, the resolution you choose will also affect which frame rates are available.
Are more pixels better?
As a general rule, yes more pixels are better as they provide greater detail and information in the image. On the other hand, more pixels per frame means greater processing power is required to record and also play the video. In addition, the more pixels you use the more hard drive space you will need to store all those pixels.
So, as with many factors in filmmaking, we have to consider our practical limitations. Before you choose resolution, you factor in the processing power and hard drive storage space you have available.
However, ultimately, there’s a general principle for creating polished cinematic video. And that is the less your audience are aware of your pixels the better. So, the more pixels you have within each frame, the smaller they will be and therefore less noticeable to the human eye.
On the other hand, film lacks the precise definition contained within digital images so when achieving the film look do we really need all that extra pixel detail?
How to set Resolution with FiLMiC Pro
Later, I will talk about how resolution changes the look of your video, for example if you are trying to achieve the film look. But first let’s look at how to set resolution with FiLMiC Pro.
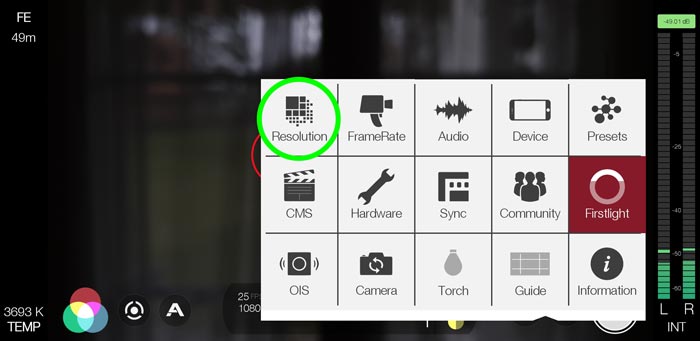
- Open FiLMiC Pro
- Tap the Settings icon
- Select Resolution
- Tap the left-right arrows to select desired resolution
- Close settings menu
Resolution settings available will depend on how FiLMiC Pro works with your device. Using my Samsung S9, I have the following resolution options available:
- SD 540p
- HD 720p
- HD 1080p
- 2K 1152p
- 3K 1836p
- 4K 2160p
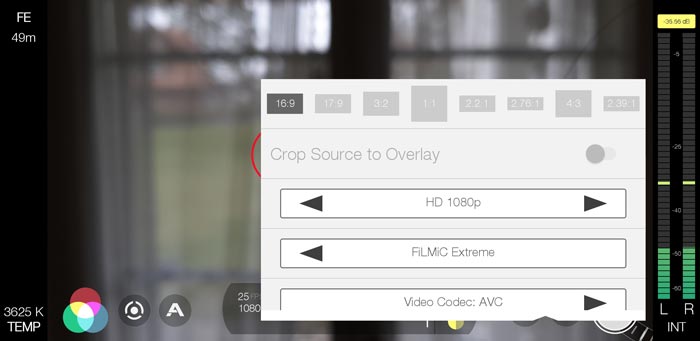
The number refers to the height of the frame, measured in pixels. Meanwhile, the width of each resolution will be defined by the ratio setting located at the top of the resolution control panel. By default, FiLMiC Pro records in a 16×9 frame ratio.
But what do the other letters mean?
Terms like Standard Definition and High Definition can mean different things depending on medium or format. If we try to investigate these resolution standards, it’s very easy to get lost in a jungle of technical information about TVs, DVDs, Blu-ray and so on. But let’s go through a basic overview.
Standard Definition (SD)
With a ratio of 16:9 the SD 540p setting will set a frame size of 960 pixels wide x 540 pixels high. This frame size is exactly one quarter of a Full HD (1080p) frame, in a 16:9 aspect ratio.
File size: I recorded 1 minute of SD 540p video with the bitrate set to “FiLMiC Quality” and the file came out at about 60MB.
But SD can mean different things in different situations. For example, a SD TV might be 704×480. Or it might be 704×576. Which then becomes 1024×576 after horizontal scaling…
A good old DVD uses Standard Definition. Which means 480 “lines” of resolution in the U.S. (NTSC) and 576 “lines” elsewhere (PAL). Like I say, it gets messy with resolutions changing depending on many different factors. Plus there’s analogue TV and digital TV… That said, these days most of us now have digital TVs.
High Definition (HD)
High Definition (HD) video has a greater resolution than Standard Definition (SD). FiLMiC Pro has two HD options, 720p and 1080p. In basic terms, 720p has less definition than 1080p.
With a ratio of 16:9 the HD 720p setting will set a frame size of 1280 pixels wide × 720 pixels high. Meanwhile, HD 1080p will set a frame size of 1920 wide x 1080 high.
File size: I recorded 1 minute of HD 720p video with the bitrate set to “FiLMiC Quality” and the file came out at about 117MB. Meanwhile, 1 minute of HD 1080p video with the bitrate set to “FiLMiC Quality” came out at about 231MB.
2K 1152p
Many cameras – and other camera apps – go directly from HD to 4K, with nothing in between. In FiLMiC Pro, however, we have 2 other settings, 2K and 3K. This is actually quite handy if you want to add a little extra resolution but don’t want to go all the way to 4K.
I’ve shot 5 episodes of an Amazon Prime series using FiLMiC Pro and used the 2K resolution setting for all of them. The choice is a nice compromise between quality and file sizes. I still get the option to reframe my shots a little if I need to, while the file sizes are still manageable.
While the DCI (Digital Cinema Initiatives) defines 2K resolution standard as 2048×1080 (which is a 17:9 ratio), FiLMiC Pro seem to have gone with monitor resolution as a guide. For that reason, with the 16:9 ratio, their 2K 1152p comes out at 2048 pixels wide x by 1152 high.
File size: I recorded 1 minute of 2K 1152p video with the bitrate set to “FiLMiC Quality” and the file came out at about 233MB.
3K 1836p
The step between 2K and 4K is – surprise surprise – 3K. While 3K doesn’t really appear as a normal video shooting format, FiLMiC Pro provides it as an option. Using the 16:9 ratio, their 3K 1836p comes out at 3264 pixels wide x by 1836 high.
File size: I recorded 1 minute of 3K 1836p video with the bitrate set to “FiLMiC Quality” and the file came out at about 232MB.
4K 2160p
In 2005, Digital Cinema Initiatives (DCI) published the Digital Cinema System Specification. This specification establishes standardised 2K and 4K container formats for digital cinema production, with resolutions of 2048 × 1080 and 4096 × 2160 respectively. However, FiLMiC Pro 4K (presumably determined by native smartphone formats), gives us a 4K resolution of 3840 x 2160.
File size: I recorded 1 minute of 4K 2160p video with the bitrate set to “FiLMiC Quality” and the file came out at about 545MB.
Progressive (p) vs Interlaced (i)
The p that comes after the resolution number, eg 540p or 1080p stands for Progressive.
When I was preparing to shoot my feature film 10 years, there was a lot of talk about whether to shoot video interlaced or progressive. The advice was to shoot progressive as this had a more filmic look.
So, no surprise that an app called FiLMiC Pro would only give us progressive as a choice. And actually, as far as I’m aware, there is no option to shoot interlaced using a smartphone (correct me if I’m wrong). Indeed, going though the video settings on my Samsung S9 there is no option to switch between progressive and interlaced.
If we were able to shoot interlaced video it would come with an i indicator instead of the p. Eg: 1080i. Anyway, when using FiLMiC Pro it’s not something we need to worry about as there is no interlaced option. But it’s probably still worth knowing what that little p means.
Bitrate Setting
Below the resolution setting is another control with left and right arrows. This setting controls the bitrate of the video.
When we are setting up our camera for video recording, most of us understand the resolution setting. This is directly related to the frame size and ratio, so we can “see” the difference. When it comes to setting bitrate it’s less clear.
But put simply, bitrate is the amount of digital bytes of information being processed by your camera (or other device) every second. Therefore, bitrate is actually measured in bits per second.
What is video bitrate?
Film is a very long strip of celluloid containing thousands of frames. Each frame will be the same quality, no matter how you project that frame. This is one of the reasons some people still argue for the use of film. Just like the vinyl vs CD or digital file argument.
With digital, however, the image information is turned into light (or light turned into image information) using a computer. Video is recorded or played back from a stream of digital information. Your digital camera, projector or TV requires a processor to convert all this information.
Bitrate has a direct influence on the quality of your video. That’s why simply increasing resolution for better quality isn’t quite the whole story. Putting it simply, a video can only appear with as much information as the processor playing or recording it can manage.
Imagine trying to transfer 1 million litres of water from one tank to another. No matter how powerful the pump you used, the water could only travel as fast as the width of the hose allows. And the same, essentially, goes for bitrate.
How to Set Bitrate with FiLMiC Pro
If you are shooting on a smartphone and using the FiLMiC Pro camera app, amongst other things you can also set the recording bitrate. This is how to set video bitrate when using FiLMiC Pro:
- Open FiLMiC Pro
- Tap the Settings Menu (circular cog icon)
- Tap the Resolution tab
- Finally, tap the left and right arrow on the middle setting to choose the desired bitrate level
Now, FiLMiC Pro doesn’t give the bitrate number. Instead, the app has setting names:
- Economy
- Standard
- FiLMiC Quality
- FiLMiC Extreme
Economy is the lowest setting with the lowest quality. However, this will create lower file sizes than the other settings.
Standard is the same bitrate as your smartphone’s native camera app uses.
FiLMiC Quality sets your bitrate above your native camera apps normal rate. In this case, 32mb per second.
FiLMiC Extreme sets your bitrate above your native camera apps normal rate. In this case, 100mbps for 2k, 3k and 4k. At 1080p this target is is 50mbps.
Note the use of the term target bitrate.
FiLMiC say, “When you set a bitrate in FiLMiC Pro you are establishing a target for the camera framework. Depending on the quality of the feed you may see final bit rates that are higher or lower than this target in order to ensure quality. In doing this we can provide for a high quality while also keeping the video file size as low as possible.”
In other words, like many aspects of shooting using a smartphone, this is not a precise science.
Pros & Cons
While using a higher bitrate should allow better quality videos, file sizes and processor needs also increase. Again, the setting you choose comes back to your set up and how much it can handle.
Bitrate File Sizes
To test how the bitrate setting affects file size, I set FiLMiC Pro to the “Extreme” setting and once again recorded 1 minute of video. This is the results:
- 540p = 88mb
- 720p = 181mb
- 1080p = 540mb
- 2K = 540mb
- 3K = 540mb
- 4K = 854mb
One thing that immediately struck me was how files sizes between 1080p to 3K remain the same. Is this something to do with my smartphone’s available native video resolution? This is what my S9 handset offers:
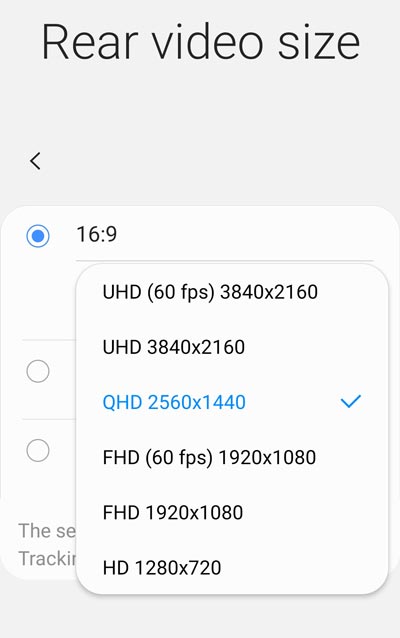
So, my Samsung device lists the resolutions slightly differently.
- High Definition (HD)
- Full High Definition (FHD)
- Quad High Definition (QHD)
- Ultra High Definition (UHD)
Like I say, there’s no 2K or 3K available. And often FiLMIC Pro is working around what your device can do and what it allows 3rd party apps access to. So, the suggestion here is that while 2K and 3K indeed contain more pixels, they aren’t actually better video quality than the 1080p setting.
You might want to try this on your device. Do you get the same result, or does 2K and 3K come out with bigger files than 1080p? I would love to know, especially any iPhone shooters out there. Let us know in the comments.
Variable Bitrate
Variable bitrate (VBR) relates to the bitrate used in both sound and video encoding. As opposed to constant bitrate (CBR), VBR files vary the amount of output data. Like variable frame rate, VBR adjusts bitrate “on the go” allocating more bitrate to more complex segments of media files and less to less complex segments.
“Simply put, VBR lets the encoder use more bits for “stuff that is hard to encode” and save bits for the parts of the file that are easy to compress. What is hard and easy in terms of compression? Lots of motion in a video for example require more bits to encode, since the differences between adjacent video frames will be larger. High spatial details and complex textures are also hard to encode.” Werner Robitza
As we know, unlike analogue media, digital media is all about compression and VBR is another way for higher quality media to be stored in manageable drive spaces.
Variable bitrate is used in the h.264 codec (AVC setting in FiLMiC Pro) and presumably the h.265 codec as well (HEVC setting). As I have gone over before, HEVC produces smaller files but places greater demands on editing systems.
But what does all this mean when choosing a resolution to shoot in?
What Resolution Do You Need?
10 years ago, I shot a feature film with a camcorder and it ended up being screened on the biggest cinema screen in Europe. The maximum resolution I could choose was 1920 x 1080 HD. I could also choose between interlaced and progressive (choosing the latter).
Even on the biggest screen in Europe, the image held up well. I think was a lot to do with the projection system, as an add-on lens was used to blow up the HD image. Therefore, we didn’t have to consider the number of pixels in the screen.
My point being, you can shoot in HD and make it work on a cinema screen. Therefore, it should certainly also be good enough for streaming platforms like YouTube or Amazon Prime. Netflix has it’s own guidelines for video production, however they did accept 4K smartphone video when the film was directed by Steven Soderbergh. Unfortunately, that doesn’t mean they will accept our smartphone-shot videos, even if shot at 8K.
Major Platform Max Resolutions
Platforms like Amazon Video and Apple TV have maximum resolutions they can currently stream at. Here’s a few examples:
- Amazon Video: 1280×720
- BBC iPlayer: 1280×720
- Hulu: 1280×720
- Apple TV: 1920×1080
- Netflix: 3840×2160
- Vimeo: 1920×1080
- YouTube: 7680×4320
So, you can see there is quite a wide variation in resolutions. And even if a platform offers that maximum resolution, a viewer can only watch at a quality their internet speed allows.
Chroma subsampling
There’s a reason why we might want to record in 4K even if we only intend on mastering at HD 1080p. And that is down to a thing called “chroma subsampling”.
Once more, this is part of digital video compression where the information from 4 pixels is combined into one, to save memory. Or, more specifically, the chroma (colour) information.
As I have mentioned before, to use digital media in practical situations (eg: streaming) it needs to be compressed. This means removing information, but doing so in a way that the human eye (or ear for sound) doesn’t notice too much.
As it happens, the human eye has less problem with missing chroma (colour) information than luma (brightness) information. So in compressed video formats colour information is sacrificed. Due to this process, 1080p video can look poorer quality than 4K, EVEN when you are viewing the video at HD resolution.
Therefore, it makes sense to record at a higher video resolution, even if you will master the video at a lower quality. In addition, uploading a 4K video to a platform like YouTube should result in a better looking video than uploading 1080p, even when viewed at 1080p.
In Conclusion
Therefore, it is safe to say we should endeavour to record at the highest resolution in FiLMiC Pro our system and storage resources can handle. While we can always compress video to smaller sizes, going up from a lower quality is pretty much impossible to do without compromising the image.
Smartphone Video – Beginner to Advanced
If you want to know more about smartphone filmmaking, my book Smartphone Videography – Beginners to Advanced is now available to download for members on Patreon. The book is 170 pages long and covers essential smartphone filmmaking topics:
Things like how to get the perfect exposure, when to use manual control, which codecs to use, HDR, how to use frame rates, lenses, shot types, stabilisation and much more. There’s also my Exploring the Film Look Guide as well as Smartphone Colour Grading.
Members can also access all 5 episodes of our smartphone shot Silent Eye series, with accompanying screenplays and making of podcasts. There’s other materials too and I will be adding more in the future.
If you want to join me there, follow this link.

Hi
Thanks for another brilliantly explained and in depth look at smartphone resolution. Would love to know how you approach transcoding/Proxies in Adobe for editing 2k and 4k h.264 or hvec.
Thanks
Hello, I wanted to answer the question in your article about file sizes between FHD and 4K when shooting on iPhones.
I use a 3rd party app to shoot in 2560×1440 or 3200×1800 (which are not offered in the native app) and the file sizes vary as one would suggest, unlike your file sizes which where more or less identical. However, I use these mainly to get a better stabilization on videos with my older iPhone model (XS Max) when walking and it works quite well for me; filming in 4K looks good without motion, but elsewhere it is a little too bumpy and video quality suffers from that.
Additionally, depending on what I film, I switch between iOS standard bitrate factors and about 1.5x more which produces good results especially in combination with 3K resolution and HEVC codec. Sadly, my iPad won’t accept these captures – don’t really know why. But that’s a different story.
To be honest, the more I have tried to think into taking photo and video, the more I struggle with deciding for a certain codec, a certain resolution, a certain bitrate etc. Very complex topic.
“ film lacks the precise definition contained within digital images”
Regular 35mm film is more precise than UHD. Higher level film products like 65mm blow current digital acquisition out of the water. They also have no bayer patterns to reduce chroma information.