White Balance for Video – the Basics Explained
If you’re using auto settings on your camera, you might be wondering why your video has a strange colour. When we set white balance, we usually try to have the in-camera image look as close to how we see it with our eyes. To achieve this, we set the colour so that white looks white, then all other colours should fall into place too.
When using film, white balance is set by the type of film you put in the camera. Whereas in digital photography and videography, white balance is controlled by camera settings. This can also referred to as grey balance or neutral balance.
Digital video cameras usually have an auto white balance function. This works like all the other auto functions such as focus and shutter speed. If you take your iPhone out of the box and just start shooting video, the camera will do the best job it can adjusting everything correctly.
However, professional cinematographers or camera operators would rarely use auto settings. This is because when set to auto the settings can change during the shot and you can see the colour balance changing. Also, auto settings leave you with little control over elements which have a dramatic effect on the look of your video.
Temperature scale
All light has a specific measurement on the colour temperature scale. The scale is called the Kelvin scale as all light colours are measured in Kelvins. You might notice some numbers with a ‘K’ after them.
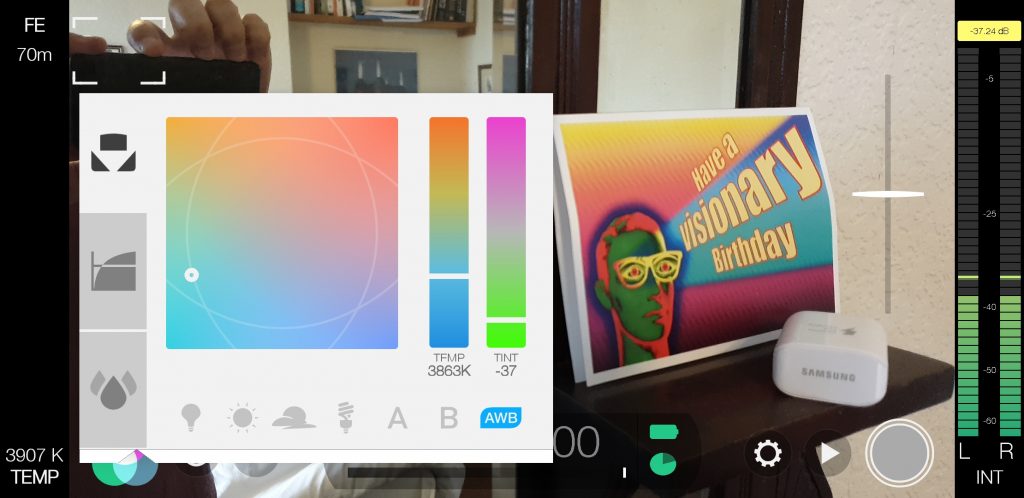
Below is a screenshot from the FiLMiC Pro camera app. You can see there are 2 “K” numbers. In the bottom left is the colour temperature reading of 3907K and in the middle 3863K.
They’re different numbers because I still have it on auto. White balance is constantly adjusting and one number has to keep up with the other. Once you tap the AWB button (blue) it turns red to fix the white balance. Both numbers then synchronize.
Colour temperature changes with light source
Look again at the screen grab above. In the colour control box you can see a row of icons at the bottom: light bulb (tungsten), sun (daylight), cloud (cloudy sky) and what looks like a modern energy saving bulb (fluorescent). These icons represent different types of light which will have different preset K numbers.
Bright light, like daylight or studio lights, tends to have a temperature of around 5,550K. A candle flame is warmer and redder, placing it at about 1850-1930K. Alternatively, pure blue sky from a north-facing source comes in at 10,000K.
Our brain has a white balance auto setting we only notice if make a point of trying to observe it. How our brains perceive colour is an almost endless topic. I remember my first lessons at art college dealt with basic experiments into how this works.
However, digital cameras are not yet as brilliant as our eye-brain system for making things look right. Well, it’s nice to know the machines occasionally still need us for stuff, isn’t it?
Setting white balance
The simple way to set white balance is using a white balance card or just a piece of white paper. In the location where you are shooting (with any lights you are using for the shot switched on), place the white paper in front of the camera and fill the screen. Wait for the auto white balance to find the correct setting then lock it.
Before you lock it, the white paper should look white.
Skin tones
Our brains are highly tuned to read the faces of other humans. A species that relies on social interaction needs to know how others are feeling as quickly as possible. Perhaps this is why indie-filmmaking legend John Cassavetes said the best filming location in the world is the human face.
This means our brains are very sensitive to skin tone, while colours of other objects is less important. If skin tones are off in an image, our brains are hardwired to sound the alarm. “Hey man, you don’t look well!”
Of course, there are other messages we receive from natural changes in skin tone. Angry people’s faces go redder, for example. And a blushing face might mean they’ve done something wrong, or might mean something else…
No wonder then that our brains are highly tuned to detect slight changes in skin tone. Our ancestors’ survival depended on it.
When it comes to film and video, getting skin tones right can be vital. So that’s another good reason to pay close attention to your white balance setting.
Fixing white balance later
Most editing software now has easily used white balance correction features. In Adobe Premiere and After Effects, I regularly use the white balance selector contained within Lumetri color.
If you have a part of the image that you know should be white (but is currently not white), you can use the eyedropper to select it. Lumetri color will now adjust the white balance of the whole image based on the area you selected.
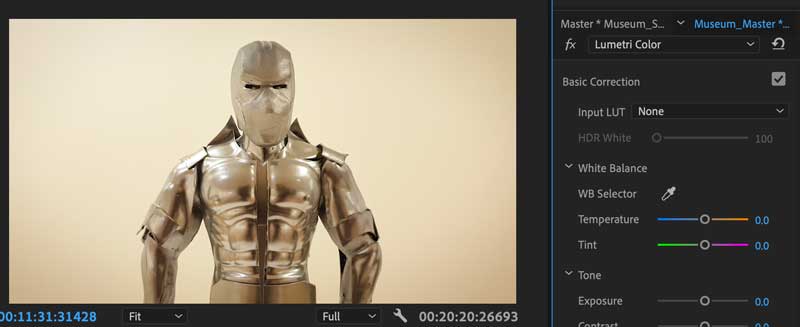
In the above image taken from a video I shot using FiLMiC Pro and a Samsung S9, the image appears a little too yellow. The wall behind the figure is cream coloured, yet I know the wall was white. So by taking the eyedropper from Lumetri Color, I select part of the wall by moving the eyedropper there and clicking.
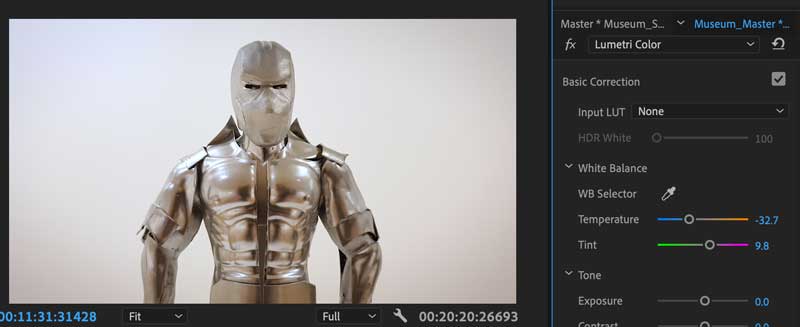
This is the result. Now the wall looks much closer to white than before. You can see to the right, under the eyedropper, the Temperature and Tint settings have changed. Temperature is -32.7 (more blue) while Tint is +9.8 (more magenta).
- Temperature adjusts the warmth of the image from blue to red.
- Tint adjust the image from green to magenta.
Try to get white balance as correct as possible when shooting
There’s a limit to what can be fixed in post. And when shooting on iPhone and smartphones, there’s even less room to fix things later as the file format used does not tolerate dramatic adjustments in colour too well. Added to that, if you don’t have any clear white object in frame, the process of colour correcting is more complicated and skilled.
Therefore, getting it right when shooting will save you a lot of time later.
Eager to learn more?
Join our weekly newsletter featuring inspiring stories, no-budget filmmaking tips and comprehensive equipment reviews to help you turn your film projects into reality!
I wonder how often I should do the white balance. For example a scene with two characters in a table and I’m gonna shoot over the shoulder also I wonder how to white balance if you’re using color gels. Anyone?
I would check it every time you change shot/angle, at least.
As to using coloured gels, in my opinion you would take the white balance reading before applying the gels. Because you don’t want the camera to take away that added colour.