Creating Simple CGI with Adobe After Effects
I’m currently doing post-production work on an episode of Silent Eye, shot on Samsung S9 phones – The Museum of Me. I’ve completed a rough assembly of the whole film (comes out at about 13 minutes). So now I can look at CGI (computer generated imagery) aspects of the film.
So, if you’re thinking of getting into some CGI work yourself or you’re just interested in how it works, read on…
We have a very small budget, so when we approached shooting this episode, I originally said I wanted to keep the effects down to a minimum. I have done CGI work before (using After Effects) and I know amount of time it soaks up. I’m not an expert, having taught myself using YouTube tutorials.
Plus this is not my profession, so each time I come to do some CGI work I need to spend some days refreshing my memory, and getting back into it – just adding to the time demand.
However, we wanted to create at least a hint of a futuristic museum so in the end I decided to just accept I would have a ton of CGI work to do. And so to it…
Adobe After Effects
I use After Effects because it’s pretty easy to use for adding 2D images into your footage. For example, if you want to replace a TV screen in your shot with a movie or a news broadcast. Or maybe you want to add change the screen of a smartphone in a close up shot, adding custom elements.
After Effects is very useful for this task. Also, because I use Adobe’s other software, it was pretty easy for me to jump into After Effects too. You can also use it for 3D work, but has become less popular for this kind of work in recent years.
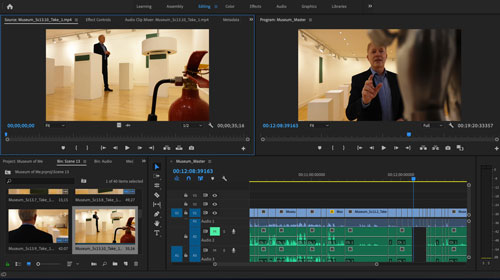
Another thing to consider – Premiere Pro and After Effects are integrated, so you can right-click a shot in your timeline and send it directly to After Effects to work on there. The shot in your timeline remains linked to the After Effects file, so that you can go back and make changes to the AR file and they will appear in the shot in your timelines.
Mocha AE CC
When you want to add objects to a shot (for example, screen replacement as described above), if the camera is moving, you must use some kind of tracking. After Effects has it’s own tracking features. However, it also comes with a free version of Mocha, which is now integrated like a plugin (it used to be a separate program).
So what is Mocha? Long time AE users know Mocha AE well. It’s one of the best tools out there for tracking 2D planes and replacing them. I’ve used it hundreds of times, replacing posters on walls (and placing scifi-style video adverts in their place), adding images and videos to phone screens, replacing TV screens and so on. Basically, if you have a flat surface in your shot and you want to replace it with something else, this is a great tool for doing the tracking part.
Introduction to Adobe After Effects using Mocha AE CC
In this shot, I want to replace the sign on the wall which appears as the elevator doors open.

This was shot using my Samsung S9, with no lenses, using FiLMiC pro (natural profile). I was shooting handheld, hence the need to use Mocha to track the movement in the shot. This is the opening shot of the film.
In this shot, the characters wait to reach their level as the elevator descends. The doors open to reveal what you see here and they step out. So I have a few things I need to do here:
I need to track the sign on the wall using Mocha, however it’s not visible for the whole shot which adds complications. I decided to cut before the actors walk in front of it, saving me from having to mask around them (frame by frame).
Boot up Mocha
With Mocha now more integrated into After Effects, it has it’s own slot on the effects menu.
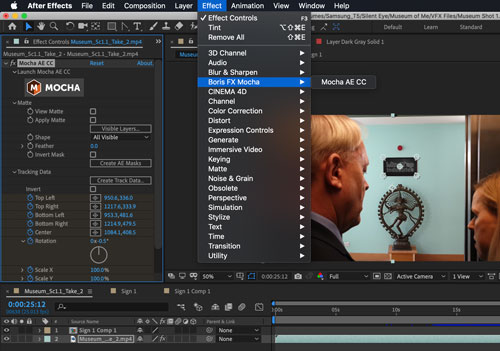
With the video layer selected, add the Mocha effect. When you click the Mocha logo in the effest tab on the left, it boots up Mocha and you can start tracking.
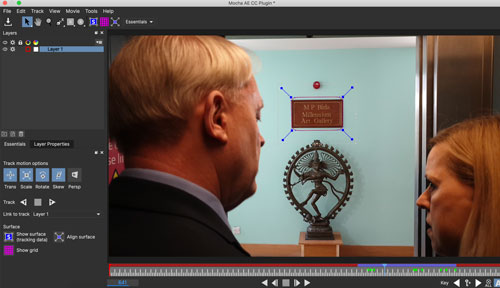
Basically, this process involves using the pen tool to add points around the area you want to track, completing the circle at the end. Mocha will now use only the information within that area to track the sign. Frame by frame, it analyses the image and works out how the image is moving and attempts to follow it as accurately as possible.
Mocha uses details in the image to track. The more clear the details, the better they are for tracking. This is why when filming, filmmakers add extra marks onto objects in the set they want to track later.
In this case, I knew the sign had enough contrast to track, so I didn’t need to add markers (helped by the camera not moving too much). There’s also the red light above and the statue below to add extra details for tracking purposes, if I need them.
You can track from anywhere along the shot
I only need a few seconds tracking information for this shot (the bit in purple), so there’s no need to track the whole thing. Because the shot starts with the sign obscured by the doors, I chose to start from near the end and track backwards.
Once you have the area selected, click the “show planar surface” button (blue with an S in it). Drag the corners so that the blue box covers the area you want to replace. The corners of the blue box will hopefully stay by the corners of the object you want to change (in my case, that sign).
Essentials
Mocha now has an “essentials” view, which is all the basic tools with more advanced stuff stripped out. So if you run your track and it works fine, you can save and close Mocha. However, if the blue box slips out of place during the track, you might need to open up the other settings.
The other views are “classic” “big picture” and “roto”.
I won’t go into too much detail here, as this is just an overview. But there are tons of tutorials online, should you run into difficulties.
Adjusting the tracking area
Tracking backwards brings me to the point where the doors close on the sign – but we can still see the sign for a few frames, during this motion. So how do I continue to track?
With Mocha you can pause the track at any time, to adjust the tracking area. So as the doors closed over the sign, I moved the tracking area, frame by frame, hoping there’s still enough information to keep my new sign in position. In the last couple of frames it was impossible to track, so I had to fudge it a little in After Effects later.
Back in After Effects
Once the track is done, save Mocha and close it. You now have to create tracking data using the Mocha plugin controls (in the effects controls section of AE). This involves selecting the name you gave to the tracking process in Mocha (it will be the default name if you didn’t give it one).
I had already created a new sign in Adobe Photoshop which I imported into After Effects. So I placed this image into a composition in AE. After Effects uses compositions (like folders on a computer) to group tracks – you can have comps within comps within comps.
Now, using the Mocha effect controls again, I exported the “corner pin” data onto the sign comp. Bear in mind, the sign composition needs to be exactly the same size as the video you are tracking. Now the image of the sign should snap over the sign in the video I am replacing, like this:
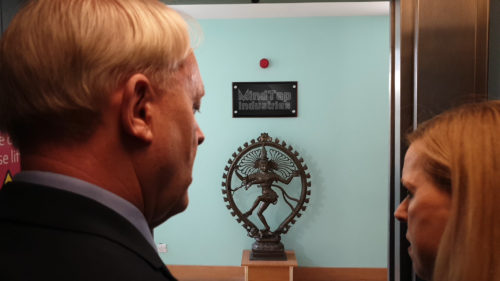
Playing the video, my new sign remains glued to the sign in the video, matching any movements exactly. Hopefully giving the illusion that the sign exists in reality on the wall.
Masking
But the job isn’t over. As the elevator doors open, I need to reveal the new sign as if it were behind the doors. I do this using masks in After Effects.
![]()
The box in pink is a mask. Put simply, masks in AE cut out everything either outside or inside the mask to reveal the layer below. In this case I’m removing everything outside so that the layer below (the video) is revealed to create the illusion I’m after. Essentially, I am erasing sections of my new sign to show the elevator doors.
But the doors are moving, so I need to animate the shape of the mask. I need it to move with the doors.
By switching “mask path” on by clicking the stopwatch symbol (it changes from grey to blue) I am allowing any changes to the shape of the mask to be recorded over time.
In a way, this is like traditional animation methods used since the beginning of filmmaking. Each frame, I adjust the shape of the mask by hand to match the movement of the doors. You don’t necessarily need to adjust the mask each frame, as After Effects will interpret movement between frames for you.
Note: you may find when you add the mask the portion of the image masked is offset. This is down to the corner pin effect on the new Sign layer.
One fix is to place the new sign layer into a new composition. Make sure to check the “move all attributes into new composition” button. Now add the mask to the new comp instead and it should be fine.
Eager to learn more?
Join our weekly newsletter featuring inspiring stories, no-budget filmmaking tips and comprehensive equipment reviews to help you turn your film projects into reality!