New FREE iPhone Camera App by Blackmagic Design – Tutorial
The makers of high quality, affordable digital video cameras and the DaVinci Resolve editing system, Blackmagic Design, have just released a camera app for iPhones. And it’s entirely free.
As far as I know, there’s no android version and I’m not sure if they’re planning one.
As soon as I heard about it, last night, I downloaded the software to try it out. The layout is based on the UI of their blackmagic cinema cameras, so if you’ve used or own one of those you’ll be familiar with it.
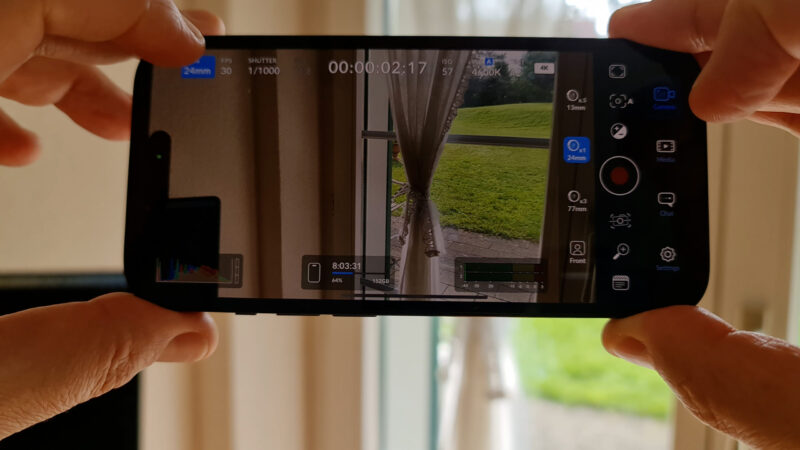
It’s a very nice layout. I mean that looks beautiful, doesn’t it? In my opinion, that’s one of the the best looking camera app UIs I’ve ever seen. Not too cluttered, nor too simple.
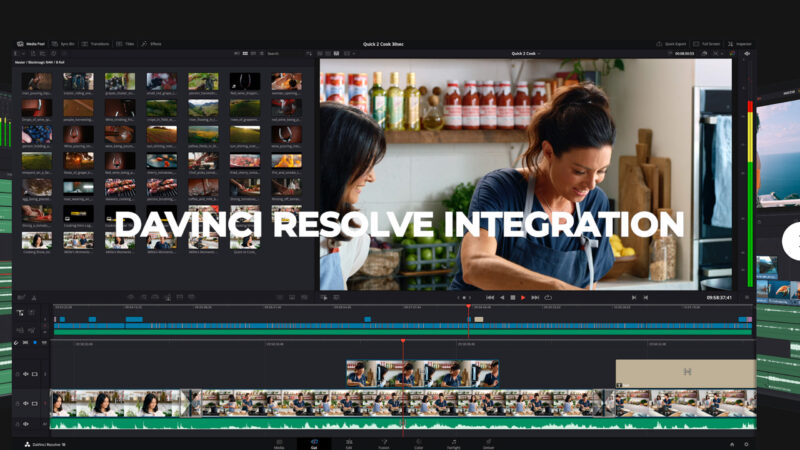
DaVinci Resolve Integration
The app is integrated with the Resolve DaVinci editing system, so if you are a Resolve user this app is even more useful to you. The app will allow you to backup your footage to the cloud so that it immediately appears in your DaVinci project, which is great if you’re working in a team.
By default, this iphone camera app shoots in landscape aspect ratio only. So when you hold it vertically, you get a horizontal frame. Which means you can record landscape video when you’re holding the phone vertically, which is sometimes easier and more convenient. However, shooting like that reduces the resolution, so maybe not the best idea if you are concerned about quality. But OK for grabbing quick test shots.
User Interface Overview
At the top of the screen, starting from the left, we have Lens, Frame Rate and Shutter Speed. Tap them to open up a controller on the right.
Then we have the IRIS (or aperture) which for each camera in a smartphone is fixed. But if you change cameras then you will see the IRIS number change.
Then we have the timecode in the middle, which shows the length of the last clip recorded in hours, minutes and seconds. When you start recording, it resets and goes red. You can change this in the settings to display the time of day instead.
Next we have ISO and the White Balance settings for colour temperature in Kelvin and Tint. Tap those to bring up a controller.
Finally, we have the current resolution setting. To change that you need to use the settings cog.
When the shutter, ISO and white balance are set to AUTO there will be a little A next to the setting.
As soon as you set shutter speed manually, both shutter and ISO become locked. The little A disappears. To get back to auto exposure, tap the EV value button on the right and now enable AUTO.
To lock focus and exposure, you can tap and hold on the screen, like you can with the iPhone’s native camera app. But there’s no separate exposure and focus reticales like there are with Filmic Pro. Tap again to unlock.
To adjust focus manually, tap the focus button on the right. Now use the slider to set focus.
Needs Better Focus Control
The focus slider is one feature which I think needs working on, because at the moment you can’t sweep across the full range of the focus. So, if I wanted to film a focus pull from very near to very far, then it’s going to be tricky to do that smoothly. Ideally, you would want to make a focus pull in one movement.
Not only that, but when you start recording the focus slider slides away. To shoot a focus pull then you need to start recording and then tap the focus controller to open it. There’s also no automated focus change system like you get in Filmic Pro and other apps.
But this is the first version of this app, so hopefully they will improve the focus control in later versions.
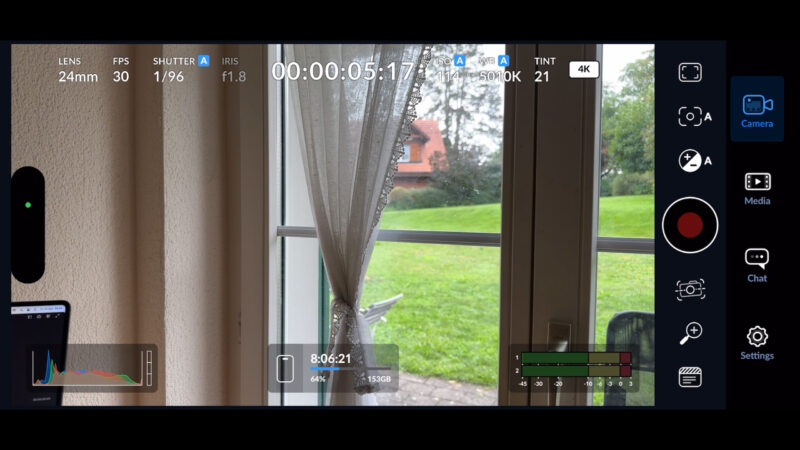
We also have some other buttons on the right side, so let’s quickly go through those.
Right-side Buttons
In the middle obviously is the record button. Tap to record, tap to stop recording.
Tap the top button to open up all kinds of overlays, analytics and guides. You can set a grid guide, you can set safety areas at various ratios. You can custom adjust these guides too.
Next down is the focus control, which I already talked about. Then there’s exposure value, which is like the slider on the native app. If you want to keep auto exposure but compensate up or down, you can set that here.
As well, you can lock and unlock auto exposure by tapping at the top. If you disable auto exposure, shutter speed and ISO immediately become locked at their current settings. This means you can have locked exposure at the same time as auto focus.
Below the record button is the button for stabilisation settings. Notice that when you go through the different levels of stabilisation, it does not crop in as much as it does with apps like Filmic Pro. In fact, it seems that Standard, Cinematic and Extreme are all the same level.
When you set these higher stabilisation settings in Filmic Pro you get noticeable latency, so there’s a delay when you move the camera. And that’s the stabilisation working. So I think that’s something that also needs fixing in the Blackmagic app.
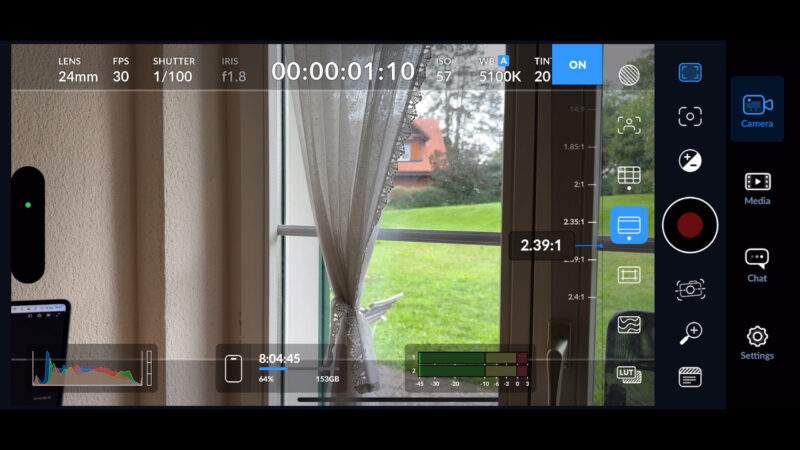
Next down is the zoom controller. And below that is a button to open up media management settings. Useful for shooting a movie and you want to keep track of takes and scenes. You can get these to match your screenplay and that will save you time when editing.
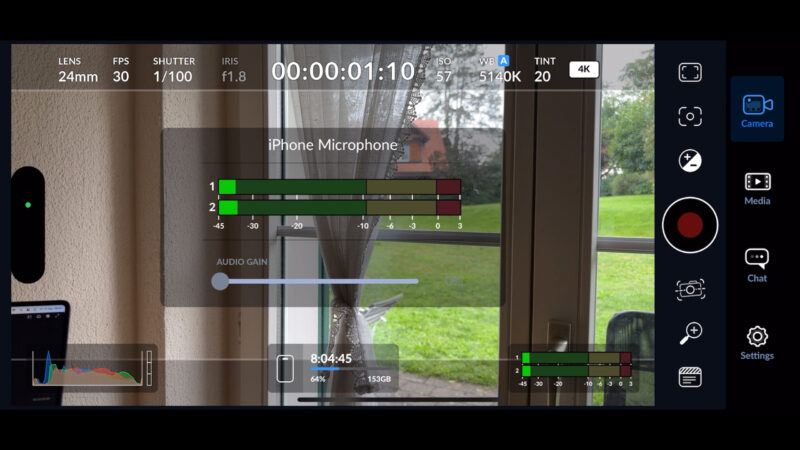
Bottom left of the screen, we have a histogram for RGB levels. Middle-bottom we have memory remaining in the device. Bottom right we have audio levels. If you tap the audio levels you get a bigger version in the middle of the screen with a slider, which is currently disabled.
My guess is that this slider is for when you have external microphones.
Further right we have some more buttons. Camera just enables the main shooting screen. Media takes you to your media gallery. If you have a Blackmagic account you can login and sync your files.
Further down is chat, which again you need to login to your Blackmagic account to access that feature.
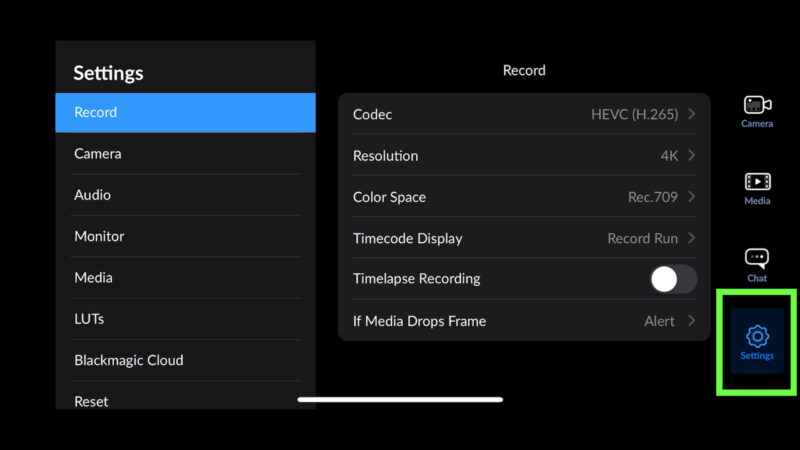
Finally we have settings, which contains all your main settings for video codec where all the prores settings are, video resolution, color space so you can switch to Dolby Vision, change timecode from time to the time of day, switch to timelapse recording, you can also switch it to stop recording if you get dropped frames.
Under the camera you can set anamorphic de-squeeze, enable vertical video – otherwise it will just record everything horizontal. Below there are audio settings and below that all kinds of other settings which are more niche. For example, here you can enable the app to auto upload the clips to a specified DaVinci Resolve project.
Smartphone Videography – Beginner to Advanced
If you want to know more about filmmaking, my book Smartphone Videography – Beginners to Advanced is now available to download for members on Patreon. The book is 170 pages long and covers essential smartphone filmmaking topics:
Things like how to get the perfect exposure, when to use manual control, which codecs to use, HDR, how to use frame rates, lenses, shot types, stabilisation and much more. There’s also my Exploring the Film Look Guide as well as Smartphone Colour Grading, as well as over 50+ video lessons covering topics such as cinematic camera movement, framing and editing.
If you want to join me there follow this link.

I just downloaded the black magic camera app on my iPhone X and I see no difference when switching between Standard, Cinematic and Extreme Stabilisation, is this something to do with the hardware on my iPhone X.