Creating Slow Motion in Adobe Premiere Pro
In the last week, I’ve been editing Episode 5 of our smartphone-shot SciFi series Silent Eye. In the past, I’ve rarely used slow motion in any of my films. But this time, I saw opportunities to increase the power of the emotion of non-dialogue scenes by slowing down some shots.
Obviously, using slow mo while characters are speaking is tricky. Unless they’re screaming or crying, “NoOooOOOOOooo!” or something, slow motion isn’t really appropriate. If you slow down the image, you will have to slow down the audio too, which will only create something surreal or comical.
So, in general, we nearly always use slow motion in fiction to heighten the drama of a moment of action. If a character is distraught, or in combat, or being led to their doom, for example. My problem was that I didn’t shoot any footage in slow motion and it was only as I came to edit that I thought, “that would look cool in slo mo”.
Normally, to create a slow motion shot we shoot in a high frame rate and then slow it down. For example, if your final film will be 25fps you could shoot the shot at 50fps, then slow to 25fps. Now, the shot will match the frame rate of the other shots but the action will be 50% slower.
Of course, we can slow our 25fps down to 12fps, but that would create a rather jerky look to the shot wouldn’t it? Because 12fps is around the point at which our eyes can see separate frames. using this method the slow mo shot would look like a series of still frames flashing up on the screen.
But that was the past. These days we have a software process called “frame interpolation”.
Frame Interpolation
Frame interpolation is quite a broad (and sometimes controversial) subject. Put simply, frame interpolation is a process where software adds extra frames between the existing ones. Played back, jerky footage is transformed into smooth footage.
This effect was used impressively in Peter Jackson’s WW1 footage renovation project They Shall Not Grow Old. World War 1 footage was generally shot with old hand-cranked cameras with frame rates of about 11fps. That’s why the people in them appeared to move around jerkily and unnaturally. Frame interpolation software was used to add the missing frames and in some respects “bring to life” the people in the films. Again, this was not without critics who said the footage should be left as it is and not “modernised” in this way.
Anyway, me using frame interpolation to create smooth slow motion shots for our movie is in no way controversial. And it’s good to know we have this powerful option available. But is it as good as shooting in a higher frame rate and slowing down?
Well, depends what look you want but it probably doesn’t look quite as “perfect” as footage shot in high frame rates. As always, software processes tend to come with occasional glitches. But getting the extra frames during the shoot means you don’t need software to add extra ones.
Adobe Premiere Speed/Duration Setting
To slow down a clip in Adobe Premiere Pro:
- place it on the timeline then right click:
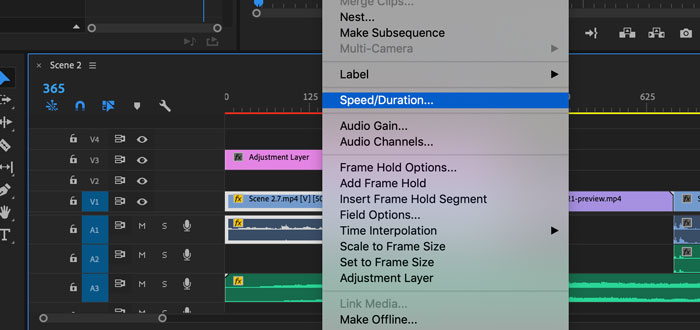
- Select Speed/Duration.
- Type in the % speed you want.
- Check “maintain audio pitch” if you want to prevent the audio sounding like you’re in the world of giants.
- Now choose one of 3 Time Interpolation settings.
- Frame Sampling
- Frame Blending
- Optical Flow
These 3 options tell the interpolation software how to create the missing frames. To my eyes, the Optical Flow setting provides the smoothest look. In my opinion, this is closest to how it would look if you’d shot with high frame rate.
What Percent is Good?
Advice is to stay above 50% when using interpolation. Anything slower starts to give the software too much to do and it’s more likely to struggle.
This is what the 3 settings look like
Helpful folks on YouTube have filmed various actions to demonstrate the look when the different settings are used.
So, creating slow motion in Adobe Premiere Pro can be a lot of fun and add some extra weight to a scene.
This feature also helped my improve my edit. I had a character moving at different speeds in different takes, so it was hard to cut together. By slowing some takes down, I was able to match the walking speed between cuts so they’re smoother.
Nice I have to play around more with this feature. Thanks.