Live Analytics: FiLMiC Pro & FiLMiC Remote Tutorial
In this article I’ll look at how to use FiLMiC’s live analytics tools. I’ll be focusing on the main FiLMiC app but I’ll also talk about FiLMiC Remote, which has a few extra analytics tools.
What is Live Analytics?
The Live Analytics features in FiLMiC Pro give you extra insight into what is being captured when you hit the record button. Essentially, they are there to assist you in achieving accurate focus and exposure. This is done by adding a screen overlay, which then highlights the important areas, informing you if your focus or exposure is in the right place.
Of course, you can just look at the FiLMiC Pro screen and see what’s in focus. But, using a small screen, this can be tricky. So, for example, things like focus peaking turn the in focus areas of the image green.
4 Analytics Overlays & 2 Modes
FiLMiC Pro offers 4 different analytics overlays. There’s also 2 different analytics modes.
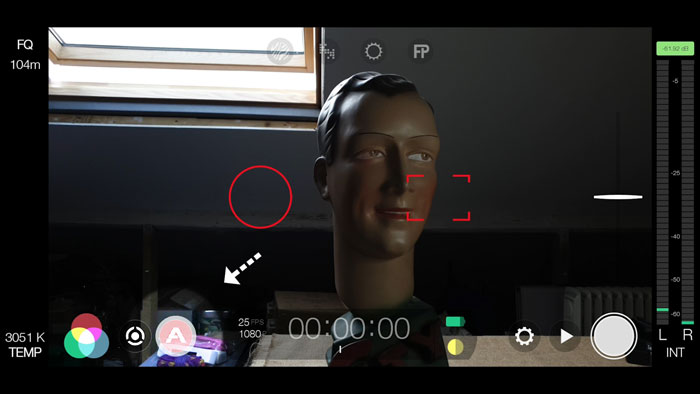
If you tap the A icon at the bottom of the screen, this enables Live Analytics. 4 icons appear at the top of the screen for the 4 different analytics tools.
Once Live Analytics is enabled, moving the focus and exposure wheels triggers the overlay to appear. Once you stop moving the wheel, the overlay vanishes again.
Of the 4 icons at the top, the first 3 are for exposure. They are pretty much doing the same job, but in a slightly different way. Meanwhile, the 4th icon uses the letters FP, which stand for Focus Peaking.
Responsive Overlays
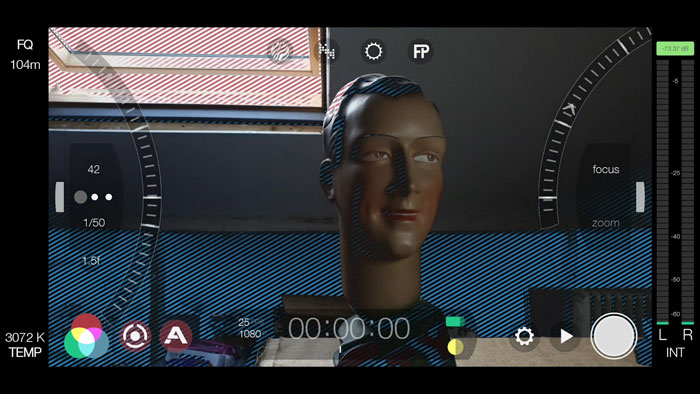
With the Live Analytics on, and without selecting one of the 4 overlay icons at the top, you will get 2 responsive overlays. Moving the exposure wheel activates the zebra overlay, showing you blue stripes for underexposed and red stripes for overexposed areas.
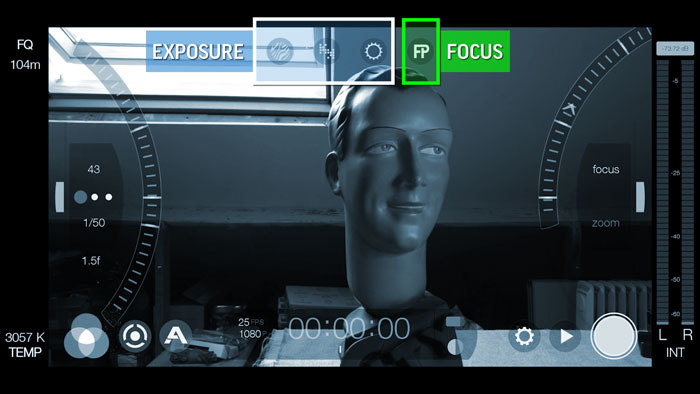
Alternatively, moving the focus wheel activates the focus peaking overlay. Green areas indicate what FiLMiC calls “critical focus” in the frame. In other words, where it’s green should be in focus.
Permanent Overlays
To keep an overlay on permanently, you can select the required overly from the 4 icons at the top. Top right is Focus Peaking while top left gives you Exposure Zebras. The 2 middle icons are Clipping and False Color overlays.
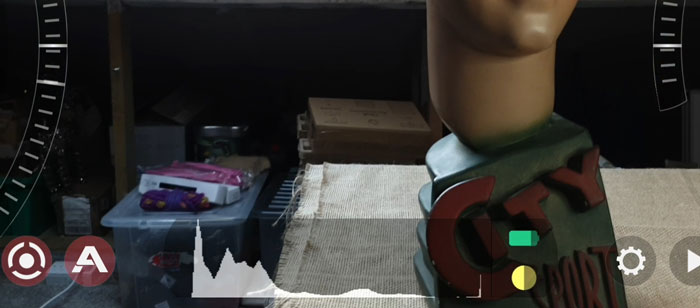
The Clipping overlay shows you which parts of the image are being lost due to over or under exposure. Red areas are blown out highlights, which will appear pure white in your video. Meanwhile, blue areas represent underexposed shadows, which will end up appearing black when played back.
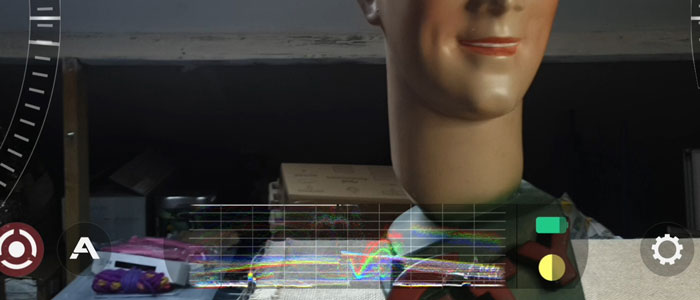
The False Color overlay again shows blown out highlights as red and underexposed shadows as blue. But adds a green overlay for correctly exposed areas.
So you can see that the exposure overlays basically represent almost identical information, but in 3 different ways. So, it’s really up to you how you want to view this information.
Balancing Exposure
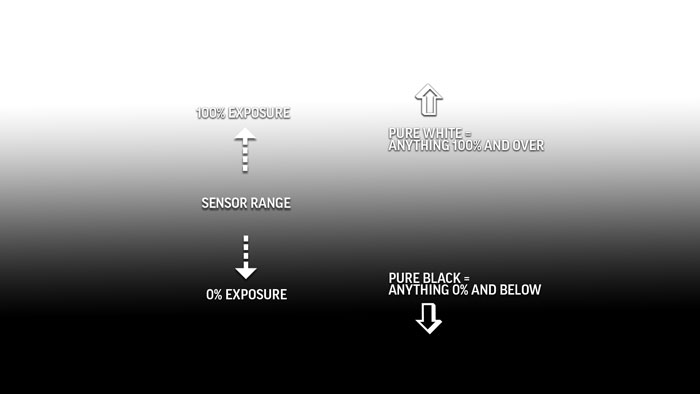
By moving the exposure wheel, you’re balancing how the frame is exposed. Unless the light within the frame falls perfectly within the dynamic range of your camera sensor, you will experience either black shadows and/or white highlights.
Black shadows and white highlights means there is no luma or colour information retained in those areas. Essentially, they pass the range of your sensor and therefore max out (or bottom out). Where 0-100% equals the dynamic range of your sensor, you can imagine it as anything beyond 100% is read as 100% and anything below 0% is read as 0%.
Highlights vs Shadows Trade-Off
Setting exposure always becomes a tradeoff between highlights and shadows. To avoid the white clipping out, you can choose to reduce exposure. But this will come at the “cost” of larger areas of black, detail-less shadows.
Alternatively, you can choose to expose the shadows. But this will come at the cost of larger pure white, blown out areas. And of course, you can choose anywhere in between, depending on the look and style you want.
It’s worth noting that usually when setting exposure we lean in favour of keeping overblown white areas to a minimum. This is for 2 reasons:
- It usually looks nicer and more normal to our eyes. Our eyes are used to seeing black areas, when it’s dark for example. On the other hand, it’s very unlikely our eyes will experience large blown out white areas. Therefore it looks somewhat unnatural.
- It’s usually possible to recover some detail from the shadows in post production, using editing or grading software.
Recovering Shadow Detail
Recovering Detail from Shadows
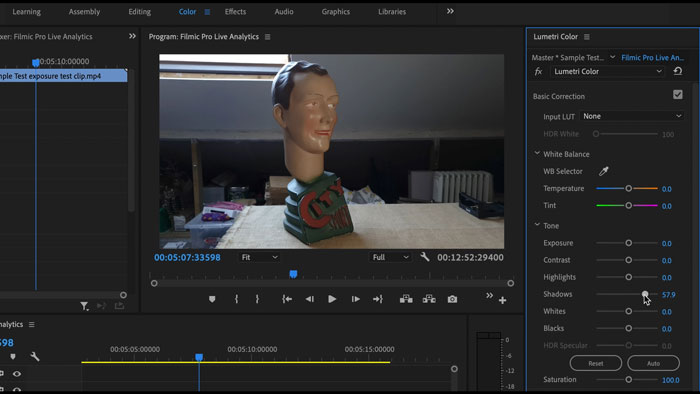
In this example, I’ll show you what I mean using Adobe Premiere Pro. In the Lumetri settings, you can push up the shadows. This increases brightness but only in the dark areas, leaving the mid and light areas untouched.
Doing this, you might be able to bring back a little more detail in the shadows.
We can also try to pull down overblown highlights, and see if we can rescue some detail. But this is usually less effective. Even so, you might want to do this to stop the white areas being so present and overbearing.
Bringing down the highlights and pushing up the shadows also reduces the contrast in the whole image.
Imaging histograms
In addition to the exposure and focus overlays, FiLMiC Pro has 3 imaging histograms. These are activated by tapping the code counter area.
Tap once to cycle through the choices: luminosity, RGB and waveform.
The luminosity histogram again tells you about the exposure of your frame. Like the overlays, it tells you how much of the frame is hitting perfect black and perfect white. In the middle is – surprise surprise – the mid-tones, from darker mid-tones to brighter mid-tones.
Towards the left end of the histogram, we’re looking at the shadows that are not quite black. Towards the right end we’re looking at the almost white areas. This also means these areas will still contain colour.
For example, a very light skin tone might be near the right end of the histogram. But add a little more exposure and now that area goes from skin tone to white. Therefore, by over exposing you lose colour information.
The same goes for the shadows. Near the left end, you will find darker skin tones, which are then lost to perfect black if you decrease the exposure.
RGB & Waveform Histograms
The RGB histogram simply presents the same information, but split into the composite colours – red, green and blue – that all light is made from.
The waveform histogram shows you the exposure once more, but this time as a graph. The bottom axis matches the horizontal axis of the image. Meanwhile, the vertical axis tells you the exposure level of the corresponding part of the frame.
So, if you look at the left of the histogram, you see exposure levels for the left of the frame. If you look at the right, you see the exposure levels for the right of the frame. And so on…
As you can see, the information is “live”. So, as you move the camera, or elements within the frame move, so do the live analytics and histograms.
FiLMiC Remote
I’ve already made a video about FiLMiC’s remote app. But in brief, FiLMiC Remote allows you to monitor and control FiLMiC Pro via a 2nd smartphone (or compatible device).
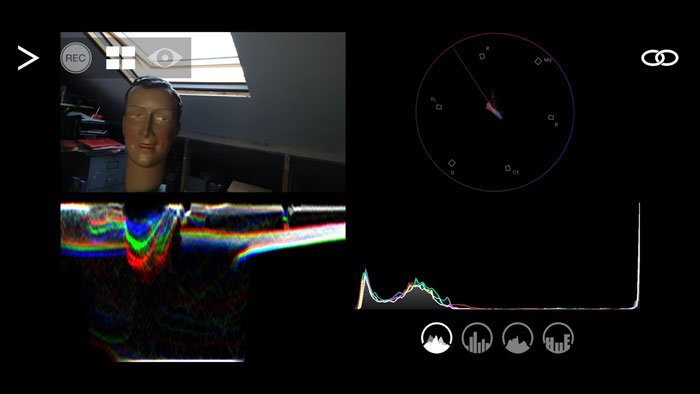
While you can see all the same histograms and analytics available in the app, Remote also adds a few extra ones. So if you go into Remote and switch to Monitor Mode, you’ll get to see that luminance histogram larger so it’s easier to see what’s going on.
In addition, there is a vector scope which displays colour saturation by channel, across the entire image. Then there’s another histogram with 4 different options: RGB composite, Zone, luminance and RGB but with the channels separated out so it’s easier to see.
How important are analytics?
You can certainly use FiLMiC Pro without using the analytics and get great results. However, if accuracy is important, then using the overlays makes the job easier.
While looking at your monitor screen is generally fine, it’s not necessarily 100% accurate. Your screen might be altering brightness or colour tone.
Also, while no 2 monitors display colour and luminosity the same. Added to that, light in the room or location bounces off the monitor screen, and changes the look.
So by using these tools you get a more scientific understanding of your exposure. These analytics and histograms tell you exactly what is hitting the sensor and being recorded.
Should we always use live analytics?
Truth be told, I don’t often use the analytics, even when I’m shooting short films. Really, the time you spend thinking about creative elements should be priority. And if you’re making a short film on a tiny budget, with small or even zero crew, then spending time gazing at analytics can distract you from the important stuff – like the story, acting, lighting, composition.
That said, if you aspire to becoming a professional cinematographer, then understanding these tools can be important. If you want to use your smartphone as the first steps of film school, and intend to graduate to cinema cameras later, then these are fantastic learning tools at such a low cost.
I recommend playing with the analytics tools to see if it improves your exposure. See how having a more scientific approach affects the final result. Does the footage look different once you start editing it? Or are you basically getting similar results?
If you practice using the analytics tools, in a situation without time-pressures, you’ll get a better understanding of how your device exposes a frame. In the long run, it might actually speed up your shooting process as you get a deeper understanding of what your device can do.
Filmmaking is Art
Don’t get bogged down in trying to achieve some kind of perfect exposure, where nothing is lost to highlights or shadows. I got this shot by accident and ended up using it in the movie, because it works in the context of the story.
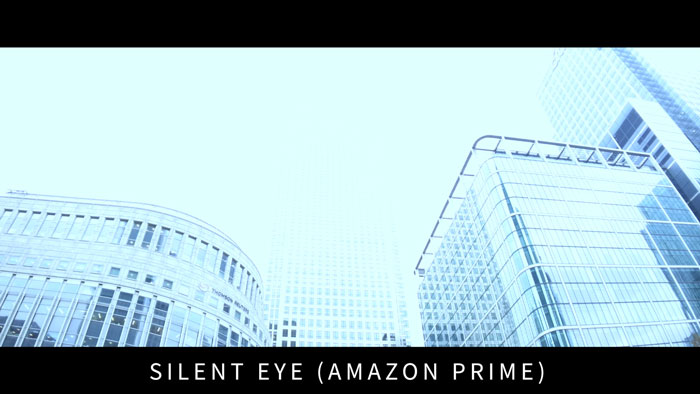
As you can see, the top of the buildings and the sky are completely blown out. While this was an accident, I actually liked the way it made the buildings seem more imposing. As if they’re so tall, they vanish into the brightness of the sky.
The subject of the film is about humanity trying to cope with our dwindling resources. People have to be put to sleep so there’s more to go around. This shot felt to me like it reflected the idea of a hellish future.
As I said previously, it’s not normal for our eyes to see huge blown out white areas. The unnatural feel of this shot then reflects to me the disharmony of the situation of the story.
A bit like humans trying to balance the exposure in our cameras, humans of the future are trying to rebalance our relationship with nature. And at this point of the story, the balance is wrong and this is reflected by this shot being overexposed.
I also found it made the buildings look more beautiful, in a way.
Get It Right “In Camera”
You might say, “well you should expose it properly and then overexpose it in post”. But if I’d done that, boosting the exposure would have added a ton of noise to the image. And, you know, why not just keep it simple. Getting it right “in camera” is the way to go, especially with smartphones.
Anyway, I just wanted to illustrate how our art should not be ruled by filmmaking technology. Rather, the other way around. However, by understanding the technology better, by using live analytics for example, we’ll have more control and better skills to utilise it for our needs as artists.
Eager to learn more?
Join our weekly newsletter featuring inspiring stories, no-budget filmmaking tips and comprehensive equipment reviews to help you turn your film projects into reality!