Master your Insta360 GO 2
This is the article where you learn everything you need to know about your Insta360 GO 2 action camera.
This camera can be used in so many different ways, which makes it extremely versatile. But that also means it can be a bit complicated when you’re first starting out. Or maybe you’ve been using it a while but haven’t yet got to grips with it.
Either way, this article is for you. I’m going to start with the basics and then explore this device’s full potential.
The version I have comes with various accessories for mounting the camera, a lens guard, as well as ND filters which help to make your footage look smoother when filming in daylight.
What I like about the Insta360 GO 2 is that it opens up creative opportunities not available with bigger cameras, even with smartphones.
The Insta360 app is pretty essential for using the camera. There’s various settings controls, including ISO and shutter speed, as well as editing software. So you will want to install that, if you haven’t already.
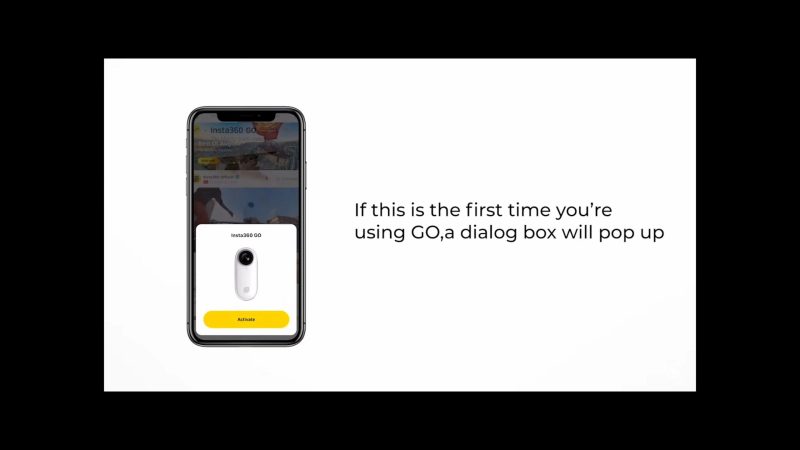
Activate Insta360 GO 2
When you first use your Insta360 GO 2, you need to activate it via the app and wifi. Make sure to connect the app to your camera using bluetooth and install any firmware, before you do anything else.
How Insta360 GO 2 Works
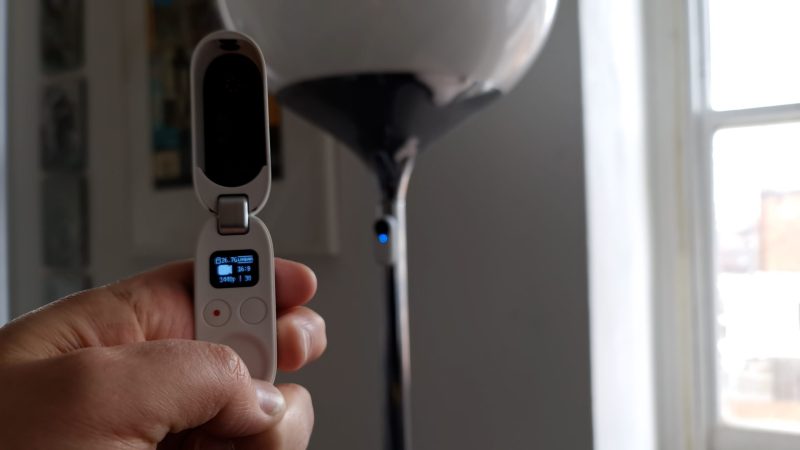
The Insta360 GO 2 has 2 main parts 1) the camera and 2) the charging case with a mini screen. You can capture photos and video using only the camera part as well as when mounted within the charging case.
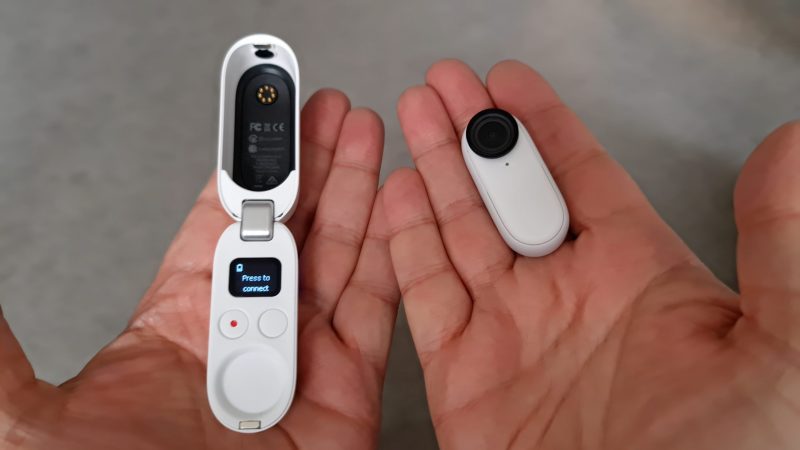
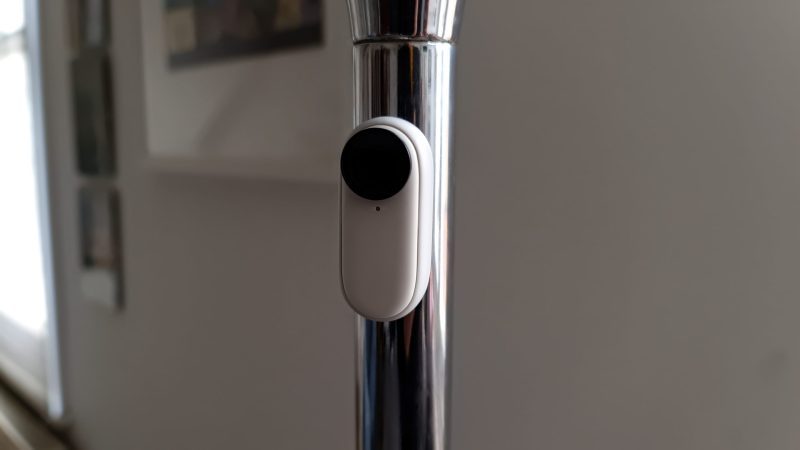
The camera has a magnet at the back which holds it securely within the case. This magnet can also be used to stick the camera to metal surfaces, which is one of the popular features of this little camera. And, of course, it’s used to attach the camera to the magnet pendant.
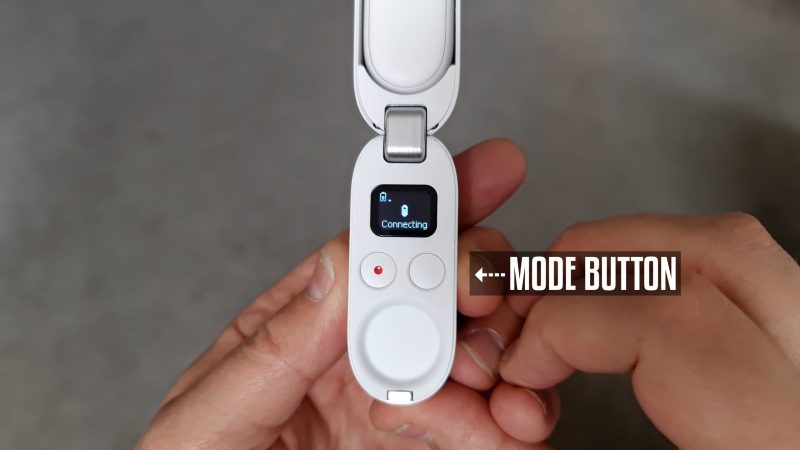
The case opens with a hinge at one end. When you open it, it asks you to connect the case to the camera. Press the button on the right once to connect. This button is called the mode button.
A Very Versatile Camera
Once it’s connected, you can use the mini screen and 2 buttons beneath to control the camera.
You can use the camera in the case, holding the case. Or you can open out the 2 little legs and turn it into a kind of tiny tripod. The legs are pretty delicate so you need to be a bit careful with them.
You can also remove the camera part from the case and use it as a standalone camera. Or you can use the charging case as a remote control. Use the magnet or clip to place the camera somewhere, for example, and control it from the case.
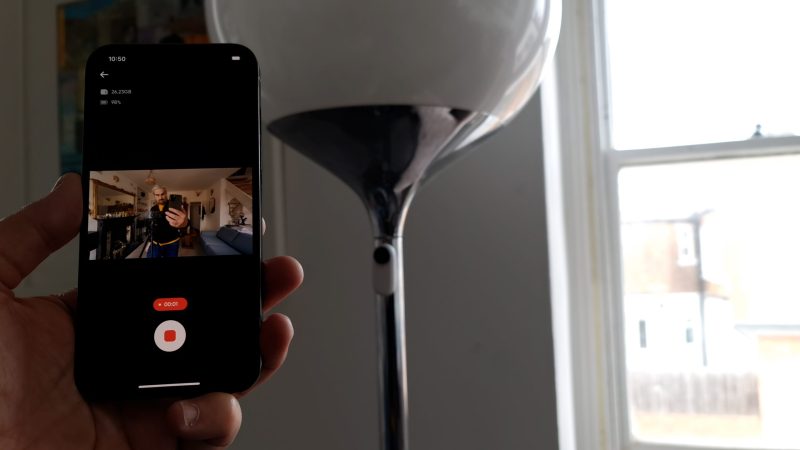
As well, you can use the Insta360 app to capture photos and videos, as a remote control for the camera. Plus using the app you get to see a preview of what you’re capturing. But the app can also be used to edit videos and access settings, tutorials and more.
The charging case also has a place to mount it to a tripod, monopod or any kind of extension handle with a regular tripod size screw.
So that’s a basic overview of the Insta360 GO 2. Let’s try recording a video.
Insta360 GO 2 Quick Start: Record Video
With the camera mounted in the charging case, press the record button.
In the mini screen, the video camera icon moves to the middle and the minutes and seconds counter ticking along. And the indicator light starts flashing.
Press the record button again to stop recording. The video now saves to the camera’s memory.
To start recording with just the camera, use the action button which is basically the bottom part of the camera.
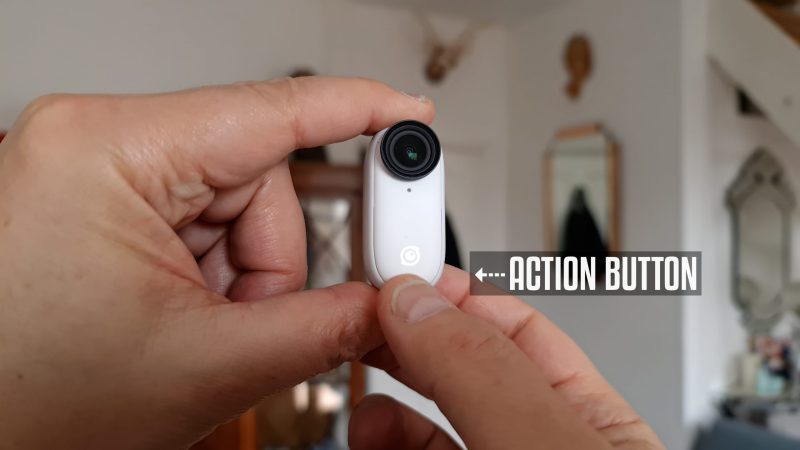
Press once and the camera starts recording. When the light below the lens starts flashing, that means the camera is recording video. As before, press the action button once more to stop recording.
Now we’ve recorded some video, how do we find it so we can view it and use it?
Where’s Insta360 GO 2 My Video?
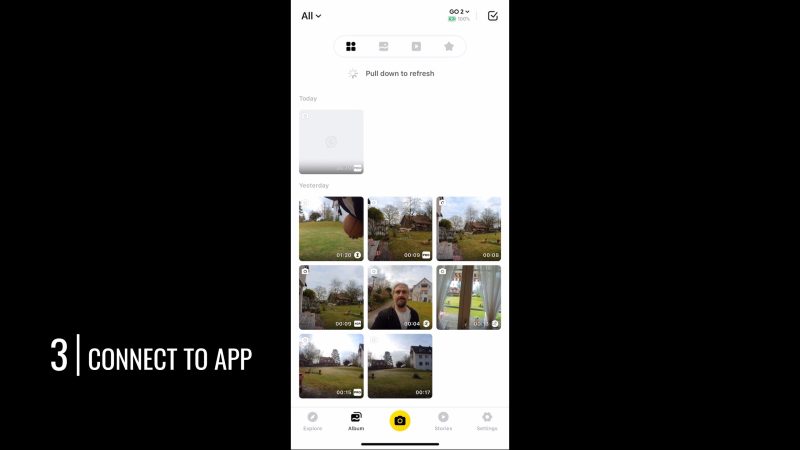
To get access to the videos we’ve just recorded, we either need to use the Insta360 app, the Insta360 Studio software for desktop or simply connect the device directly to your computer.
Via Insta360 App
Open the app and connect to the Insta360 via bluetooth. This is not the smoothest app I’ve ever experienced, so you might find connecting takes a couple of tries.
Once connected, tap the album button. The app will now access the video files from the camera or from the phone if you have down. If you play a video, you’re actually streaming it from the camera’s memory.
You can see where the video files are by using this dropdown menu in the top left corner. “All” shows you videos on your phone and on the camera. Select “local” to see videos stored on your phone or “camera” for videos there.
Using the app, you can move files from the GO 2 to your phone for a better editing experience. In the app you can edit individual clips as well as edit clips together on a timeline. Pro Video clips have a much greater range of editing options within the app.
Via Direct Link to Computer
You can access your Insta360 GO 2 media files by connecting the charging case to your computer with the cable supplied. Or with a USB C to USB C cable. I used my Samsung smartphone charger cable.
Unfold the case and press the connect button. The Insta360 GO 2 will switch to USB mode, indicated in the mini screen. The device should now appear as an external drive. Open it and navigate to the folder containing the files.
They look different depending on which format you used to record them. They also look different to how they appear using the Insta360 app or Studio software.
Via Insta360 Studio
The Insta360 Studio software is free to download for Mac or PC. To access your videos, connect the camera to your computer using the USB C port. When you open the program, it should automatically detect a connected Insta360 GO 2.
You can choose to select files or simply import everything on the device. Now, compared to the Insta360 app on your smartphone, this desktop software is much more limited in what you can do.
Now that we know how to find our videos, let’s look at how to edit them.
Editing Insta360 GO 2 Video
GO 2 videos can be edited within the Insta360 app on your smartphone. Or you can take them directly to your editing software for editing.
If you recorded a video in Pro mode, you will get a lot more options within the Insta360 app. In fact, to get the full power of the GO 2 camera you should really use Pro mode.
That said, if you’re looking to do something quickly, then I understand why you’d want to use regular video mode. I will talk about editing Pro Video a bit later, but first let’s look at basic editing.
Basic Editing
This is how to use the Insta360 app’s basic editing features.
1. Tap the stories button located in the bottom menu.
2. Tap Create a Story.
3. Use the drop-down menu to find local files, which are the files you have downloaded onto your phone. You can actually use any video files here, not only GO 2 files. Just tap where it says Phone.
4. Select one or more files you want to edit together.
5. Tap the yellow selected button at the bottom.
6. FlashCut will use AI to make a sequence for you. Otherwise tap Manual Editing.
Whichever one you choose, you will eventually end up in the same place: the Insta360 video editor. If you’ve ever used apps like VN or CapCut this will look familiar and it works in a pretty similar way.
If you choose FlashCut, it will pick some music and create an edit, which you can then go in and work on yourself. So this might be quite a good way to get started on an edit.
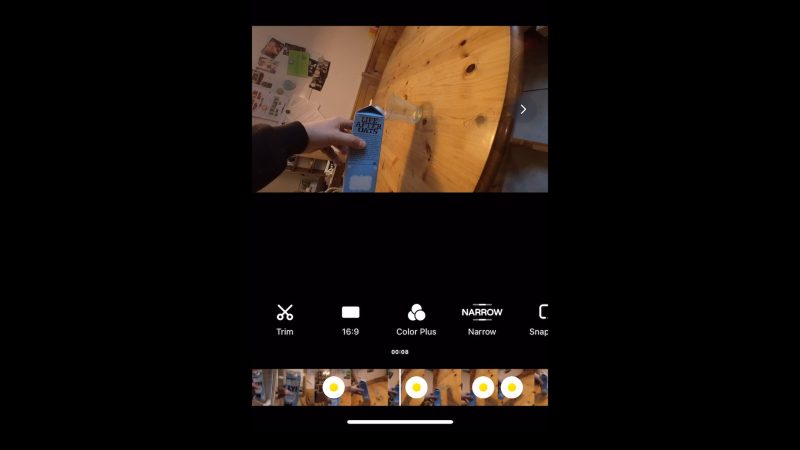
So you can do all the usual stuff: trim clips, change aspect ratio, slow down or speed up a clip, add music, transitions, filters, colour adjustments and so on.
When you’re done, export the final video using the yellow button top right. This creates a new file which you can then share from your phone’s gallery as normal.
I’ll go into the editing section of the app in more detail later. For now let’s get back to the basics of the camera.
Insta360 GO 2 Standalone Camera
We can take the camera out of the charging case and use the button on the bottom to record video and take photos. A single press or a double press will do different things. As well, the camera being switched on or off makes a difference to what happens when you single or double press.
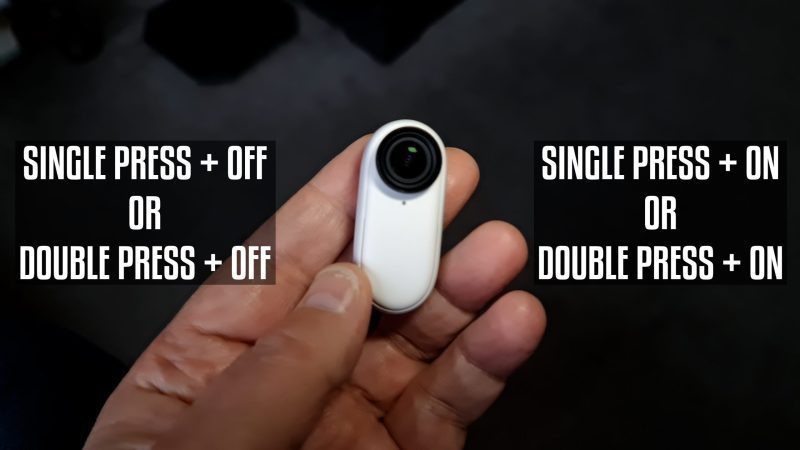
When the camera is switched off (the indicator light is off) a single press starts recording video in normal video mode. Single press again to stop recording.
A double press takes a photo, after which the camera switches itself off again.
If you just want to turn on the camera, press and hold the Action button. First the light is dark blue. Wait for it to turn light blue. Release the button and the camera is now on.
With the camera switched on, a single press starts recording video in Pro video mode. Press again to stop recording.
A double press starts a Hyperlapse video recording.
When recording a hyperlapse, the indicator light will flash faster than when recording normal video. So that helps you to know your double tap has worked and the camera is indeed recording hyperlapse video.
When recording any video, pressing once will stop recording.
To switch off the camera, press and hold until it turns off.
Now, these are the default settings. But you can actually assign the single and double tap to different things, using the Insta360 GO 2 app.
Next let’s look at the various modes and settings accessed via the charger case and mini screen.
Insta360 GO 2 Mini Screen
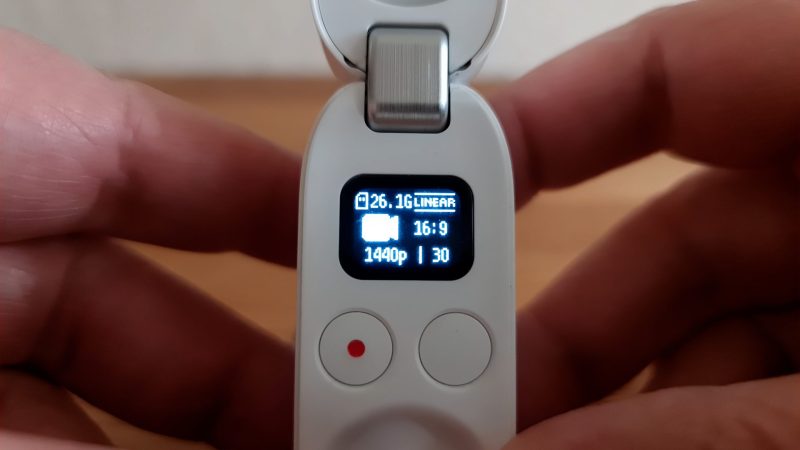
When in video mode, the mini screen displays various information.
- Top left is the remaining memory.
- Top right is the field of view.
- 1440p is the resolution of the video.
- 16:9 is the current aspect ratio.
- 30 is the frame rate, 30fps.
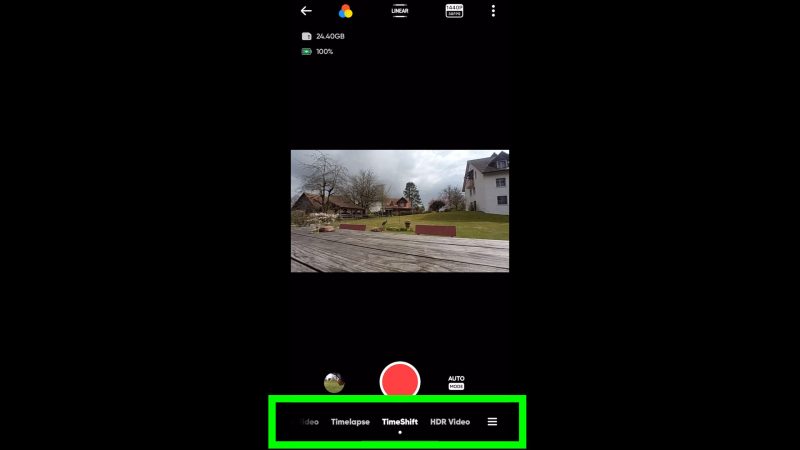
If we now press the right (mode) button, we can shuttle through the various modes:
- video
- photo
- pro video
- TimeShift
- timelapse
- HDR video
- Slow-mo
- settings
To select a mode, locate it using the mode button and wait a second.
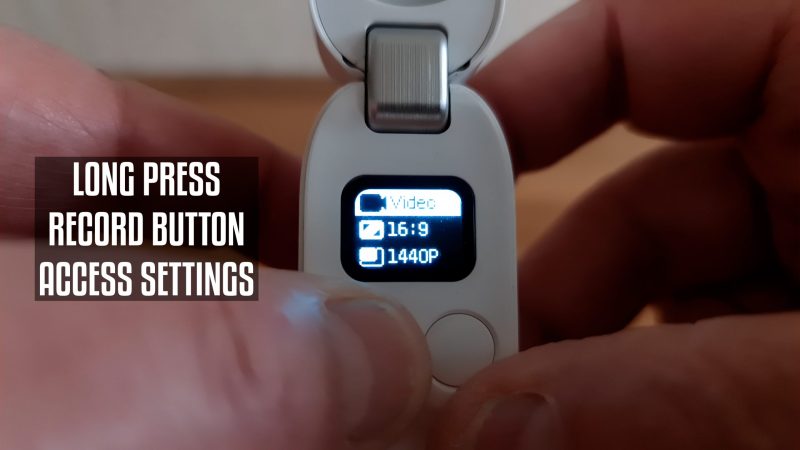
To open settings, select settings and then press the record button.
Now you can shuttle through various options, by using the mode button.
If you press the mode button again while settings is still selected, you open a second menu of video settings. Again, use the right button to select a setting and then the record button to change the setting.
By the way, you can also access the video menu settings when you are in video mode. Just long press on the record button.
So let’s quickly go through all these modes and settings.
Insta360 GO 2 Video Settings
Where it says 16:9 allows you to switch between landscape or portrait. 9:16 is portrait.
1440p is the resolution of the video and this is actually the maximum resolution. So the actual resolution here is 2560 x 1440.
1080p is the only other option, which is 1920 x 1080. When shooting video, I pretty much always use the maximum quality possible. But if you know you don’t need the extra quality and want to save storage space then use 1080p.
Next is frame rate. Options here are 24, 25, 30 and 50 fps.
Below that is the field of view setting. Switch between Ultra Wide, ActionView, Linear and Narrow which give you a different kind of framing.
Now we have the colour profile of the video, where you can switch between Standard, Log and Vivid. Log is desaturated which is more useful for colour grading your video later, while Vivid has extra colour saturation.
The timer setting allows you to select a maximum duration for a video. This means the camera will automatically stop recording when it reaches the time set here. You can go from 15 seconds up to 30 minutes.
Photo
The Insta360 GO 2 takes RAW photos by default, but if you switch this off it takes 9MP photos which will be lower quality but use up less storage space. When RAW is selected you will see PURE SHOT in the mini screen.
There’s not too many settings to play with here. Apart from switching RAW on or off you can set a timer of 3, 5 or 10 seconds.
When you edit Pure Shot photos you will get an image which uses the whole GO 2 sensor, which you can then reframe. Like with video, the true power of this device lies in what you can do when editing your media later.
Pro Video
One difference between the 2 video modes is that in regular video mode, when you rotate the camera the video rotates as well, like with an ordinary camera. But Pro video mode has horizon lock, which means that the video does not rotate with the camera. Although this only happens when viewed in the narrow or linear field of view.
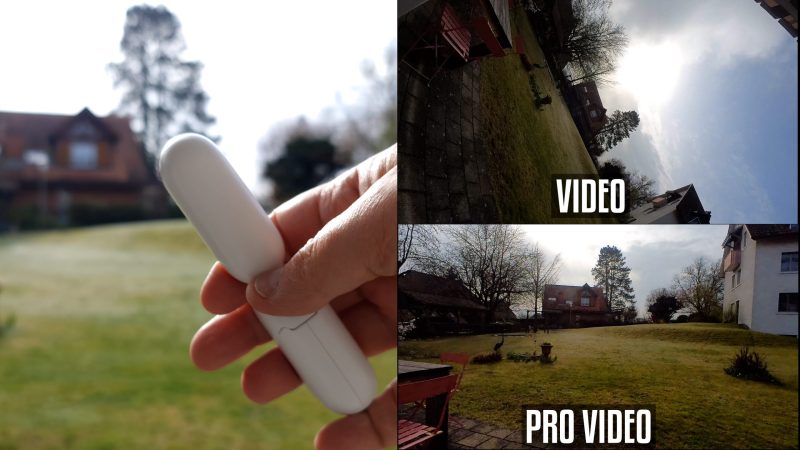
Instead, you can add rotation later using the Insta360 app. Or you can actually switch off horizon lock when editing.
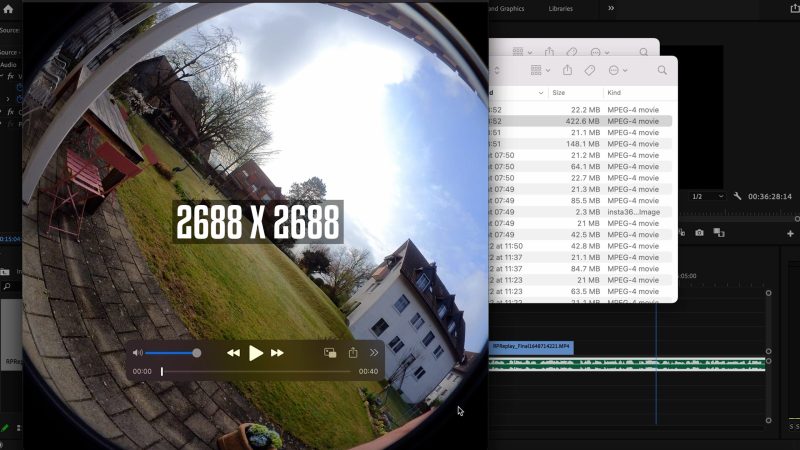
Another difference is that pro videos captured in the 1440 setting actually create videos which are 2688 x 2688 pixels. And this gives you options for editing the video in different ways, for example reframing, adding keyframes or stabilisation, before outputting at a standard aspect ratio.
Video files captured using the Pro Mode will be marked as Pro videos, when you import them into the app or Studio software for editing. So that makes it easier to keep track of which files were shot in which mode.
For the settings here, they are all exactly the same as for the regular video, which I went through before.
One thing to bear in mind when choosing a field of view: in regular video mode, whatever you choose before recording is what you get, but when using pro video, no matter what you choose here, you’ll be able to switch this when editing later.
So in fact it doesn’t matter which field of view you choose in Pro video.
Timeshift
Next mode is Timeshift, and this mode is basically the same as the more commonly used term, hyperlapse. A hyperlapse video is like timelapse with everything speeded up, except the camera moves.
So you can use this mode walking, riding a bike or driving a car and so on. When editing, you can adjust the speed and even add motion blur. The Insta360 GO 2 is great for hyperlapse as it’s so small it can be easily carried or mounted on anything which the magnet can stick to.
The settings for Timeshift are the same as I’ve already covered. So let’s move on to timelapse.
Timelapse
Timelapse is similar to hyperlapse except the camera is normally fixed in place and doesn’t move. And again, the Insta360 GO 2 is great for timelapse, for the same reason as it’s great for hyperlapse. It’s small and you can easily set it up somewhere.
For settings the only thing different here is the interval setting. Timelapse works by taking photos, say every 1 second or every 5 seconds. Here we can go from 0.5 seconds to 120 seconds.
Half a second will just speed things up a little while 120 seconds apart will really speed things up. So you might use that for showing a flower blooming or a whole day passing in a few seconds.
HDR
HDR mode uses software to increase the dynamic range of the video. This means shadows will look lighter and have more detail and bright areas like the sky will look less blown out.
If we navigate through the HDR settings we can see that they are pretty much the same. Only difference is you can only choose 24 or 25fps in this mode.
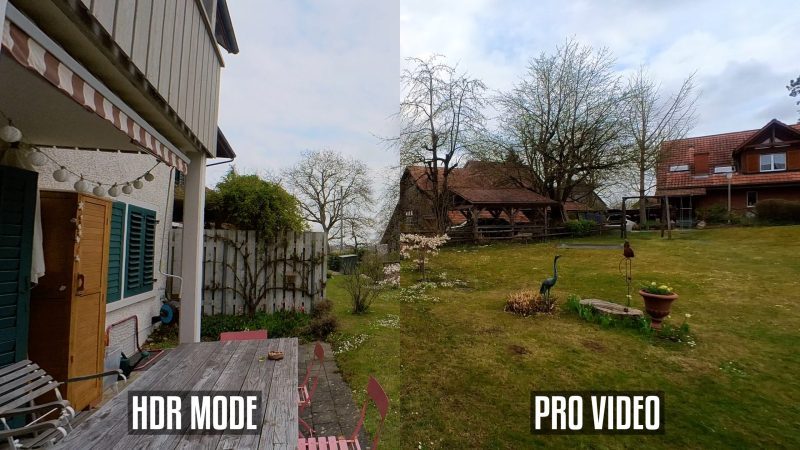
When you shoot an HDR video, this creates a Pro Video but with extra dynamic range. This means we can edit an HDR video in the app or Insta360 Studio just like Pro Video, change field of view, stabilisation and so on.
Slow-Mo
In slow motion mode, the GO 2 will shoot video at 120fps and then play it back at a slower frame rate. There’s no option to change resolution or frame rate, so it’s 120fps and 1080p. The other settings are the same as covered before.
You can also edit slow-mo video like Pro Mode video, but with fewer editing options. This is one situation where the Insta360 Studio software gives more options than the Insta360 app.
In Insta360 Studio, you can edit the speed of a Slow-Mo video fully, whereas in the Insta360 app you can only add changes to a 120fps video. So the Studio software is good for creating subtle speed changes, while the app is good for creating a super slow-mo effect.
As well, in Studio you can change the field of view, except without the ultra wide option. There’s no option to change to 9:16 either, so if you want to record slow motion in portrait you need to turn the camera 90°.
Using Insta360 App as Remote
One of the 3 ways to capture images with the GO 2 is to use the Insta360 app as a remote.
After connecting your smartphone to the GO 2, tap the camera button at the bottom. You should now see a preview of the camera screen. This will be a little bit delayed, as it has to be streamed from the camera to the phone via bluetooth.
If you swipe left and right along the bottom, you can switch between various modes. By default, the app starts in regular video mode. All the modes to the right of video mode are other kinds of video modes.
There are all the modes we’ve already talked about before, plus this mode called Reframe Live, which is for live streaming. However, Insta360 says the GO 2 does not currently support live streaming.
All the modes to the left of standard video mode are still photo modes. So we have Night Shot, Interval and Starlapse.
Another way to switch modes is to use the menu button in the bottom right corner.
At the top we have color, field of view and resolution setting controls. Plus these 3 dots top right open up some more options: add a grid and a histogram, or go watch some tutorials.
Manual Mode
Most of the features are the same features you can access with the charging case. But one feature unique to the Insta360 app is the access to manual control. This allows you to set shutter speed, ISO and white balance.
The only way to lock exposure using the Insta360 GO 2 is by using manual mode in the app.
Tap where it says auto mode and switch to manual. Now you get those 3 controllers. With white balance you can only set one of 4 kelvin numbers. You can’t fine tune. Like it has to be 5000 or 4000, nothing in between. But at least this means it will be locked for the shot.

You can also choose ISO or shutter speed priority. For example, if you want to make sure the ISO is fixed and the only thing which will automatically change is the shutter speed. Because a high ISO can create nasty digital noise.
So we could set ISO to say 100 and now let auto exposure set the shutter speed. This way we are guaranteed to avoid digital noise. But we might find the shot is underexposed if there’s not enough light.
Instead of using manual mode, we can simply choose to use EV which stands for exposure value. If you think the exposure is too bright, reduce the EV to a negative value.
Set Maximum Video Length
If you want to set a maximum length for your video, tap the button to the right of the auto mode button. You might be filming some kind of action and aren’t able to hit the stop button. Maybe you just want some short clips so this means all you have to do is hit record and relax knowing it will stop filming.
You can set it as short as 15 seconds and as long as 30 minutes. But if you set it to 30 minutes you will get a warning saying the GO 2 might overheat.
Overheating is one of the common issues of this camera. One way to reduce overheating is to shoot at the lower resolution (1080p). Even if I just leave the camera switched on and connected to the app for 20 minutes it will heat up.
Editing Pro Video
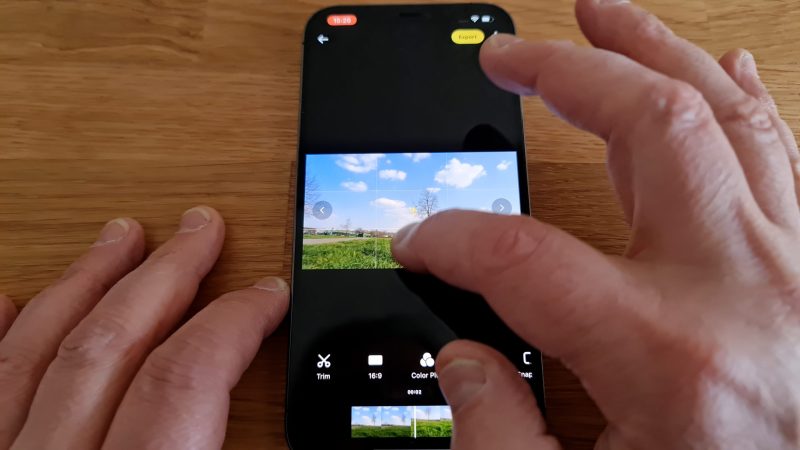
Editing a video you have shot using Pro mode allows you to make quite a few changes. Tap a video with the PRO in the bottom right corner. The video immediately starts playing.
Press on the video and hold to add a keyframe, which then allows you to adjust the roll of the video or reframe the video.
Reframe Video
Hold and drag your finger around. Push too far and you will see the edges of the frame appear.
Remember that the GO 2 Pro video gives you a square file but it’s like a circle of usable video within the square.
Setting your field of view to narrow gives you the most room to reframe things (you will be able to move further before you hit the jaggedy edges of the circle). There’s also distorted parts of the image you want to avoid getting into frame.
This also adds a keyframe, which means you can have the framing change during the shot by adding further keyframes later in the video.
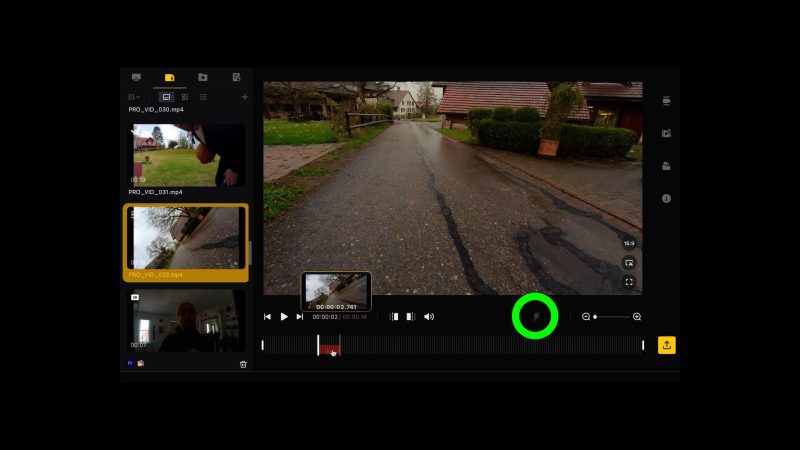
Trim
Trim brings up 2 different trimming options. There’s a basic trim which allows you to cut off the start and end of the video. There’s also Jump Cut which allows you to make a number of edits through the video using jump cuts.
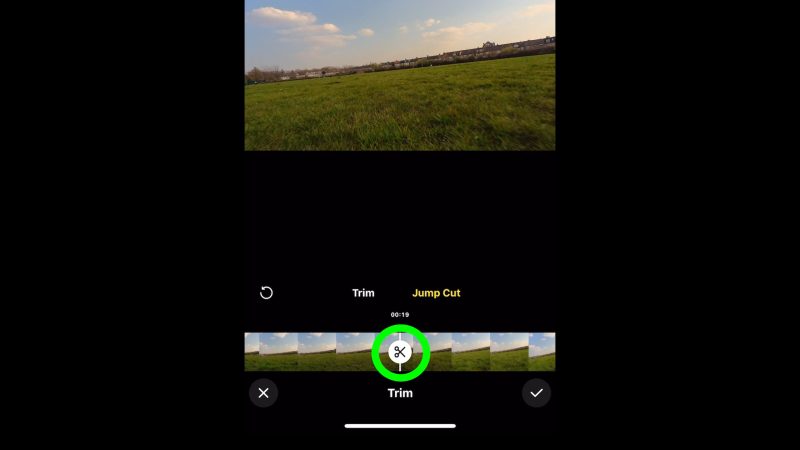
Tap Jump Cut and now we get a white circle with the scissor symbol. Move the video to the beginning of the bit you want to keep. Tap the white button and swipe along to the end of the section of video you want to keep.
Tap the scissor button which is now yellow. This highlighted area is the part which will be kept. Swipe along and tap the scissor button again. Swipe and basically repeat this for as many sections you want to keep.
When you tap the tick, everything in the darker areas of the video will be deleted leaving only the highlighted areas. So, this is useful if you have a really long clip and you just want to grab the best parts.
Aspect Ratio
Next button allows you to change the aspect ratio. Remember, with the pro video, you are cropping into a larger square video. Therefore there’s no issue with quality loss.
Color Plus
Tap to enable Color Plus, which seems to add extra contrast to the video. Basically it gives the image more of a punch. But you might also find it makes video noise and banding more visible.
Field of View
Next button allows us to change the field of view. We have the same 4 options I’ve already talked about before. One thing to note is that choosing Wide or Action appears to switch off Horizon Lock, even though it says it’s switched on.
Snapshot
Snapshot simply takes a still frame from wherever you have the play head and places it in the phone’s photo album.
Beautify
I think most of us know what Beautify does now. Just adds allegedly beautifying effects to a human face.
Music
Just add music here from Insta360’s library. There’s quite a range of tracks. First it recommends 5 tracks to you, but tap more to find a wider range under common headings.
I would assume these tracks are royalty free and therefore usable on YouTube, but I haven’t actually tested that. So I’ll include a track on this video now and see if YouTube flags it.
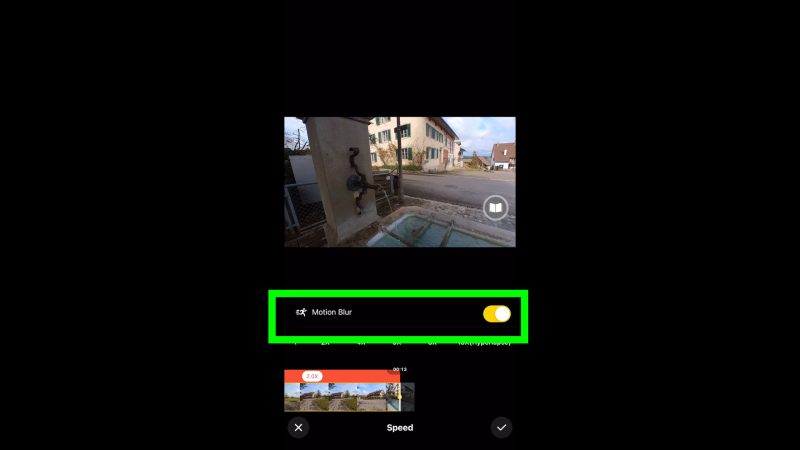
Speed
You can use the speed setting to speed up or slow down the video, at chosen points.
So tap a speed setting and now swipe the timeline to create a duration for this speed. Then tap the tick.
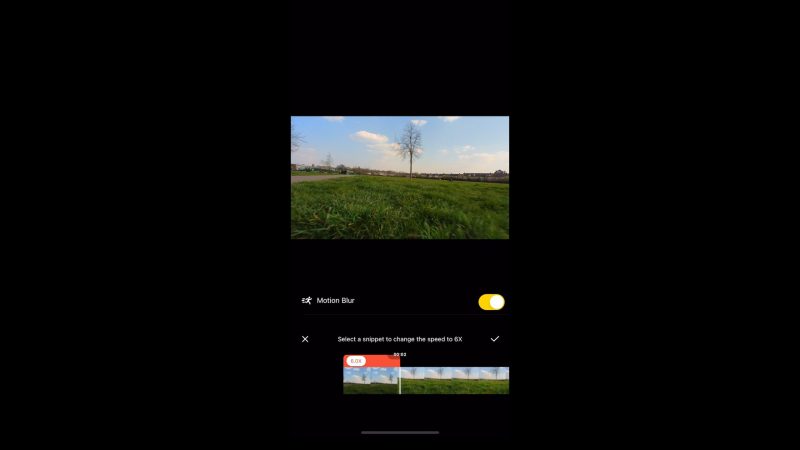
If you have Motion Blur toggled on here, it will add motion blur to the final video. This is useful for any Hyperlapse type videos.
You can see that you don’t really need to use the Hyperlapse or TimeShift modes when shooting video. Just shoot a Pro Video clip and change the speed when editing. The downside of doing it this way is that you will have a bigger file taking up memory space on the camera.
More than one speed change can be added to a clip. So, for example, you could add speed ramp style effects throughout a longer clip.
Filter
Filter allows you to add preset colour looks to your video. Tap the filter then tap again to open up a slider which allows you to control how strong you want the filter to be.
The first 2 filters, Tilt-shift and Comic, don’t have a slider. They’re just on or off.
Adjust
Adjust opens up all the regular colour grading type controls. So you can adjust things like contrast, saturation and so on.
Freeze Frame
Freeze Frame does what it says, simply freezes the video for a few seconds at that moment. You can choose between 3, 5 and 10 seconds. As it says at the top here, you won’t see the frozen frame until you’ve exported the video.
Mark
Mark just drops a yellow marker onto the timeline below. If you have a long take, this can be useful to preview the clip and go through marking the best parts.
Finally we have the self explanatory reset and trash can buttons.
How to Switch enable Stabilisation & Horizon Lock
If you tap the 3 dots at the top right of the screen you open up more settings.
Here you can switch Stabilisation and Horizon Lock on or off.
There’s also Aquavision if you are editing a clip you filmed underwater.
How to Create a Barrel Roll Shot
The Insta360 GO 2 is a great camera for shooting barrel roll shots. This is where the camera rotates in a circular motion and it can be really fun to do. But this will also give you a good understanding of how the GO 2 works.
So here’s a simple step by step guide to walk you through it.
1. Switch the GO 2 to Pro Video.
For this, I’m going to use the highest resolution and the highest frame rate. Shooting at 50fps means I can slow the video down when editing to create a slow motion effect.
When shooting in Pro Video mode you don’t need to worry about the field of view or colour settings as they can be changed later.

2. Record a video.
The magic of the GO 2 is that we don’t need to rotate the camera when we’re filming. In fact it doesn’t matter which angle you hold the camera. Hold the camera at any angle and the video will stay level with the horizon.
This is because when you record video in Pro Mode, it actually captures a square video with the corners rounded off due to the nature of the wide angle lens. When we edit the video, we can adjust the field of view and have the frame spin as if the camera itself is spinning.

3. Connect the GO 2 to the Insta360 App.
It’s possible to edit the video while it’s still on the camera, but I prefer to transfer the video from the camera to my iPhone. This means you can switch off the camera and, as well, you will get a better editing experience.
If you leave it on the camera, you might experience some lag as your phone has to keep streaming the video from the camera via bluetooth. And that’s going to use more battery as well.
How to Download Insta360 GO 2 Video to Phone
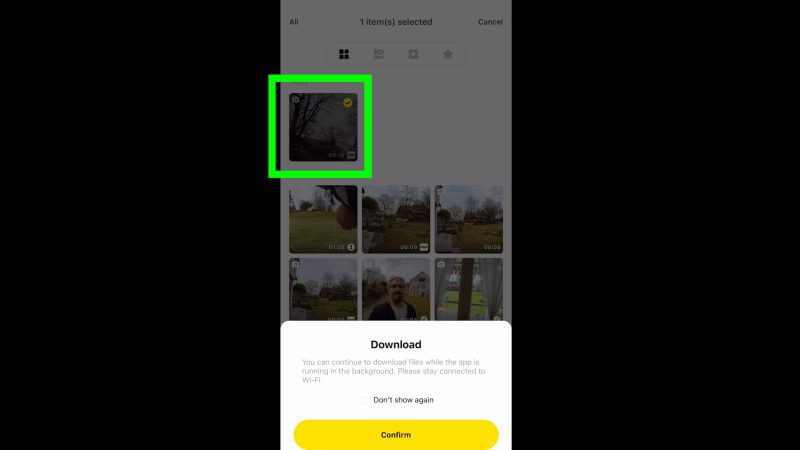
To download the video to your phone, select the video that you want to use for the barrel roll.
- tap the check box in the top right corner
- select the video and you get a yellow circle with a tick
- tap the download button at the bottom
How to Edit Insta360 GO 2 Pro Video
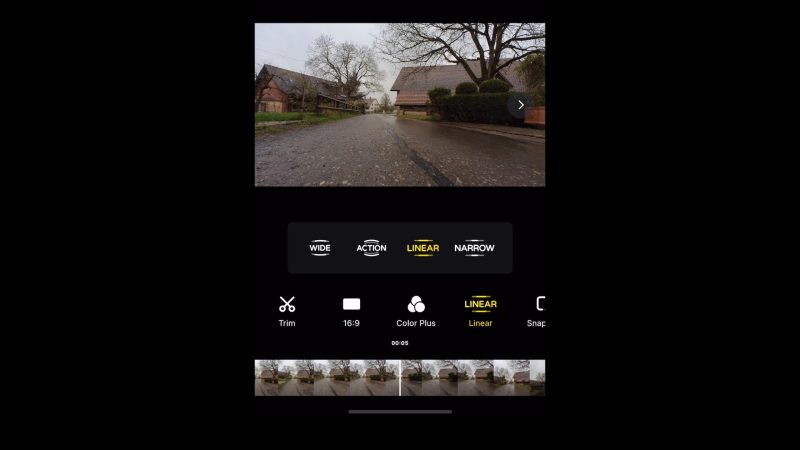
When we switch to the local folder, we can now see all the videos that we have downloaded onto the device. Tap to select the video and it will immediately start playing.
Now we can choose the field of view. The Linear view is probably close to an ultra wide lens on a smartphone while Narrow is closer to the main regular wide lens.
Next, find the point in the video where you want the barrel roll to begin. Pause the video then tap and hold until you get a yellow circle. This now adds a keyframe to the video at this point.
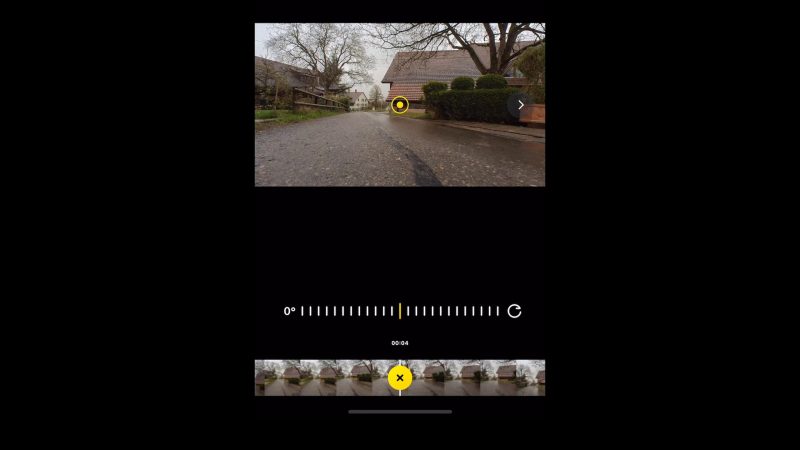
As soon as you add the keyframe the video auto plays. I don’t know why it does that, because we want to go back and edit the keyframe first.
Swipe at the bottom to move the video back to the keyframe. Now you will be able to adjust the roll using this slider control. This goes all the way up to plus 360° or all the way to minus 360°.
This means that the maximum amount of barrel roll we can create goes from minus 360 to plus 360, which comes to 720°. If you want to do that, set the first keyframe to minus 360.
Move or play to a later point in the video. Again, tap and hold to create another keyframe. Now swipe to adjust the rotation amount. If we want, we can rotate to the maximum plus 360°.
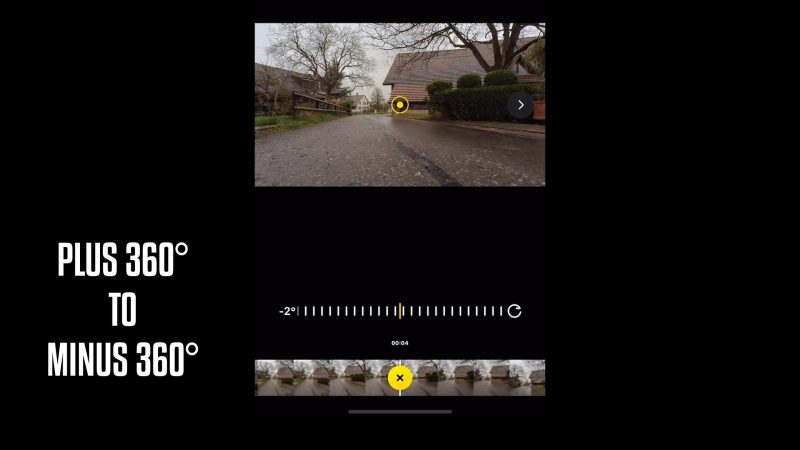
We can add further keyframes, as many keyframes as we want. But if the previous keyframe was 360, we cannot go past that with the next keyframe. We can only go in reverse.
To remove a keyframe, move over it until you get a yellow circle with an X and tap it.
Once you are happy, export the video and a new video will be created with the barrel roll added.
Creative Barrel Roll Shot
A fun way to use a barrel roll is to make it look like the camera is locked to a rotating object. No need to rotate the camera, so just shoot the video and keep the camera centred on the spinning object. In the app, adjust the keyframes to match the spin of the object.
Managing Media
It’s actually possible to take the video files directly from your GO 2 camera, drag them onto your computer drive and import them directly into an editing program.
If we open up the folder on the camera containing files, we can see there is a Pro Video file as well as a file labelled Pro_LRV. The LRV file is a low-resolution file used for previewing in the app. Therefore don’t use this file if you are taking files directly from the camera.
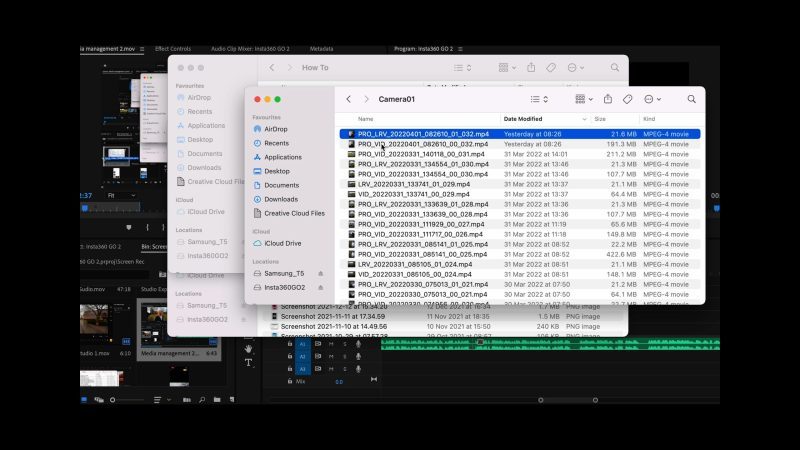
I can drag the Pro Video file onto my laptop and then bring it into Adobe Premiere. But you can see I do not get the full square video. It actually crops it down to 2560 x 1440. Even if I zoom out on the timeline, it’s still cropped.

If you’ve used any mode apart from Pro Video, then this will be fine. Regular video, timelapse, slow mo and so on are ready to go, so you can just drop them straight in.
When using Pro mode, of course you can use this video in your editing program as it is. But most likely you will want to set the field of view, add stabilisation and maybe add rotation keyframes.
To do those things, you need to use the Insta360 app or the Insta360 Studio. Bear in mind that the Insta360 Studio does not currently allow you to add keyframes.
Insta360 Studio
Insta360 provides a free piece of software called Studio, for Mac and Windows. This allows you to make some edits but you cannot currently add keyframes. So, while it’s nice to have things set out on a bigger monitor, what we can do is quite a bit more limited compared to the Insta360 app.
Connect your GO 2 using a cable and open Studio. You can import all files or drag and drop individual files. There’s also a plugin available for both Adobe Premiere Pro and Final Cut Pro, which allows you to make limited adjustments directly within those platforms.
The advantage of that would be that you can make adjustments within a Premiere or Final Cut Pro sequence, rather than having to switch back to a different program.
Studio doesn’t allow you to edit different shots together on a timeline. All it does is allow you to switch the field of view, the aspect ratio, as well as trim a clip.
It is possible to reframe a video, like with the app. Click and hold then drag to reframe. As there’s no keyframes, this will reframe the entire clip.
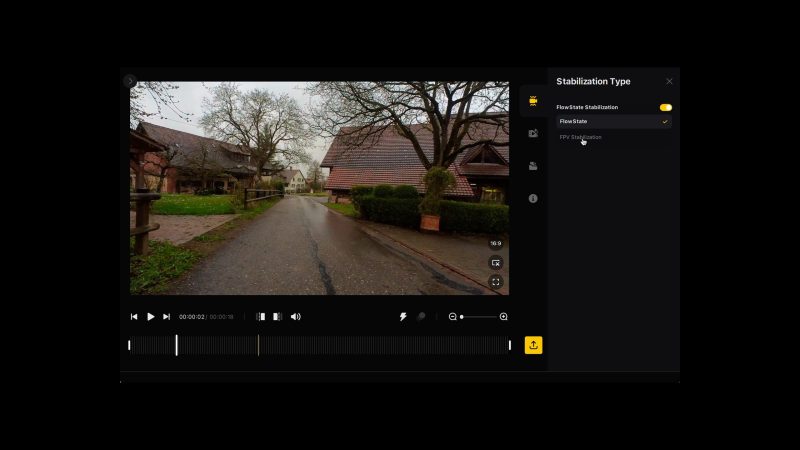
One thing you can do in this program is change the type of stabilisation. Another advantage is being able to change the speed of a slow-mo video, as I mentioned earlier.
Exporting Video using Insta360 Studio
And when you export you can choose a ProRes codec which is higher quality. Thing is, because we are starting with an h.264 file, we can’t add extra quality by using this but one advantage is that it will lose less quality as well as being better for editing and grading.
The downside is that it will create much bigger video files. The ProRes files output from here will be about 5 times the size of h.265 files.
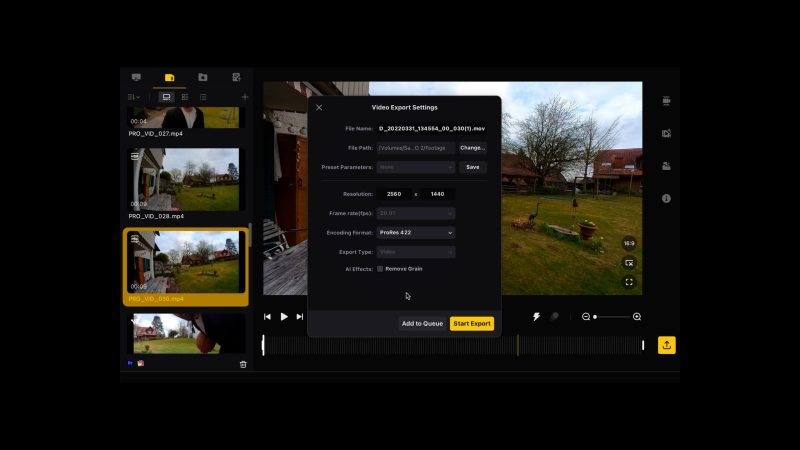
Studio also has a noise reduction tool when exporting. So if you have been filming in low light and find you have some ugly noise, you can try using noise reduction here.
Create TimeShift using Insta360 Studio
Another thing you can do is create a TimeShift shot. Place the playhead where you want it to begin, click the TimeShift button, drag to the right as far as you want to apply the TimeShift, click and it will be applied to the video.
Insta360 GO 2 ND filters
My package came with some ND filters as an extra accessory. This is on top of the regular accessories, like the magnetic pendant, the clip and the pivot stand.
ND filters allow you to get smoother looking footage in bright conditions, by slowing the shutter speed. For action footage, you might actually prefer the sharper, fast shutter speed look. But for other types of videos, a smoother look might be nicer.
For example, B roll footage or vlogging footage.
These ones are by Telesin and came with my purchase, but you can buy these separately for not too much money. On AliExpress this is selling for about £15. The box holds 3 ND filters of different strengths and a CPL filter, which is good for reducing sunlight glare.
To add a filter, first you need to remove the lens protector, which screws on and off. This is a little bit fiddly to do, unlike the nice DJI Pocket filters and lenses which use a magnet. So don’t expect to do this in a hurry, or with frozen hands.
I find it easier to do this when the camera is not in the charger. Just be careful not to cross the thread, because you could find yourself unable to use it again.
Find Insta360 GO 2 ND filters on AliExpress
Find Insta360 GO 2 ND Filters on Amazon
Insta360 GO 2 Cheat Sheet
With so many features, shooting modes and various editing apps, it can be hard to remember everything when you’re out shooting. The problem is, it’s not always easy or convenient to search through a YouTube video or a long article like this in the “heat of the moment”, so to speak.
For that reason I have created an Insta360 GO 2 Quick Reference guide containing only the most important memory-triggering information. This guide is available for members to download as a PDF. I suggest keeping this PDF on your phone so that you can easily open it up and scan through.
Smartphone Video – Beginner to Advanced
If you want to know more about smartphone filmmaking, my book Smartphone Videography – Beginners to Advanced is now available to download for members on Patreon. The book is 170 pages long and covers essential smartphone filmmaking topics:
Things like how to get the perfect exposure, when to use manual control, which codecs to use, HDR, how to use frame rates, lenses, shot types, stabilisation and much more. There’s also my Exploring the Film Look Guide as well as Smartphone Colour Grading.
Members can also access all 5 episodes of our smartphone shot Silent Eye series, with accompanying screenplays and making of podcasts. There’s other materials too and I will be adding more in the future.
If you want to join me there, follow this link.

Under the section of connecting the charging case to the phone, you state using a USB C to USB C cable and that you use your Samsung charging cable. As far as I can tell, you cannot use this type of cable, as the device is not USB C compatible. The USB C at the case must be used with a USB C to USB A cable. This has been railed as a fail by many people, meaning slower transfer and charging times.
I used it and it works. My laptop doesn’t have a USB A so I would have to use an adapter, but as I say it worked fine for me.