9 Best Video Recording Apps for iPhone
Recent iPhones come with amazing cameras for both photography and videography. But whereas many Android support manual control of your camera right out of the box, iPhones don’t. Therefore, if you want to control shutter speed, ISO, white balance, focus and so on, you will need to download one of the many video recording apps.
In this article, I will be looking at the best apps for shooting video with an iPhone, but I will be going in order of affordability: cheapest first, most expensive last. Bear in mind that prices for apps and their hidden price in the form of in-app purchases, change all the time and also cost different amounts depending where you are in the world.
One thing you need to know: if you have an iPhone newer than iPhone 7 you will never get complete manual control. This is down to computational features which give your iPhone camera greater dynamic range. A thing called dynamic tone mapping overrides your manual ISO as it tries to boost detail in the shadows.
Let’s look at some of the best video recording apps for iPhone.
1. StaCam – Free (in app purchase)
StaCam is an app created by Zhiyun to be used with some of their gimbals, for example the Smooth 5. However, you can actually use it without connecting to a gimbal. If you just want basic control of shutter, ISO, white balance and focus, you can do that within this app.
You will see a flashing Bluetooth icon, but you can just ignore it. There are some LUTS you can add, as well, including Log profiles. There’s also a variety of other features, some of which you need to pay a subscription for.
In fact, most of these LUTs are free, including all the Log profiles. Like I say, if you just want basic controls for free, this app can do a job for you. It’s nice and easy to access exposure and focus controls.
In the bottom left we have the settings, so tap one of them and then switch from auto to manual. Use the slider to adjust the setting.
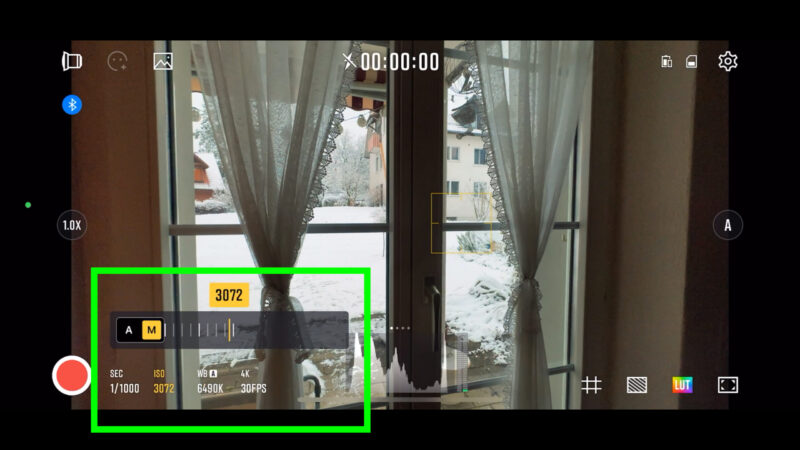
There are yellow exposure and focus reticles. Tap and drag to separate them out and now you can set and lock exposure and focus using these reticles. Place the reticle and then tap to lock or unlock it.
A setting called Anti-shakes allows you to set different levels of stabilisation. You can also set bitrate and codec but other than that it is very basic. Read my full StaCam tutorial.
Some video recording apps are have been produced by companies which are mainly lens or accessory makers.
2. BeastCam – Currently $2
BeastCam is an app created by makers of iPhone filmmaking accessories BeastGrip. When it was launched a couple of years ago, BeastCam cost about $15. It’s currently going for $2. According to the App Sliced website, the app was briefly $1 about a month ago.
Anyway, $2 is a steal for what this app can do.
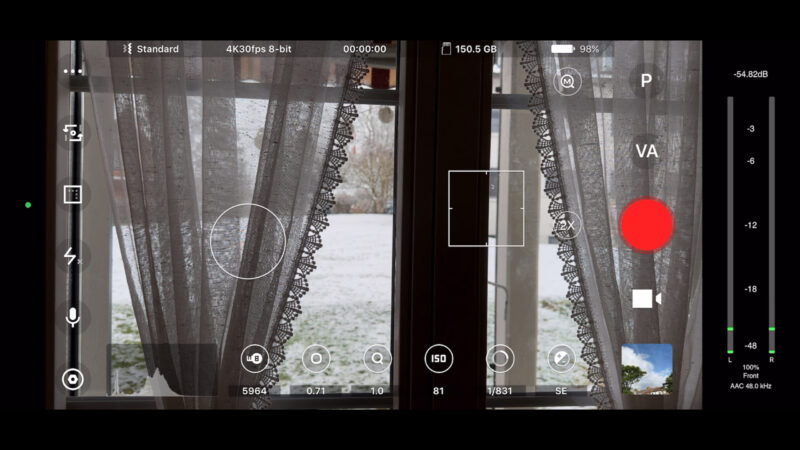
Visually it’s pretty busy but once you spend a bit of time getting familiar with the layout, it soon becomes pretty intuitive.
Whereas some video recording apps only allow you to shoot either photos or video, BeastCam allows both and you can switch between photo and video mode easily.
You can manually control all the main settings, shutter, ISO, white balance and focus. Just tap the relevant button at the bottom to bring up a slider.
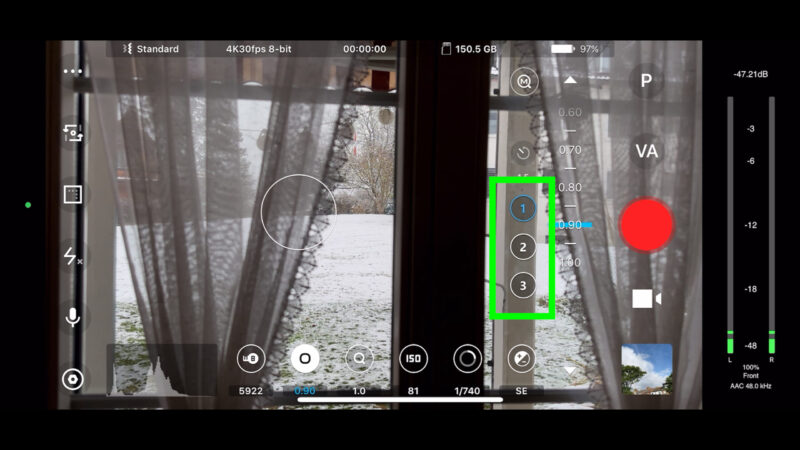
Tap focus and use the slider. The automation of focus pulls is brilliant and easiest to use than FiLMiC Pro’s. Move focus to the first point then tap one of the buttons numbered 1-3 and it turns blue. Move to the 2nd point and tap another of the numbered buttons, which also turns blue.
Focus Pull Speed
At the top, this button allows you to precisely set the focus pull speed. To move between each point just tap one of the blue buttons. You can also automate zooms in exactly the same way.
The square and the circle are reticles which allow you to set & lock exposure and focus. Moving the reticle over the area you want to use to set focus or exposure then tap to lock. They will turn blue.
Tap the 3 dots top left to open up some settings.
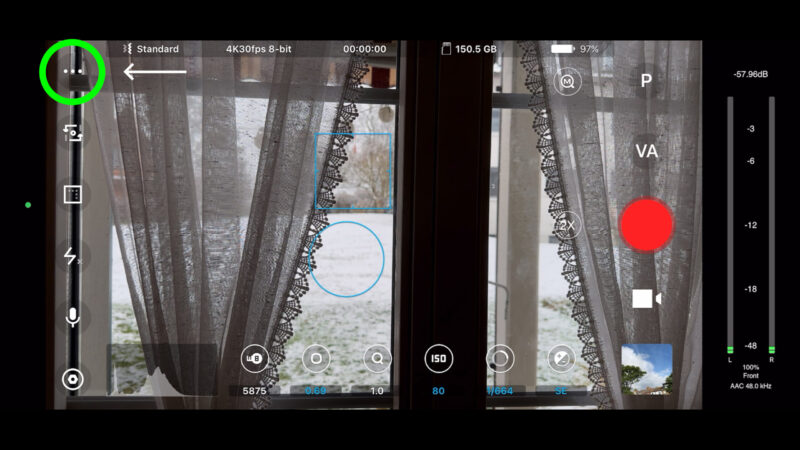
Digital Slate allows you to customise the naming of your recorded clips, so it’s easier to find what you need later. There are hardware settings, mainly aimed at BeastGrip’s conversion lenses for iPhone. So we have DoF, and the 1.33x and 1.55x anamorphic de-squeeze settings.
There’s 3 stabilisation settings, off, standard and cinematic. There’s some guides you can switch on, including one which allows you to see how level your camera is, which is pretty cool.
Next button down allows you to switch lenses. Below that we have resolution, frame rate, bitrate and codec settings. I do like being able to switch through the resolution and quickly see which frame rates are available.
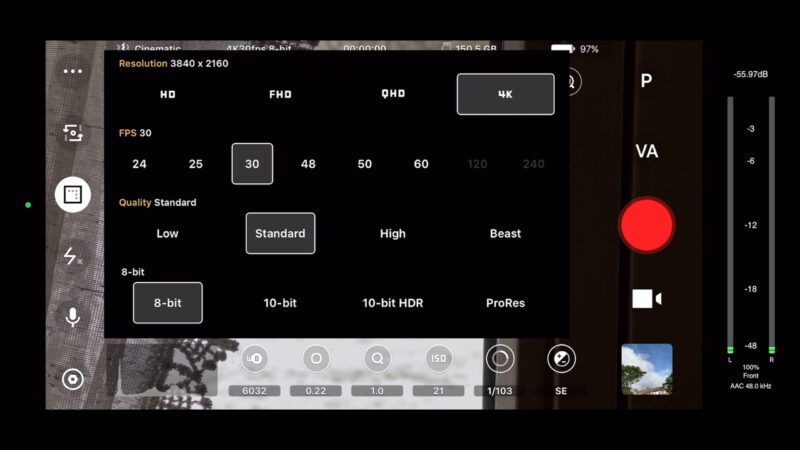
So you’ve got 8-bit, 10-bit, 10-bit HDR and ProRes here.
Audio Controls
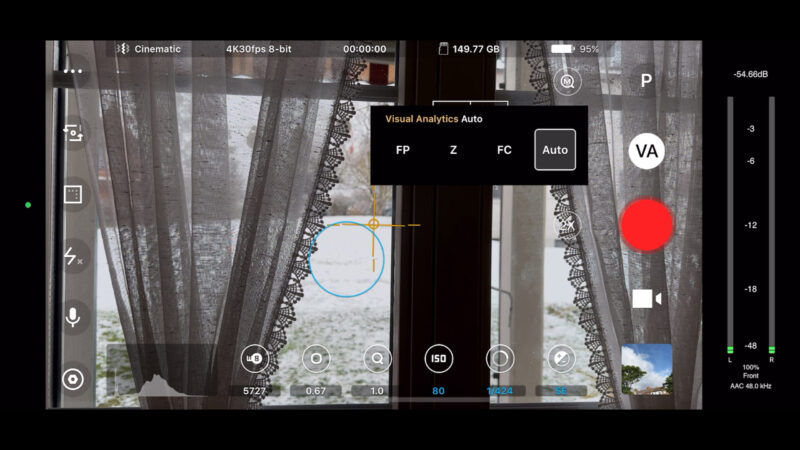
There’s audio controls and below that another settings button. At the top we can switch between 2 exposure modes: manual and smart. A window pops up suggesting you use smart exposure, presumably that’s down to the dynamic tone mapping. But if you choose Smart Exposure, you can no longer set ISO and shutter speed manually.
There are analytical overlays. If you choose Auto you will get zebras or focus peaking depending on the control you are using.
Although this UI might look confusing at first glance, I really think this is very well laid out and all the controls are easy to reach.
3. ProMovie Recorder + $3
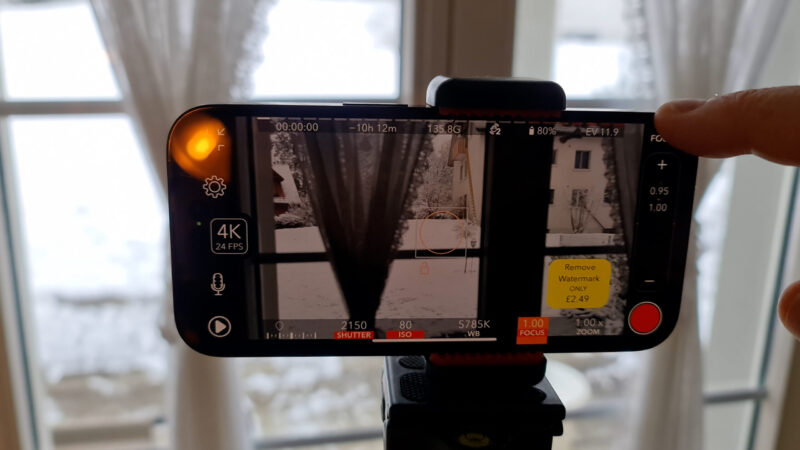
ProMovie Recorder is only $3 (or in the UK it’s £2.49). You can install and use all the features for free, but your videos will contain a watermark unless you pay.
If you like your interface with big lettering you might like ProMovie. As well, using this button top left you can cycle through different looking interfaces, including no interface at all. All the main controls are easily accessed by tapping the relevant setting.

If you tap the screen you can set exposure and focus for that area of the image. Lock or tap the x to switch back to auto. You can also separate out the exposure and focus reticles.
There’s a nice big button on the left for frame rate and resolution. You can also change aspect ratio and bitrate here. To select the video format you need to 1) tap the cog, 2) go into settings, and then 3) open “advanced” and then you can change between h.264 and h.265.
But you will find there’s no Dolby Vision or ProRes. So that’s a bit of a long route to change codec and then the choice is again limited.
Best Video Recording Apps – Manual Exposure
By tapping shutter or ISO you can adjust exposure manually and the settings are marked red as locked. You then get these reticles in the middle of the screen. Tap it to unlock and the app springs back to auto exposure and focus.
Swipe the slider to change the setting. On my iPhone 14 Pro this slider is quite short which means if you want to shoot a deep focus pull, you might run out of slider. However, you can actually press the buttons at the top and bottom to get the slider to move as well. So you could use that for a focus pull, but you only have one speed available.
There’s 3 options for stabilisation: off, 1 or 2. However, I found that whichever I selected, there was no difference in how the video came out. So my guess is that a new version of iOS has done something to stabilisation which needs updating by the app devs to get it to work again.
To switch cameras, you need to tap the cog, tap camera and then select from a list. Again, it’s 1 or 2 extra taps to reach something you are likely to want to use frequently. More often than resolution and frame rate, for example, and yet you get a big button dedicated for those settings.
Triple Lens Mode
However, it does have a triple lens mode. In this mode, the app will automatically switch between lenses when zooming, like you can with the native iPhone camera app. There are limits to when you can use this, like high frame rates are out of bounds for example.
There are some basic audio controls and the audio level meter runs across the top of the app. Overall, it’s not a bad app and it’s very affordable. But there are some features missing.
4. MAVIS – $6
The MAVIS camera app has been around for a while. Currently, it’s $6 on the app store. While I downloaded it a few years back, the developer stopped updating the app for at least a year which put me off. The app got a lot of praise from smartphone filmmakers when it first came out, but I’m not sure they’re keeping up with the required bug fixing, which I’m sure is a constant job.
The app does have a nice interface as well as easily accessible analytics. Problem is, on my iPhone 14 Pro the manual exposure controls don’t really work. When you slide ISO or shutter speed, the auto exposure seems to override the setting and it springs back. I was made aware of this when a member on Patreon mentioned it in our Discord server – so it’s not only me.
For that reason, it’s not currently usable as an app for manually controlling your iPhone camera. So I’m not going to review it any further. You can pay $6 for the app but whether it works or not at any given time might be down to luck.
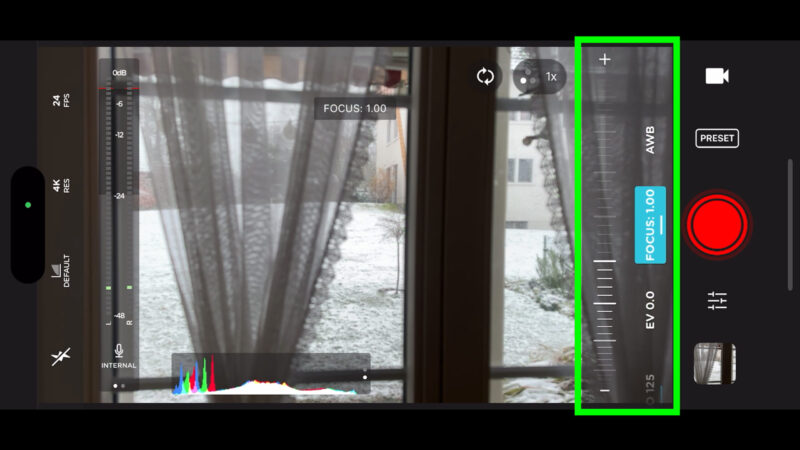
5. Cinema P3 – £7
Cinema P3 is free to download but if you want all the controls you need to buy the pro version. At the time when I paid for the pro version it cost me £7.
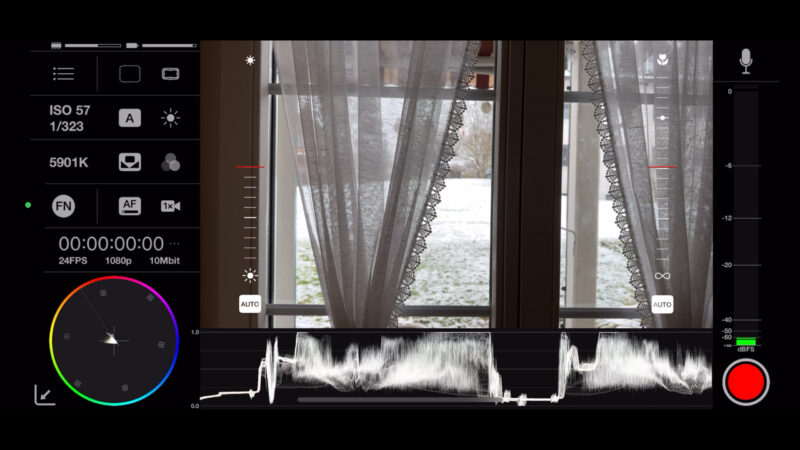
This app has lots of features. It also allows you to customise the way the interface works, so you can set it up to work the way you prefer.
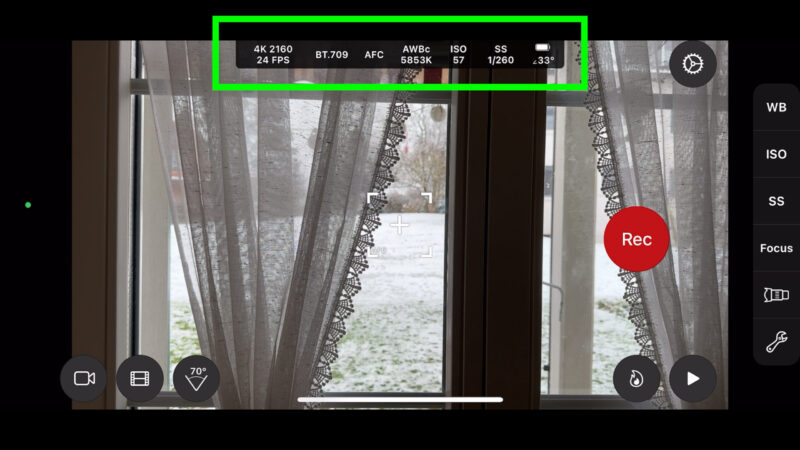
There’s no reticles this time but the bar at the top displays your most important settings. As well, you can tap these settings to bring up the relevant controls.
Tap the button bottom left to open up 3 different modes: photo, video or creative. Photo and video modes also allow you to choose lenses. Creative mode gives you various LUTs and colour profiles including Log settings.
Tap the film strip button to bring up a resolution, frame rate and codec picker. This includes a colour setting called P3 which is said to offer up to 25% more colour than standard (Rec.709) video. Next button along is the lens picker.
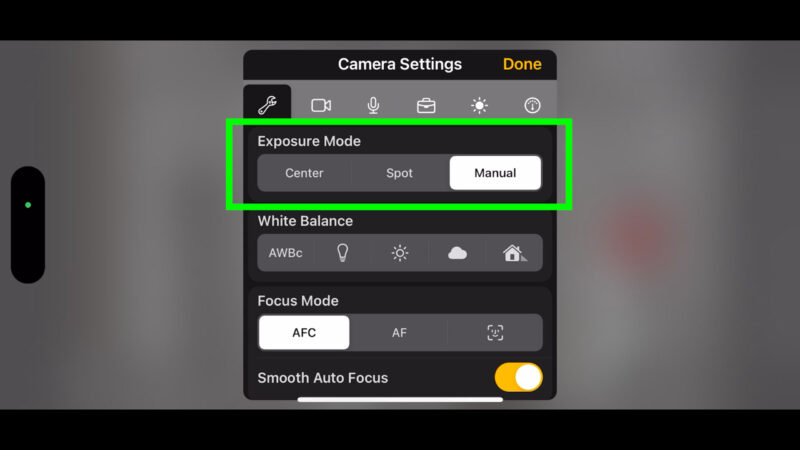
Exposure Mode
Tap the spanner button to bring up a host of settings. If you want full manual control, switch exposure to manual here. There’s many other settings here, just tap the tabs to find more.
There’s 2 levels of cinematic stabilisation. You can toggle between global and local dynamic tone mapping. Use local if you want to reduce the way dynamic tone mapping overrides manual exposure.
There’s video settings, including different ProRes formats. There’s audio controls, including switching on or off an audio level meter and lots of other audio controls here too.
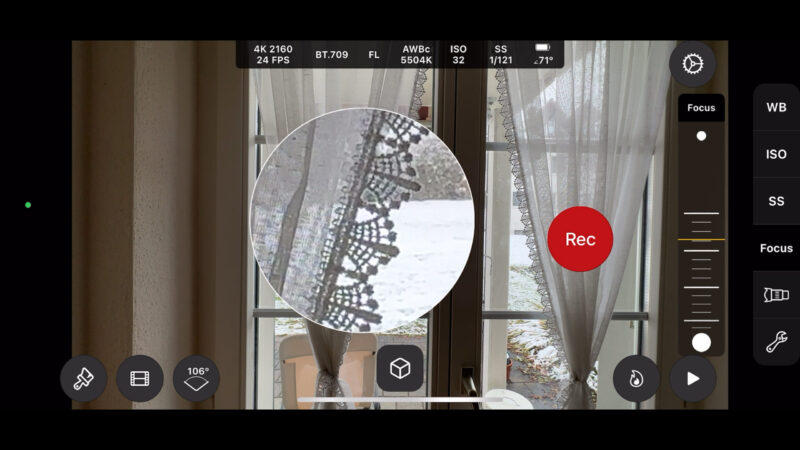
Next along we have Tools, which includes displaying a manual focus loupe. What this does is zoom in on a portion of the image so you can more easily set focus exactly. Once it’s on, open manual focus and you will get this zoomed in circle. You can move this around to the point you want to be in focus.
You can customise display settings, which includes locking your screen to 100% brightness. While having a dimmed screen saves battery, it also misleads you when you are trying to set exposure. You can also switch screen dimming off completely.
Personally, I don’t find the interface as intuitive as BeastCam. However, the amount of features, settings and customisation options available is pretty much unmatched by any of the other apps I’ve tried, including FiLMiC Pro. Only thing missing is gimbal support, which is true of all apps except Filmic.
Another great thing about this app is the tutorials on the official website. I’ve only really scratched the surface here with what it’s possible to do with this app.
6. Moment – Pro Camera $7
Like BeastGrip, Moment makes and sells camera accessories, including conversion lenses for smartphones. They also released their own camera app for iPhone. There is an Android version but they stopped updating it some years ago.
Currently, the Moment app is $7.
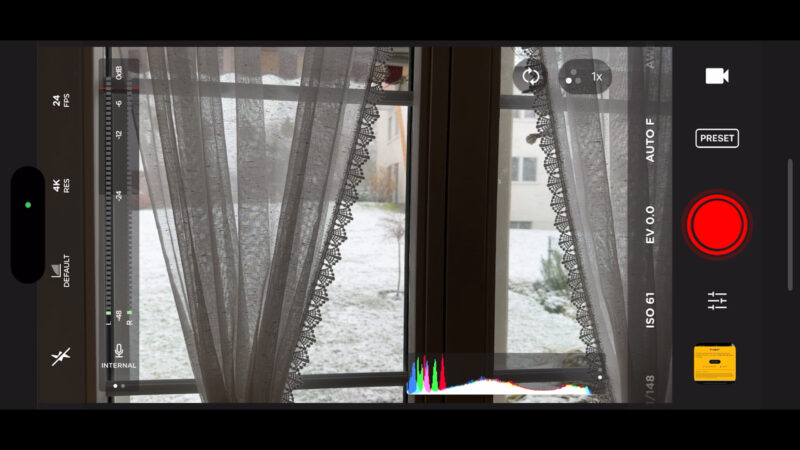
The interface is nice and simple. You can manually set ISO, shutter speed, white balance and focus by swiping this menu bar and tapping the setting. You can shoot photos and videos. There’s also a slow shutter feature for photos and a timelapse feature which allows you to add motion blur. So that’s a great effect for hyperlapse videos.
There’s a button top right for switching cameras on your phone, but you have to cycle through to get the camera you want rather than getting a list to choose from. There’s grids and guides, a couple of histograms, analytics overlays and some support for use with Osmo Mobile gimbals.
Conversion Lenses
Naturally, there are settings for use with Moment’s conversion lenses. Tap the button top left and choose from a list of buttons. There’s also 3 colour profiles available: regular, flat and Log.
It’s easy to set resolution and frame rate too. But if you want to change codec you need to go into settings and scroll down a list. Surprisingly, there’s no Dolby Vision or ProRes available. You just get the standard h.264 or h.265. Choices for stabilisation are just on or off.
However you can set bitrate up to 100mbps. And you can access PAL frame rates as well, should you need those. But those are also available via the iPhone’s native app.
If you swipe on the audio meter you get a level control for monitoring. Overall, it’s nice and simple but there are some basic features missing. No Dolby Vision or ProRes, no 10-bit colour option. However, it might be worth having the app simply for the slow shutter and hyperlapse with motion blur.
7. ProCam 8 – $10 (plus in app purchases)
ProCam has been around for a while and currently sits at $10 plus there are in-app purchases. I think I bought everything some time ago, so I’m not sure what the in-app purchases are. I haven’t really used this app much, but I seem to have all the features available.
The interface is a bit different, so it takes a little bit longer to get familiar with the controls.
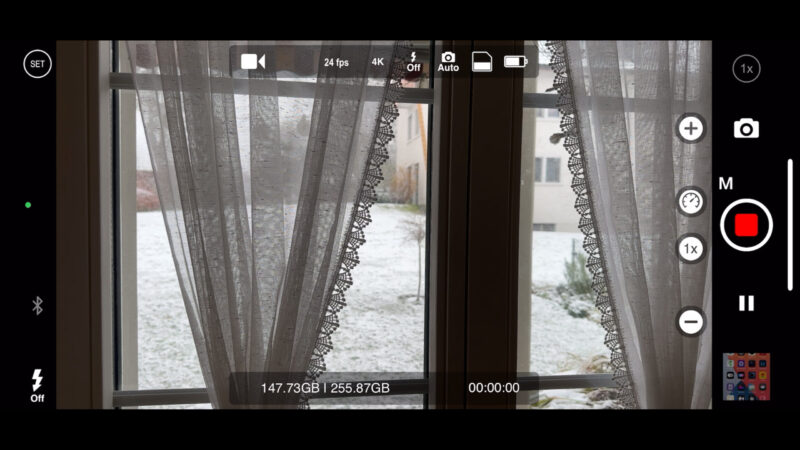
To get manual control, tap the M button next to the record button, which reveals the shutter, ISO and white balance settings. Tap the setting you want to adjust and swipe the slider.
To return to auto mode, tap the setting until it turns yellow. Tap the circle button top right to open camera options.
Tap the arrow below the record button to access frame rate and resolution settings. They are grouped together, so you can’t just switch frame rate. You have to find the grouping you want. Like 4K and 24fps.
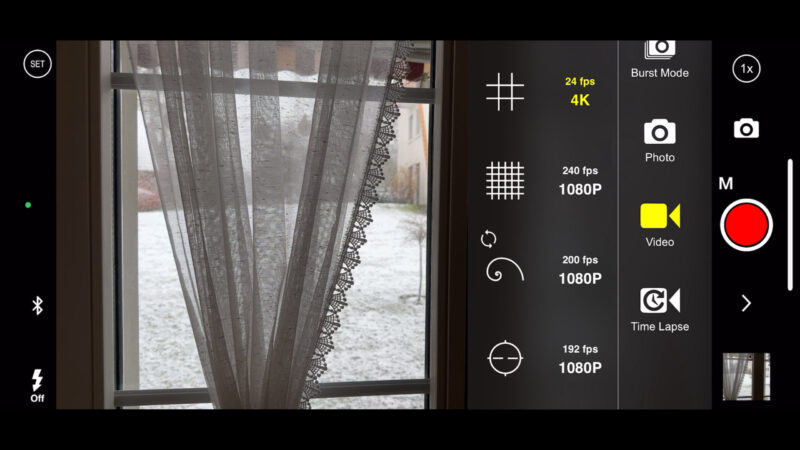
As well, the developer has decided to include grids and guides here. Personally, I would prefer to have resolution and frame rate separate and put the guides in settings somewhere.
You can also swipe up and down to find the different modes. Video, photo, timelapse, burst photos, slow shutter, portrait and something called “3D photo”.
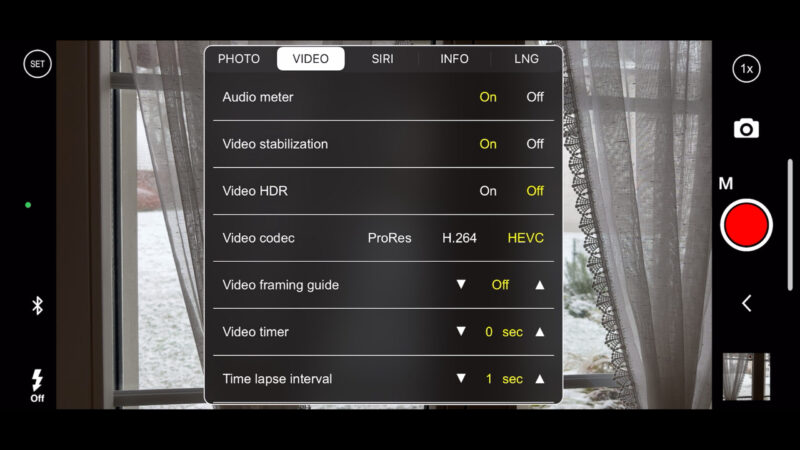
Dolby Vision & ProRes
Tap the SET button top left to access extra settings. Here you can choose Dolby Vision and ProRes, so it’s good to know those formats are supported. There’s only on or off for stabilisation, but it does appear to work.
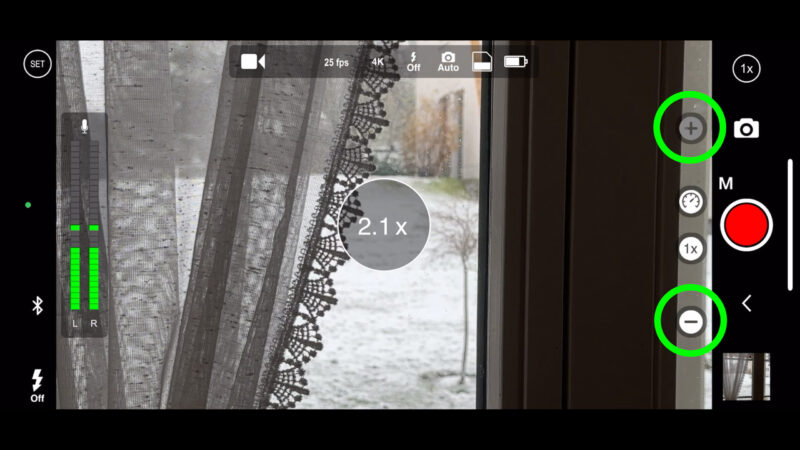
To zoom in and out in video mode you need to use the plus and minus buttons. You can set the speed of the zoom, but there is no manual slider option. The developer says that they have updated the app to make use of the iPhone 14 Pro’s 2x telephoto.
You can make interface choices such as switching the audio meter on or off. But there’s no option to adjust the bitrate, so I guess you get the iPhone’s standard bitrate.
Overall, it’s not a bad app but I don’t like the interface too much. That might be because I’m just not used to it. Mainly I just don’t like choosing frame rate and resolution from a list of combinations. Thing is, I pretty much always just shoot 4K but I will change frame rate regularly.
So this app is a no from me, but you might find this suits your way of working.
8. ProTake – $20 / Year
Now we get into the subscription apps. Subscriptions are very unpopular but if you get a good app that’s reliable, well designed and well maintained, then perhaps it’s worth it. If $20 a year means your app works when you need it to, rather than breaking down because the lack of funds means the developer doesn’t have time to fix bugs, then maybe it’s worth it.
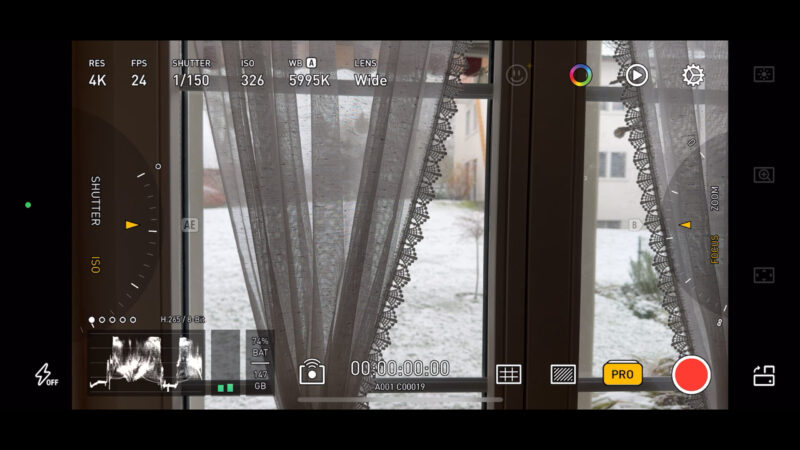
The app is a very good one, in my opinion. The interface is very user friendly and important settings are very easy to find and change. No hunting through menus within menus within menus.
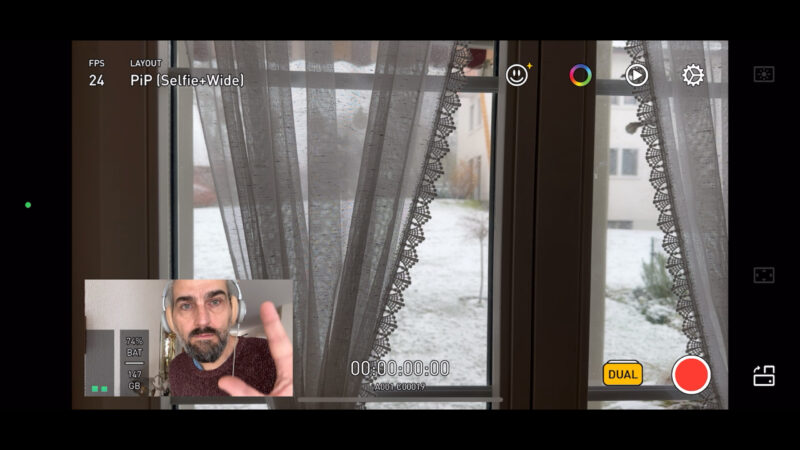
Tap where it says AUTO to switch between different modes. If you switch to PRO you will need to pay the subscription to record video. There’s also DUAL which allows you to record with 2 cameras at the same time, so you can have a picture within a picture. PORTRAIT creates the fake blurry background, like Cinematic Mode, but not as good and without being able to edit the focal length after.
Protake has control wheels on each side like the old version of Filmic Pro. To switch between manual and auto just tap the button to the side of the wheel. Now you can easily switch between shutter and ISO.
Swipe the focus / zoom wheel to switch to manual focus. Swipe the wheel to set focus. Tap the B button to set a point which the wheel will return to for an automated focus pull. This is definitely the best and simplest system for automated focus pulls out of all the apps.
To return to auto focus swipe round until you reach the A.
Resolution & Bitrate
Tap the settings at the top to open up a nice big menu at the bottom. When you choose resolution I like that you get the bitrate beside it, which goes up to 64mbps. It just makes sense to have resolution and bitrate together.
Frame rate goes up to 60fps and includes 25fps. In 1080p you can go up to 240fps on my iPhone 14 Pro. There’s even a slow 6fps option for that weird dreamy effect, if you combine it with a very slow shutter speed. You can also easily switch to timelapse here.
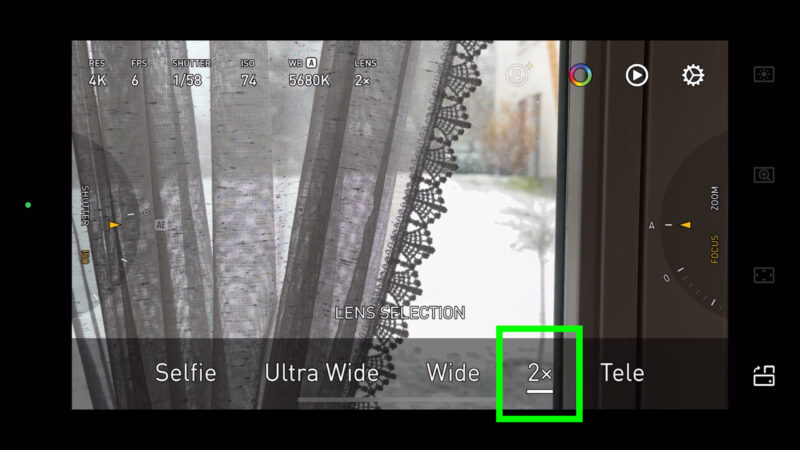
Tap the LENS button to open a lens picker. This is the only app I’ve used which gives direct access to the iPhone 14 Pro’s 2nd tele lens, which is the 2x. So that’s really nice to have.
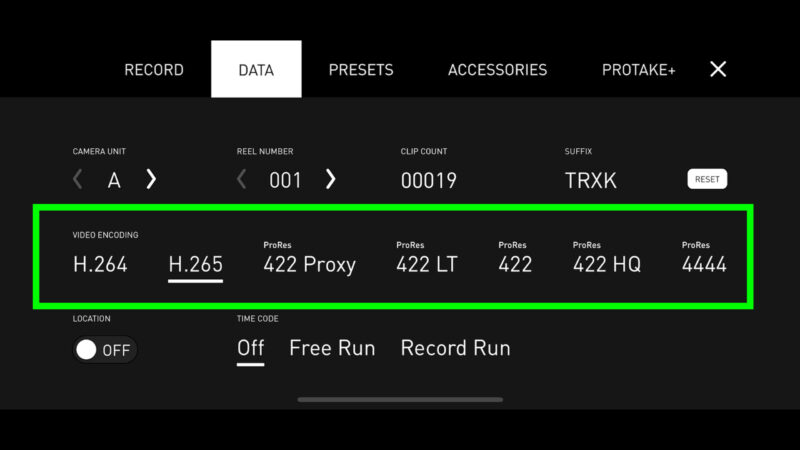
Tap the cog to open up more settings. The DATA tab allows you to switch codec and we have the full range, from h.264 up to ProRes 4444, which is the highest quality.
More settings
Under RECORD we have 2 pages of settings. On the first page you can see we have 8-bit, 10-bit as well as Dolby Vision. So all current iPhone formats are available and more. There’s also 4 different levels of stabilisation, from off to extreme.
In the second page there’s a setting called High Dynamic Range Imaging, which you can toggle on or off. My guess is that this is to do with dynamic tone mapping. If you switch it off, I expect it reduces the effect. Less dynamic range but more manual control over exposure.
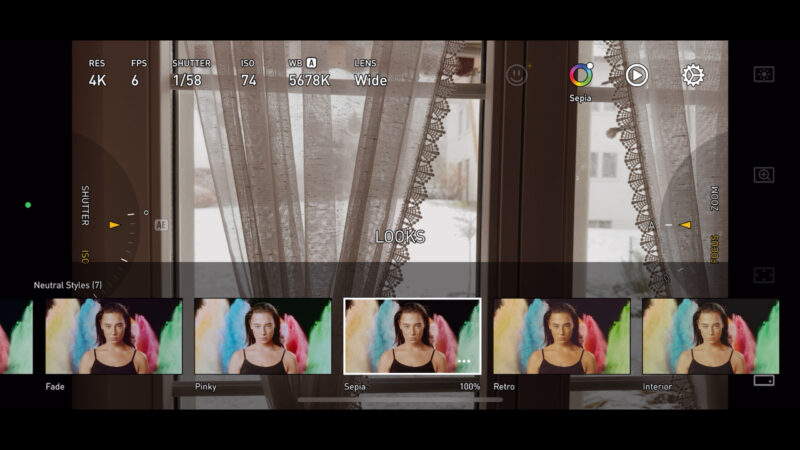
If we tap the ProTake button at the top we get a bunch of LUTs. Log C and various looks, and film look filters. I don’t usually like these but these ones look pretty good.
There’s a menu for accessories, including Zhiyun gimbals. I tried it with my Smooth 5 but while the gimbal connected, none of the buttons did anything, including the record button. There’s also a de-squeeze for anamorphic lenses.
There’s analytics overlays as well as 5 different histograms in the bottom left. Tap the audio levels to bring up audio controls. You have options for various guides too.
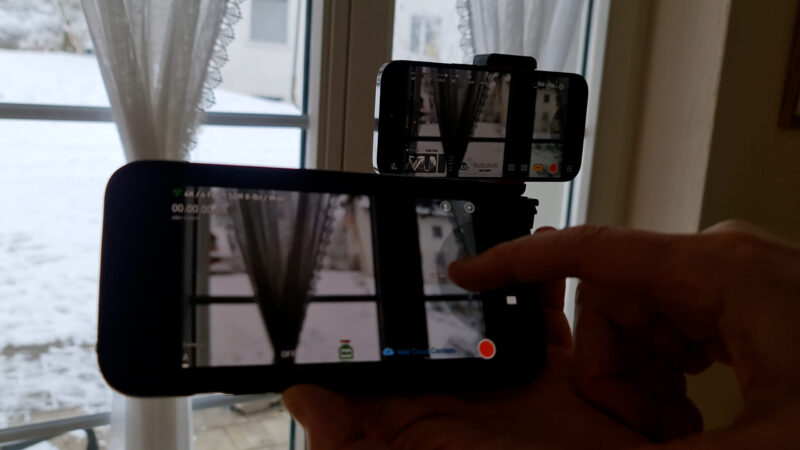
This app also allows you to use a device as a monitor. Just tap this connection button to the left of the counter and set one device to camera and the other to monitor. There are limited controls from the monitoring device such as record, focus and zoom.
So this is a pretty extensive app. The only thing really missing is gimbal support. Downside is it’s $20 a year, although when I stopped my subscription, they offered me a 40% discount. So this year will only cost me $12.
9. FiLMiC Pro – $3 a week or $50 a year
FiLMiC Pro is now owned by a company called Bending Spoons, which means to use the new version of the app you will need to pay a rather pricey subscription. For new users it’s $3 a week or $50 a year. And if you want to express your anger at anyone, it should be at Bending Spoons because they alone set the price.
There are more features than ProTake and the developers will respond to questions and issues. On the other hand, Protake doesn’t have a website or any kind of social media presence. There’s no manual to access and very few tutorials. If you have any issues with the app, then good luck.
I’m not going to cover Filmic Pro here because I already made a video about it. So if you are new to Filmic Pro then go check out that video to get an overview of the app.
Those are my best video recording apps for iPhone. What are your thoughts about video recording apps? Leave a comment below.
Videography – Beginner to Advanced
If you want to know more about filmmaking, my book Smartphone Videography – Beginners to Advanced is now available to download for members on Patreon. The book is 170 pages long and covers essential smartphone filmmaking topics:
Things like how to get the perfect exposure, when to use manual control, which codecs to use, HDR, how to use frame rates, lenses, shot types, stabilisation and much more. There’s also my Exploring the Film Look Guide as well as Smartphone Colour Grading.
Members can also access my regular filmmaking podcast, as well all 5 episodes of our smartphone-shot Silent Eye series, with accompanying screenplays and making of podcasts. There’s other materials too and I will be adding more in the future.
If you want to join me there follow this link.
