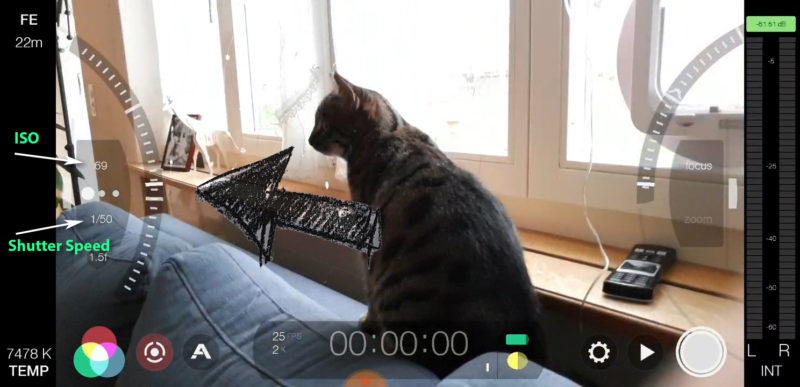
Setting ISO using the FiLMiC Pro Camera App

- Open FiLMiC Pro
- Open Manual Controls
- Move Exposure Wheel to set the desired Shutter Speed
- Click on the Shutter Speed to lock it (it goes red)
- now move the wheel to set the ISO
The higher you set the ISO the brighter the image
BUT
The higher you set the ISO the more noise you get
Read more: ISO for Video – the Basics Explained
Eager to learn more?
Join our weekly newsletter featuring inspiring stories, no-budget filmmaking tips and comprehensive equipment reviews to help you turn your film projects into reality!
Simon Horrocks
Simon Horrocks is a screenwriter & filmmaker. His debut feature THIRD CONTACT was shot on a consumer camcorder and premiered at the BFI IMAX in 2013. His shot-on-smartphones sci-fi series SILENT EYE featured on Amazon Prime. He now runs a popular Patreon page which offers online courses for beginners, customised tips and more: www.patreon.com/SilentEye


So where is the rest of the video? This is about setting ISO, not shutter speed. Of course being at the whim of a locked-in shutter speed is likely force you to push ISO way past an acceptable exposure latitude, So what we need to see are results from locking in a desired ISO (ISO 800, 100, etc.) and then manually dialing in a shutter speed that brings the waveform monitor output into an acceptable range of values.
Well it depends on your priority. If you’re trying to get a certain look, for example 180 degree shutter angle 24fps – 1/48 sp, then it makes sense to lock down the shutter speed first.
What is your method of determining the iso setting with the locked shutter speed at 1/48?
as low as possible. Anything above 200 I try to avoid