4 Key Filmic Pro Settings You Might Not Know
There are some features in Filmic pro you might not know about but which can make a big difference to the look of your video or just cause you problems. So here’s 4 features to check over before you start that important shoot.
Compared to other camera apps for shooting video using your smartphone, FiLMiC Pro has a lot of features. Going through all the menus and scrolling through a host of toggle switches, it’s easy to miss some important ones.
Personally, I tend to focus on things like exposure and focus. But it’s really worth looking at some of the lesser known features, as they can make a big difference. In addition, sometimes things get switched off or on, or turned down, and then we’re confused about why FiLMiC doesn’t seems to be working properly.
So let’s go through a few of them and find out what they do and whether you should use them or not.

Edge Enhancement (Android Only)
When shooting with Apple or Android phones, both will add digital sharpening to your video. However, digital sharpening is not something we would normally apply if we’re trying to achieve the film look. And (if we need it) we can always apply it later.
Digital sharpening is a filter which works to overcome the limitations of a camera’s sensor. Basically, the filter looks for edges in the image and attempts to make them more clearly defined.
Thing is, film tends to return softer images than digital sensors. Therefore, if we want to mimic the look of film, it would be handy to be able to turn off digital sharpening. By the way, creating a softer image isn’t just a digital problem, decades ago cinematographers even complained that modern film was too sharp. Some even boasted of adding layers of filters to create a softer image.
So why do smartphone makers add digital sharpening?
Digital sharpening makes sense when we see manufacturers marketing a device’s increasing ability to capture image detail. Soft images don’t sell devices with high resolution screens, like 4K and 8K TVs. Plus if you are viewing videos or photos on a smartphone, then having crisper images makes sense too. They’re simply easier to look at on a small screen.
Unfortunately, Apple has not allowed 3rd party apps access so currently only Android users can turn off edge sharpening.
How to turn off Edge Sharpening
- Open settings
- Click “Device” Icon
- Scroll to the bottom setting: “Edge Enhancement”
- Tap left to disable.
By default, the setting is set to fast edge enhancement. You can also tap right to switch on quality edge enhancement. However, FiLMiC Pro says they can see no visible difference.
So, if you want to keep your videos with extra edge sharpness, then keep it on. I recommend you experiment with both edge enhancement settings, as different devices produce different results.
But if you want that smoother, softer film look, then make sure it’s in the off position.
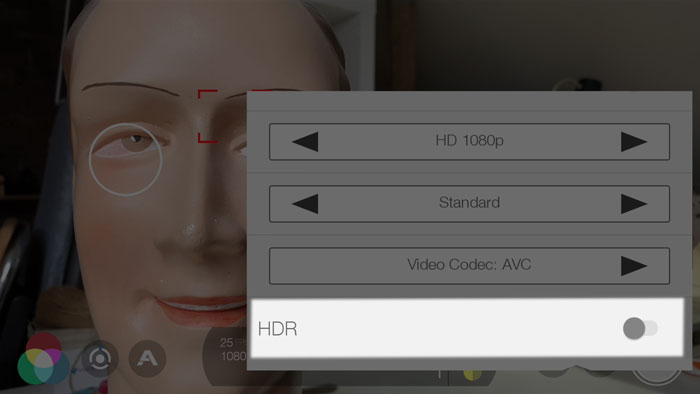
HDR
HDR stands for High Dynamic Range and this feature is used across a variety of TVs and other video devices, including smartphones.
This format originated with stills photography. Photos captured at different exposure levels are merged into one. This helps improve the dynamic range of your photos by taking the best exposed parts from different photos to create one complete photo.
For example, a portrait picture outside might have the sky washed out or the person’s face in deep shadow. With HDR, 2 photos can be merged. So the correctly exposed sky is taken from one photo and the correctly exposed face from the other.
In essence, an image using this format will be somewhat closer to how your eyes see it, rather than how your camera sees it.
Different types of HDR
Different devices come with different types of HDR. For example, the latest Samsung devices carry HDR10+. Meanwhile, Apple says the iPhone 11 Pro has “extended dynamic range for video at 30 fps”. And when HDR features are enabled, software analyses an image using dynamic tone mapping and attempts to expose areas of the image differently.
While this is great when using auto settings, when you try to use manual settings via FiLMiC Pro (and other apps) there can be conflicts. This is because a manual camera app is trying to stop the camera setting things automatically. But HDR and other AI features are trying to adjust the image dynamically, sometimes frame by frame.
Therefore, FiLMiC Pro and the inbuilt camera software sometimes conflict and weird things start to happen.

HDR on Samsung S9
I noticed this when shooting the video on how to use focus in FiLMiC Pro. While performing a test focus pull, I noticed one part of the image suddenly changing tone in the middle of the shot.
Another time, the exposure controls stopped working. As I moved the exposure wheel, all that happened was extra noise was created and the brightness remained the same. Like FiLMiC Pro is pushing it one way and the HDR is pushing it another.
Soderbergh talked about this after shooting High Flying Bird with an iPhone 8+. The AI was overriding FiLMiC Pro and causing issues which needed hours of post-production work to fix.
“If somebody walks past a window, or you pan through a light, it, even though it’s supposed to be frozen, [the sensor] responds. What makes it even worse is it’s not the entire frame that responds, it’s pieces of the frame.” Steven Soderbergh
He even joked he would send Apple the bill for all the work they needed to do to fix it. So for that reason you might want to switch off HDR. Again, I don’t think this is possible with iPhones. I did ask FiLMiC Pro about this but they haven’t responded.
However, when Beastgrip announced their camera app will finally be launched next month I asked about the iPhone AI issue. Their reply was: “Some older models have problems with skin tones under specific conditions, but in newer iPhones they fixed it”.
I’m not sure if that really answers the question, but as I don’t have an iPhone I can’t test it. So, iPhone users, do you have experiences with FiLMiC Pro and other apps conflicting with HDR or other software?
HDR – On or Off?
Well, if our device has the option, should we have HDR on or off? It seems obvious that when using FiLMiC Pro for manual control we don’t want other software trying to override it with dynamic tone mapping.
Then again, why do FiLMiC even give us the option to turn it on? My guess is that each device is different. So I recommend you try it out on your device and see what happens if you have HDR on and try to adjust exposure manually.
But, if you have an important shoot and you haven’t had time to test your device with HDR on thoroughly, then I’d recommend you make sure HDR is disabled. Any conflict with FiLMiC can ruin a shot.
How to turn off HDR
- Open settings
- Click the “Resolution” Icon
- Scroll to the bottom HDR on-off switch
- Tap switch icon to disable HDR
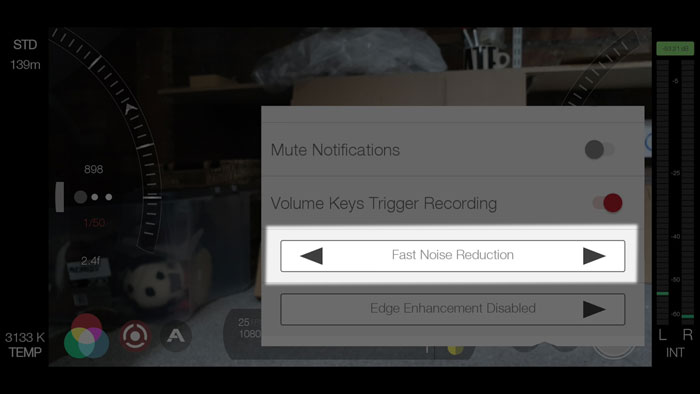
Noise Reduction
Noisy video is often a problem with current smartphones, with their small sensors. Noise happens when the digital signal providing the image information needs to be boosted, usually if there’s not enough light in the scene. But smartphones also have inbuilt noise reduction software to help you out.
The question is, should we have noise reduction switched on or off. Well, it depends on the situation and the device.
3 settings – disabled, fast or high quality.
Now, as with many features in FiLMiC Pro, noise reduction uses processing power. And our smartphones (indeed, any digital cameras) have a limited amount. So, if you want to film in 4K at the extreme bitrate quality, using a Log setting and so on, each one of these requires more of your phone’s processor.
At some point, your device’s processor will get stretched by too many demands. Your phone might overheat and FiLMiC Pro become less stable. Crashes happen and bugs start appearing that weren’t there before.
So, if you are using settings which are really stretching your camera’s capabilities, you might want to turn off everything else you don’t necessarily need. One of those things might be noise reduction.
For example, if you are shooting with plenty of light then you might not need to reduce noise. Or you can simply keep the setting at “fast”, which is not as demanding but still removes a lot of noise.
Another thing to bear in mind is that noise reduction alters the look of the video, removing some fine detail. So, if you find you have enough light so your ISO is at the lowest setting, there may be no noise anyway. In which case, have it disabled.
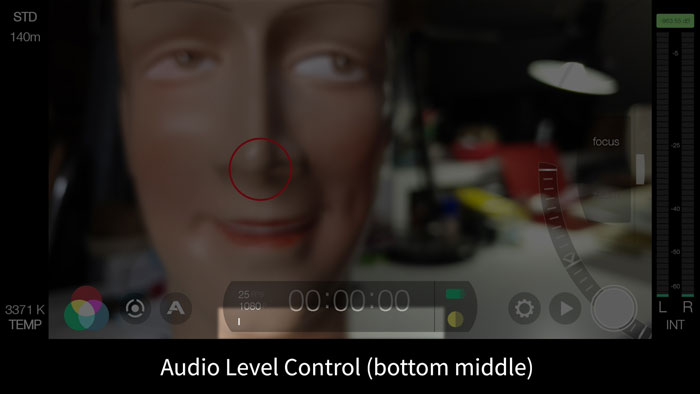
Volume Slider
Did you ever find the level meters in the app are at zero when they should be registering an audio level? Then it could be that your audio in FiLMiC Pro is set to zero. This is another feature which you might not even know exists, until one day you find you unintentionally recorded a silent video.
Well, there’s actually an audio level slider which you might not have noticed. The slider is located right at the bottom in the middle, below the time display. Because it’s a rather small white vertical line, it’s easy not to notice it.
If the slider is all the way to the left, your audio volume will be at zero. By default, I believe the slider is on the opposite side. In other words, all the way to the right at full gain.
Of course, you can adjust the level to somewhere between those two points if you need to. Otherwise, just leave it at maximum.
Eager to learn more?
Join our weekly newsletter featuring inspiring stories, no-budget filmmaking tips and comprehensive equipment reviews to help you turn your film projects into reality!
Hi, thanks for all the info you provide… very profesional…
Maybe you could help… I can’t find many of the options you mentioned in this page, for example FAST NOISE REDUCTION… or choose the video codec or the HDR / SDR… maybe you know what is happening… thanks in advance…
If you are using an iPhone, it’s not available.