How to De-Squeeze Anamorphic for iPhone or Android
If you’ve been working with an anamorphic lens adapter for your smartphone videos, you will have come across a thing called “de-squeeze”. But if you’ve just received your anamorphic lens and are confused by the de-squeeze process, this article will help give you some starter tips.
A wide lens, but only on the horizontal dimension…
An anamorphic is a wide angle lens which widens the view left and right, while keeping the up and down view unaffected. When it comes to conversion lenses for smartphones, this feature is unique to the anamorphic.
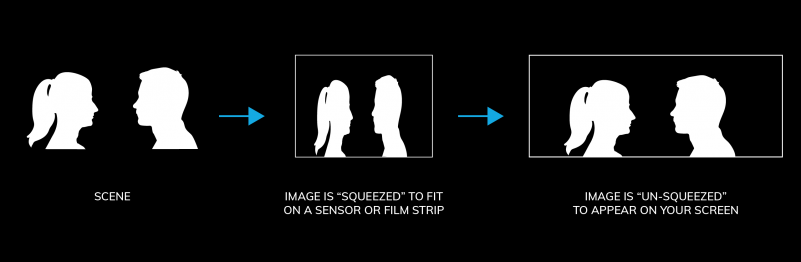
So, because it’s only widening the horizontal dimension of the image, the image become distorted. Everything in the image literally gets squeezed in, from the left and right of the frame. As a result, any people in the frame look a lot thinner (but not in a good way).
This image from Nimia illustrates this process well. This stretched-out style has become a look we now think of as cinematic.
A 1.33x anamorphic adapter squeezes a 33% wider field of view onto the camera sensor of your smartphone. Therefore, that video will now be in a standard 16×9 ratio. The exact pixel size of the video will depend on the resolution you filmed at.
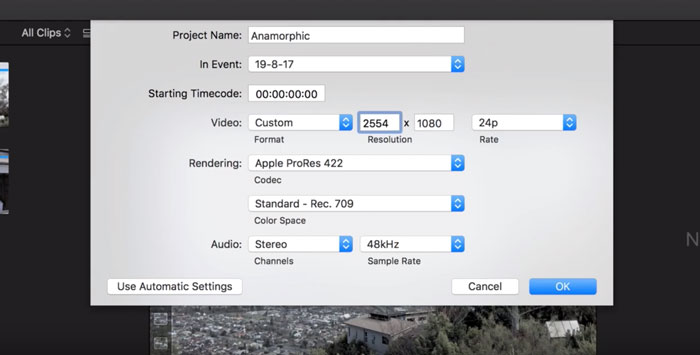
If you filmed in HD (1920 x 1080 pixels), you multiply the width of your frame by 1.33 and get 2554 (being fussy that 1.33 should be 1.33 recurring, but that’s an impossible calculation). Therefore, you want your final de-squeezed frame to be 2554 x 1080 pixels.
Note: this process does not create extra definition or extra quality. Effectively, you are upscaling the video from a lower resolution to a higher one.
At 2K Resolution: 16×9 = 2048 x 1152 pixels. De-squeezed: (times by 1.33) = 2724 x 1152.
At 3K Resolution: 16×9 = 3264 x 1836 pixels. De-squeezed: (times by 1.33) = 4341 x 1836.
At 4K Resolution: 16 x 9 = 3840 x 2160 pixels. De-squeezed: (times by 1.33) = 5107 x 2160.
So the resolutions in bold are what you are aiming to get post de-squeeze.
Film in 16×9 aspect ratio
Note: make sure you are filming in the 16×9 aspect ratio. Anamorphic conversion lenses for smartphones are designed to be used with the 16×9 ratio. If you shoot with FiLMiC Pro, for example, and set to a different ratio, your final image can get messed up by distortion and quality loss.
De-Squeeze Using FiLMiC Pro
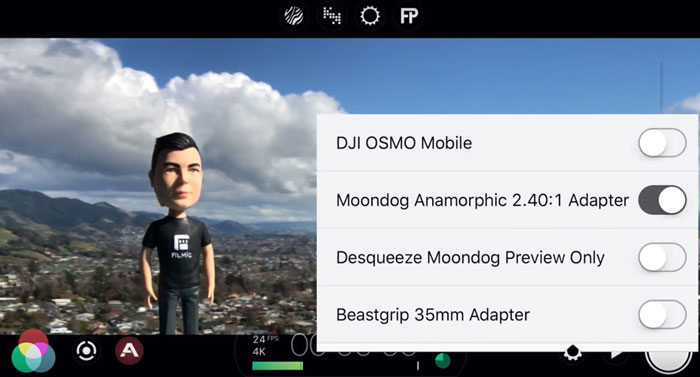
When shooting with the FiLMiC Pro app, there is a setting for anamorphic conversion lenses. This will de-squeeze the frame for you. The advantage is you will see the frame ratio as you are filming and don’t have to de-squeeze later.
- Open app.
- Press the “Gear” icon to the right-hand side of the screen.
- Click on “Hardware”.
- Click the “Moondog Anamorphic Adapter” to de-squeeze image.
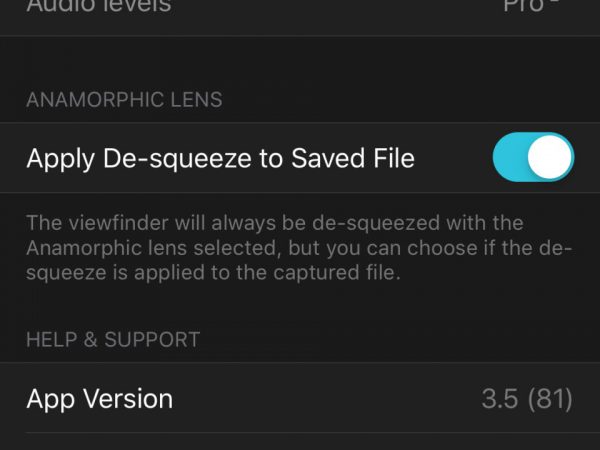
With FiLMiC Pro you can choose “preview only” which means you will only see the final result while filming. The file recorded will be 16×9. This gives you the option to de-squeeze later, if you prefer to work that way.
De-Squeeze Using Moment Camera App
Not only do Moment make a anamorphic lens adapter, but they also have their own app which – like FiLMiC Pro – will do the de-squeezing for you.
From the Moment website:
- Open App
- Select the “Anamorphic Lens Button”; the one with the little “A” in the middle of the circle. (NOTE): Using the Anamorphic setting with your Moment Anamorphic Lens will only show what it’s like de-squeezed as a preview, but it WILL NOT save de-squeezed. You must continue to step three.
- Click the “Settings” button (three lines).
- Apply the “De-Squeezed file” button.
- You’re all done; except… if you’re shooting 4K 60FPS or 1080p 240FPS, your phone will have a difficult time processing that high amount of RAM power, resulting in dropped frames after production. We DO NOT RECOMMEND using our de-squeezed function if you are shooting in either 4K 60FPS or 1080p 240FPS.
De-Squeeze in Post
If you decide to record in 16×9 and then de-squeeze the video later, you can use your editing software to achieve this. Basically, using the resolution sizes above for the de-squeezed frame, you need to be able to set your sequence settings (or similar) to match.
De-Squeeze Using Premiere Pro
One method is to set your sequence settings to match the de-squeezed ratio. Now, when you place the squeezed video on the timeline, right click and use “scale to frame size”. The video clip will now de-squeeze.
Premiere Pro also has a function to set your clip for anamorphic.
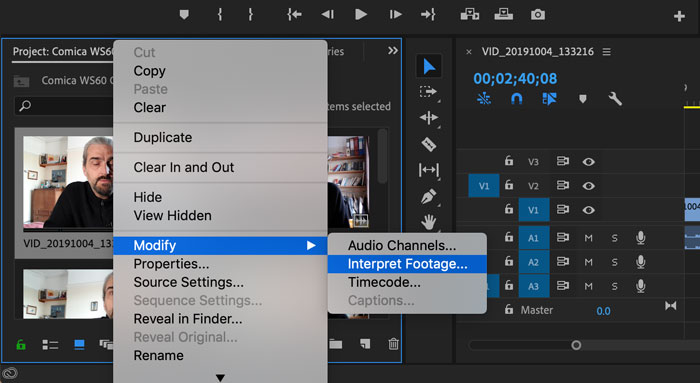
Right click the clip in the project and find the Interpret Footage setting. Select “Conform To” then select Anamorphic.
De-Squeeze Using Final Cut Pro X
When creating a new project, set up the ratio in the settings. In the image below, the settings are for the HD resolution anamorphic. If you shot in higher resolutions, set accordingly.
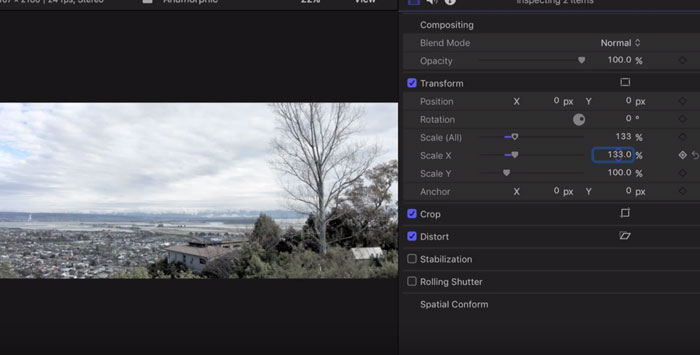
With all the clips to de-squeeze in the timeline, select them all and change the X scale to 133%.
Other programs
Without going through every camera app, conversion tool or editing program out there (this post would be pages long), you should be able to understand the basic principles here. So if you are using other apps or software, then it should be a simple matter of applying these principles to your footage.
Smartphone Video – Beginner to Advanced
If you want to know more about smartphone filmmaking, my book Smartphone Videography – Beginners to Advanced is now available to download for members on Patreon. The book is 170 pages long and covers essential smartphone filmmaking topics:
Things like how to get the perfect exposure, when to use manual control, which codecs to use, HDR, how to use frame rates, lenses, shot types, stabilisation and much more. There’s also my Exploring the Film Look Guide as well as Smartphone Colour Grading.
Members can also access all 5 episodes of our smartphone shot Silent Eye series, with accompanying screenplays and making of podcasts. There’s other materials too and I will be adding more in the future.
If you want to join me there, follow this link.

Thank you so much! All clear and helpful!
Glad you found it useful Vladimir!
Quick question.
If shot a film on iPhone in 4K using filmic Pro with x1.33 anamorphic lens, what is the final size to master the film in 4K? 3840×2160?
Thank you