DJI OM 4 (Osmo Mobile 4): SETUP & TUTORIAL – OM 4 vs OM 3 – Review
The DJI Osmo Mobile 4 is a smartphone gimbal, following on from the hugely popular Osmo Mobile 3. I think the success of the Osmo Mobile 3 must have been a motivating factor in DJI bringing the next model out so quickly.
In this video I’m going to go through the unboxing, setting up and run through of the main features, including the Mimo app. I also look at the difference between this model and the previous model – is there a big difference?
The first difference to note is that DJI have abbreviated the name from Osmo Mobile to an easier OM. So this is the OM 4, rather than the Osmo Mobile 4.
What’s in the box?
This time, it looks like DJI have decided to worry less about undercutting the competition in terms of price. So this gimbal is a few dollars more than gimbals like the Zhiyun Q2 and it’s currently almost twice the price of the Hohem iSteady X.
But the mini tripod is included this time, whereas with the DJI Osmo Mobile 3, the tripod was an optional extra. At the moment, at least, there’s no option to buy without the tripod and reduce the cost.
There’s an identical bag and wrist strap, plus charging cable.
There’s a see through plastic alignment guide, for helping you position the magnetic ring holder, should you wish to attach it permanently to your phone.
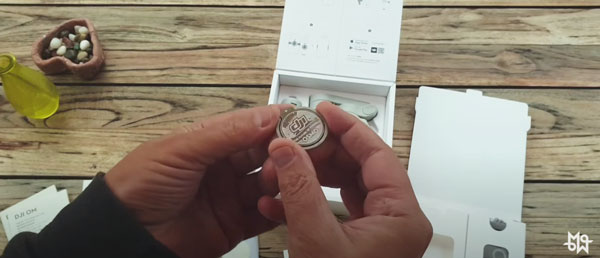
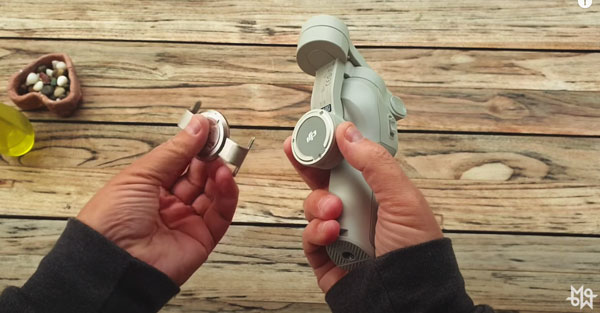
So then there’s the magnetic phone clamp and the magnetic ring holder. So that’s the main change from the Osmo Mobile 3 – this idea to use magnets to attach your phone to the gimbal. And there’s 2 ways you can do this: with a clamp or with the ring holder.
So if you don’t want to attach a ring holder to your phone, then use the clamp. I think I will use the clamp.
There’s also this “riser pad” for small phones. So, if your phone is too small for the clamp and isn’t gripped tight enough, then add this pad. If not, you may place this in the Drawer of Forgotten Cables & Other Electronic Accessories… “just in case”.
Then there’s this little pouch of items, which is for sticking the ring holder to your phone. Again, if you don’t want to stick the ring holder to your phone… you know which drawer to place this in.
Unfold the Gimbal
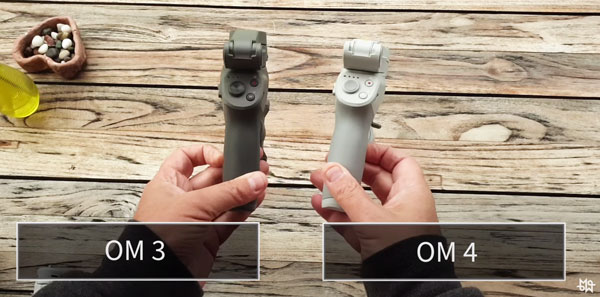
Just like the Osmo Mobile 3, the OM 4 is a foldable gimbal. In fact, the gimbals are almost identical in appearance and design apart from the magnet clamp for mounting a smartphone. So, you can now unfold your gimbal.
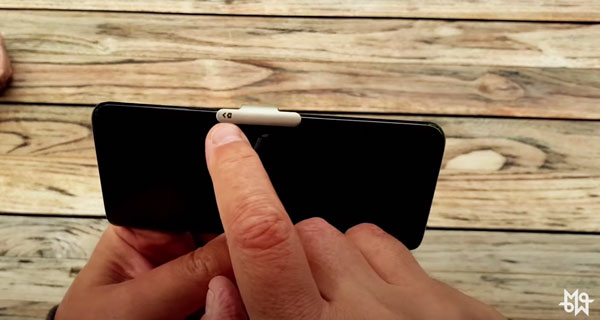
There’s 3 stickers you’ll probably want to remove. This one just tells you which way to place the phone in the clamp. But on the OM 4 they’ve cleverly added a little graphic here to remind you.
This sticker says to be careful not to pinch fingers and ensure accurate alignment when mounting. And this one just leads you to the Mimo app via a QR code and also lists the functions of the trigger.
Mount the Smartphone
The biggest difference between the OM 3 and the OM 4 is the magnetic mounting system. DJI are pitching that difference as the main reason to go out and buy the OM 4. So how well does it work?
I think many people’s first reaction to the magnetic clamp was one of concern. Will this magnet hold my iPhone 11 Pro Max with lens attached? And if so, will the magnet be so strong as to disturb the inner workings of the phone itself?
Well, the magnet is very strong. With my Samsung S9, which is quite a light phone, plus a case and lens, you can throw the gimbal around quite a bit and the clamp doesn’t budge.
As far as magnet doing something nasty to your phone, I think phones are ok with magnets. I’m sure DJI wouldn’t take a risk with your $1000 smartphone. And I can say from the limited use with my Samsung, it hasn’t affected it. People have been mounting their phones in their cars with magnetic clamps for a while now, so I think we’re safe there.
Clamp or Ring Holder?
Before you install or boot up the DJI Mimo app, mount your smartphone. I’m just going to use the clamp. Even if you intend to use the ring holder, probably best to use the clamp for setup up purposes. If all goes well, attach the ring holder if you want to use that.
It would certainly make mounting your smartphone to the gimbal very convenient. No fiddling with a clamp. But then you have to consider if you’re going to use a case.
Because if you attach the ring to your phone and then you want to use a case to mount a lens, things are going to get complicated.
Using a case – this one is the regular Moment case – it sits fine in the clamp. That’s gripped pretty tight.
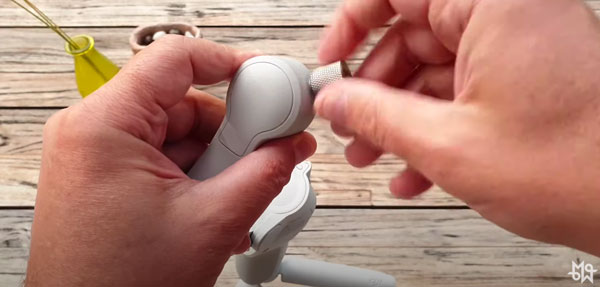
As the sticker said, when you connect the 2 magnets to mount the phone, make sure they’re aligned properly. You can see there’s a little recess here which fits the clamp.
Now, make sure your smartphone camera is on the left. But then flip the phone so the camera faces away from you.
Balancing the Smartphone
Like with the DJI OM 3, if you use the clamp your smartphone needs balancing. At least, you will help the motors if you try to get the phone balanced as well as possible.
That said, if you are using the ring holder, you can’t adjust the balance. The position of your phone will be fixed. The assumption is, I presume, that you won’t be using any heavy extras like lenses or microphones.
But if you are using the clamp, then the phone’s position can be adjusted as you would with the OM 3 clamp. Basically, move the phone left to right in the clamp. But also the clamp arms can be adjusted up and down for perfect balance.
Counterweights
If you’re adding extras like lenses or microphones, you might want to add some counterweights. These are from Ulanzi. The OM 4 can take the counterweights on the side of the clamp, same as the OM 3.
Install the Mimo App
If you don’t already have the Mimo app installed, then go ahead and install that now – there’s a version for both Apple and Android. I already have it installed from the Osmo Mobile 3.
Don’t forget to make sure bluetooth is enabled on your phone.
After booting up the app, some firmware needs to be installed and the new gimbal activated. This required logging into my DJI account on the app.
The app takes you through a series of Quick Start pages with useful information about the basics of using the gimbal.
Once through the app installation and gimbal activation, you’re ready to start shooting some smooth cinematic video.
Buttons Functions
When powered off, the M button can be tapped once to check the battery level of the gimbal. That’s cool – it’s nice to be able to quickly check the battery status.
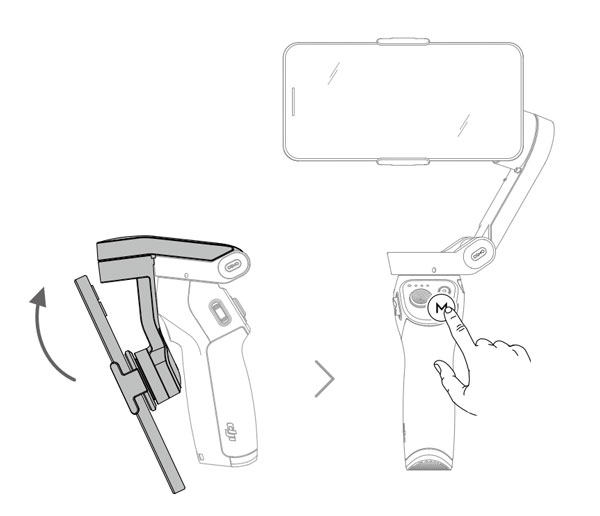
Press and hold this M button to power on the gimbal.
Once powered on, double tap the M button to switch from portrait to landscape or visa versa.
The Joystick allows you to move the smartphone manually, pan and tilt. Like the OM 3, the joystick has sensitivity control. If you push it a little bit, the gimbal moves slowly. If you push the joystick fully, the gimbal moves faster.
I also like the feel of the new joystick in the OM 4. It has a grippy centre which makes the slow gimbal pan or tilt easier to achieve.
The Shutter Button (red circle) allows you to take a photo or start video recording, depending on the mode the app is in. if you press and hold in photo mode, you get a photo burst. Like many pictures taken at once.
The slider at the side of the gimbal handle can be used to zoom in and out.
The trigger has a number of functions
- If you press and hold, you enter lock mode. The camera will remain facing the same way, no matter where you turn the gimbal. Release to exit lock mode.
- If you press the trigger you can start or stop ActiveTrack.
- Press the trigger twice to recenter the camera.
- Three quick presses switches between front and rear cameras.
- Press twice but hold the second press to enter sport mode. This mode makes the gimbal react faster.
Mimo App
The DJI OM 4 uses the same Mimo app as the Osmo Mobile 3 and other DJI devices. If you’ve already been using the Mimo app, then there won’t be too many surprises here.
I was curious to see if the app functioned differently, depending on which gimbal it was connected to. And the answer is, no. It looks like the app works the same with both the OM 3 and OM 4. So, essentially, you get all the same features.
Of the gimbal apps I’ve tried, the DJI Mimo app is the best, in my opinion. There seems to be very few glitches and the features and functions all work pretty smoothly.
App Features
If you follow my OM 3 tutorial, you’ll see me walk through the Mimo Story Mode. That hasn’t changed, although it looks like they’ve added a few extra templates.
There’s also a new CloneMe mode, which allows you to take a panoramic photo, where the same person appears multiple times. That’s a feature that’s been around for a while on other devices, but is now included in the Mimo app.
The ActiveTrack works really well, especially when combined with Gesture Control. This makes it easier to film yourself and track yourself moving around the frame.

Story Mode
Select Story Mode and then choose the template you find fits the subject of your video. Looks like they’ve added a few new ones since the last time I used the app. You can also create your own choosing shot length and camera moves, for each shot.
Once you set it running, you will see the shots and each shot length set out at the bottom. Your task is to fill each of these shots and the app will edit them together at the end, with the music.
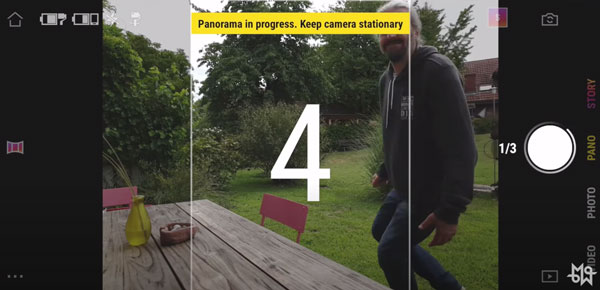
CloneMe
Select Pano in the right menu. Then tap the Pano icon on the left, which opens up 4 options. Select the coloured CloneMe icon on the right of those options. Tap the big white button and, if you are doing this alone, run round to get into shot.
The app and gimbal now take 3 shots, left, centre and right. You have to try to position yourself with the white lines in this central box for the stitching to work best. Otherwise you might find part of your clone missing, like a hand or a foot.
Well, I managed it first go so it can’t be too difficult.
TimeLapse
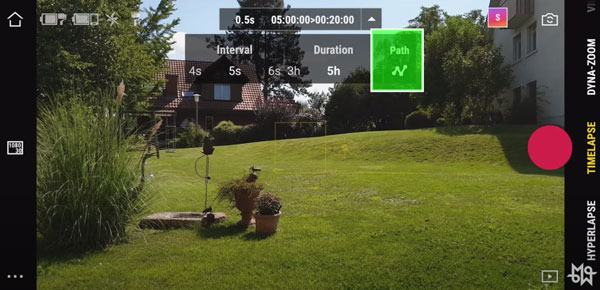
To shoot a timelapse video, select the TimeLapse mode. Now at the top of the screen you will get some timelapse settings. Length of time between shots and how long you want the gimbal to keep taking frames. Then at the right you can set it to move during the capture process.
If you want the movement, enable that setting by tapping the icon on the right of those settings. Now use the joystick to get your first angle. Tap the plus button. Now move the gimbal again to set the next point – you can set up to four.
If you just want a simple pan, for example, you just need to set 2 points – the start and finish points. Once you’ve set those, hit the record button and leave the OM 4 and Mimo app to do it’s work.
OM 3 vs OM 4
So, not too much difference between the OM 3 and the OM 4. However, I do think there is a slight improvement. The motors are also said to be a little bit stronger, allowing up to 230 ± 60 g. So the top end would be 290 grams.
The gimbal itself weighs 390 grams. The Magnetic Phone Clamp, 32.6 grams. While the Magnetic Ring Holder adds 11.4 grams and the tripod weighs 72 grams.
On the other hand, the OM 3 weighs a total of 405 grams. So the OM 4 comes in a little heavier if you include the weight of the clamp.
The roll on the OM 4 is – 136.7° to 198° while on the OM 3 it’s -85.1° to 252.2°.
But in general, magnetic mounting aside, the 2 models work pretty much the same.
Eager to learn more?
Join our weekly newsletter featuring inspiring stories, no-budget filmmaking tips and comprehensive equipment reviews to help you turn your film projects into reality!