How to Get the Film Look on a Smartphone: Adobe After Effects
This is a follow up article to How to Get the Film Look using FiLMiC Pro. As I said previously, this is how I do it but others will suggest different methods. The good thing to know is, like there’s no one way to paint paintings or sing songs, there’s no one way to make digital video look like film.
Digital video will never look exactly like film, however we can try to emulate the impression film leaves us with. It’s worth remembering the film vs digital look is one of randomly placed crystals vs pixels in rigid grids. There’s also the major issue of digital compression.
Thing is, even if you shoot your movie on film and it gets a cinema screening, these days that film will often be projected by a digital projector. Therefore, cinematography that started out as microscopic crystals often ends up as rows of compressed pixels, anyway. My point being, the line between film and digital has become blurred and will continue to blur even further.
For example, filmmakers like Christopher Nolan insist film needs to be shot on film. But most of Nolan’s films have digital effects added to them, which means they end up going through a digital process anyway. And, as I say, grains become pixels. Or rather, a mixture of the two.
So it’s worth bearing in mind that as we attempt the film look using video shot with a smartphone, we are really creating a new look, which is actually a digital-analogue hybrid.
Time = Money
A lot of times, people complain that those “shot on iPhone” movies are made with serious budgets, which they say is misleading to us ordinary no-budget filmmakers. While some shot on iPhone videos may have had the assistance of bigger budgets, mine haven’t. So everything I am talking about in my work should be achievable on a limited budget.
I’ve been making films with tiny budgets since the mid 90s and in that time I’ve learned how to make the most with very little. Indeed, our first episode of Silent Eye was made with no money at all. OK, so we gave people sandwiches, fruit and tea and coffee. Of course, you will always need to spend some money.
No budget filmmaking usually means covering a lot of bases yourself. And the only way I have found to cover so many bases is to use as many shortcuts as possible. I know that if I overwhelm myself with too many technical challenges, my story won’t get told.
Therefore, without a bigger budget we can’t pretend like we’re filmmakers with bigger budgets. We have to use the filmmaker version of “street smarts”. In the same way guerrilla warfare or guerrilla marketing employs unconventional tactics, so must guerrilla filmmakers.
That said, we can also learn from how the pros do it. And if certain tactics work to help us achieve the film look with a smartphone, then why not use them?
FiLMiC Pro and Premiere Pro settings
I’ve been shooting a TV show for Amazon Prime using my Samsung smartphones (S8, S8+ and S9). During the 5 episodes (each one is a self-contained story) I have tried different methods and looks. For the last episode (Sleephouse) we decided to shoot in a more classical way, using a Moondog Labs anamorphic adapter lens.
I shot at 2K using the FiLMiC Extreme bitrate setting. I used AVC codec with HDR switched off.
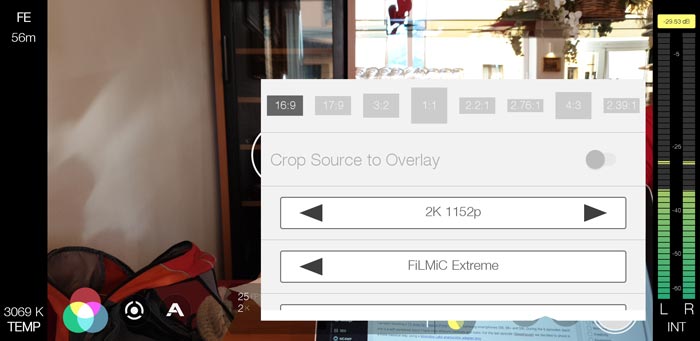
For this particular film look with a smartphone, I used the Moondog Labs anamorphic and switched on Moondog Labs in the hardware setting. This means the footage is recorded “de-squeezed” so all I have to do is import it into Premiere Pro and set the sequence to the correct ratio.
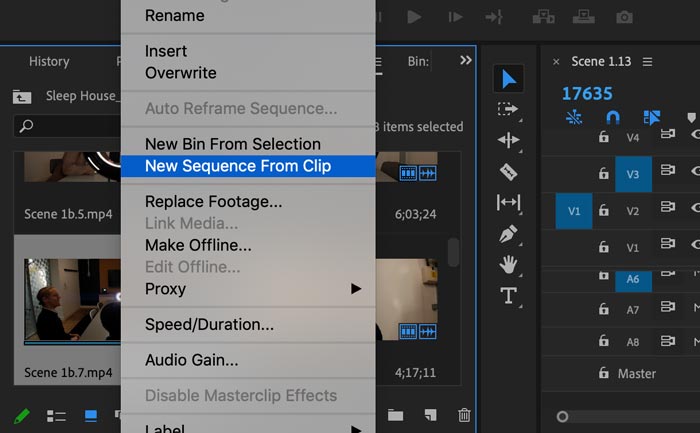
If you wish to use the same ratio as you shot at, all you have to do is right click a clip and then select New Sequence From Clip. Premiere will now create a new clip using the information from the clip to create the correct sequence settings.
However, while I shoot at 2K, I want to master at a lower resolution. This gives me the option to do some reframing if I need to.
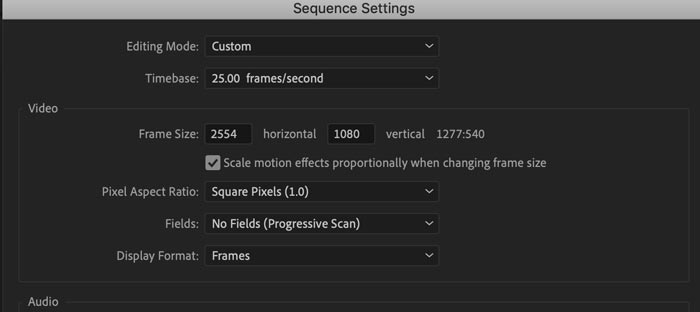
Shooting 2K using the Moondog Labs anamorphic and with the FiLMiC Pro de-squeeze setting on, I end up with clips which are 2724 x 1152 pixels. But after creating my sequence using the New Sequence From Clip command, I then change the resolution of the sequence to 2554 x 1080.
Dynamic Link to After Effects
While I added colour changes directly in Premiere for the first 4 episodes, for the last one I decided to work on the colour in After Effects. In Adobe Premiere Pro, you can send clips to After Effects using the dynamic link. This means you can render out clips, then go back and edit them in AE if need be.
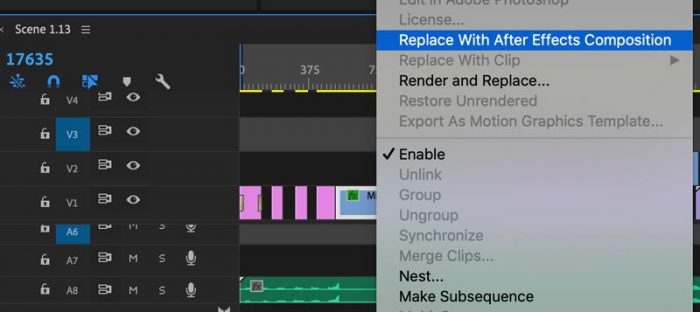
To send a clip to After Effects, once a clip is in the sequence, you can right click it and choose Replace With After Effects Composition. After Effects will now open up (if it’s not already open) with a composition containing your clip.
Note: I only send clips to After Effects after I have finished editing the entire film. This is because the dynamic link trims your clip permanently, so you will not be able to make adjustments after (except to shorten the clip further).
Lumetri Color
To improve the film look of my video shot on a smartphone, I also use Lumetri Color. If you don’t have Adobe CC, then you should be able to find similar settings in other editing platforms such as DaVinci Resolve and Final Cut Pro.
Once you have your clip in After Effects, you can use the Adobe’s Lumetri Color to work on the grading of your clip. In fact, Lumetri Color is also available directly in Premier Pro, as well. However, I find it easier to work with the After Effects interface and, in addition, I applied some VFX work in After Effects.
In the end, it made more sense to use Lumetri Color in After Effects for the whole film.
This is a shot from the first scene of the film, imported into After Effects. The shot came out pretty well, even before I added colour.
What works in this shot is that the light is pretty even throughout the frame. There are very few extremely bright parts of the image and not too many dark areas. A big window with daylight, for example, would likely blow out. Meanwhile, big shadows would end up being crushed into large patches of complete black.
The tricky part about lighting a scene is to add enough light so your ISO can be kept low, but without creating too much extreme contrast between light and dark areas. This is where the dynamic range of your camera sensor comes in.
Make the most of your sensor’s dynamic range
Smartphones are not quite as good as cameras with larger sensors when it comes to dynamic range. Therefore, if you try to work with less harsh lighting you will create less contrast between light and dark areas. This way, your camera will do a better job at revealing details in the shadows.
There’s things you can do to help this, outside of camera settings. One is to avoid black and white in the scene. For example, make sure your actors don’t wear any black or white jacket, shirt or top clothing. Don’t shoot in rooms with white walls.
Less Red, More Blue
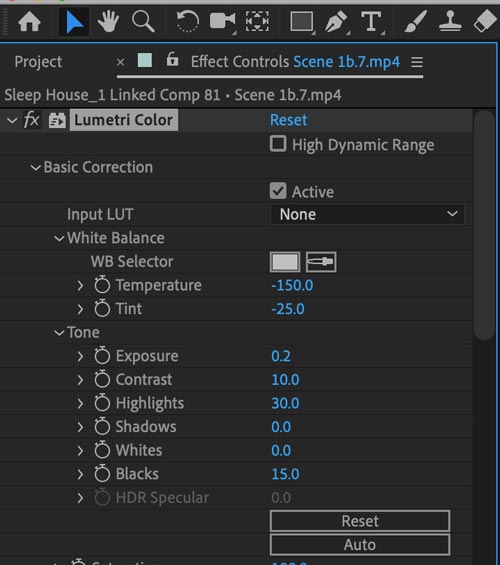
Putting it simply, using Lumetri Color I removed a lot of the warmth (red) from the image.
Why did I want to make the image colder?
The film is a near-future SciFi drama depicting a time where humanity is facing an environmental crisis. Therefore, I don’t want people watching the film to feel nice and warm and cosy. Rather, to convey the mood of the drama, I wanted a colder, bluer look.
In Lumetri Color, I simply used the temperature setting and moved the slider into the negative until I achieved the level of red-blue I wanted. While I do this using only my eyes as guides, comparing to other shots in the scene to make sure they match, you could choose to use the analytics tools available.
On the other hand, if you want to convey a positive message to your audience then a warmer colour might be more appropriate. For example, if you’re advertising a holiday or a product, you will most likely want the audience to feel warm and positive.
Boost the Blacks & Shadows
Lumetri Color has 2 settings which can be used to adjust the darker areas of the image: shadows and blacks.
Now, with digital video, absolute black can be shown as absolute black. But with film being projected by light shining through physical film, black does not come out as 100% black. Therefore, to mimic the look of film we can push up the blacks and shadows a little.
One bonus of boosting the shadows is some extra details can be revealed that were crushed by the smartphone’s colour compression. Smartphones are designed to shoot video that looks good “out of the box”, whilst also compressing it to fit into the limited storage space of a phone. In other words, smartphones often sacrifice details in the shadows to create more immediately pleasing, higher contrast images.
These are my Lumetri Color settings for this shot.
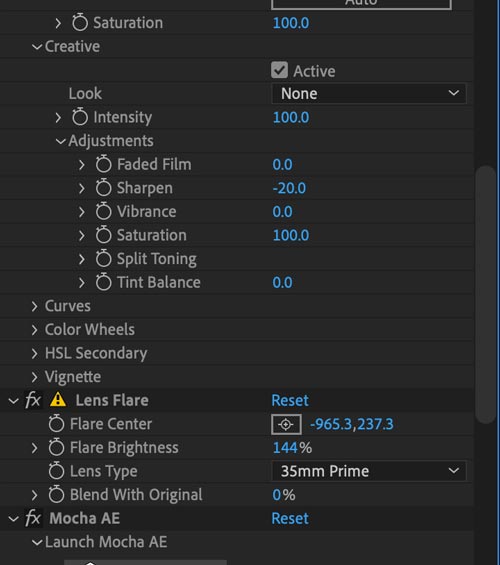
 Soften
 Soften
While digital video usually has very precise definition, film usually has a softer look. Due to being made up of plastic and other chemicals, edges of objects when shot using film are just not as sharp as that shot using digital sensors. Therefore, to further mimic the look of film we can soften the image a little.
In Lumetri Color, go to the Creative settings heading. Below you will find the sharpen settings. If you set this at about -20 you will soften the image just a touch and help it look less digital.
Other Effects
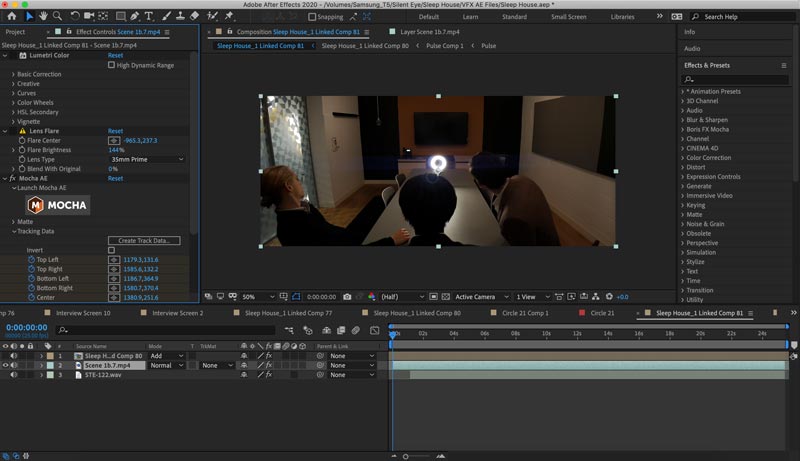
Aside from the colour work, I also needed to add a screen replacement. I did this using MOCHA motion tracking software, which comes free with After Effects.
I also added a lens flare using the native effect in After Effects. This effect is quite limited, but I’ve found it can be quite useful for adding a little texture to the final image. In this angle, I placed the flare outside of the frame so that some of the glare spills across from the edge. It also compliments the existing flare which comes from pointing the Moondog Labs at the circular light on the table.
The final shot looks like this:
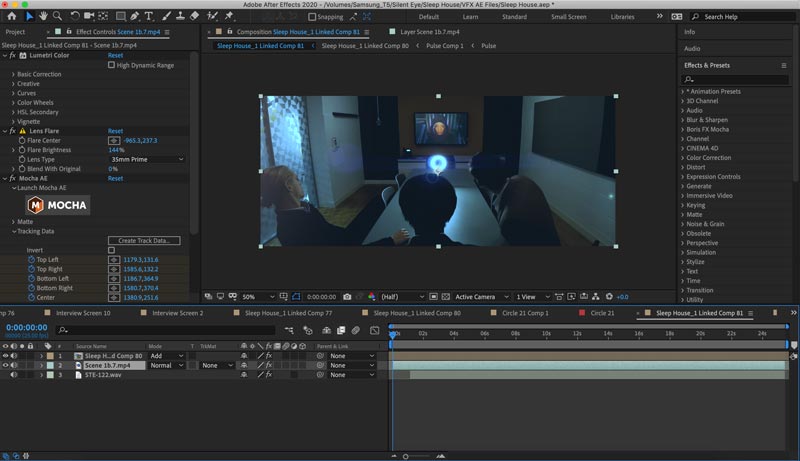
You might think the original image is actually richer and more pleasing to look at. It has higher contrast and warmer tones. But, as I say, for this particular story, I wanted a generally somber mood.
So, this is just one angle, in one scene, which comes from a film made of hundreds of angles and about 15 scenes. In future posts I will go more into detail about how we approached each scene to achieve the film look using a smartphone.
Eager to learn more?
Join our weekly newsletter featuring inspiring stories, no-budget filmmaking tips and comprehensive equipment reviews to help you turn your film projects into reality!
Si
These are very good suggestions.
You’re doing a good job with your projects…
I hope people read your post, there is much more to learn to shoot a good video, than just push “record” on the phone.
Few people take phone video seriously. I was amazed with iP4S capability and shot amazing video early on. Proving that you can shoot in total darkness at night with a few low power lights and make it so real as if it was real, which is 🙂
Hahah
I developed many products to make shooting with phone a lot easier. If you’re interested to see it, let me know and send you the link.
Theo (retired film producer for 34 years)