How to use Focus for Cinematic Video: FiLMiC Pro Tutorial
In this article I’m going to talk about the creative and technical aspects of using focus to make your films look more cinematic and polished. I’m going to use FiLMiC Pro to show you how you can achieve great looking video with your smartphone and a low-cost camera app.
Many new filmmakers often overlook the use of focus as a tool, as they concentrate on LUTs and smooth stabilised footage. Having shot many films myself and worked with professional cinematographers, my experience is that getting the right things in focus at the right time is key.
Apart from the technical side of getting correct focus, there is a creative side too.
What’s the difference between Deep Focus and Shallow Focus?
Deep Focus
Deep focus is a cinematic technique using a large depth of field. Put simply, depth of field is the range of things which are in focus. In deep focus, virtually everything is in focus.
As it happens, smartphones are excellent at achieving deep focus because they have small sensors and lenses with small apertures.
Having everything that’s in the frame in focus makes cinematography easier, to some extent. The camera operator doesn’t have to worry about making sure certain objects are in focus, because everything is in focus. For example, if you are filming a pan shot of an actor moving to the left and away, you don’t have to maintain focus on the actor if everything is in focus.
On the other hand, deep focus is often seen as undesirable as it flattens the image. In other words, with everything in focus there is less sense of depth in the frame.
Shallow Focus
Shallow focus is a photographic and cinematographic technique incorporating a shallow (or small) depth of field. In shallow focus one distance from the lens is in focus, while the rest is out of focus. Shallow focus is typically used to emphasise one part of the image over another.
Some form of shallow depth of field is now used in almost all professional filmmaking. This is because having the background (and foreground) out of focus is the easiest way to create a sense of depth in image.

Bokeh Effect
A shallow depth of field also creates the “bokeh” effect, which is when lights in the background form blurred oval shapes. Having bokeh lights can make night shots look very beautiful and romantic. In some shots the filmmaker takes this effect to the extreme, while in others the filmmaker prefers to use it more subtly.
This is a creative decision based on how you want the audience to feel and the mood you want to convey. Having a highly blurred background makes it less distracting and creates a more romantic, dreamy effect. Meanwhile, having the background just slightly out of focus lets the audience see what is going on in the background at the same time as giving the background some distance and separation from the subject.
Another thing to bear in mind is that if the background always has the most extreme bokeh, the effect has less impact. For example, let’s say you come to an emotional romantic scene and you want to increase the sense of romance by using bokeh. Well, if the whole film is full of extreme bokeh up until that point, it will just be more of the same.
On the other hand, if you use it sparingly then applying it for the big romantic scene will add extra power to the effect.
How do you create shallow depth of field with a smartphone?
Achieving shallow depth of field with a smartphone
There are a couple of ways to achieve a more shallow depth of field using a smartphone. One is to place the camera as near to the subject as possible. The other is to use conversion lenses, like a telephoto or a shallow depth of field converter.
How do you create a sense of depth in the image without shallow focus depth?
Citizen Kane
One of the most famous uses of deep focus was in the film Citizen Kane (1942) directed by Orson Welles. This frame has been well-used to illustrate the innovative work of cinematographer Greg Toland.
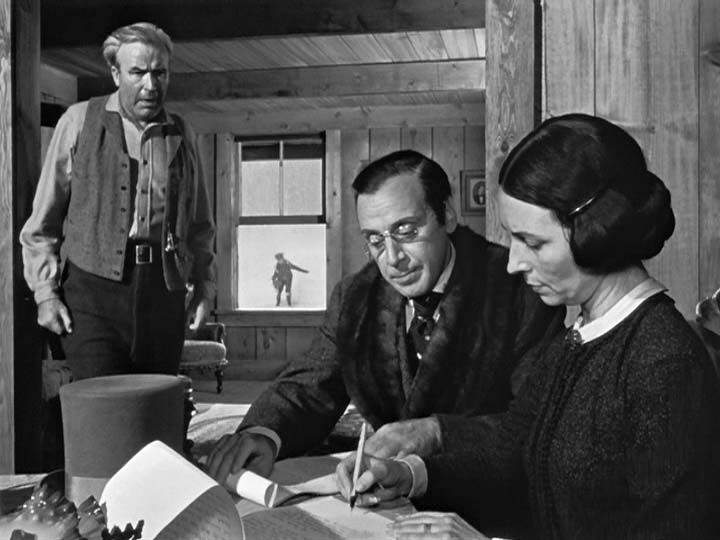
Take a look at this frame. Everything is in focus, all the way from items on the desk in the foreground to the young Charles Foster Kane who can be seeing playing freely, outside. The young boy, whose fate is being decided by the 3 adults inside, is still in focus despite his distance from the other characters.
The filmmakers went to great lengths to achieve this effect. But while missing a shallow depth of field, this image still displays a great sense of depth. I would argue this frame has more depth to it as an image as many shots with blurred backgrounds.
So how is this achieved?
The answer is: lots of attention to composition and lighting. The way the objects in this frame are set up is reminiscent of the great master painters of the renaissance.
We have the 2 actors in the foreground, as they decide the boy’s future. But the eye of the viewer is drawn to the boy via the actor in the middle ground, standing to the left of the frame. our eyes are then drawn to the boy, aided by the him being perfectly framed in the window.
Humans instinctively follow the gaze of other humans, especially if they are expressing distress. Now, if you follow the gaze of the standing adult to the left of the frame, his gaze passes directly over the window in the background.
Could we recreate this with a smartphone?
The smartphone’s natural deep depth of field is going to help us recreate this famous frame from Citizen Kane. However, we would struggle with the dynamic range required to expose the exterior as well as the interior. When shooting interiors in daylight, windows get blown out.
However, most likely this scene was achieved by shooting the whole thing in a contained set. So the exterior lighting would have been completely under Toland’s control. Either that, or they might have used some kind of back projection. In which case, yes you could definitely achieve this with a smartphone (and a contained set and/or back projection).
To create a sense of depth in a shot with deep focus we need to rely more on theatrical techniques. There is no focal depth of field on a theatre stage, therefore lighting design, set design and staging of the actors becomes key. It’s perhaps no surprise then that Orson Welles came directly from a theatre background before directing Citizen Kane.
You can see the whole scene here. Notice how the camera movement reinforces the sense of depth in the image.
Rack Focus
A rack focus in filmmaking and television production is the practice of changing the focus of the lens during a shot. The term can refer to small or large changes of focus. If the focus is shallow, then the technique becomes more noticeable. In professional films, a camera assistant called a focus puller is responsible for rack focusing.
Pulling focus during a shot is a standard technique used constantly in professional filmmaking. The idea is to draw the viewer’s attention from one subject (usually an actor) to another. You will see this done countless times during many film and TV productions.
How to Pull Focus with FiLMiC Pro
FiLMiC Pro is very good for pulling focus. You can even set it to pull focus automatically.
- Open FiLMiC Pro
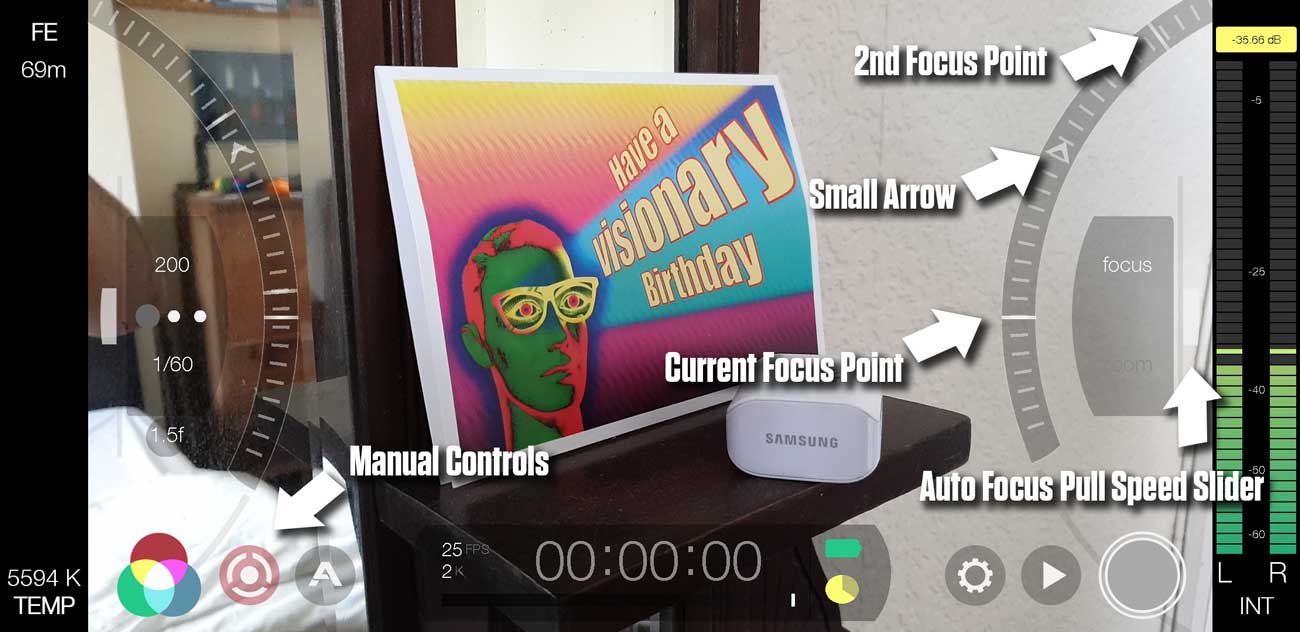
- Open Manual Controls
- Move Focus Wheel to first Focus Point
- Tap the focus point line on the wheel to set first focus point
- Move Focus Wheel to the second Focus Point
- Tap the focus point line on the wheel to set second focus point
- Now tap the mark you wish to start your focus pull from
- To start the focus pull, tap on the mark you wish to end the pull at
- Alternatively, tap on the small arrow if available
- Adjust the focus pull speed using the variable speed slider
Read how to pull focus with FiLMiC Pro.
Auto Focus Mode
Professional cinematographers almost never use auto focus. Even with a small crew, the camera operator and/or cinematographer will want to employ a “focus puller”. A focus puller’s job is nothing more than controlling the focus of the camera during the shot.
The fact that a dedicated crew member has the task of pulling focus, even on productions with limited budgets, should tell you how important this job is to cinematography. Meanwhile, auto focus is not yet good enough to take on the job of a skilled focus puller. One reason for this is the creative nature of the focus pull itself.
The cinematographer and director will decide where and how to move the focus depending on what the actors are doing in the scene. On the other hand, auto focus simply focuses on an object it detects within a defined frame. This means what the camera focuses on is harder to control.
Setting Focus using Auto Focus
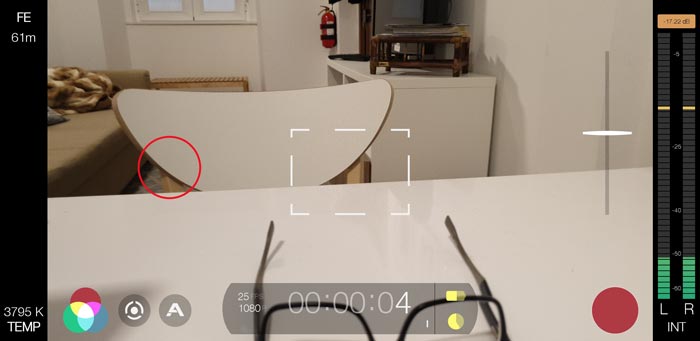
While professional filmmakers don’t use auto focus during a take, we can use it to set focus before filming. In FiLMiC Pro this is done by moving the rectangle box over the object you wish to focus on. A second tap turns the rectangle red and locks the focus.
“Continuous” Auto Focus & Smartphone Filmmaking
Even if you could afford one, it’s almost impossible to employ a focus puller while filming with your smartphone. There’s no mechanism such as a “follow focus” and having 2 people using the smartphone’s screen would be impractical. FiLMiC provide an app for remote control via another device, but any lagging would mess up your focus pull.
But, if the object of the shot is likely to change distance from the camera during the shot, what can we do? For example, if you are tracking the subject or the subject moves nearer or further from the camera during the scene. One option is to use a continuous auto focus.
Setting continuous auto focus means the camera will be constantly searching the image for the subject during the whole take. In FilLMiC Pro, by double tapping the focus rectangle, you expand the rectangle and switch to continuous focus. Now the auto focus of your smartphone camera will adjust during the shot.
Using the auto focus square to manual focus pull
If you keep the focus rectangle unlocked, the rectangle can be moved manually during a shot. This gives you some manual control over the focus, without the need of a focus puller. However, you have no control over the speed of the focus change or the speed at which the auto focus finds the new focus.
Locking Focus
Aside from the previous methods, you can also simply lock focus for the duration of the shot. This method requires the subject of the shot to remain at the same distance from the camera. Unless you want the subject to move out of focus for creative reasons.
For example, you might have the subject in close up, perhaps talking to camera, and then have them move away into the background. Instead of having the focus follow them, they can move out of focus. In a sense, they merge with a blurred background as they move, which can be a smooth shot.
Avoid Focusing on the Background
A common problem when using auto focus to set the focus length on a smartphone is the sensor fixing on the wrong subject. This often occurs when shooting a close up and the sensor decides to focus on a wall in the background. If the wall isn’t too far from the subject, you might not notice subject is out of focus until you view the video on a bigger monitor.
So, try to make sure the sensor is using the correct subject for focus length.
This happened to me in one shot from my last short film. I found a way to reduce the problem, although it does take a bit of time. Using After Effects, I created a mask around the subject then made the background more blurry than the subject (Sophie) to give the illusion the subject in focus.
Focus Peaking Tool
A tool called “Focus Peaking” is a focusing aid to help you make sure the intended subject is in focus. The tool works in live preview on digital cameras, placing a white or coloured highlight on in-focus edges within an image. This is achieved using an edge detect filter.
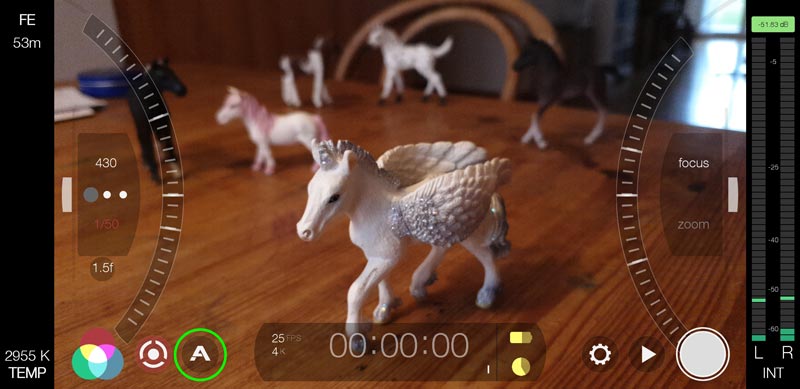
In the image below, you can see the use of focus peaking in FiLMiC Pro. While the image is turned black and white, the in-focus edges are indicated by a light green filter. Most of the green edges are around the in-focus Pegasus toy, while there are some edges detected in out of focus objects such as the door in the background.
How to Switch on Focus Peaking in FiLMiC Pro
FiLMiC Pro comes with a number of metering functions, one of which is Focus Peaking.
- Open FiLMiC Pro
- Tap the Live Analytics icon (A).
- The 4 live analytics icons appear at the top of the screen.
- Tap the 4th Focus Peaking icon (FP).
There are 4 icons at the top centre of the FiLMiC Pro preview screen. The first 3 are for exposure metering. The last icon has the letters FP, which stand for Focus Peaking.
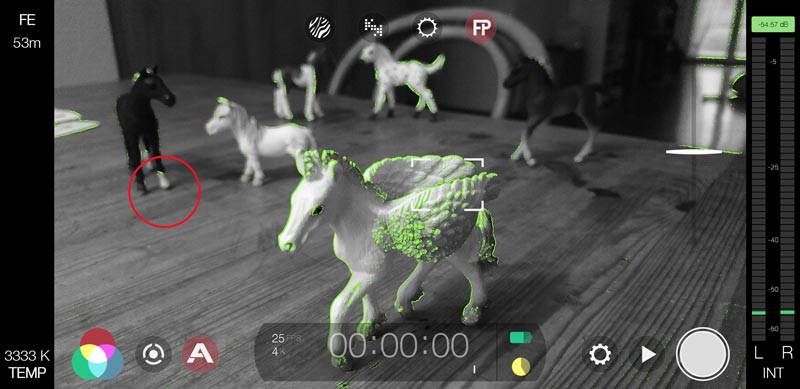
Once FP is selected, the preview image turns black and white and in-focus edges are indicated by a bright green filter. By moving the focus wheel, we can see the green edge detector moving to different distances.
Eager to learn more?
Join our weekly newsletter featuring inspiring stories, no-budget filmmaking tips and comprehensive equipment reviews to help you turn your film projects into reality!
Interesting. I can see that the tonal values within the frame as well as the actual depth of the set help to give it the depth you’re talking about.
Yes. And that pull in through the window was well ahead of its time. Nobody in mainstream cinema used cine cameras that way before
Cant find live analytics buttons ???
Is it still there in latest version of filmic pro? July2021
it’s still there: https://youtu.be/oHPmOu9pTTc
[…] [2] https://momofilmfest.com/how-to-use-focus-for-cinematic-video-filmic-pro-tutorial/ […]