How to use Frame Rate for Cinematic Video: FiLMiC Pro Tutorial
As you move beyond auto settings of your smartphone camera, you’ll most likely want to start setting your own frame rate. In this article I’m going to talk about the creative and technical aspects of using Frame Rate to make your films look more cinematic and polished. I’m going to use FiLMiC Pro to show you how you can achieve great looking video with your smartphone and a low-cost camera app.
Frame Rate is a very important setting when shooting video or film. Different settings create different looks, as well as presenting different challenges. The frame rate setting can also be used to fix the problem of strobing when filming with artificial light.
What is Frame Rate?
Frame Rate: Basics Explained
Put simply, the frame rate is the number of frames your camera shoots per second of filming. You see, film or video are not actually moving images. Even with today’s advanced technology, there is no such thing as a real moving image.
What film and video do is present to the human eye a series of still images which create the illusion of movement. That’s because, after a certain number of still images per second, the human brain starts to interpret it as movement.
Frame rate is written as a number with the letters fps. For example, the standard frame rate for film is 24fps. The letters “fps” stand for frames per second.
Some history
If you go right back to the invention of moving images, with devices such as the Zoetrope, you can see frames and frame rates in action.
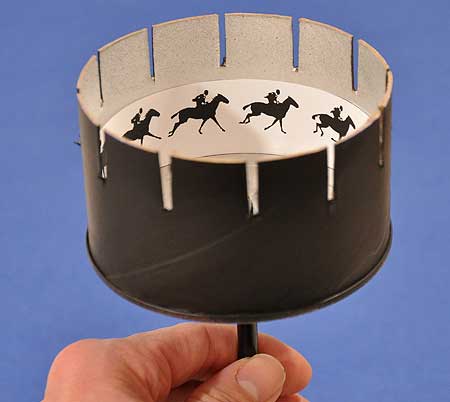
In the picture above, you can see simple still images of a running horse. When you view the image of the horse and rider through slits in the spinning cylinder, the illusion of a galloping horse is created. Your mind fills in the gaps and the image is animated. And if you speed up or slow down the speed at which you spin the cylinder, you will be changing the frame rate.
Early silent films had stated frame rates anywhere from 16 to 24 frames per second. But since the cameras were hand-cranked, the rate often changed during the scene to fit the mood. Which is an interesting thought, isn’t it? The hand-cranked film camera was more like an expressive musical instrument, with frame rate controlled directly by human motion.
How 24fps became the standard for film
The human visual system can process 10 to 12 images per second and perceive them individually, while higher rates are perceived as motion. Remember, when we talk about images per second, we are talking about frame rate.
American inventor, Thomas Edison believed that the optimal frame rate was 46 frames per second. So he built a camera and film projection system that operated at that speed. But film stocks of the day were too slow and expensive, therefore most silent films were filmed around 16-18fps and projected closer to 20-24 fps.
Because silent films were played faster than they were captured, they had a slightly speeded up look. Fortunately, for legendary film comedians like Charlie Chaplin and Buster Keaton, this made them look even funnier.
But when synchronised sound was introduced to the movies in the 1920s, the film industry had to fix the speed film was captured and played back. This was because audio played at the wrong speed can sound really bad. So Hollywood decided on 24fps, which meant film travelled through a projector at a rate of 456 millimetres (18 inches) per second.
How to set Frame Rate with FiLMiC Pro
Later, I will talk about how the different frame rates affect the look of video. But first, how can manually control it using FiLMiC Pro?
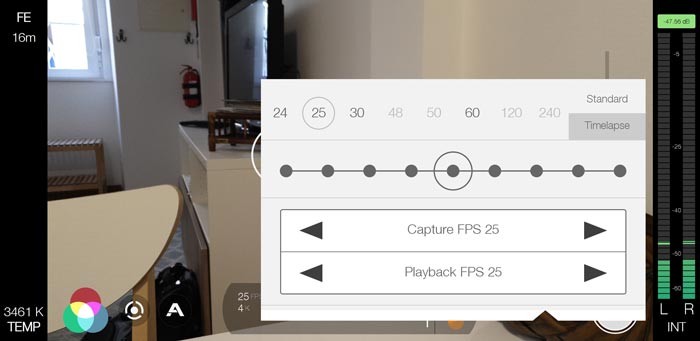
- Open FiLMiC Pro
- Tap the Settings icon
- Select Frame Rate
- Tap the desired frame rate from those listed
- Close settings menu
Bear in mind, available frame rates are in dark grey. The lighter grey rates are only available depending on other factors such as resolution or device. For instance, due to the processor demands, higher frame rates are sometimes only available at lower resolutions.
For this example, I have the resolution set to 4K. But once I set resolution to HD 1080p, 120 and 240 frame rates become available.
Capture FPS vs Playback FPS
You can see there are 2 frame rate settings: capture and playback. Remember silent films used to be played back faster than they were captured? Yes, in FiLMiC Pro we can play with that too.
But why would we want to have a different capture and playback frame rate?
The main reason for setting capture and playback differently is to create slow motion. I will talk about slow motion later, but first lets look at standard frame rates for shooting video.
What frame rate should I choose?
24fps – for many decades now, 24fps has been the standard for movies and TV shows. Even if a film is shot at a higher frame rate, it’s often produced and displayed at 24fps. Most feature films and TV shows are shot and viewed at 24 fps. So when people talk about creating the cinematic film look they suggest 24fps.
30fps – is the standard for television and is still widely used, despite producers moving toward a more cinematic 24fps.
Anything higher than 30fps is usually reserved for sports or anything you want to show in slow motion. You see, if you shoot in 60fps and then show those images at 24fps, the motion will be slowed down – and look nice and smooth.
60fps – reduces motion blur and creates clearer, cleaner video. While many filmmakers still choose 24fps for the film look, others prefer the cleaner look of 60fps. However, it does make your video look more “digital” and less like film.
Higher frame rates
While most movies are still shot using 24fps, some films have experimented with higher frame rates. In recent years, for example, Peter Jackson’s The Hobbit trilogy was shot at 48fps. While last year, Gemini Man (2019) directed by Ang Lee and starring Will Smith was shot at 120fps.
The resulting look has divided opinion. While some say it makes the movies look like video games or cheap video, others enjoy the extra clarity and “realism” of the image. In addition, there are at this moment pretty much no cinemas in existence that can project a movie at 120fps.
“High frame rates comes along with 3D, and it all comes from digital [filmmaking]. Once it’s digital, it allows dimension unlike film.” Ang Lee, Gemini Man
Are high frames the future? I think we will begin to see more movies shot using high frame rates. But I don’t think they will replace traditional 24fps movies. Instead, I believe we will see high frame rates as another creative choice made possible by digital technology.
Shutter speed
When setting frame rate the shutter speed you use will affect your choice. Frame rate and shutter speed generally work together to create the look and feel of your video. For example, the film look is usually created by combining 24fps and 1/48 shutter speed.
25fps – I use 25fps and 1/50th because in Europe artificial lights can start to flicker at 24fps. That’s because lights in North America and north of South America flicker at a 60hz frequency, while in Europe, Africa and Asia, it’s 50Hz. This is directly related to the AC current of the particular country.
Slow Motion
Slow motion is a great cinematic tool which has been used for decades. It’s a technique which helps lend emotional impact, add a poetic mood to your cinematography or epic style to your action scenes. And while you can create slow motion using editing software, it also makes sense to create it in-camera.
How to Create a Slow Motion Shot in FiLMiC Pro
- Open FiLMiC Pro
- Tap the Settings icon
- Tap Frame Rate
- Select a high capture frame rate (48, 50, 60, 120 or 240 fps)
- Select a matching lower playback frame rate (24, 25, 30 or 120 fps)
- Close settings menu
So, for example, if you set capture frame rate to 50fps and playback to 25fps, your shot will play back 50% slower. And your final shot will be playing back at 25fps, but in slow motion.
Slow Motion Uses
Often, we think of some kind of dynamic action as being the best use of slow motion. For example, in any kind of fight scene, or a physically dramatic moment like leaping across a chasm. It can also add weight to emotional scenes, like a tear rolling down cheek, or the cliche of two lovers running into each other’s arms.
However, slow motion can also be used in less visible ways, to add style to a shot. Hollywood director Zack Snyder loves to use heavily stylised slow motion, as you can see in his “shot on iPhone” short Snow Steam Iron (literally every single shot is slow mo).
Smoother moving camera shots
When we want smooth camera shots, we tend to think of inbuilt stabilisation, gimbals and camera sliders. However, shooting a moving shot in slow motion can add extra smoothness to the shot, too. For example, if you are moving around a subject, shooting in slow motion will add extra style and a slicker gliding movement to your shot.
Timelapse
FiLMiC Pro also gives you the option to shoot timelapse videos. Put simply, a timelapse shot is the opposite of a slow motion shot. The camera shoots at a very slow frame rate and then plays back at a regular speed.
Timelapse is great for showing time passing, compressed into a short space of time. For example, clouds scudding dramatically across the horizon. Or crowds of commuters hurrying to work across a city.
How to Create a Timelapse shot in FiLMiC Pro
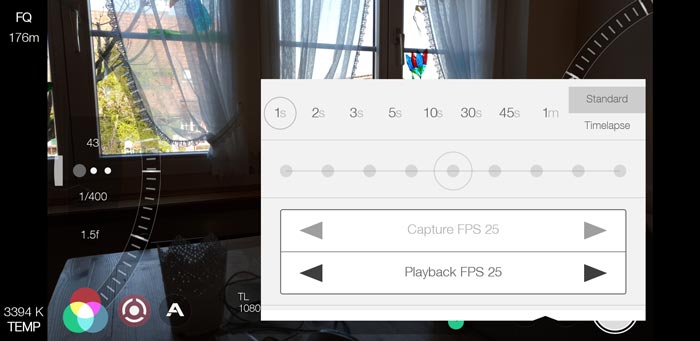
- Open FiLMiC Pro
- Tap the Settings icon
- Tap Frame Rate
- Switch to Timelapse
- Set the time to lapse between frames (from 1s up to 1 minute)
- Close settings menu
Now, once you hit the record button, FiLMiC Pro will begin to shoot a frame according to the time set. ie: 1 frame every 1 second up to 1 frame every 60 seconds. As you probably worked out, the longer between frames the more compressed time will be.
Lock Exposure & Focus
When shooting timelapse, the effect will appear more polished if you lock the exposure and focus. Otherwise, each frame taken could have a new exposure and focus setting and the final shot will appear less smooth.
Timelapse Uses
Timelapse can be a really useful shot for certain types of video. I would say the shot is used mostly in factual content, like travel videos, how to videos, TV shows and so on. The reason being timelapse is one of the easiest and effective ways to show time passing. In addition, including an occasional timelapse shot adds variety and interest for the viewer.
However, for drama and film work, timelapse is rarely used. This is because the shot tends to break the dramatic mood, although the shot might work in a comedy. Having said that, a dramatic sky timelapse with a huge storm approaching might add impact to a serious movie.
Can you think of any examples of a well used timelapse in either a TV show or a movie?
Variable Frame Rate
When shooting video using a smartphone (including an iPhone) the software within the phone uses compression. The compressed video format is often called h.264 (AVC), or the new h.265 (HEVC) codec.
What is variable frame rate (VFR)?
Variable frame rate refers to a video recording method where the frame rate changes over time during a media file (shot or take). The purpose of VFR is to reduce the amount of information that needs to be stored in a file. This means high resolution video file sizes can be reduced, which is very useful for smartphones with limited storage space.
But the main advantage of VFR video is that high resolution video can be streamed using less bandwidth. This is very useful for any kind of video streaming, from Facebook to Twitter and any social media platform, to VOD sites like Netflix.
So, that sounds great. What’s the catch?
The catch is that VFR video files demand more processing power to work with. To cut a long explanation short, this is because VFR video needs to be decoded in realtime. This is not a problem for simple playback, but if you want to change colour or add effects your editing software has extra work to do. And sometimes that extra work is too much for your system to handle.
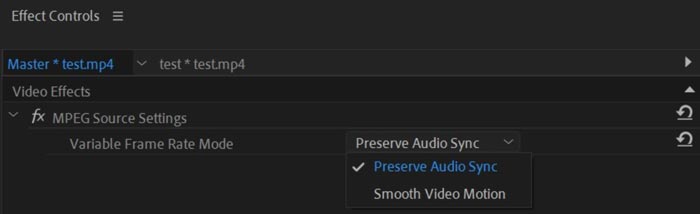
Audio sync issues
Another issue that can arise when editing h.264 or h.265 video is that audio can go out of sync. However, in Adobe Premiere Pro for example you can tell the program to preserve audio sync.
AVC or HEVC?
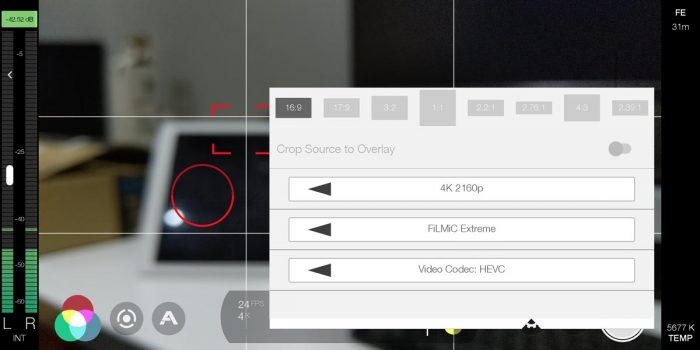
In FiLMiC Pro, if your device supports it, you can choose to record in either AVC (h.264) or HEVC (h.265). So which one should you choose? Well, h.265 compresses the video more and so takes up less space on your device. However, it also demands more processing power from your editing system.
Eager to learn more?
Join our weekly newsletter featuring inspiring stories, no-budget filmmaking tips and comprehensive equipment reviews to help you turn your film projects into reality!