LUT (Lookup Table) – basics explained
In computer science, a lookup table is an array that replaces runtime computation with a simpler array indexing operation… But luts be honest, you don’t care about that, right? You’re here to find out about how to make your videos look cinematic.
In image processing, a lookup table is used to transform the input data into a more desirable output format. Uhm what?
Put simply, a LUT is what we now call a preset colour adjustment which we can apply to our video at the click of a button. Traditionally, LUTs have been used to map one colour space to another. More recently, LUTs have taken on a creative purpose too – from dramatic day for night tonal shifts to film ‘looks’.
Typically, you’ll see LUTs in use when working with LOG or flat footage. You know, that washed-out footage used to capture a greater dynamic range in an image. By applying a preset LUT, the washed out footage is converted into something more saturated, contrasting and colourful.
If you have Adobe software such as Photoshop or Premiere Pro, you will already have a few LUTs installed with them. We need consult no tables, however, and the only looking up we need to do is when we turn our face to the heavens to thank our LUT-creating overlords for making our videos look beautiful.
Is it really that simple?
Just because something is instant, doesn’t make it good.
By now, most of us have used filters to alter the look of our smartphone photos and videos when uploading them to social media platforms like Instagram. And LUTs are often used by people in a similar way – especially by those who are not trained colourists.
In fact, a lookup table is really a mathematical concept. It’s a precalculated set of values in a matrix that you can look up and find the corresponding output value. That doesn’t mean much to me and, unless you are mathematically-minded, probably not much to you either.
OK, imagine colours are represented by numbers. A value that equals a specific colour. When a lookup table is applied to those values, it shifts those values. Consequently, the colours are changed.
Now, this set of numbers (LUT) can used on different shots, on different software and on different devices to alter the colour of photos, videos and monitors. Although the LUT is identical each time, the result changes depending on what you start with.
A LUT does not analyse your footage and decide what the footage needs to achieve a certain look. It simply applies a series of adjustments, regardless of what you apply them to.
Imagine a colour is a number
Say your video contains a colour represented by the number 100. Then you apply a LUT which adjusts that number, adding 3. The new value of that colour = 103. Let’s say this +3 makes your 100 a little more blue.
But what if your video starts with 50? Now you add 3 and end up with 53. Although you have added blue again, the final result is a lot less blue than the previous example.
Therefore, a LUT does not give your video a certain look. Rather, it adjusts your video by a preset amount. The final look is determined by what you start with added to the LUT.
And this is how we can be misguided in our approach to using LUTs.
Say you are watching a video which demonstrates the incredible cinematic-transforming powers of a LUT. The swipe over turns that dirty rotten grey washed out (log format) footage into a bright, wonderous thing of celestial beauty, the like of which would make angels quit angelling knowing they can’t compete. Except, after you hurriedly download The Holy LUT and drag it onto your footage, the same magic does not happen.
Are the LUT gods angry with you?
No. It’s just the values of the colours in your video are not the same as the values of the colours of the video used to demonstrate the LUT’s almighty powers.
At least, this is how a 1D LUT works. 3D LUTs are a different proposition entirely…
There’s different types and uses of LUTs?
For colourists and filmmakers, LUTs have different purposes.
Viewing LUTs enable a cinematographer to change the colour of a monitor, so that they can see how their footage will look after correction.
Transformation LUTs take your footage from one colour space to another.
Calibration LUTs correct the colour of a monitor.
There’s also 1D and 3D LUTs. A 1D LUT simply applies a set of values, while the 3D LUT applies a set of values but those values are also interacting.
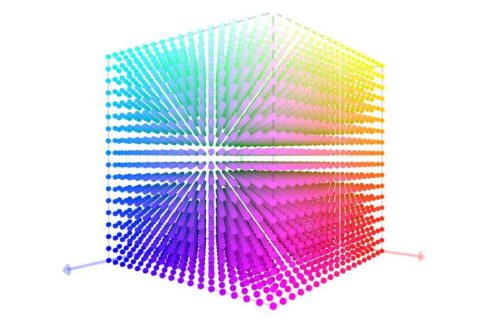
3D LUTs
3D LUTs work in “3D Space”, or the “XYZ colour space”. The three X, Y and Z planes map to red, green and blue.
The theory is, a 3D LUT with its XYZ colour space offers us more precision for transforming colour than a specific value-bound 1D LUT with its fixed number of input and output values.
For example, you might have an image and use a 1D LUT to boost the blue channel and reduce the red channel. Being adjusted individually with no regard to one another, the people’s faces in the image might now have an unhealthy looking blue tinge.
But using a 3D LUT, it’s possible to reduce the overall red in the image whilst maintaining naturalistic skin tones.
If you are interested to learn more about the difference between 1D and 3D LUTs, I found this article by James Ritson to be a pretty good explanation.
So we can see that 1D LUTs have their uses, but 3D LUTs are more sophisticated in how they handle complex operations where colour values are altered relative to one another, rather than in isolation.
Wrapping up…
So that’s a basic overview. I do believe it’s a pretty complex and confusing subject. If you look online, it’s hard to find two people who agree with each other on how to achieve the best results. Just from a few hours research this morning, I found plenty of contradictory advice.
Is a LUT for correction or is it only to be used creatively? Depends who you ask, or whose YouTube tutorial you watch.
Some will say you need to shoot LOG format then apply LUTs to get a higher dynamic range and more colouring options. Others will say this won’t help you unless you have 10bit colour and above.
My advice is to check out the many tutorials online and see who comes up with a look you like. You might want to consider the time you have available to achieve that look yourself. Because you might find the person inspiring you has spent decades learning their trade and spends days working on each shot.
Eager to learn more?
Join our weekly newsletter featuring inspiring stories, no-budget filmmaking tips and comprehensive equipment reviews to help you turn your film projects into reality!