How to Shoot Log Video on a Smartphone
In this article I’m going to explain how and why to shoot and grade Log video created using your smartphone. I’ll show you how to achieve this using 2 camera apps – FiLMiC Pro & McPro24fps. Then I will grade the footage in LumaFusion on my iPad Pro.
One of the reasons recording in log video has become so popular is that it’s often associated with the idea of better image quality. But colour grading is one of the most tricky things to get right and truly make your video look more cinematic and professional. Therefore, it’s worth taking some time to understand the principles and best practices when shooting & grading Log.
What is Log Video?
Log is short for logarithmic. In mathematics, the logarithm is the inverse function to exponentiation. I don’t have a clue what I just said. And most likely, neither do you.
But let’s try and make this accessible to non-scientists and non-mathematicians.
Basically, a frame of digital video is composed of a set of digital exposure values. These values get encoded into a video file as it’s recorded onto a digital camera’s memory. And that encoding process always involves compression.
Linear or Curve?
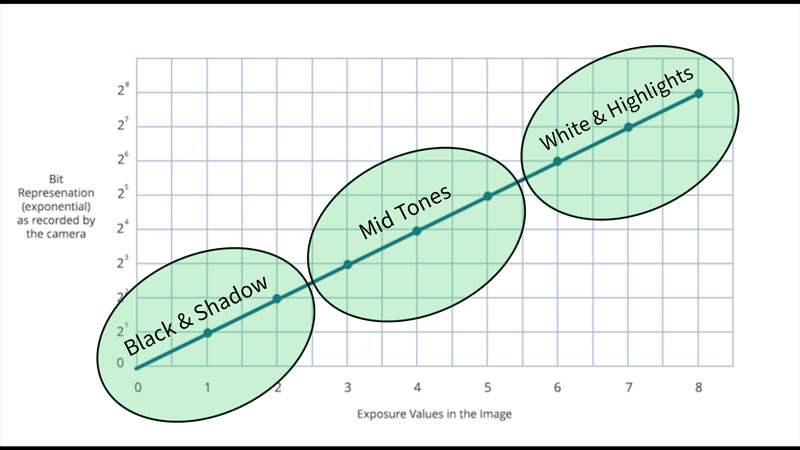
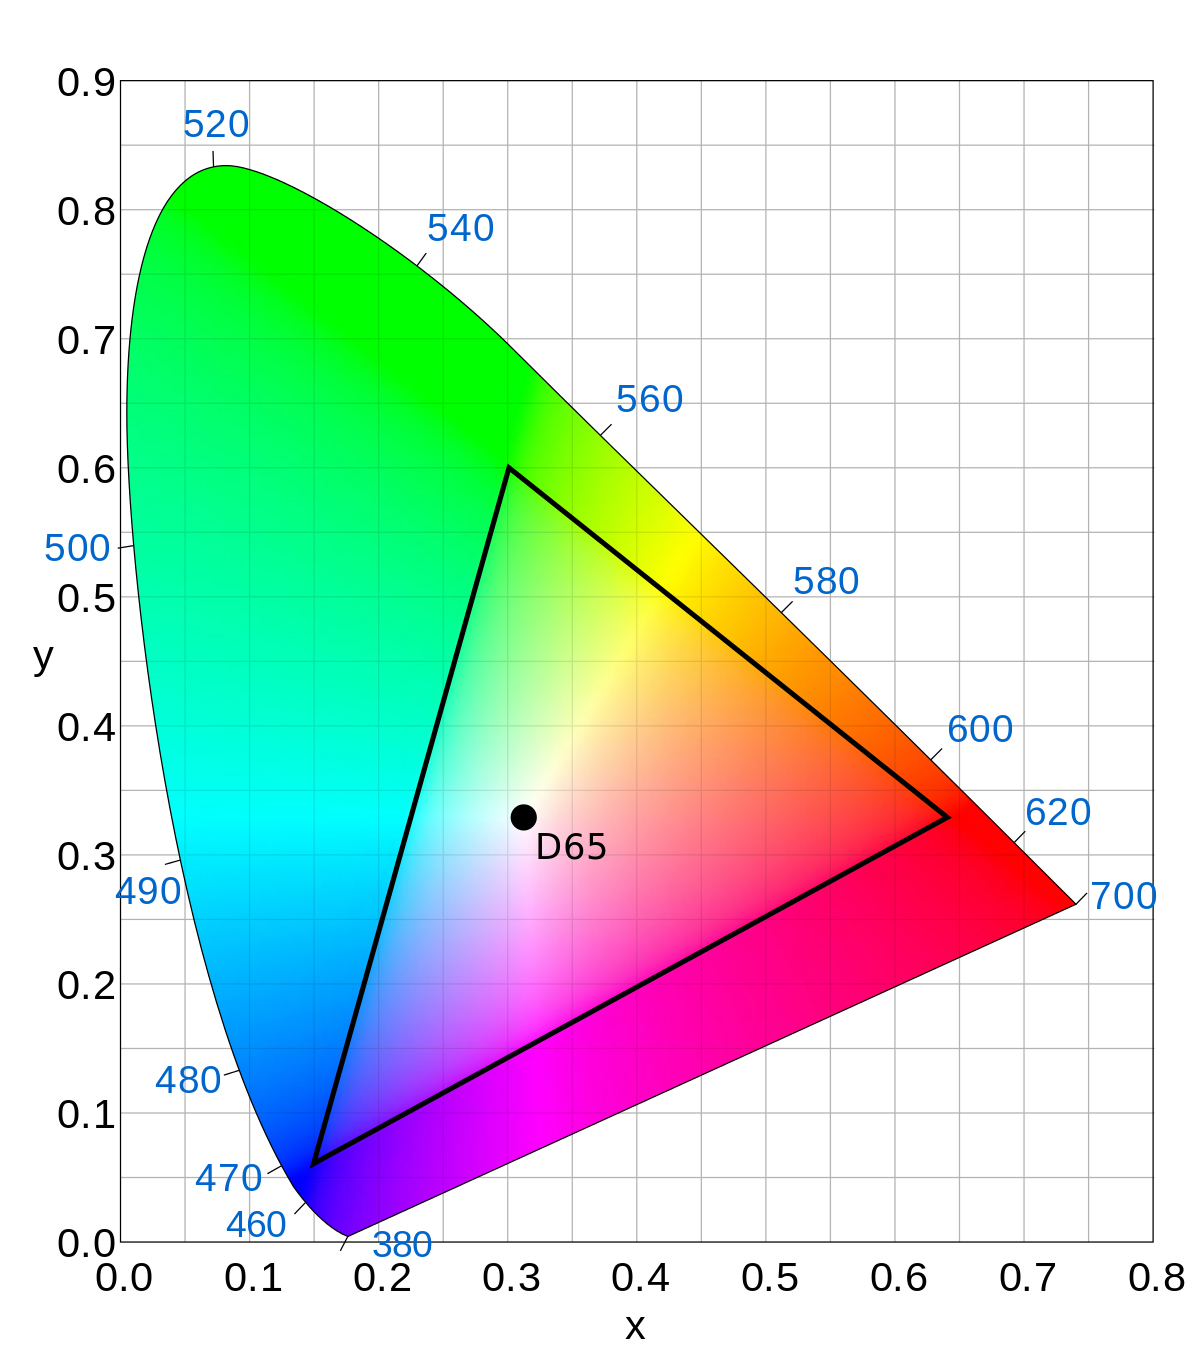
Without using a log video setting, our smartphones (and other cameras) record what is known as “linear”. There’s a whole lot of science behind this, but basically on a graph it looks like this:
On this graph, values at the bottom left are black and shadows, while top right you find the white and highlights. In the middle are the mid tones.
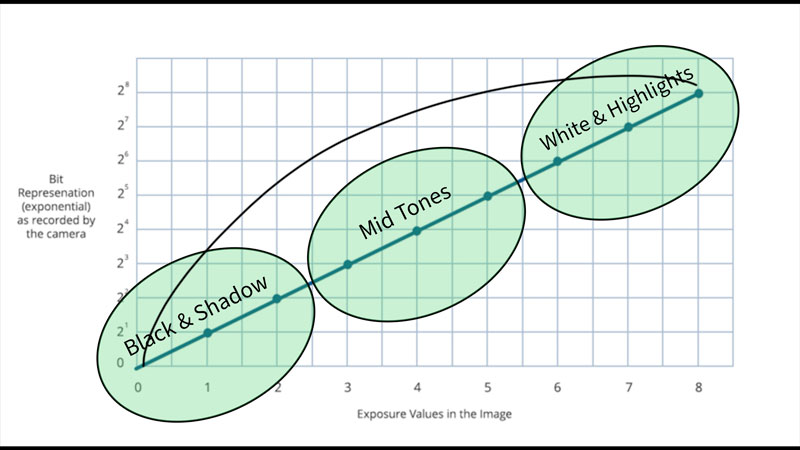
That’s why Log video profiles are sometimes called “curves”. For example, in McPro24fps, every time you choose a log profile, you see it represented graphically as a curve.
When you look at a Log curve, you can see that the mid tones are pushed up. Pleasing contrast in an image is created by reducing the mid tones. Therefore, increasing the mid tones reduces the contrast of the video. And that’s why the log profile looks washed out.
While a linear profile creates a nice looking image, at the same time a large portion of the digital information is concentrated at the top, where the whites are. Meanwhile, the blacks get the least.
The lower half – the dark half – might end up with only a sixteenth of the entire bit depth of your image. What a log curve does is share this information out more equally. And, so the theory goes, retains more shadow details for us to work with later.
Why not just increase exposure?
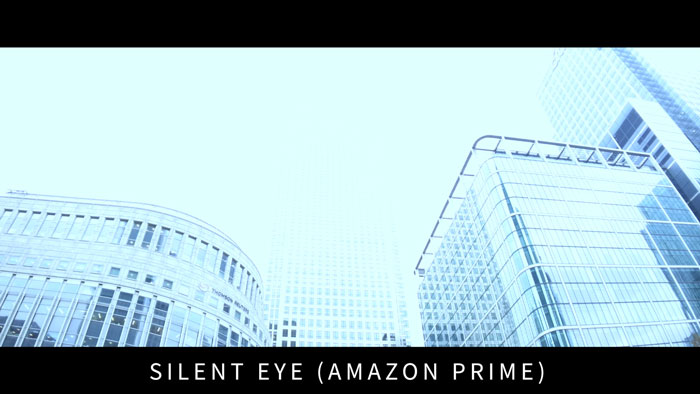
Using a linear profile, if we increase exposure to get at those shadow details, all the whites get blown out. And blown out means lost forever. Here’s a still from a clip where I deliberately blew out the whites, because I liked the ghostly look of it. This is from the Silent Eye series we shot on Samsung S8 and S9 phones.
All that information in the sky is gone. When I came to edit, I could not change my mind, and bring down brightness to reveal the sky again. I am stuck with how it looks.
Why not just boost the shadows?
The answer is, you can. But some will tell you the image won’t tolerate it, because there’s so little digital information recorded for the shadows. Therefore the result will be a pixelated video, with banding and extra noise.
One problem with shooting in Log video format in 8-bit colour with a h.264 or h.265 codec is that these codecs are heavily compressed.
And 8-bit colour leaves you with a small amount of information to work with. Like when I overexposed that image and information was lost, 8-bit colour also loses information. But the codec you use does it in such a way that it still carries enough range of colours and tones to look good on your TV.
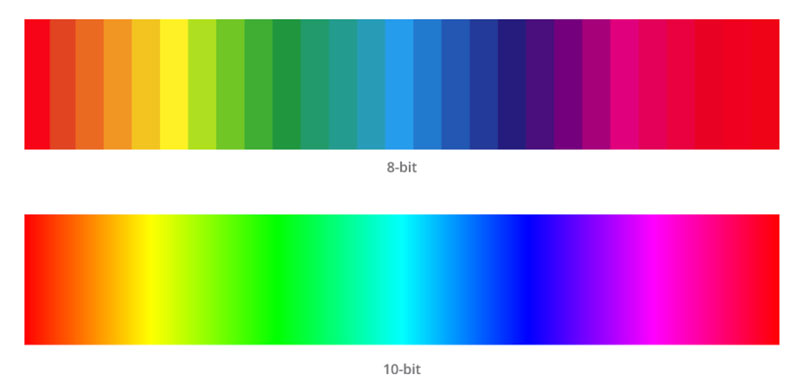
8-bit vs 10-bit Colour
In an 8-bit video file, like those recorded by most consumer and prosumer gear, there are 256 possible exposure representations available across the entire spectrum, starting from absolute black to super white.
Pixels that are absolute black are given the lowest value of 0. Super-white pixels are given the highest value of 255. If your video has blown-out whites, those are made up of the 255 value pixels.
Meanwhile, 10-bit video contains up to 1,024 value levels per channel. In other words, you have values from 0 at black up to 1,023 for white. So that’s obviously a huge difference in the amount of image information retained in the file.
10-bit Colour on Smartphones?
On certain Android devices, McPro24fps allows you to shoot 10-bit colour. And, just as I was making this video, FiLMiC Pro released an update with 10-bit colour, too.
However, on iPhone this will only work for the iPhone 12 range of devices and any future iPhone models. Only certain Android devices can support 10-bit colour, which luckily includes my Samsung Note20 Ultra.
What is Dynamic Range?
Dynamic range describes the ratio between the brightest and darkest parts of an image, from pure black to brightest white. But even the best digital cameras capture only about half as the human eye.
Dynamic range is all about tone, not colour. As it happens, the human eye is more sensitive to differences in tone than differences in colour. So, dynamic range is therefore perhaps more important.
If a camera can only capture a low dynamic range, the blacks and the whites get crushed or blown out more easily. With a higher dynamic range, a camera can capture more details in the dark and light areas.
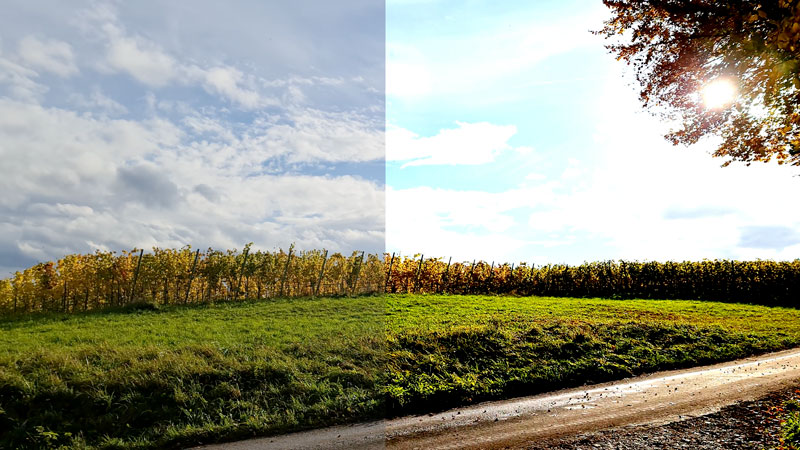
For example, when you’re filming a skyline, you’re dealing with a scene which has a big tonal range between the brighter and darker parts. And so your camera sensor struggles to capture it all. Then, either the sky gets blown out or the landscape is crushed to black.
With greater dynamic range, the sky will be less blown out or the landscape less crushed. Perhaps you will see more details of the land and trees.
What is Video Compression?
Digital information for audio and video files needs to be compressed, otherwise the files would not be manageable.
Compression is what makes digital media usable. But it also requires that much of the information captured by the camera sensor is discarded. The way this information is discarded is determined by the codec.
When played back, an approximation of the original is created. Generally speaking, the more you compress a video file, the more data is thrown out and the worse the approximation looks versus the original.
So, when we see references to h.264 and h.265 files, this is the name given to different methods of compression. H.264 – or AVC as it’s otherwise known, which stands for Advanced Video Coding – is currently the codec most commonly used in consumer cameras and smartphones.
H.265 – or HEVC as it’s otherwise known, which stands for High Efficiency Video Coding – is a newer codec. It’s better at compressing video information, therefore you can achieve higher quality video while using up less hard drive space.
Why is this important?
Shooting and grading log video is all about the amount of digital information available in the file you are working on.
Compression in digital media is basically a science developed to trick your eyes and ears into thinking you’re seeing and hearing more information than is actually available. In other words, these codecs are finely tuned processes whereby the information is trimmed and tweaked and filtered to create something that’s pleasing to the eyes and ears.
And this is what makes streaming video possible. Without these codecs there would be no YouTube, no Netflix, no Amazon prime. It just wouldn’t be practical to deliver uncompressed video over a broadband or WiFi connection.
So that’s why these codecs are called delivery formats. They’re designed to deliver finished video. It’s like a baked cake, covered in icing and decoration. While this cake contains flour, water, eggs and so on you can no longer cook with these ingredients.
So what’s the problem?
The problem comes when you want to change the look of this video. In a sense, it’s like trying to re-bake a cake that’s already baked. You would most likely end up with a horrible mess that tastes disgusting.
Shooting in a log format is kinda like buying a cake-making kit. Everything has been prepared, but it’s not quite finished. And it needs you to do some extra work to make it edible.
The theory is that when you shoot log, less information is discarded. And therefore, when you come to grade, you have more of those cake ingredients to work with. If we think about this cake analogy, a cake kit gives you more possibilities than a finished cake, but it takes more effort.
But wait…
If we’re retaining more information then, logically, the file should be bigger, right?
Well, actually, yes, you’re right.
But when we shoot log we don’t end up with bigger files. So, they can’t really retain more information. That’s right, because they’re the same h.264 or h.265 files as before, with the same information as if we shot without log.
So what’s going on?
When people talk about log retaining more image information, what they really mean is log video retains different information. Information more suited to playing around with later. At least, that’s what we hope.
What log does is reduce contrast and saturation. This creates a washed out video, where everything looks kinda grey. The dynamics of the image are turned right down.
And, in theory, this makes it just a little bit easier to move the image in a new direction.
How to Shoot Log Video with FiLMiC Pro
If you want to shoot video using FiLMiC Pro’s Log V2 you will need to purchase the Cinematographer’s Kit, which is an in-app purchase.
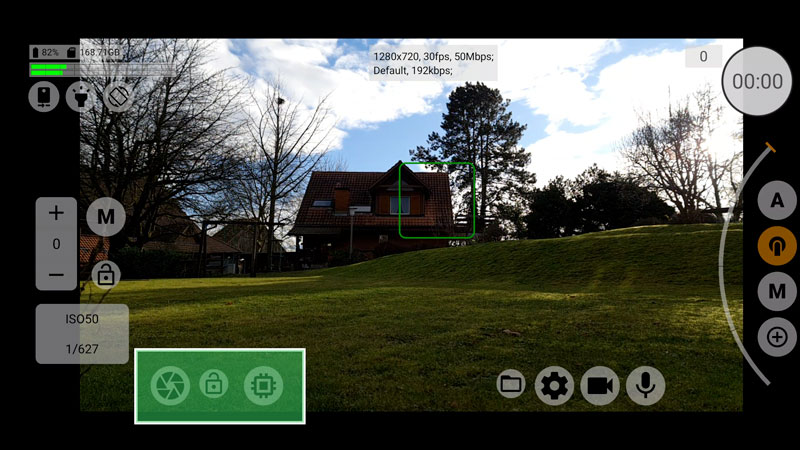
If you tap the 3 colour circles in the bottom left corner, you open up various options. The top setting is White Balance. Below that is the Cinematographer’s Kit.
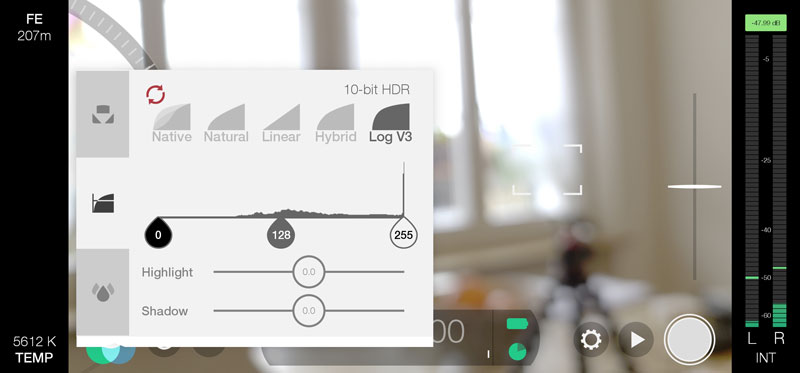
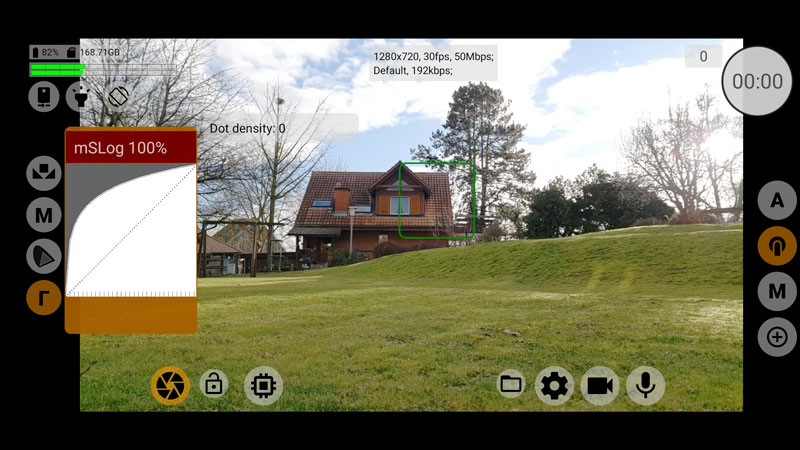
So now all you do is tap the Log V2 option on the right of the 4 options. When you tap this Log V2, you can see the histogram here changes.
How to Shoot 10-bit Log Video with FiLMiC Pro
To be able to shoot 10-bit Log in FiLMiC Pro, in Android first you need to switch to h.265 or HEVC codec. This is located in the Resolution menu. You also have to toggle on the HDR.
With an iPhone 12 it looks pretty much the same. Just switch on 10-bit colour, but not Dolby Vision, as that is not compatible with FiLMiC’s Log.
Now go back to the Cinematographer’s Kit and you will see there’s now Log V3, as well as new Linear and hybrid settings.
FiLMiC has also added the deLogV3 LUT to their website to convert to a Rec.709 colour space.
High Bitrate
It’s recommended that when you shoot Log with FiLMiC that you use the highest bitrate possible, which is FiLMiC Extreme. So if we tap out of this screen, then open the settings menu by tapping the cog icon, tap Resolution and make sure you set Bitrate to FiLMiC Extreme.
By the way, when we talk about retaining more information in the video, bitrate is another way to do that. Shooting with a high bitrate also means more colour and tone information is retained.
Low ISO
Another recommendation for shooting Log is to use the lowest possible ISO setting. On my device (a Samsung Note20 Ultra) that is 50. The reason for this is that log users have found they get extra noise. And less ISO means less noise.
FiLMiC Pro to LumaFusion
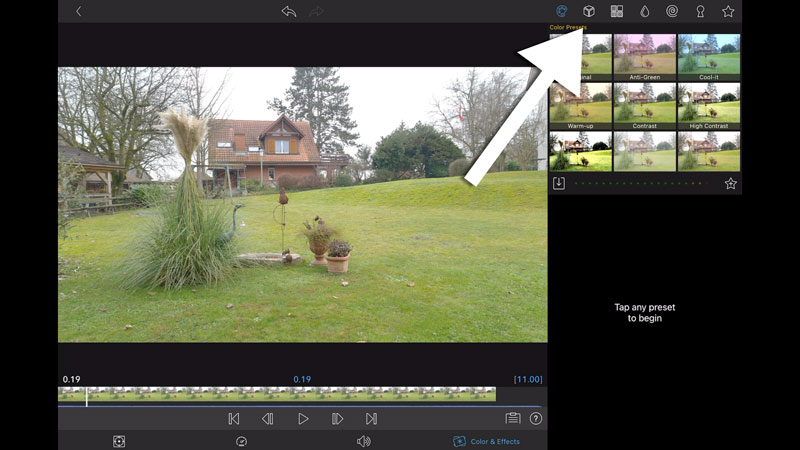
So, now I import this FiLMiC Pro Log V2 footage into LumaFusion. Place it on the timeline. Then edit this clip by tapping the pencil icon.
Now I tap Colour & Effects at the bottom. Then, top right, we need to select the cube icon which is where we find LumaFusion LUTs and any user LUTs we’ve imported.
In LumaFusion, you’ll find the official FiLMiC Pro deLogV2 already here. All you have to do is tap this and you will convert your footage to a rec.709 colour space.
Rec.709 Color
What is a rec.709 colour space?
Rec. 709 is the most common colour space for video projects. For example, for broadcast, Rec. 709 is most likely what you need to work and monitor in. It’s basically an agreed standard which works well on HDTV monitors.
How to Shoot Log Video with McPro24fps
McPro24fps is only for android, unfortunately. But the good news is it has very advanced Log settings. Whereas other apps give you log or no log, McPro24fps gives you a ton of options.
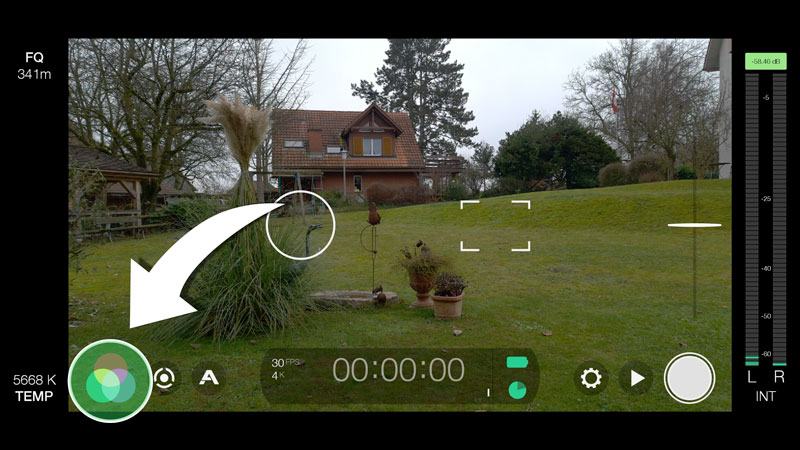
Near the left corner, below the exposure wheel, there are 3 buttons:
Left – Gamma Curve
Middle – White Balance Lock
Right – GPU Curve
The left and right buttons access a host of different Log profiles. This app gives you over 20 options and the recent update added even more options. So I think only the most dedicated McPro24fps users will explore everything available.
Gamma or GPU Curve
Tap the word “auto” boxed in red to open up the list of possible Gamma curves.
The app’s developer tells me there’s a quality difference, going from 10-bit RAW as highest down to GPU Curve as lowest.
10 bit RAW > Gamma Curve > 8bit RGB > GPU Curve
So a Gamma Curve should give you better quality video than a GPU curve.
Choose Your Curve
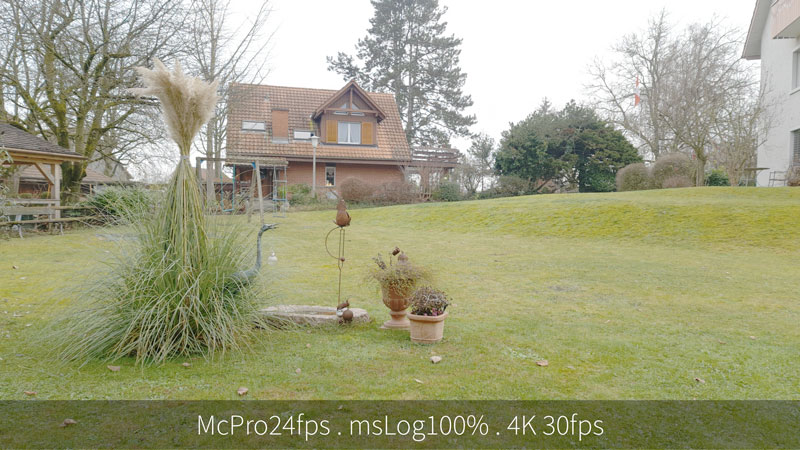
I’m going to choose msLog 100%. For no other reason than I tried some of the others and they didn’t come out as well.
In camera settings I set the bitrate to 100mbps. That is the highest I can go with this device before going into the red. I can choose higher but the red indicates that it might not work too well.
OK, now I’ll shoot some video and import it into LumaFusion.
McPro24fps to LumaFusion
Once the clip is in LumaFusion, place it on the timeline. Same as before, edit clip and go to colour and effects.
Now, we need to import a LUT from the McPro24fps website. Download the LUTs and then choose the one appropriate to the Log profile you’re using. In my case, msLog 100%.
LumaFusion can import .cube and .3dl files. So here we have the msLog100% which converts to rec.709 and is a .cube file. So locate that file where you have placed it and import.
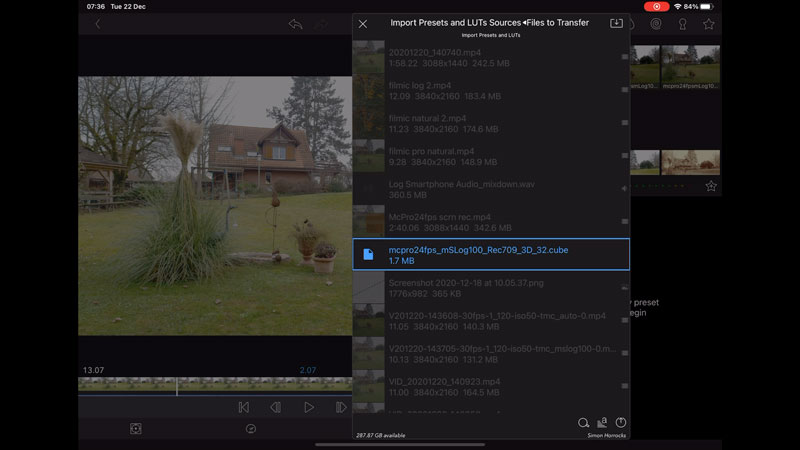
Now it pops up in your User LUTs for you to use whenever you need it. So I tap that and now I have converted the clip to the rec.709 colour space and we’re ready to start adding our own adjustments.
How to Shoot 10-bit Log Video with McPro24fps
In McPro24fps, if your device is capable, you can switch to 10-bit video. First you need to switch to the HEVC (or h.265) codec. You will find this option in the video settings menu.
If you can’t switch to HEVC then your device is not able to shoot 10-bit colour.
Smartphone Video – Beginner to Advanced
If you want to know more about smartphone filmmaking, my book Smartphone Videography – Beginners to Advanced is now available to download for members on Patreon. The book is 170 pages long and covers essential smartphone filmmaking topics:
Things like how to get the perfect exposure, when to use manual control, which codecs to use, HDR, how to use frame rates, lenses, shot types, stabilisation and much more. There’s also my Exploring the Film Look Guide as well as Smartphone Colour Grading.
Members can also access all 5 episodes of our smartphone shot Silent Eye series, with accompanying screenplays and making of podcasts. There’s other materials too and I will be adding more in the future.
If you want to join me there, follow this link.

Terrific article, Si! Glad to know I’m not the only one who’s had trouble with the orange skin phenomenon. Also interesting to learn about the additional grain introduced and the smaller range allocated to skin tones.
It’s also great knowing now that the natural setting is simply the native camera setting, which I imagine has been optimized by the manufacturer.
Much appreciated!
Wouldn’t it be just as well to put the time in to correcting a Log-shot in such a way that improves upon what can be achieved with a regularly-taken shot, and then creating a LUT, which can then be applied as standard over all other Log-shots? That way, further creative grading aside, you’ll always be starting from a point that betters a regular shot.
There is a default deLOG_v2 LUT available on Filmic Pro website.
https://www.filmicpro.com/luts/
What was the point of writing an article about something you admit you only know the basics about? And then having the gall to tell your reader to Google it? I DID google it, that’s how I landed on this garbage.
I don’t know of a single professional who says you “always” have to shoot log, only novelty-chasing hobbyists thing that. It’s an extra option that gives the filmmaker more control but also creates more work, so of course it’s dumb to use it when not necessary.
And yes, of course people who don’t know what they’re doing are going to mess it up, just like someone who knows how to cook basic meals will mess everything up if they’re handed professional utensils. Did you even try to convert the footage with a conversion LUT first? Do you think everybody who shoots log or RAW is just in on some big scam? Jesus.
Everything explained in very simple way so any beginner (like myself) can understand basic terminology and move forward. Thank you for this extremely helpful tutorial.