Open Camera – FREE Camera App for Android
Open Camera is a camera app for Android smartphones and it’s completely free. The app can be used to take still photos as well as video.
Everyone likes a free app for their phone. So I’ve downloaded the app onto my Samsung S9 to see what it’s like.
Let’s get started…
Once you are past the little intro, I was asked to give permission to the app to access the phone’s camera. Presumably, if you don’t the app doesn’t work.
Here’s a basic layout. The circled blue camera icon is the stills photo button. The movie camera icon below switches you to video mode.
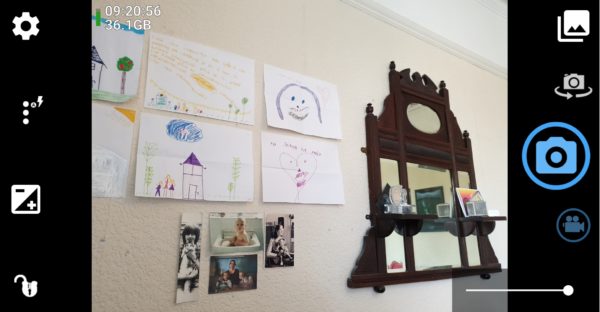
You can see there’s the usual settings icon top left. Below that the button allows you to set resolution and other settings.
Below that is exposure. And the padlock icon below that allows you to lock exposure (it turns red).
The gallery icon in the right hand top corner gives you access to your photos and videos. Scroll through the gallery by swiping left and right.
Below that is the front and rear camera switch. Below that are the 2 blue icons for stills photos or video. Then bottom right is a slider for zoom control.
The app has a lot of functionality and a large number of options and settings. In this article I’m going to focus on using the app to shoot video.
One thing to note is that not all smartphones will have the same layout or the same features. So how the app works on your smartphone will depend on the model you are using.
Setting up Open Camera app to shoot video
Tapping that settings icon takes you to a settings page. On that page you will find those blue icons again. One for stills camera and one for video.
Below location settings is a “processing settings” icon. Tapping this opens up the option to turn on “Anti-banding”. Anti-banding attempts to remove any flickering you are getting from artificial light.
Tap on the video icon to access video settings.
Video Settings
There are a number of different settings here, many of which you are going to want to look at before you start filming.
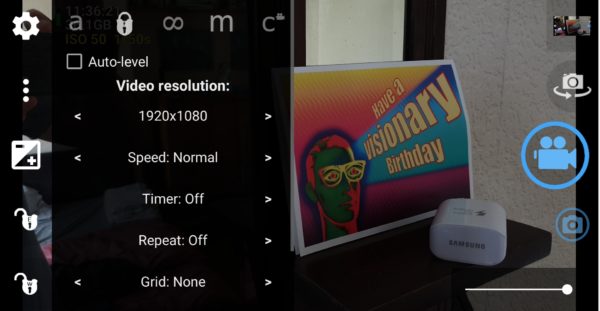
Video resolution brings up a long list of settings. At the top is your phone’s highest possible resolution using this app. My Samsung S9 starts with 4K Ultra HD and goes all the way down, past Full HD to the bottom setting which is QCIF 176×144.
(QCIF stands for Quarter Common Intermediate Format). The usual advice with resolution applies – high resolution means better quality but takes up more file space and processing power when editing.
Video format brings up 5 options: default, MPEG4 H264, MPEG4 HEVC, 3GPP and WebM (audio not supported). Unless you know you need to shoot in one of the other formats, then leave this as default.
Video bitrate (approx) brings up a long list of choices. Bitrate works in partner with resolution to determine the video quality. And as before, the higher the bitrate the higher the quality but also brings higher file sizes and requires more processing power.
On my Samsung S9, I can choose from 100kbps all the way up to 200Mbps (to compare, FiLMiC pro’s maximum bitrate is 100mbps). If you choose 200mbps be prepared to fill up your phone’s memory space very quickly.
Video Frame Rate (approx) brings up a list of choices, on my Samsung it goes from 15 frames per second to 120 fps. 24fps is the old traditional film camera frame rate, so many people prefer this choice to create more film-like videos.
I shoot 25fps because in Europe artificial lights flicker at 50hz. So 25fps is in sync and should avoid the problem with video banding. If you want a higher rate, you can choose that here.
Maximum duration of video brings up a list of units of time up to 1 hour. Unless you have a reason to limit your video length, then leave it as unlimited.
Below, there are a few other settings which deal with maximum duration and file size. If you need to use these, take a look. Otherwise skip on down to the audio set up.
Record audio is a toggle on and off. If for some reason you don’t want to record audio, you can toggle it off here.
Audio source is important as it allows you to choose the source of the audio. The Camcorder option simply uses the inbuilt smartphone mic. But if you are connecting an external mic to your smartphone, then make sure to select External mic here.
The other options here are for specialised settings and most likely you won’t need to use them.
That’s all the basic options covered. There’s a few other settings below which might be interesting to you. Switch between mono or stereo audio and lock screen to prevent accidents happening while recording. You can also create subtitles (.srt file).
Use Camera2 API
Back on the Camera Controls page, if you scroll down below the video settings button, you will find the Camera2 API switch. Switching this on opens up extra features, but only if supported by your device. When you switch this on, the app restarts and new options appear on the app’s screen.
White balance
On this same page, find the “On screen GUI” and open it. Now you get a whole list of options. The one we’re interested in here is the “Show auto white balance lock icon”. Clock the check box to have the lock icon appear on the main screen.
Exposure, Focus and White Balance
With this app like other apps you can shoot your video using auto everything. This is the most convenient way, but not the most polished. If you want to make your video look more professional, then there are 3 elements central to achieving this: exposure, focus and white balance.
I’ve gone through why these elements are so important and how they affect your video quality in previous articles. Essentially, locking these settings before you start shooting stops them changing during the shot. Most of the time, this looks messy and unattractive to the viewer.
Setting and Locking Exposure
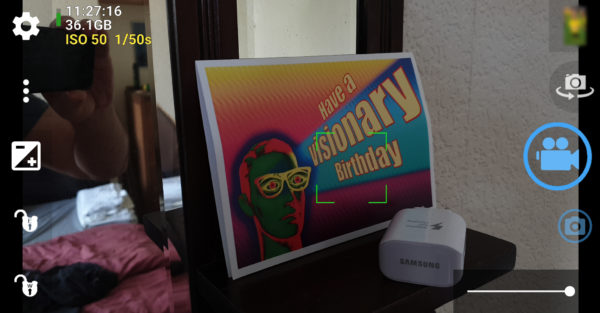
With the camera now open and set to video mode, notice the yellow/red letters and numbers in the top left corner. This is ISO and shutter speed. As you move the camera around, you will notice those numbers changing as the auto exposure goes to work, setting the exposure for you.
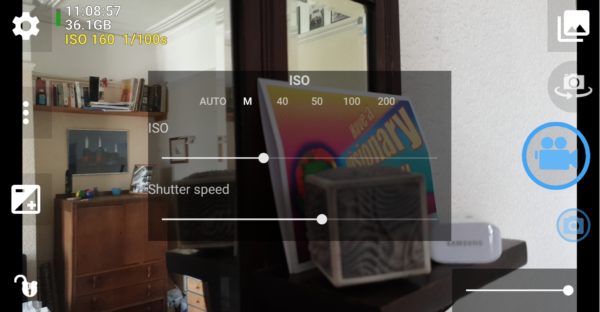
To set the exposure manually, click the -/+ icon on the left. This opens up a screen overlay which will be set to “auto” unless you have already changed it. By selecting M you will move to Manual mode.
Now you have to slider controls. One for ISO and one for Shutter Speed.
Generally, when setting ISO you want to set the lowest number possible. This will mean you have the lowest possible noise in your image. So one method might be to slide ISO right down to the lowest setting. Now movie the shutter speed around to get the desired exposure.
Once you have the desired ISO and Shutter Speed settings, click away. Note, if you have set the exposure this way, you do not need to click the E (exposure) padlock on the left of the screen. The exposure will be locked to your settings.
Setting and locking Focus
To set focus, simply tap on the screen on the object you want to focus on. A green box appears as it finds the correct focus.
Now to lock this focus is a bit fiddly. Tap the 3 dots icon on the left to open up the overlay control.
Tap the padlock icon to lock the focus. Tap away and you should get a message on screen saying focus is locked. As a side note, you can see there is another way to set Video Resolution here.
Apart from auto and lock, there’s “infinity” which sets the focus to infinity (the far distance). There’s also M for manual focus, which brings up a slider to manually set focus. The C stands for continuous auto focus, which means the camera will continue adjusting focus as you film.
Setting and locking White Balance
Setting the correct white balance is less important than locking it. A slightly off white balance can be corrected easily in your editing software. But an unlocked white balance is almost impossible to fix afterwards, if the colour tone fluctuates during the shot.
My advice for setting the white balance would be simply to use the auto function then lock it before shooting. This means all you need to do is aim the camera then tap the W (white balance) padlock in the bottom left corner. Now start shooting.
That’s the basics
Open Camera app has a ton of features. Here I’ve just gone through the basic core settings you need to look at for shooting great video. For a free app, I’m really impressed with it.
There’s some things I really like about this app. For example, it boots up and closes down pretty fast. It also remembers your last settings when closing and re-opening.
It would be really nice to have a focus lock padlock, rather than have to open a menu. Better still, a tap and hold on the green square to lock focus and/or exposure would be really useful. There’s also no way to monitor the audio level at the moment.
Although I haven’t tested this app in an intensive shooting situation, most of the downsides seem to be minor issues. All the core functions you need are there (depending on your device).
If you have tips or thoughts about using this app, please leave them in the comments below.
Check out the Official MoMo Smartphone Filmmaker KIT LIST.
Eager to learn more?
Join our weekly newsletter featuring inspiring stories, no-budget filmmaking tips and comprehensive equipment reviews to help you turn your film projects into reality!
What means blue and red video icons when shooting video with open camers
the blue icon goes red when when you are recording
The range of shutter speed.on my Samsung note 8 is up to 1/10s, but in my Samsung camera app it.goes.up to 10seconds……any ideas?
I want a.long exposure (light trails) and matching interval timer….if this app can’t do it, which app can, any ideas? None seem to offer that speed/interval matching
I was trying the video section and couldnt get it to stop recording think i pressed every icon….
What about auto focusing? I can’t enable camera2 API without root 🙁
Interesting review. Thank you.
Using OpenCamera some years and still found something new for me in it.
One comment to your “missed features”
“It would be really nice to have a focus lock padlock, rather than have to open a menu. Better still, a tap and hold on the green square to lock focus and/or exposure would be really useful.”
For exposure you can switch on a padlock on the display.
And for focus you can choose locked as you described. And then each time you want to set a new disctance just touch the screen and that position is the new (and locked) focus.
There’s also no way to monitor the audio level at the moment.
“There’s also no way to monitor the audio level at the moment.”
It is. But it is well hidden: It is in Settings – > Camera Previews -> Show audio level meter”.