The Diary of a Smartphone Filmmaker: August 2019
Last time I wrote in my smartphone filmmaker diary was back in April 2019. We’d finished shooting Episode 4 (The Museum of Me) of our smartphone-shot Silent Eye series and I was buried in the CGI work. Well, I’m no CGI artist but I can get by with basic After Effects stuff.
Screen replacement: not too much problem. Anything which requires a 3D environment: I don’t have those skills and I don’t have the software. OK, you can do some 3D work in After Effects, but I just didn’t want that extra learning curve.
And I believed I could do it using 2D elements. The challenge was to create a museum (which turns out to be virtual) using a bare room and some white pedestals. So here’s how that turned out…
Green Screen, Green Paper
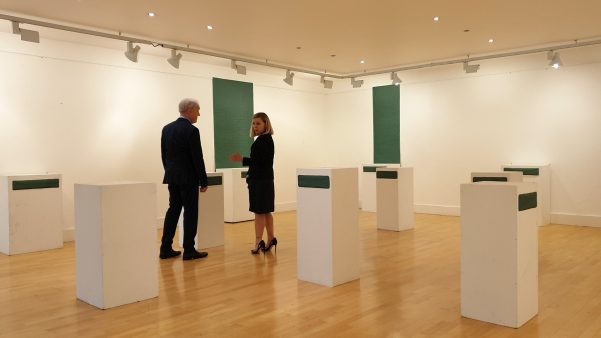
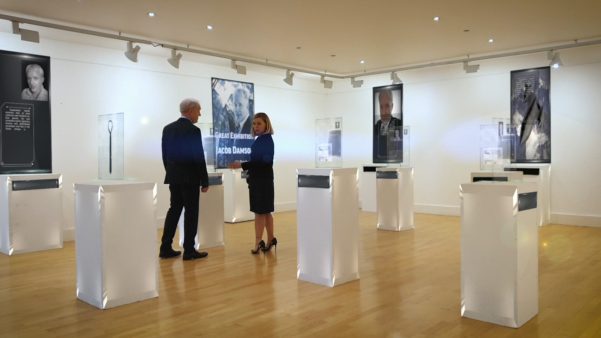
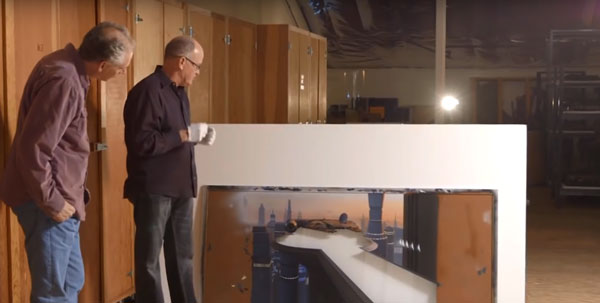
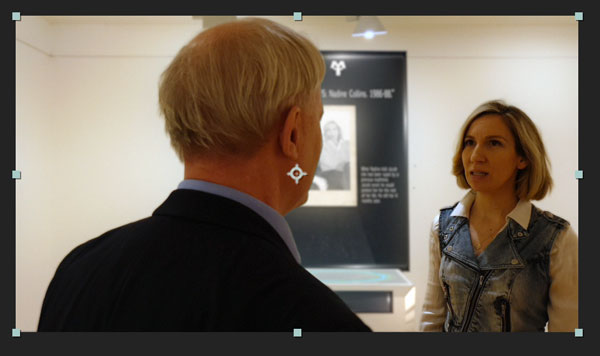
In the script, the couple find themselves in a museum. The place is full of objects from the life of the main character (Jacob Damson). But instead of sourcing dozens of props and getting them to the location, I decided to try to make the entire museum “virtual”.
This meant each plinth would carry a hologram of stuff from his life. On the walls there would be posters and information boards with more images and text about Jacob. To dress this as a physical set would have taken a few days and more money. Plus the museum is virtual anyway, so it made more sense to create it digitally.
2 for the Price of One
I bought Neewer 9 x 15 feet (2.7 x 4.6 meters) Green Screen which came with 3 Clamps. This green screen came in useful, and not just as a green screen. We also used it to block the big window at the end of the room so we could control the light better.
It didn’t block out the light completely, as you can see. But it did enough to stop changes from outside having a dramatic effect on the lighting inside. For example, if a cloud moved across the sun the light would suddenly drop, perhaps in the middle of a shot. This screen helped reduce that effect.
The green blocks on the walls were to be replaced by posters and museum info boards using Adobe After Effects. Unfortunately, when we bought the paper online it looked a lot greener. What we ended up with was a dark green, which did work, to a degree. But it wasn’t as good as having bright green, like the green screen.
Even though the green wasn’t quite correct, the blocks gave me something to motion track. I also found the paper was quite textured. Normally, this would not be ideal for keying out the green colour. But an unexpected positive was being able to use the texture to track movement.
Blank walls are a CGI artist’s nightmare
Like I say, I’m not a CGI artist. However, I’ve learned that if want to track motion, you need something to track. If you have blank walls, then you need to put markers. We did actually put some small black markers on the walls but not enough.
In Adobe After Effects, there is an affect called 3D Camera Tracker. This analyses a video and searches for points to track. You can then use these points to attach 2D and 3D object, so they appear in the video and move in 3D space.
With my blank walls and green paper, After Effects couldn’t track in 3D. So I was left using Mocha and After Effect’s single point trackers. I also found the Samsung Footage to be unreliable, and difficult to track. Frame rates varies between shots, even though FiLMiC Pro was set to 25 fps every shot.
One option would have been to render all the footage at a set frame rate before doing any CGI work. But this would have been quite a chore for hundreds of shots. Besides, I had already got quite a way into the project before I considered this. I didn’t want to start a new working method halfway through, so I ploughed on.
Don’t Move
I knew from experience that once the camera moves, CGI takes far longer and is far more complex. If the camera is stationary, however, you can create effects as they used to in movies. This was (and is) a technique called Matte Painting.
They would have a fixed shot and paint scenery onto a piece of glass . This glass would be then placed before the camera so that the painted area and the live area fitted together like a jigsaw. The live area would appear behind the glass, viewed through the gaps left by the matte painter.
Here’s an example from the original Star Wars (1977) film:
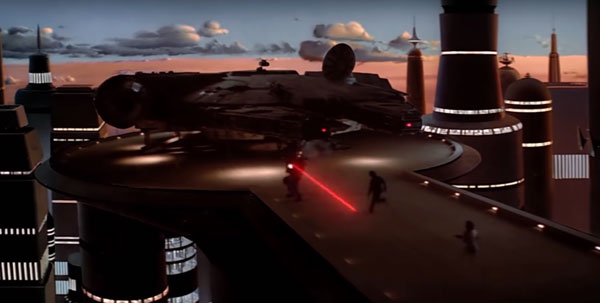

- The first shot is with the live and matte together.
- The second shot is just the matte painting.
- The third shot is matte painting supervisor Harrison Ellenshaw standing beside the same matte painting to give you an idea of scale.
We might be shocked now to look back at that original Star Wars film and see how much of the film is made up of station camera shots. Today, that would be considered almost amateurish. But pre-CGI days, there was no other way to achieve these rich and impressive backgrounds.
Looks at those towers, lights from windows, clouds and sky. Now, that would all be rendered in a computer as 3D models. With 3D models you can move the camera, as long as you can track (or record) the exact motion of the camera. But back in 1977, those towers and clouds had to be painted by man with pots of paint and some brushes.
Anyway, back to the future… what used to take highly skilled and creative matte painters, can now be done with After Effects and digital images. As long as you keep the camera motionless, it’s possible to mask out areas of your image and replace them with 2D images.
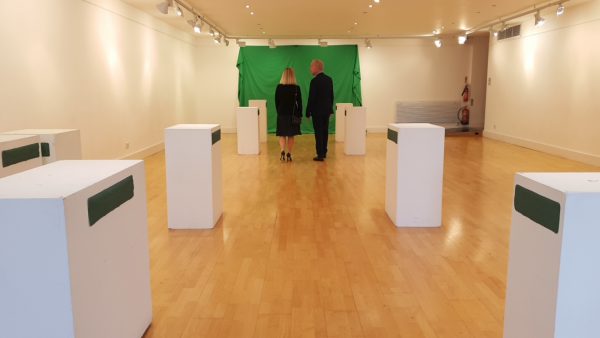
Making Corridors
The script features a few scenes which take place in the corridors of the museum. But the gallery we hired for the shoot only had small, narrow and short corridors. They didn’t really fit what I had in mind.
So I decided to resort to CGI again. We hung the green screen at one end of the room then placed plinths to mark out an imaginary corridor. I would then create the corridor in After Effects.
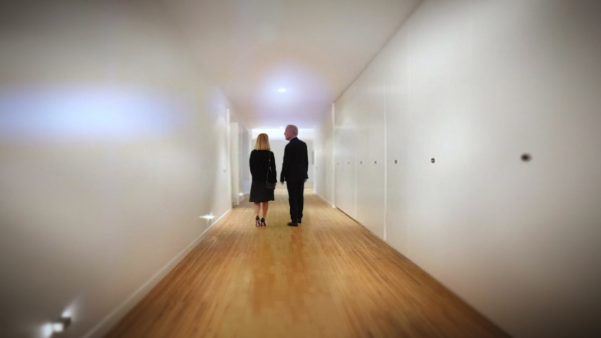
The second image shows how it turned out. This is a 2D photograph of a corridor which I have worked on in photoshop.
Now, we may have thought it better to simple shoot the whole thing in a big green screen room (extra cost). However, as we had a wooden floor I was able to blend it in to the wooden floor of the corridor in the photo. This meant we could use the reflection in the shiny floor from the original shot.
Things that really help connect 2 images together are such things as reflections and shadows. If you take their reflections away from the floor, they look like 2 figures cut out and stuck on. The reflections provide the illusion they are actually in the corridor.
I also add some glow and lens flare effects over the top of the whole thing. Again, this helps to knit everything together, smudging over the edges, blending things.
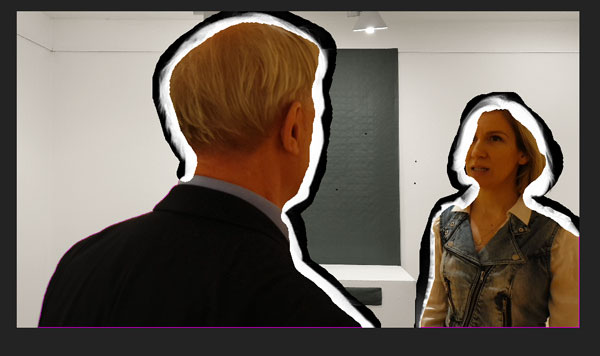
Rotoscoping
Aside from motion tracking and green screen keying, there was a lot of rotoscoping work to be done. Rotoscoping means drawing a line around a moving part of the image, frame by frame. In a sense, taking virtual scissors to your video and cutting out the bits you want to keep.
In this case, I needed to cut around the actors. The reason for using a green screen is so that you don’t need to use rotoscoping, which is exceedingly laborious.
With a green screen technique you remove everything that is green from the image, revealing the layer behind.
With rotoscoping, you mask around everything you want to keep, revealing what is behind.
The reason rotoscoping takes a lot more time is a new mask shape needs to be created for each frame. In After Effects there is a rotoscoping brush which automates this process to a degree. However, it takes a lot of processing power and needs your input to adjust things to get an accurate animated mask.
In practice, this means going through each frame, one by one, fixing errors. Then you need to freeze the mask and check it. Then when you discover the inevitable ton of glitches and errors, you unfreeze and start going through each frame again.
This might be ok for a few shots, but for this film I found I needed to rotoscope the actors in the majority of shots. Perhaps 80%. For that reason, this episode took far longer than the others.

VFX Challenge
So, more than the 3 previous episodes, this was as much a CGI challenge as it was seeing what we could achieve with a smartphone. We had the advantage that the whole shoot took place within one location, so that helped with shooting. And by using CGI to create the elements and the corridors, we could try to create the different locations within the museum in a single room. All we had to do was move the plinths and wall hangings around to create a different looking environment.
So that’s how we did it. But did we succeed?
Well, we’ll let you judge for yourselves. You can find The Museum of Me on Amazon where it and the episodes 1-4 are free to view for Amazon Prime members.
Equipment used
Stabilization
Drives
Sound
Green screen
Support us on Patreon
Patreon supporters get access to exclusive content, free festival submissions and more. As a Patron of MoMo you can watch Silent Eye’s first episode: You Have Been Chosen for free. An indecisive office worker downloads an app to make all her life decisions for her, on condition she agrees to follow every instruction.
Become a MoMo Patron today and watch Episode 1 here.
![]()
As an Amazon Associate I earn from qualifying purchases.