Zhiyun Crane M3 for Smartphones Review & Tutorial – vs Smooth 5
Is your current smartphone gimbal not really up to the job you need it for? Are you frustrated because you have a big phone and you want to use it with an anamorphic lens, variable ND filter, diffusion filter, microphone and so on but your gimbal just doesn’t have the motor strength to handle it? If so, then this might be the answer…
The Zhiyun Crane M3
A few weeks ago, Zhiyun released a new hybrid 3 axis gimbal, the Zhiyun Crane M3, following on from the previous version, the Crane M2. I’ve already got the Crane M2 (and wrote about it too), so I was keen to try out the update.
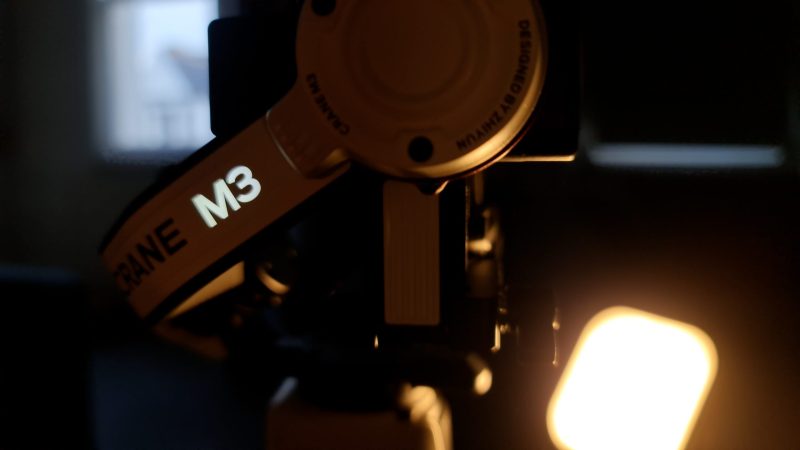
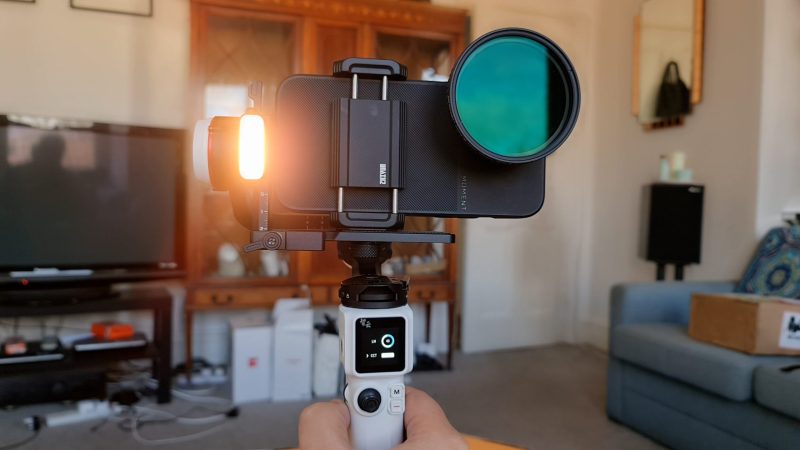
The Crane M3 is quite different to the Crane M2, even the design is like something from NASA or a Star Wars movie. I mean, I don’t think I’m exaggerating when I say, this is the most beautiful looking gimbal I’ve ever used. The M3 here on the arm of the gimbal even lights up.
And the feel and the quality of all the components is excellent.
There’s also a couple of new features which I think are really great to have in a gimbal. So let’s take a look at this gimbal and see how it compares to the Zhiyun Smooth 5, which also just came out.
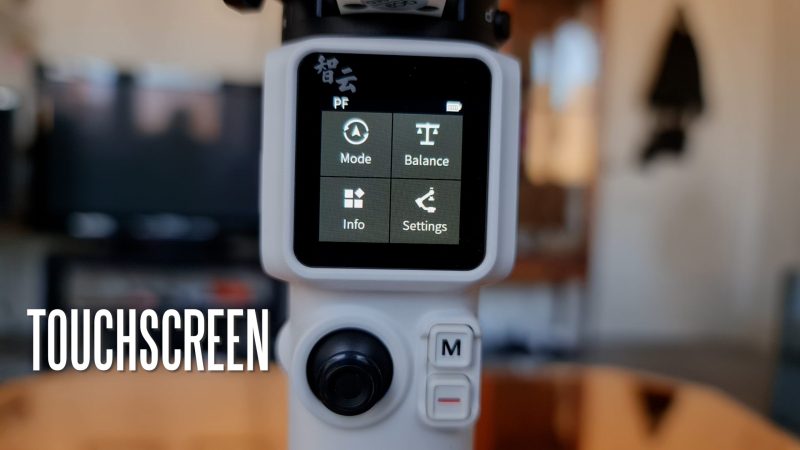
Touchscreen
The first thing you will probably have noticed is the introduction of a mini touchscreen. After you power on, the screen is divided into 4 buttons, with each opening menus or displays. The top 2 are the ones you’ll be using most of the time.
Top left allows you to choose mode. Of course you can also change mode with the mode button. But you might find this quicker going directly to the mode you want, rather than tapping through each one.
There’s also various other settings you can get to through these buttons.
Weight & Size
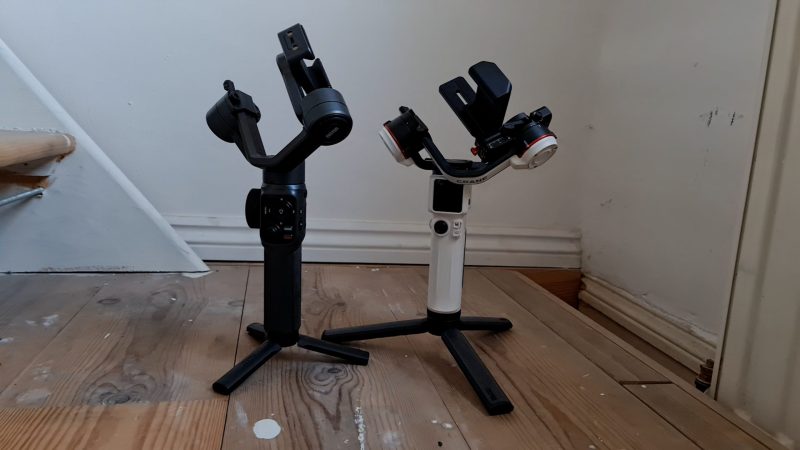
The Zhiyun Crane M3 is heavier than the Smooth 5. Zhiyun lists the weight as 700 grams, but when I weighed the gimbal to include mounting plate, clamp and tripod it actually came to almost 1KG. Which is about 370 grams more than the Zhiyun Smooth 5, at 630 grams. But when you compare the unfolded size, the Smooth 5 actually comes out a little bit bigger.
Both come with a case, but only if you pay extra. The Smooth 5 case is pretty basic, while the Crane M3 case is really nicely designed, like the gimbal, as well as being a bit shorter and fatter. It’s made from a washable material, as well.
Zhiyun Crane M3 Max Payload
The Smooth 5 has a listed max payload of 300 grams. How does that compare to the Zhiyun Crane M3?
Actually, the Crane M3 doesn’t have a maximum payload, because it’s all about balance. Instead, they have a list of compatible cameras. But for smartphones, as long as you can balance it, the motors will handle whatever weight you load onto it.
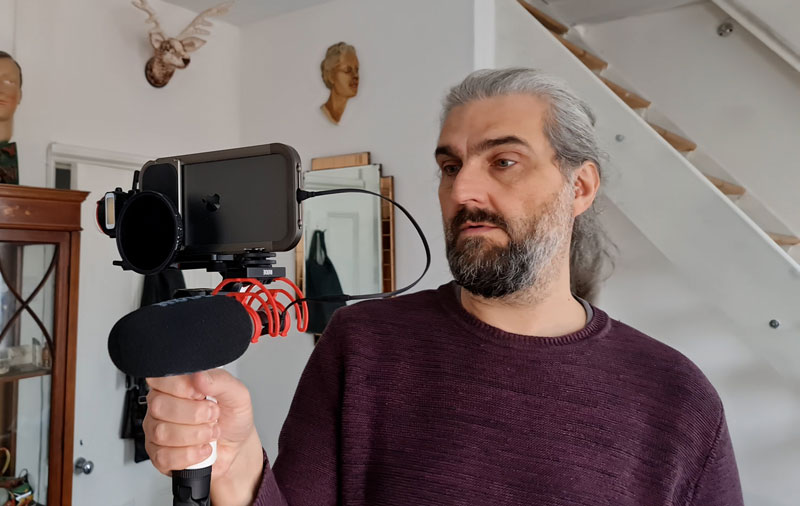
From my initial tests, it was certainly able to handle a big smartphone plus as many extras as you can fit on. Here I have it loaded with an iPhone 12 Pro Max, a SmallRig Cage, a Moment Anamorphic, a K&F Variable ND filter and a Rode VideoMic NTG shotgun. You can see it handles the weight fine.
The only problem I can see is if you wanted to use a DoF adapter. That would mean a lot of weight hanging out the front and nothing to compensate at the back. If I had a DoF adapter on here plus the lens, that’s going to be pulling down on the tilt motor. But that will depend a lot on how long and how heavy the lens is.
But even with a regular camera, a longer lens on the front is going to be touch and go whether the gimbal can cope.
DoF adapter aside, I would say the Zhiyun Crane M3 should be able to handle pretty much any smartphone setup. The Smooth 5 also does a really good job handling your smartphone plus extras, but you can’t mount a phone with something like this SmallRig cage, which needs the screw.
How to Unlock Crane M3 Motors
Like with the Smooth 5, all 3 motors need to be unlocked. One on the pan motor, one on the roll motor and on the top for the tilt motor. The top one is a bit harder to find, but just slide it away from the motor.
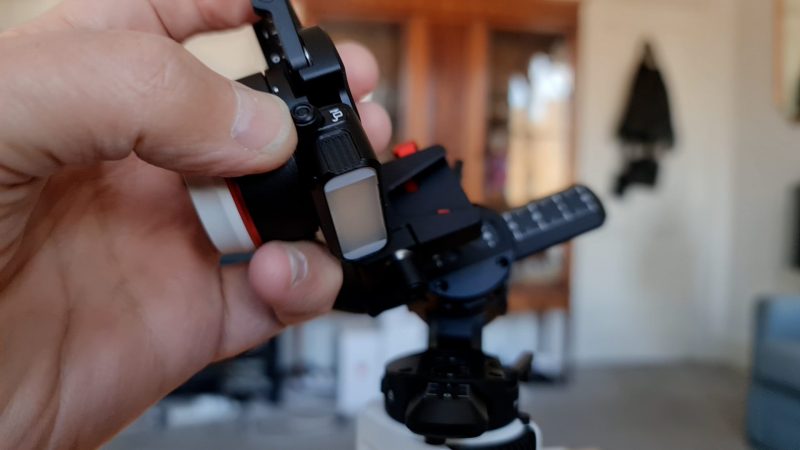
How to Mount a Phone to Crane M3
To mount a phone, the Crane M3 Combo version comes with a smartphone clamp which then attaches to the mounting plate, like you would mount a camera. But you could use your own clamp here. I found this clamp is really sturdy, partly made of metal, but it was a slight struggle to get my iPhone 12 Pro Max with a thin case mounted.
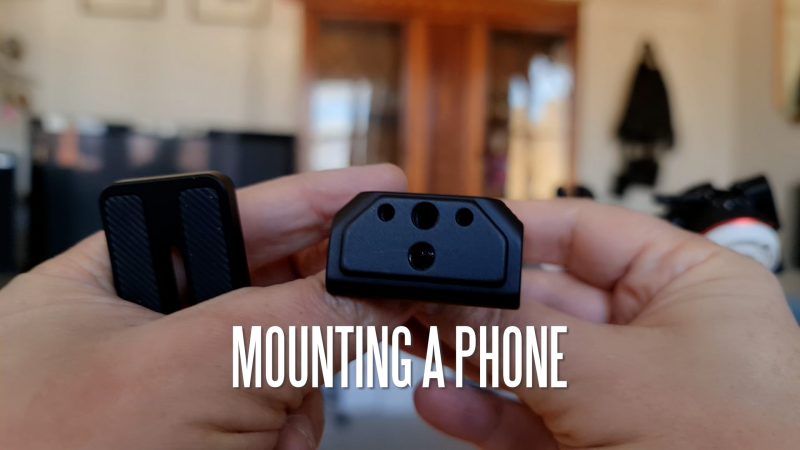
As I say, you can use any smartphone clamp designed to be used with a tripod. The only difference is that the clamp that comes with the M3 is really solid and also has 2 screw holes in the bottom so you can adjust the placing on the gimbal for balancing purposes.
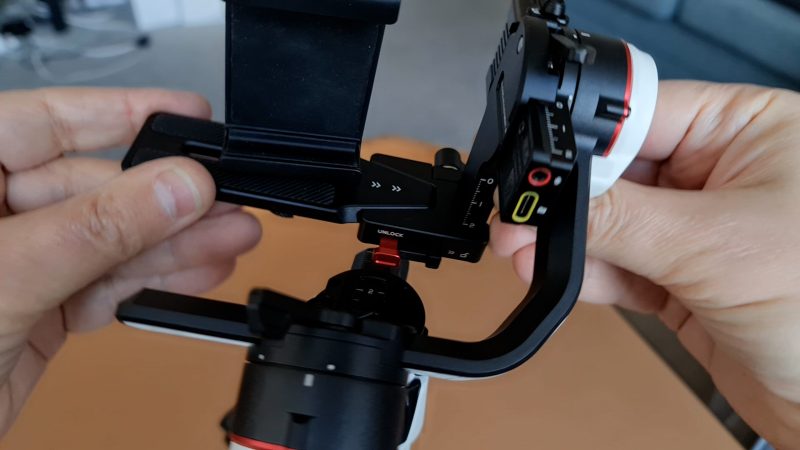
Once you have the clamp on the quick release mounting plate, you need to unlock the mechanism which holds the plate. Then the plate slides in and the lock automatically springs back into place.
How to Balance a Phone on the Crane M3
One problem I had using the Crane M2 with a smartphone was balancing, which I found to be pretty tricky. To mount an iPhone 12 Pro Max with extras and get it to balance I had to get inventive and even made my own customisation to the gimbal.
Compared to the Crane M2, the Crane M3 is much easier to balance. But compared to the Smooth 5, the balancing process is a bit more long winded. The Smooth 5 definitely wins the points for faster setup time.
Arm Adjustment
You can adjust the position of 4 different arms. There’s one at the base, the second one on the roll motor (which is probably the most important for a smartphone), then two on the tilt motor (backwards and forwards plus up and down).
Each one has some kind of lever to lock the position.
Starting with the up and down tilt arm, for a smartphone I believe it’s best to have this right at the bottom. Next, adjust the main roll arm until it’s roughly balanced.
The other 2 arms I set so that the smartphone sits right above the bottom pan motor. The balance of the arm on the tilt motor all depends on the weight you have at the front.
Touchscreen Balance
Here’s the second useful touchscreen feature, called Balance. This opens up meters showing you how well balanced each axis is. This is great for getting your balance as perfect as possible.
When I set up the gimbal, I mount the phone and then get it as close to balanced as I can. Power on, open the balance screen, and if you can see one of the motors is out of balance a little, adjust it while it’s still powered up. Adjust in small movements until you can see it’s not leaning to one side or the other.
If I put a little pressure onto the tilt axis, you can see (below) the meters moving from one side to the other. Basically, you want this to stay as near to the middle as you can. When you move the gimbal around you will see it moving too. The colour changes to orange and then red when there’s too much weight.
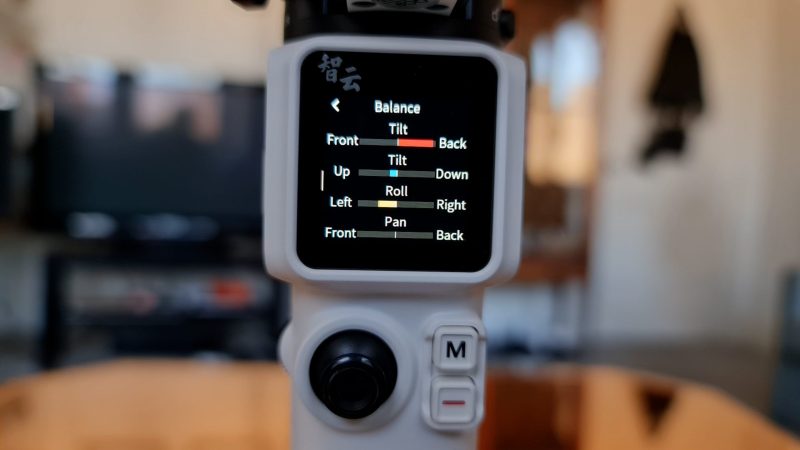
But, actually, this showed me how strong these motors are compared to the Crane M2. If you put a little bit of pressure on the motor on the M2 it starts beeping and shuts down. With the M3, it seems to be able to cope with some imbalance.
As well, compared to the Crane M2, there’s more room to move this balancing arm to accommodate the device and any extras you add on.
Fill Light
Gimbal makers, like smartphone and camera makers, are really pushing for the vlogger market these days and the Crane M3 is no exception. There’s the now-expected fill light included, although this one is not detachable like the Smooth 5 and neither can it be switched to face the opposite direction.
The Crane M3 is really designed to film only in one direction. However, like the Smooth 5, 3 taps on the trigger rotates the gimbal 180°.
To use the fill light on the M3, press and hold this wheel at the side to turn it on. Once it’s on, the touch screen shows you brightness as well as the colour temperature of the light. Just use the wheel to adjust brightness or temperature. Tap the wheel to switch between each setting.
You also have a fill light on the Zhiyun Smooth 5, and a brightness control, but it doesn’t have adjustable temperature.
External Microphone
With the Zhiyun Smooth 5, the port of the phone you might want to use for a microphone would normally be covered. To cut a long story short, you need to choose between extra weight or using a mic.
With the Zhiyun Crane M3 you can connect a microphone and it even has microphone features built in.
To connect the microphone, one option is to mount the iPhone upside down. Either that or leave enough room between the phone and the tilt motor, otherwise the microphone port will be blocked.
On the subject of microphones, the Crane M3 comes with a 6.5mm audio port which supports connection with a wired microphone.
If you have this thing, which is called the TransMount Expansion Base, it attaches to the end of the gimbal and supports various functions. This has a mic input which connects to this output at the top of the gimbal, allowing you to connect a microphone through the base.
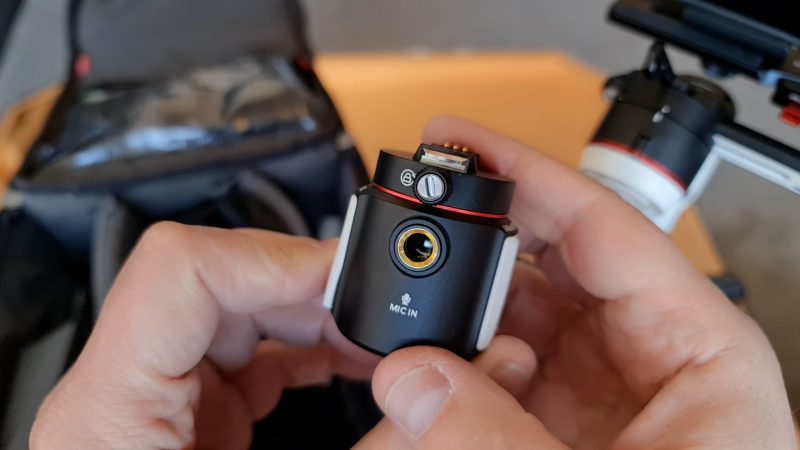
The extra base also has a port for a camera controller, but that’s for DSLR and mirrorless devices. And on the other side, a 1/4 inch port for attaching extras.
3 Buying Options
The Crane M3 comes in 3 different packages. The standard, the combo and the pro version. The standard version is the basic gimbal. The combo comes with the bag, a slightly bigger tripod and the smartphone clamp. Considering you can buy a clamp for about $10, and the combo set is $80 extra, how much do you want this bag?
But if you want the base extension you will need the Pro version, which also comes with a reasonable quality shotgun mic.
App-less
One thing to note about the Crane M3 is that there is no camera app support for a smartphone. Zhiyun has 2 apps for gimbals and this one uses the ZY Play app, while the Zhiyun Smooth 5 uses the ZY Cami app.
When you first set up the gimbal, connect using the ZY Play app and you will be taken through activation of the gimbal. Then it will ask if you want to install any firmware updates.
But what you then get is remote control functions. This is so you can control the gimbal with a smartphone while you have a regular camera mounted.
Usually if you connect a gimbal to your smartphone via bluetooth, you at least get to use the record / shutter button. But not in this case. The record / shutter button on the M3 only works with a compatible regular camera.
Personally, that doesn’t bother me too much. All it means is tapping the screen to start recording instead of the button on the handle. As well, I rarely use the apps which come with gimbals as I find I get better quality video with the native camera app.
Adjustment Wheel
Another thing I really like is this wheel at the front, just above the trigger of the gimbal.
Using the touch screen, you can assign this wheel to control the gimbal in some way. I don’t know if further options will be added in the future, but at the moment your only option is the roll axis.
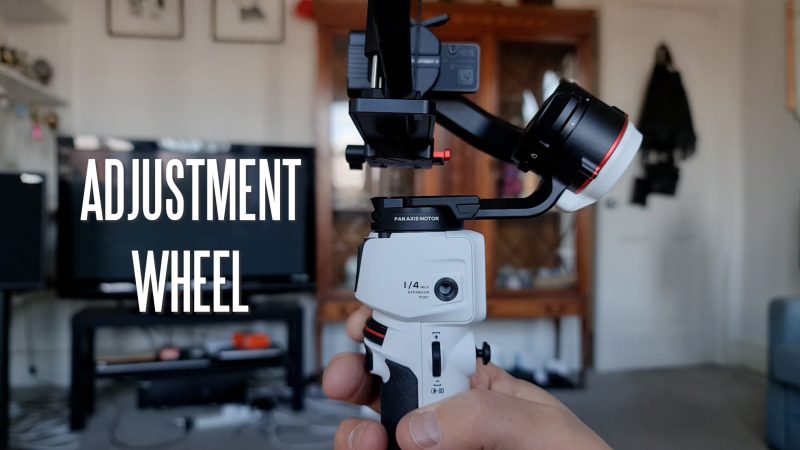
For me, this is really useful. It’s great to be able to set the roll angle on the fly, without fiddling around with settings. And this is so easy, quick and instinctive.
For example, if you are filming in a location where the ground isn’t level, but you want the camera to be level with the ground, you can just quickly adjust that with the Zhiyun Crane M3. Or maybe I just want to shoot a Dutch angle, which is a pretty standard shot in filmmaking. Again, so easy with this wheel.
Conclusion
So this gimbal doesn’t have all the smartphone controls you get with the Zhiyun Smooth 5, and all the features in the Cami app. For example, it doesn’t have the focus or zoom wheel. As well, compared to the Smooth 5, it’s not so quick to get setup and filming.
On the other hand, if you’re someone who uses smartphones as well as bigger cameras, or if you intend to make the step up to bigger cameras in the future, this gimbal has you covered.
In my opinion, this gimbal is an impressive step up from the Zhiyun Crane M2. Using this with a smartphone, the capacity to add extra weight in the form of cases, lenses and grips is also a step up from the Zhiyun Smooth 5.
I really like the mini screen, and the balancing and roll axis wheel features. Personally, I’m interested in equipment that makes filming faster, easier and more enjoyable.
For that you want controls which are easy to find and instinctive to use. I don’t want to be lost in settings when I’m filming. So, for me, just using the native app and having some basic controls is the most creative and most fun to use.
Smartphone Video – Beginner to Advanced
If you want to know more about smartphone filmmaking, my book Smartphone Videography – Beginners to Advanced is now available to download for members on Patreon. The book is 170 pages long and covers essential smartphone filmmaking topics:
Things like how to get the perfect exposure, when to use manual control, which codecs to use, HDR, how to use frame rates, lenses, shot types, stabilisation and much more. There’s also my Exploring the Film Look Guide as well as Smartphone Colour Grading.
Members can also access all 5 episodes of our smartphone shot Silent Eye series, with accompanying screenplays and making of podcasts. There’s other materials too and I will be adding more in the future.
If you want to join me there, follow this link.

Hello,
Could you let me know if there is an
update now by zhiyun where one can use the app features (loke zoom, focus pull or motion timelapsd) on the crane M3.
These features missing is the only reason I couldn’t decide on buying this gimbal.
Thank you.