Filmic Pro V7 Review & Tutorial plus Essential Tips
FiLMiC Pro V7 is finally out and, visually at least, it’s a dramatic change from previous versions. The user Interface has been almost completely redesigned. The basic layout is pretty much the same but most things now look or function a bit differently.
In this video I will go through the new UI and show you how to set shutter speed, ISO, focus and the other main controls.
Back in September of 2022, the company behind FiLMiC Pro, the best known camera app for smartphones, announced they were joining forces with an app developer called Bending Spoons from Italy. In reality, this meant Bending Spoons bought FiLMiC Pro and set about switching the app to a subscription model, much to existing users’ delight.
Filmic Pro v7 – Subscription
If you install (or update to) Filmic Pro V7, you will need to choose your subscription before you can proceed. There’s a weekly or a yearly option. If you’re upgrading as an existing Filmic Pro user, you’re given a discount.
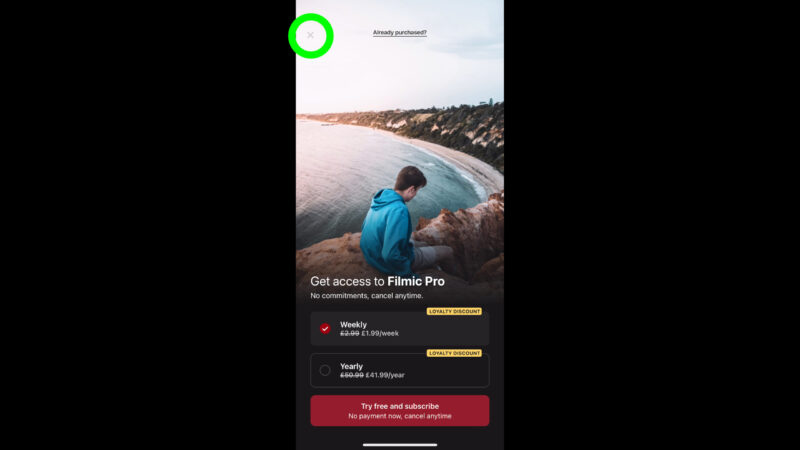
You can also choose a week’s trial. I found that if I ignored all that stuff and just tapped the X in the top left corner, I was taken to a trial version without having to subscribe. It now says PRO top left and if you tap that it tells you that you can use all the features but you won’t be able to move or share the video files to from the dedicated Filmic Pro folder.
Who is Filmic Pro v7 for now?
Now that the app has become a service that we subscribe to rather than a product we buy outright, what kind of people are going to use this app? In my opinion Filmic Pro v7 is the best video shooting app for iPhone, but it’s probably the most expensive too.
I’m not against paying a subscription for an app I use regularly, but Filmic has given me a year free. So we’ll see what happens after that.
I generally only use Filmic Pro when I’m shooting a short film or a music video. Recently, I used this app to shoot a short documentary, The Making of a Smartphone Filmmaker, and a music video. One option to save a few $ is to pay weekly and cancel as soon as we’ve finished filming. If our shoot is a week or 2, then we only have to pay for that time.
Filmic Pro Legacy
Now that Filmic Pro V7 is released, the good news is that the old version can still be used without paying a subscription fee. There’s a separate app available titled `Filmic Legacy`, which is V6 without a subscription and with all in-app purchases unlocked.
Here’s how to do that without subscribing or going through any kind of free trial.
Update to the new app and when you get to the page asking you to choose a subscription, tap the x in the top left corner. Tap the cog, tap Information and finally tap Download Filmic Legacy. This takes you to Filmic Legacy in the store.
Watch instructions on how to do this here
If you have bought Filmic Pro before August 25th 2022, you can install this app like any other and you will get a separate app on your device. Now you have both Filmic Pro v7 and Legacy apps on your device.
If you are using an iPhone, you can even export all the clips captured in v7 back into Filmic Legacy. So this makes the idea of subscribing for a limited time, capturing the footage you need, then cancelling the subscription more workable.
How to import clips from v7 into v6 Legacy
If you would like to import the clips stored in Filmic Pro v7 into Filmic Legacy (previously FiLMiC Pro v6, and made available to all filmmakers who purchased Filmic Pro prior to August 25th 2022) follow these steps:
- Open the Files app on your iOS device.
- Select ‘Browse’ > ‘On My iPhone/iPad’ > ‘FiLMiC Pro’
- Tap the three dots in the upper right hand corner and choose ‘Select’
- Select all the clips you wish to move to the Filmic Legacy library
- Tap the ‘Folder icon’ in the bottom row, and navigate to ‘On My iPhone/iPad’ > ‘FiLMiC Legacy’
- Tap ‘ Move’
Filmic Pro v7 – Overview
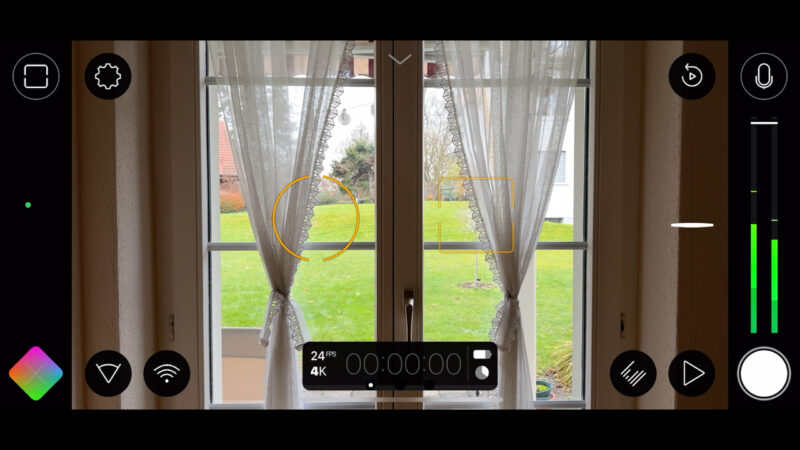
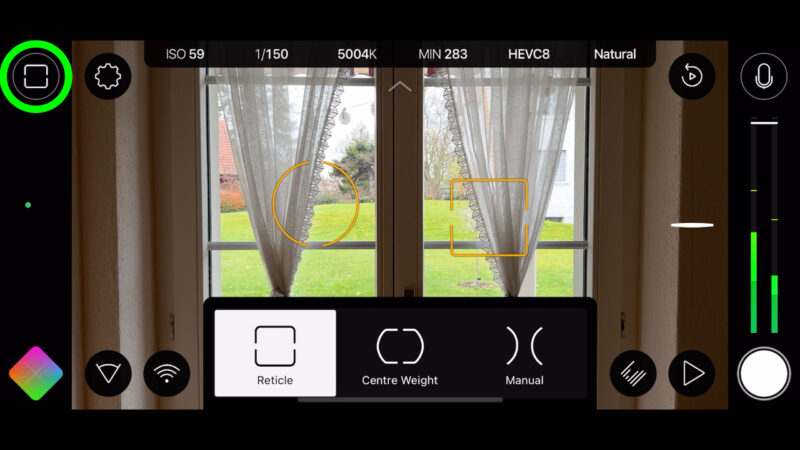
In the centre of the screen we have a circle and a square. These are the exposure (circle) and focus (square) reticles. You can drag them around or tap to lock them and they turn red.
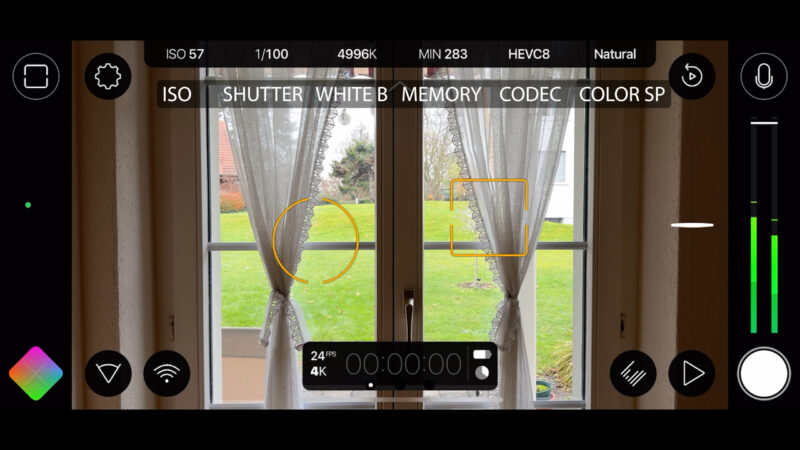
If you tap the small down-pointing arrow at the top, a bar drops down displaying your most important settings. ISO, shutter speed, white balance in kelvins, then there’s memory space left measured in minutes of video, next is codec and finally your colour format – like natural, flat or LOG.
You can tap all these settings to bring up controls that allow you to change them.
One major change to the UI of Filmic Pro is the introduction of this box that pops up from the bottom. Here you get various choices depending on which button you press. Lens picker, mode picker, analytics, white balance and things like that.
Tap the centre of the screen to send this box away again. Or just tap the button you used to open it.
The cog button top left opens up settings, laid out pretty much as they were in the previous versions.
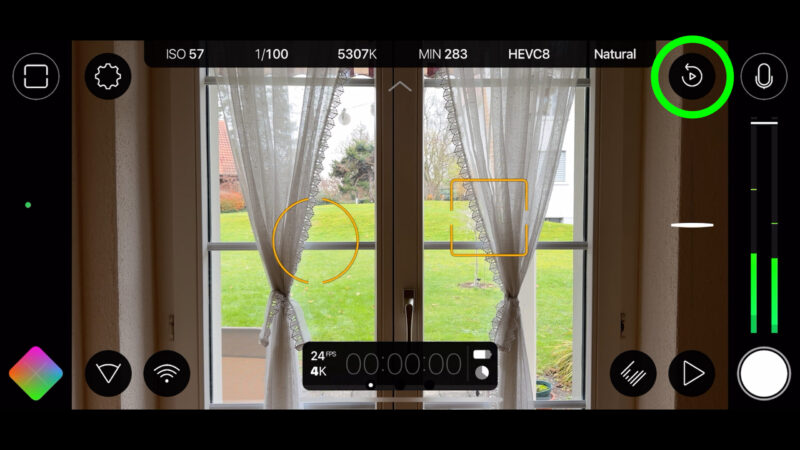
A new feature is the assignable function button, top right. This allows you to create a quick access button to one setting or feature which you can choose from a long list. For example, you can set it to play back your last recorded video, so this is great for quickly checking your last take.
Above the audio level meter we have a button which gives us access to audio controls. In the centre at the bottom we have the time counter as before, frame rate and resolution displayed, as well as battery level and remaining memory.
Tap this to show switch to histograms. Other buttons are familiar: bottom right is the record button, next to that is the gallery button, next to that the analytics button, in the bottom left is a button which opens colour controls.
Setting Exposure & Focus
There’s various ways to set exposure & focus using Filmic Pro.
If we open the mode selector, we get 3 choices. Firstly we can use the reticles, the circle and the square. Second choice is to use a centre weighted method. The last choice is to set shutter speed, ISO & focus manually, as you do in a regular camera.
If we open the top information bar, we can see shutter and ISO settings.
Reticle Mode
In reticle mode, we can swipe the screen to move these reticles. The reticle that deals with exposure is the circle.
Move the circle to where you want the camera to take the exposure reading. As you move it, you can see the ISO and shutter speed changing in the top bar.
If you now move the camera, it will adjust exposure depending on what’s in that circle. However, if you tap the circle it goes red and exposure is locked. You can see that ISO and shutter speed in the top bar are now also red and have a padlock beside them.
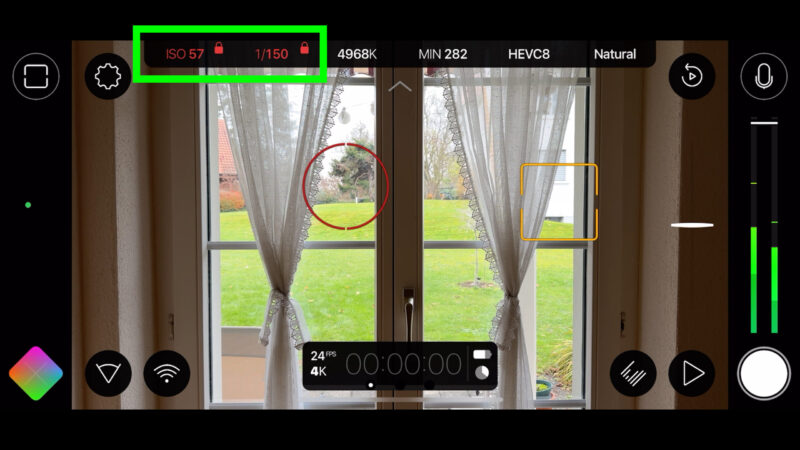
With exposure locked, when we move the camera the exposure does not adjust. You can see that the ISO and shutter speed settings at the top don’t change.
Move the focus reticle to set focus to whatever object you place it over. Again, tap to lock.
Centre Balance Mode
If we switch to centre balance mode, the reticles change and move to the centre. Exposure and focus are now set using the middle of the screen. The exposure reticle is the larger reticle, and the square focus reticle is now located inside it.
You can tap these reticles to lock them, just like the moveable reticles. This mode is useful if you’re filming yourself or a subject in the middle of the frame.
Manual Mode
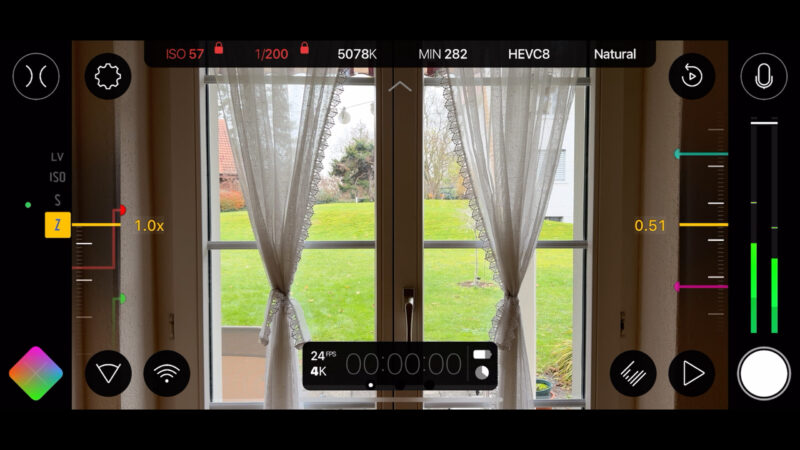
In manual mode the reticles disappear and we get a control slider on each side of the screen. Left is the exposure or zoom slider. Right is the focus slider.
The left slider has 4 different modes which you can select by tapping the mode or swiping the modes until the one you want is highlighted.
Rotating Shutter
Did you know that old photo cameras and movie cameras had different types of mechanical shutter? While photo cameras have shutters that open and close, for example a leaf shutter, movie cameras have rotating shutters. A rotating shutter is a disc which spins as the film is fed through the camera mechanism.
The disc is set differently to increase or decrease the shutter speed. And that’s where the idea of a shutter angle comes in. The main reason to adjust the shutter angle is to control the amount of motion blur recorded.
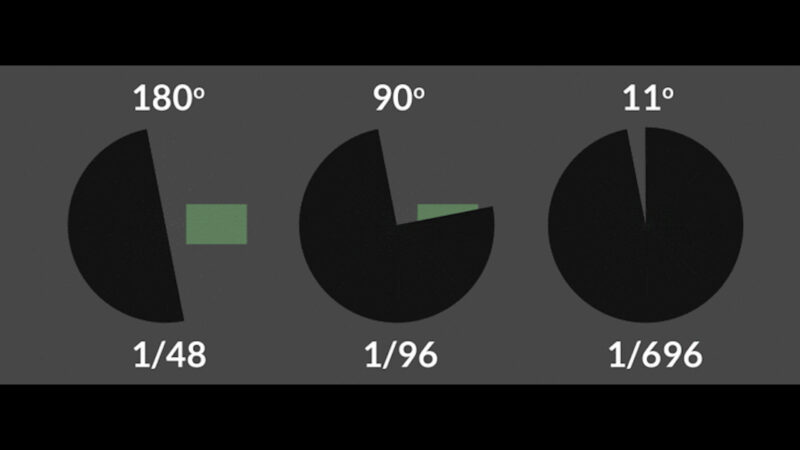
A 180° shutter angle is considered normal, which means the shutter is open half the time and closed half the time. And as nearly all films are shot at 24fps, that means the shutter is open for 1/48th of a second. And that’s how we get this combination of 24fps frame rate and 1/48 shutter speed when emulating the look of film with digital video cameras.
Manual Exposure
In manual mode, there’s now 3 ways we can adjust exposure. First we have LV. When we move the slider in this mode, Filmic Pro v7 adjusts shutter speed and ISO together. Wherever you set this, exposure will be locked when you stop moving the slider.
Next is ISO. Swipe the slider to set a specific ISO number. Then we have shutter speed. Again, swipe to set a specific shutter speed.
If you find this too small and fiddly for your fingers you can open a dedicated ISO or shutter speed slider. Tap ISO or shutter speed in the top bar. A box opens at the bottom and you can now use this slider.
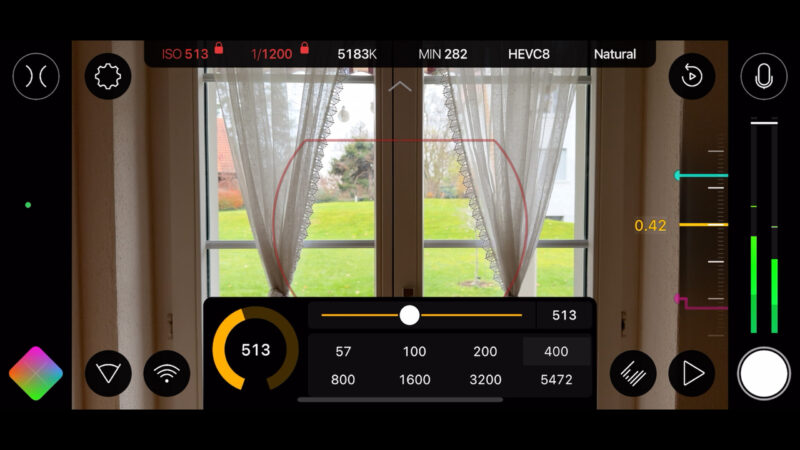
There are also preset ISO and shutter speed numbers, so you can just tap those. And if you tap the number in the circle, you can input an exact number using a keyboard.
Note that you will now find your exposure reticle has reappeared, locked and red. If you tap to unlock it, the box will slide away and you will return to auto exposure. However, you still have your manual focus slider on the right.
This means you can set focus manually while exposure is set automatically.
How to Use a Single Reticle
If you just want to use a single reticle, you can open or close one of the sliders by swiping from the left or right. This means you can set exposure manually at the same time as autofocus and set focus manually with exposure in auto.
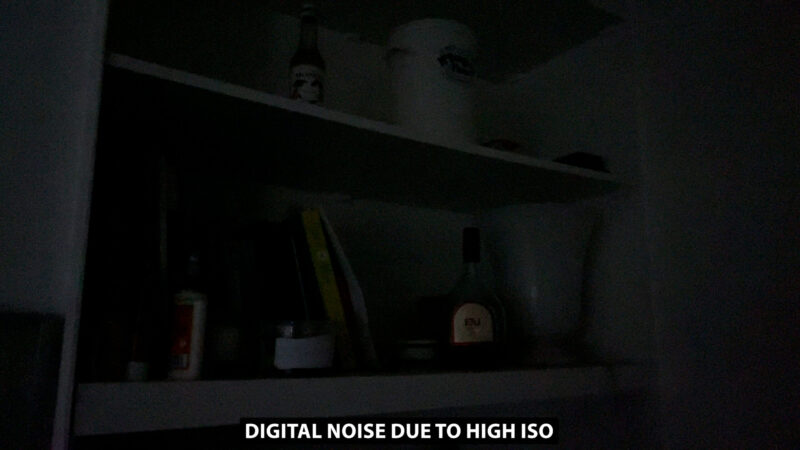
High ISO and Fast Shutter Speed
We usually try to keep ISO as low as possible. The reason for this is that high ISO is more likely to create digital noise. On the other hand, a fast shutter speed reduces motion blur and makes video look a little harsh. Usually, we want smoother looking video which is created by slower shutter speeds.
How to Set Resolution & Frame Rate
To change resolution and frame rate using Filmic Pro v7, tap the cog button and then choose video. Resolution is under the encoding tab and frame rate is under the frame rate tab.
You can also reach this menu by tapping the MIN (or minutes remaining) number or the current codec and bitrate in the top bar.
How to Change Lenses
To change lenses in Filmic Pro v7, tap this button in the bottom left of the screen, which looks like a triangle with one curved side. The lens picker box slides up from the bottom and now you can choose available lenses.
Either use the slider or tap the lens at the bottom here. In this device, which is iPhone 14 Pro, I have 0.5x ultrawide, regular wide which is the main camera and 3x telephoto. You will see the field of view changing on the left.
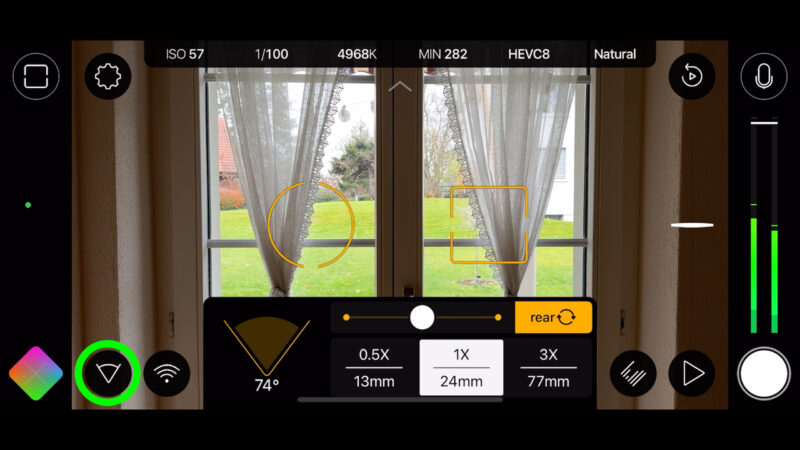
To switch between front and rear cameras, tap the yellow button with the circular arrows.
Different Lenses, Different Character
The main difference between the different cameras in your phone is between getting a wider but more distant view, or a narrower but closer view. As you can see, when we change the lens, Filmic Pro v7 shows you how the field of view of the lens changes as well as indicating the equivalent in mm.
What this means is when you use a telephoto to get a closer view of a subject, you will also see less background. On the other hand, if instead of using the telephoto we move closer to the subject so that the subject is the same size in the frame, we will now see more of the background.
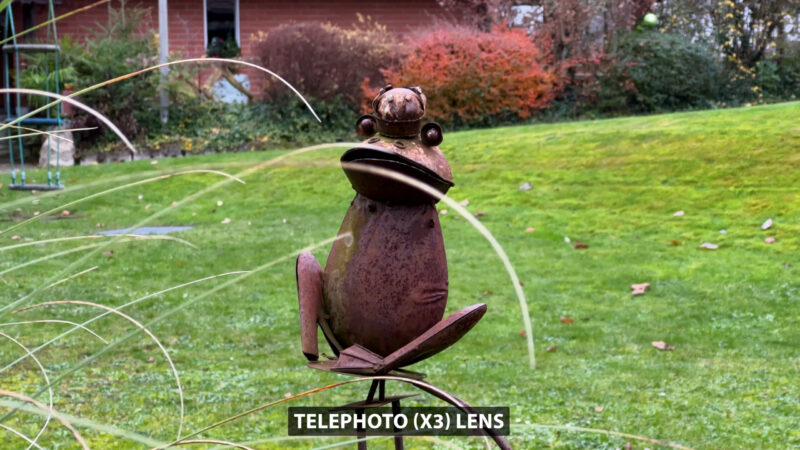
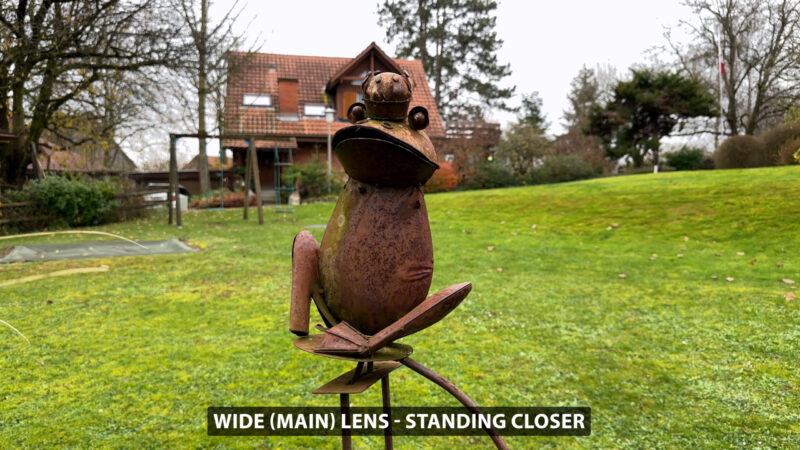
Therefore, choosing to use the tele lens is not just for the convenience, there is also an effect on the look of the image.
How to Zoom
There’s 2 ways to zoom in and out using Filmic Pro v7. First, you can use the slider on the right, which is a bit of a relic from the old Filmic Pro or you can use the left side manual control slider. Just select the Z and then swipe the slider.
If you use the side slider you will see the magnification number. So this is useful if you have an exact magnification that you need to remember for some reason.
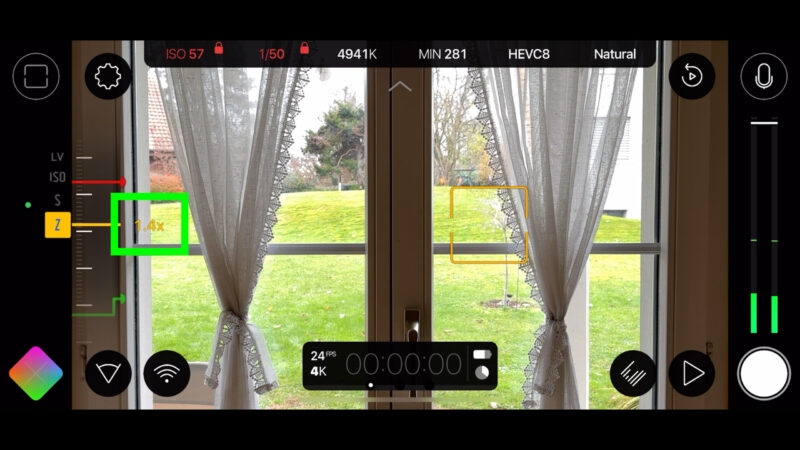
The zoom sliders in Filmic Pro will not switch lenses. So the zoom will only apply to the lens you have selected.
How to Playback Clips
To playback clips you have recorded, tap the gallery button which is this triangle in the bottom right corner. Then just tap a clip to open it and it will automatically start playing.
You can pause the clip as well as skip 15 seconds back or forward by tapping buttons with the number 15. Tap the X button to close the clip, then tap the screen to remove the gallery.
You can also set the customisable function button to play the last clip you recorded.
How to Use the FN Button
A new feature that comes with the Filmic Pro v7 overhaul is the button in the top right. This button can be set as customised from a list of possible functions.
Long press on the button to open up a menu. You can choose from any of these or tap the plus button in the corner of the menu, to open another menu of functions.
Choose one and now the button will perform that function whenever you tap it.
How to Adjust or Lock White Balance
Normally, when we want a professional looking video, we lock exposure, focus and white balance. If we leave them on auto, they can change during the shot and this can look messy. This is especially true of white balance.
In Filmic Pro v7 there are 3 modes for white balance: fully auto, fully locked, or lock on record.
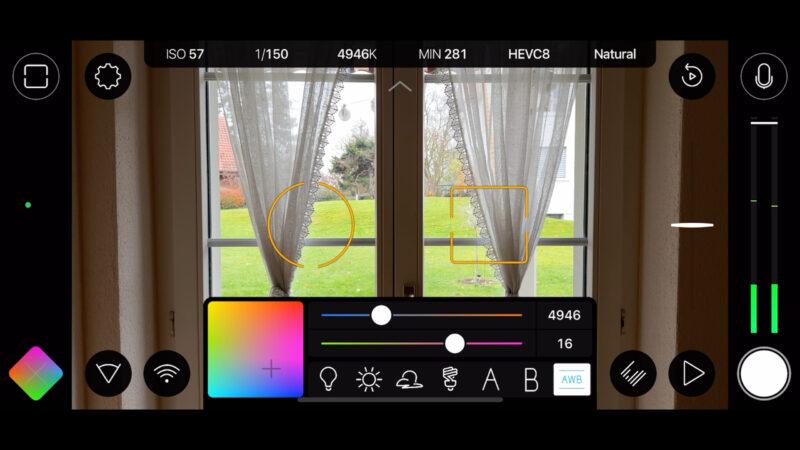
Tap the colour temperature reading, which is the number followed by a K in the top bar. The box pops up from the bottom, now containing white balance controls.
On the left of this box is another box which is a visual representation of the current white balance setting. The top slider is temperature, the bottom slider is tint.
If you slide the temperature slider left and right you will see the cross in the box move up and down. If you slide the tint slider left and right you will see the cross move left and right.
Bottom right is a white button with the letters AWB, which stands for Auto White Balance. When the letters are blue, it means you are in fully auto mode. Tap and it becomes red, which is fully locked. Tap again and the letters change to yellow, which is now “lock on record” mode.
With lock on record selected, white balance will be set automatically until you start recording, at which point it will lock until you stop recording. This setting is a good compromise between fully auto and fully locked. It will still set white balance automatically for you, but it won’t change during the shot.
Thing is, white balance can be corrected when you’re editing, but if it changes during a shot it can be much harder to correct.
At the bottom of this box are a number of preset white balance settings. The A and B are custom presets. To save a white balance setting just long press on A or B and tap save. When you tap these buttons, the saved preset will be loaded.
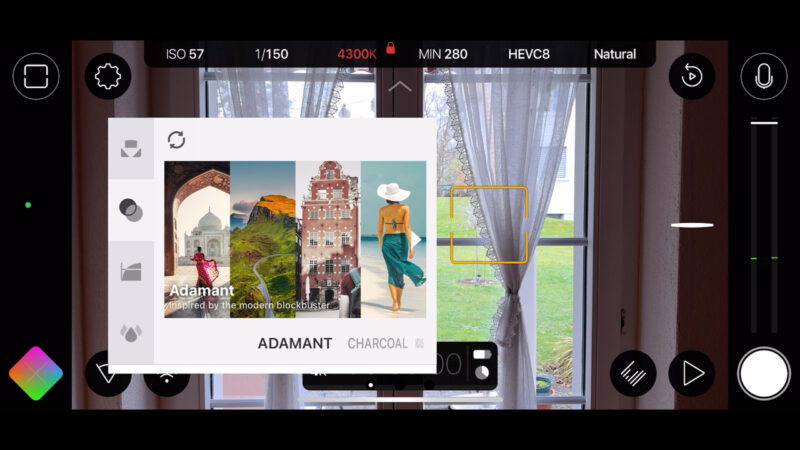
The colourful box in the bottom left corner opens up a new set of controls, which also contains the same white balance controls. But now there’s extra options. There’s looks which add colour filters to your video, there’s the flat and log settings, and finally some manual colour balance controls.
How to Use Audio Controls
There’s 2 places to find audio controls. Tap the microphone button above the audio levels. A box pops up at the bottom containing some audio controls.
A toggle switch allows you to choose whether to use automatic gain correction for the audio. If you switch this on, audio levelling effects will be added such as compression. Below that is a slider to control your overall audio level. Then below that is a control to choose which of your inbuilt mics to record with.
So that covers your basic audio controls. But if you tap the cog button and then tap audio you open up a menu which contains the same controls we just saw and some extra ones too. You can change the quality of the audio, enable bluetooth mics and so on.
If you tap the audio levels, they will change appearance: you can either have a simple display or with DB numbers and peak level indicator. The white line on the audio meter is also a slider which you can slide up and down to adjust overall audio level.
How to Record LOG Footage
Filmic Pro v7 allows you to record with 4 different colour profiles: natural, dynamic, flat and LOG. To choose, just tap the last item on the top menu bar, here it says natural.
The box pops up from the bottom and we have 4 choices. Natural is the same profile you get from the native app of your device. Dynamic adds more contrast, while Flat reduces contrast. Finally, we have Log V2 which is Filmic’s 8-bit Log profile.
If you select Log, you will see the image now becomes washed out and contains less contrast than the natural profile.
Did you know that Kodak invented the Log format in the early 1990s? They came up with the idea of using a Log (which is short for Logarithmic) profile to help them better scan film when converting it into a digital image.
The idea is now supported by many types of digital camera. A Log profile offers a wide dynamic and tonal range, which should allow more flexibility when applying colour and style choices.
How to Record 10-bit Log
If your device allows, you can switch to 10-bit colour and this then allows you to choose Filmic’s Log V3.
Tap where the next item on the top bar menu left of the colour profile. In this case it says HEVC8. Where it says 8-bit, tap and change to 10-bit. Now when you open up the colour profiles again, you will see you have Log V3 instead of Log V2.
Using 10-bit colour means your video clip will retain much more colour information than regular 8-bit. So this is useful when you come to colour grade your Log footage. On the downside 10-bit files will be bigger than 8-bit files.
Filmic provides a free LUT which you can download from their website, which converts their Log footage to standard Rec.709 footage. And if you use LumaFusion it comes with these LUTs pre-installed and ready to use.
Once you are in 10-bit colour you will notice you now get different colour profiles. We now have Linear and HLG instead of Dynamic and Flat.
How to Record ProRes
If you have a recent iPhone, Filmic Pro v7 allows you to record in the ProRes codec. ProRes is a professional level video format which retains more image information than the more compressed codecs which our phones normally use.
On the downside, ProRes files can be up to 30 times bigger than the HEVC files iPhones normally use for video. This means moving and storing ProRes files can be more of a challenge.
Tap the relevant button on the top menu bar or tap the cog and tap video.
Tap where it says 8-bit and now you can choose ProRes 709 or ProRes 2020. The latter choice is to be used if your final output is intended to be in an HDR format.
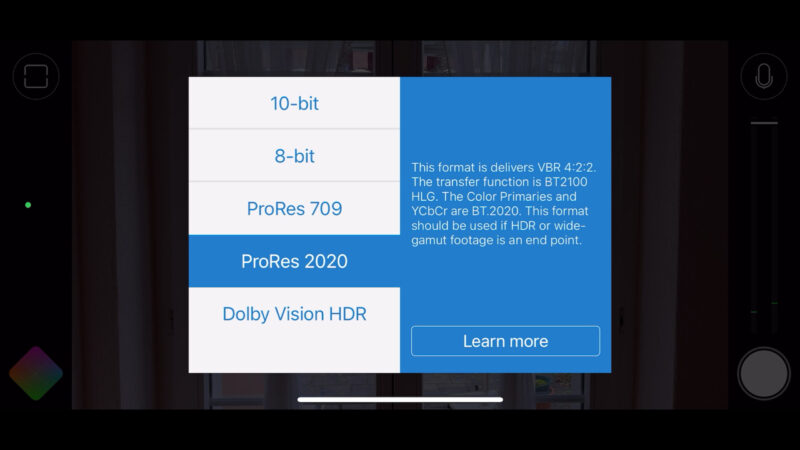
Depending on your device, you will be limited in resolution and the use of Log formats. Using my iPhone 14 Pro with 256GB of memory, I can shoot ProRes 709 using Log V3. But using ProRes 2020 I cannot also choose a Log setting.
With devices which have 128GB memory, I believe ProRes is limited to 1080p resolution.
How to Record Dolby Vision
If you want to record video In Dolby Vision then you can also choose that here. Dolby Vision is a HDR format which requires compatibility with whatever you are using to playback. For example, if your laptop screen can’t play HDR then at best you won’t be able to see the benefit, or worst it will look overexposed and washed out.
If you want to edit your Dolby Vision footage you will need to set the correct colour space in your editing software. If you don’t, again it can look washed out.
How to Use Live Analytics
Live analytics gives you a set of overlays which can help you expose and set focus correctly. Tap the button in the bottom right corner which is made up of a series of angled lines. The box pops up from the bottom and now you have 4 choices.
When you have it set to Reactive nothing happens until you adjust exposure or focus. Adjusting focus adds a focus peaking overlay, adjusting exposure adds blue zebras which indicate the darker areas of the image.
If you choose Zebras you will get blue zebras for the dark areas and red zebras for the blown out or white areas.
False colour gives you a range of colours which represent exposure values across the frame. Finally, focus peaking gives you a green outline overlay where the green represents the parts of the image which are in focus.
How to Connect to Filmic Remote
Filmic Pro v7 provides remote monitoring and control via a 2nd app called Filmic Remote. Tap the button bottom left which looks like a wifi signal. Choose control and now open Filmic Remote with another device.
There are various ways to connect, but the easiest is if both devices are on the same wifi service. As it stands, Filmic Remote still uses the old user interface but it does connect.
They have to use the same operating system, so you can’t have an Android connected to an iPhone, for example.
How to Automate Focus & Zoom
The sliders used for focus and zoom have these coloured markers.
This is how to set up an automated focus pull
- Move the focus so that the first object is in focus.
- Press and hold on the slider until the coloured marker moves.
- Move focus to the 3nd object
- Press and hold on the slider until the other coloured marker moves into place.
- Start recording
- Tap the slider at the end you want it to move towards, or the end of the little coloured marker
- The slider now moves slowly from one point to the next point
- Stop recording
The zoom slider works in exactly the same way. In the previous version, we were able to adjust the speed of the focus pull or zoom. Filmic Pro V7 doesn’t yet have this, but Filmic say this is something they are working on and it will return in later updates.
Filmic Pro V7 Tips
With the zoom slider and the audio slider in this area, when you swipe from the right you might find you accidentally hit them. Which is annoying, but could be worse than annoying if you don’t notice you did it, and only later find out you have no audio on your clips or you’ve cropped in 20% and lost image quality.
First thing you can do is remove the zoom slider. Go into settings (cog) and then device and Hide Zoom Rocker.
Instead of swiping you can long press on the focus reticle to bring up the focus slider.
Hopefully, Filmic will allow us to also hide the volume slider as well, because I think it’s quite easy to hit swipe this by accident.
Videography – Beginner to Advanced
If you want to know more about filmmaking, my book Smartphone Videography – Beginners to Advanced is now available to download for members on Patreon. The book is 170 pages long and covers essential smartphone filmmaking topics:
Things like how to get the perfect exposure, when to use manual control, which codecs to use, HDR, how to use frame rates, lenses, shot types, stabilisation and much more. There’s also my Exploring the Film Look Guide as well as Smartphone Colour Grading.
Members can also access my regular filmmaking podcast, as well all 5 episodes of our smartphone-shot Silent Eye series, with accompanying screenplays and making of podcasts. There’s other materials too and I will be adding more in the future.
If you want to join me there follow this link.

You are 100% wrong about FILMIC Pro users being delighted with the new subscription model. We are now limited in much of what we can do with the new legacy version of something that WE PAID FOR in the first place.
It was sarcasm