Beginner’s Guide to McPro24fps: Tutorial
McPro24fps is a great video recording app for Android, with a depth of features not matched by any other app, including FiLMiC Pro. As far as I’m aware, there’s nothing on iOS to match this either. But, like the name, it is a little complicated.
So, in this article I’m going to go through the McPro24fps features and give you an idea of how best to use this app.
McPro24fps Interface
The McPro24fps interface was recently given a makeover. In fact, on the same day I released the last video about this app, instantly making that video out of date. Thanks for letting me know, McPro24fps people. Just kidding – it definitely needed some reworking.
So this is what it looks like now. I do believe it’s a big improvement.
Like many other apps, we have the exposure controls on the left of the screen and the focus controls on the right. So let’s first look at the exposure controls.
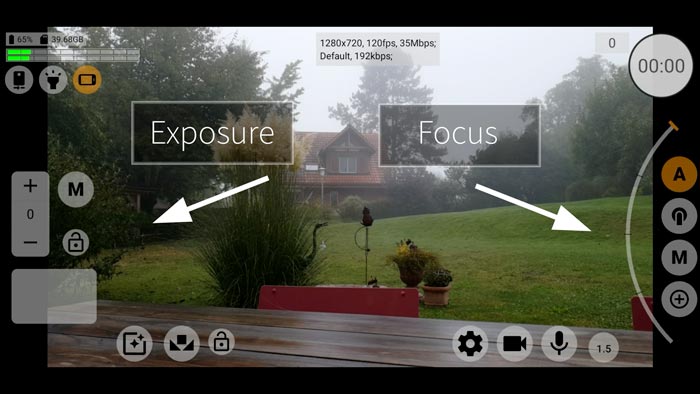
Exposure
In auto mode, the + and – symbols can be tapped to adjust the auto exposure level, brighter or darker. Like, if you just want to use auto exposure but don’t like how it’s turning out. For example, if you find this shot of the room too bright, you can tap the minus sign and adjust it.
Now, if I’m happy with this level of exposure, I can tap the padlock icon and lock it in position.
Below the + and – signs is a box showing you the ISO and shutter speed settings being used by your camera. So, if we unlock exposure, and move the camera, we can see those settings change as the light changes. But if I tap the padlock and now move the camera, those settings are fixed.
The last icon here is the big capital M. Tap that to enable manual exposure.
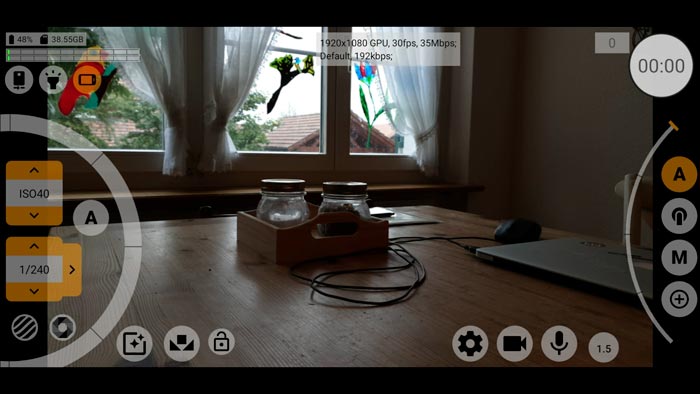
Manual Exposure
The wheel is to adjust ISO. Meanwhile, the shutter speed is contained in a box with 3 arrows. Up and down adjusts the shutter speed. Because the McPro24fps is set to shoot at 30fps, this number now moves in multiples of 30: 30, 60, 120, 240 and so on.
But if we want it to move in multiples of 50, we tap that right arrow. The reason we might want this is to remove that strobing effect we get from artificial lights. So, in countries where the electricity is 50hz, switch shutter to multiples of 50.
The box above the shutter box contains the current ISO setting. Tapping the arrows up and down adjusts the ISO in bigger jumps. 100, 150, 200, 300 and so on. Best practice here is to get roughly where you want with the arrows, and then use the wheel for fine tuning.
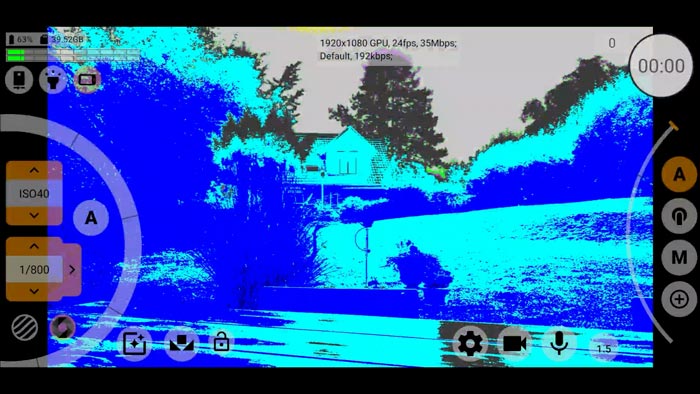
Live Analytics
Below the exposure settings are 2 buttons for live analytics overlays.
The left button enables zebra stripes: black stripes on white for underexposed and white stripes on black for overexposed areas.
The right button toggles on the false colour overlay. This gives you a heat map of the whole image, with hot or red being overexposed and cold or blue being underexposed. As you bring down the ISO the heat map becomes bluer. I think this is how they shot A Scanner Darkly (joke).
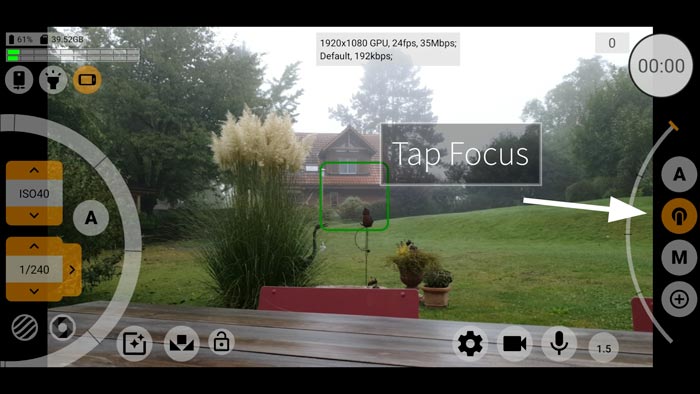
Focus
On the right of the screen is the focus control. At first, focus is set to auto. You can tell as the big letter A button is orange.
While in auto mode, focus will constantly adjust live, even while recording. In this mode, the control wheel becomes a focus meter, letting you know the current focal distance. You can see it moving as you aim the camera at different objects.
Tap focus
The next button down switches McPro24fps to tap focus mode. When enabled, tapping the screen will set focus on the object tapped. This works even while recording, so it’s possible to make a cheeky focus pull using this method.
Manual Focus
To switch to manual focus, tap the button with the big M. The focus meter now expands to become the focus control wheel. Plus, you get a series of new buttons.
Swiping up and down on the wheel will manually adjust the focus.
The two buttons with identical arrows can be used to set the upper and lower focus limit. Basically, these buttons are for performing manual and auto focus pulls. But this is probably an advanced function we can look at later.
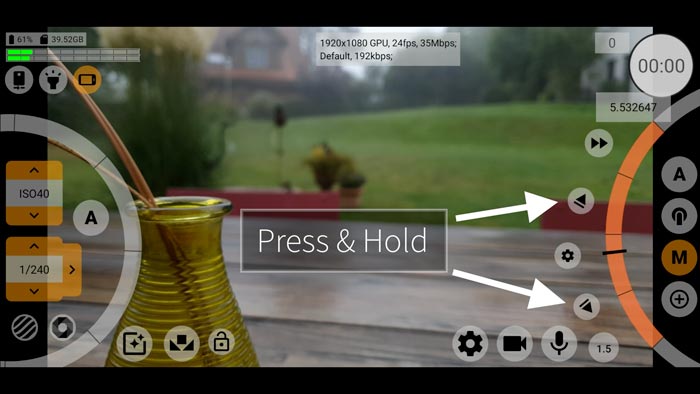
Zoom Mode
Right at the bottom of the focus mode buttons is a button with a plus sign. Tap this to switch to zoom mode. Now the wheel goes green and will control zoom.
Note, tap and hold the Zoom button to switch Zoom Mode.
Frame Rate & Resolution
Below the focus & zoom controls you will find 3 buttons (or 4 if you have a Samsung S9 or S10). A cog for settings and a microphone for audio. But to set frame rate and resolution we need to tap the camera icon.
Setting frame rate and resolution is somewhat more complicated in McPro24fps than with other apps. The apps current frame rate and resolution setting is listed at the top. Tap this to open up another menu.
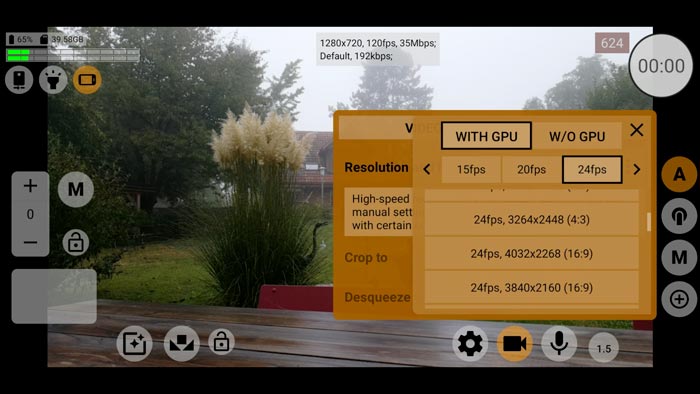
Left and right arrows allow you to select frame rate. After selecting frame rate, you can select resolution from a list below.
Scroll through the list to find your desired resolution. Most have a frame ratio in brackets beside them.
Note that after you select frame rate, until you also select a resolution from the list below, the frame rate won’t change. Once resolution is selected, the app takes you out of the menu and back to the main screen.
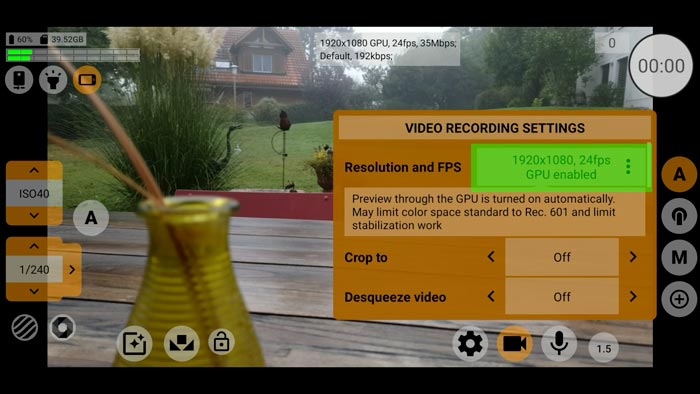
With GPU or Without GPU
At the top of the menu you can switch between 2 options: With GPU or without GPU. I’ve never seen a video app offer this before. And it’s features like this which will appeal to those who like lots of settings to tinker with.
GPU stands for Graphics Processing Unit and some features need to use the GPU while others need it switched off. This means certain features are incompatible with each other.
For example, on my device I cannot shoot 120 fps and use the GPU gamma curves at the same time. Every device has its limits, but McPro24fps allows you the most freedom to experiment with different options and push those limits. And this is where the complexity of the app pays off, if you are prepared to put in the time to explore what your device can achieve.
So, if I select Without GPU, extra frame rates now become available. You can see that these frame rates are in red. This essentially means using them comes with a degree of uncertainty. And that is the same for other settings marked in red throughout the app.
Recording Video with McPro24fps
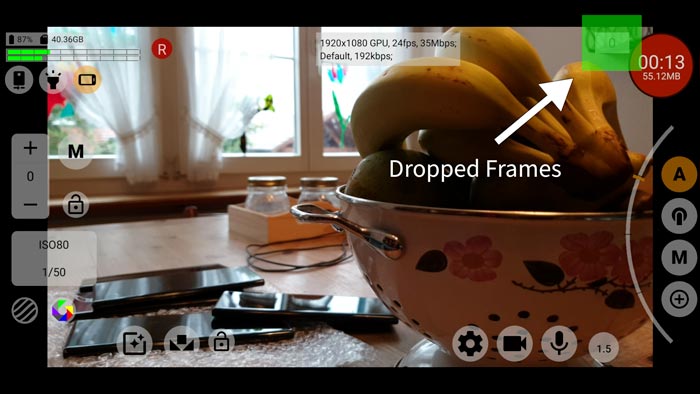
To record video, simply press the button in the top right corner of the app. The time counter is placed within this button. So once you tap record, the counter should start ticking.
Dropped Frames Counter
Another feature unique to McPro24fps is the dropped frames counter right next to the record button.
When recording digital video in any devices, dropped frames can occur. A dropped frame is when the device loses video information or is simply unable to complete the capture of the information. Then one or more frames are dropped – they just go missing.
This can result in jerky, jittery footage as the missing frames become apparent.
Your device is more likely to drop frames when the system is put under pressure. For example, recording at high frame rates, at high bitrates, at high resolutions, or when using a Log colour profile.
So you can see that this dropped frames counter is a great insight into the capabilities of your device.
White Balance
At the bottom left of the screen there is a set of 3 icons.
The padlock icon locks white balance at the current settings. Next to the padlock is the white balance button itself. Tap that to open up the white balance setting.
White balance is in auto by default. To switch to manual tap the red bar where it says auto. Now you can select from a menu, which includes manual.
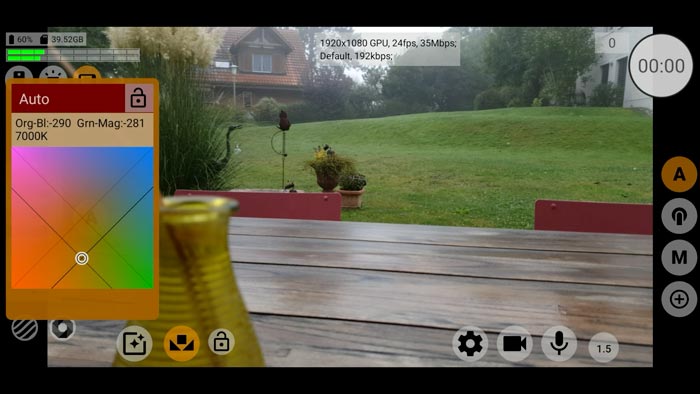
If you tap manual, you now get 3 different ways to set white balance manually. The white balance box allows you to move this little circle anywhere in the box. Moving from top left to bottom right adjusts the tint, while moving top right to bottom left adjusts the Kelvin number.
On the right of the screen, you get a list of temperatures in Kelvin and you simply tap the desired number.
For example, if you are using artificial lights and you know the temperature of the light – like 3600K – then you can just tap that 3600K button.
There’s also Tint and Saturation settings to adjust using these sliders.
Lock White Balance
Now, usually all we want to do is make sure white balance doesn’t change during the shot. So just tap that padlock button and start shooting.
Save Preset
Once you are in manual mode, you can save your current settings by tapping that plus sign at the bottom of the settings box. Name your preset and save. That setting is now added to the list of settings in the menu.
To delete this preset, select it and you should get a minus sign at the bottom left of the box. Tap to delete the saved setting.
Tonemap, GPU Curves & More
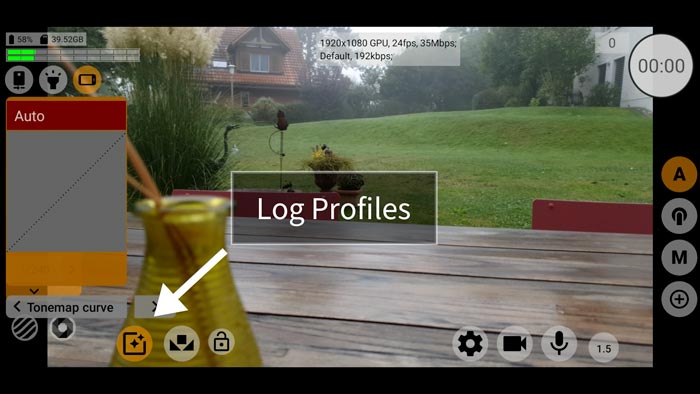
The next button in this row opens up the Log profile manager plus some other settings which alter the look of your video. There’s really a lot of settings here, including 2 menus of colour profiles including Log.
Using the arrows at the bottom, you can switch between them: Tonemap curve, GPU curve, NR & Sharpness and Extra.
I asked the developer of the app what was the difference between Tonemap curve and GPU curve and he said this:
“10 bit RAW > Tonemap Curve > 8bit RGB > GPU Curve” McPro24fps
I asked if this meant the Tonemap curve is better quality than GPU and he said that it should be.
When you select a preset setting, McPro24fps gives you a list of the settings which make up this curve. And all this is editable. Just tap the setting and a slider appears on the right.
NR & Sharpness
Smartphones tend to add a lot of sharpening to the video they produce. This is to make it look crisper, but it also makes it look more digital. If you want your video to look more like film you can reduce the sharpness.
If you tap the red bar where it says off, an empty menu appears. Tap empty and now you can change these sharpness settings increasing or decreasing sharpness.
McPro24fps even allows you to add a little bit of blur. Make sure to add a blur radius, or you won’t see any difference.
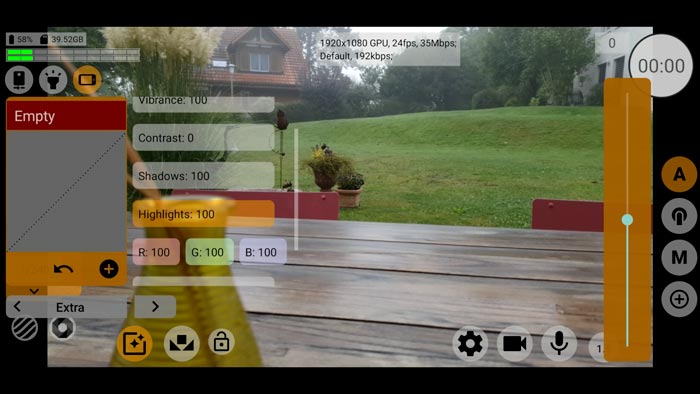
Extra
The Extra setting here even allows you to do some colour grading within the app. Again, tap empty and you will access some really useful settings here.
Want more detail in the shadows? Then tap shadows and use the slider to set it how you want.
Again, each custom setting can be saved using the plus sign button.
Current Settings Info Box
At the top of the screen you’ll find a box containing the current McPro24fps settings. Resolution, GPU status (whether it’s on or off), frame rate, bitrate. The second row is your audio settings: microphone selected and audio bitrate.
Audio
The button at the bottom with a mic icon, next to the camera button, is the audio button. Tap this to open up the audio settings menu. Here you can select the audio source, level, channels, sample rate and bitrate.
Preview
Tapping the cog icon at the bottom opens up a menu called Preview. In this menu you can make a lot of customisations to the McPro24fps app. Switch on various meters like focus peaking and white balance.
Switch lenses
To switch lenses tap the top left icon with an image of a smartphone and arrow. A list appears displaying all the lenses available to 3rd party app developers.
If your smartphone has lenses that don’t appear in this list, then that’s most likely because the maker of your device has hidden that lens.
With my Samsung S9, all the 3 lenses in my device are available. But I know devices with telephoto lenses for example often hide those lenses.
Orientation
To the right of the lens button, is the flashlight and then the orientation button. Tap to switch between auto, then locked landscape and portrait.
Eager to learn more?
Join our weekly newsletter featuring inspiring stories, no-budget filmmaking tips and comprehensive equipment reviews to help you turn your film projects into reality!
AWESOME AWESOME article Simon!
I was torn on which Android video app to purchase. I have now decided to purchase McPro24FPS from watching your videos and from reading this article.
Thank you for sharing you honest and experienced insight on this tremendous app.
Take care my friend!
Patrick (CyberLinkGuy1968)
Awesome app and thanks for the video very useful. I’m an iPhone user so I guess this app is no available on IOS?
Unfortunately it’s android only. thanks for the comment!
Dear mr. Simon..
It’s not a lie that iam your greatest fan..
But how can I get this amazing app if I live in Suriname in South America??
I’ve tried the app store, written to the mcpro24fps people, no luck..
Why is that..
Please help!!
Thank you..
have you joined the Telegram mcpro24fps chat group? I believe there is a free version, but it’s in Russian
Hello Simon, I noticed that MCpro24fps has bad audio quality when I record. More like a limited frequency no matter the audio bitrate, just comes out with wacky audio….
Any fix?
Kann man in der App auch angeben wie lange der Clip aufnimmt z.b. 5 sec oder 10 sec. und dann automatisch aufhört?
Can you also specify in the app how long the clip records e.g. 5 sec or 10 sec. and then automatically stops?