Best iPhone Filmmaking Kit 2021
If you want to shoot great cinematic video with your iPhone, the easiest way is to just use the phone. The latest iPhones can shoot Dolby Vision which pushes it to an even higher level. Adding extra equipment can really boost the production values of your content, whether you’re shooting YouTube videos or short films.
Something as simple as a $25 tripod gives you so many extra options. There’s cases, grips and cages, too. The mic in your iphone is pretty good, but if you want to be truly professional you can add an external mic, so I’ll be looking at the best ones.
iPhones now come with multiple lens options, but I still like to use add-on lenses. Then there’s extras like ND, polarising, and diffusion filters, which all help to make your videos look more cinematic.
The inbuilt stabilization of your iPhone is so good, why do you need a 3 axis gimbal? Well, I’ll tell you why later in the video. Then there’s things like lights and dedicated camera apps which give you more control.
I’ve time stamped everything, so if you’re only interested in a particular type of kit, you can find it easily. I’m also going to give you some tips to get the most from your iPhone & extras.
Best Tripods for iPhone
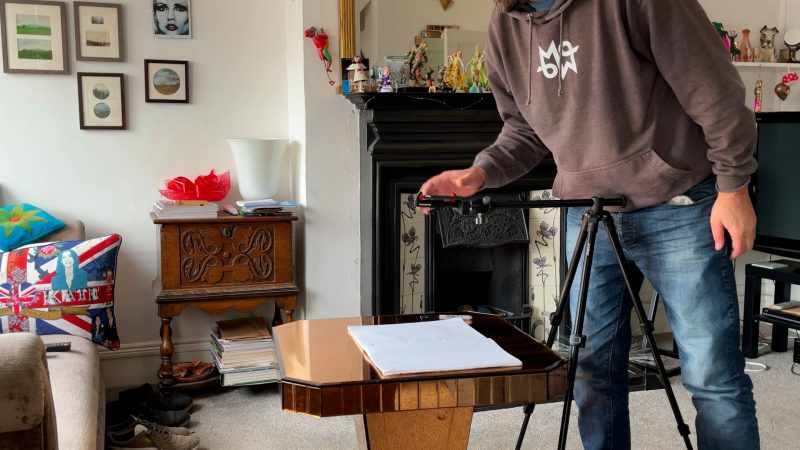
As I film with smartphones a lot, I have quite a few different tripod and monopod options. I have tripods in a range of sizes, which are useful in different situations.
Joby GripTight ONE Micro Stand
You will struggle to find a more convenient tripod than this one made by Joby. Your iPhone clips in easily and you can then rest it on a table or other flat surface. This is the biggest iPhone – a 12 Pro Max – and it fits fine.
What I love about this is how it folds up so tiny and you can slip it in your pocket.
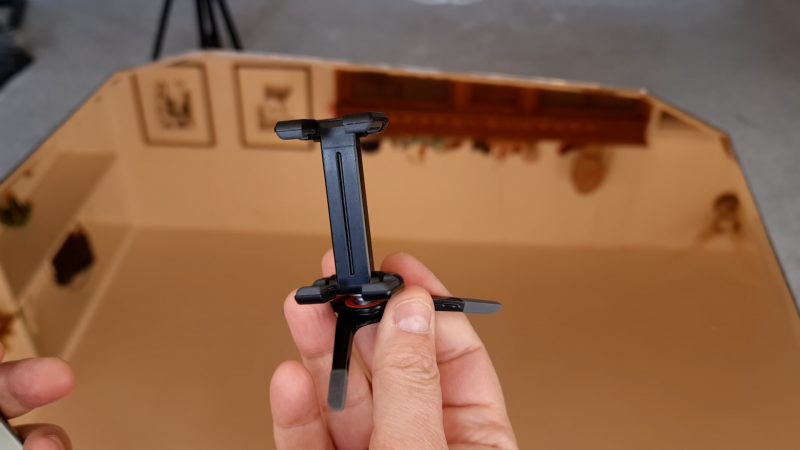
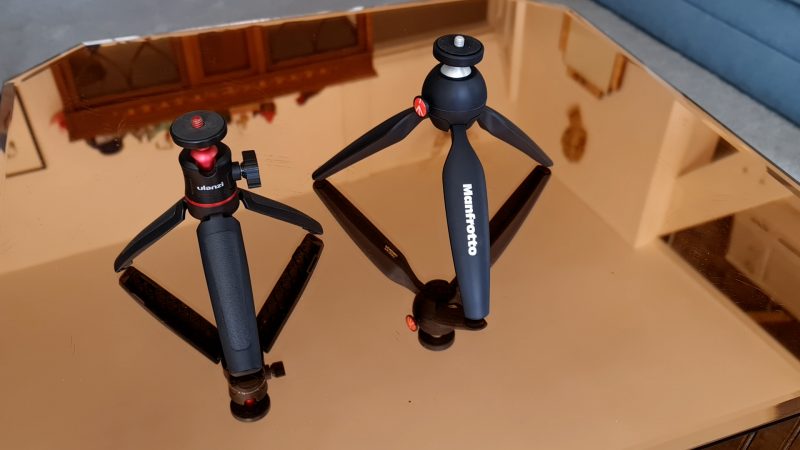
Ulanzi MT-08
The next one is by Ulanzi. This is also pretty small and is good as a mini tripod as well as for vlogging. The legs fold together and become a handle with a rubber grip, then there’s a ball head so you can set it to different angles.
The centre extends out as well for vlogging or if you just want it taller. You will need a smartphone clamp like this to mount your iPhone.

Mpow iPhone Tripod Mount
This mount is nice because it gives you the option to switch from landscape to portrait and it’s pretty solid too. It just attaches to the top of your tripod.
Loosen the jaws of the clamp enough to fit your iPhone in then tighten up again. So that takes a bit longer than the spring loaded clamps. But once it’s in it feels very secure.
This also comes with one of those bluetooth triggers so you can start your camera remotely.
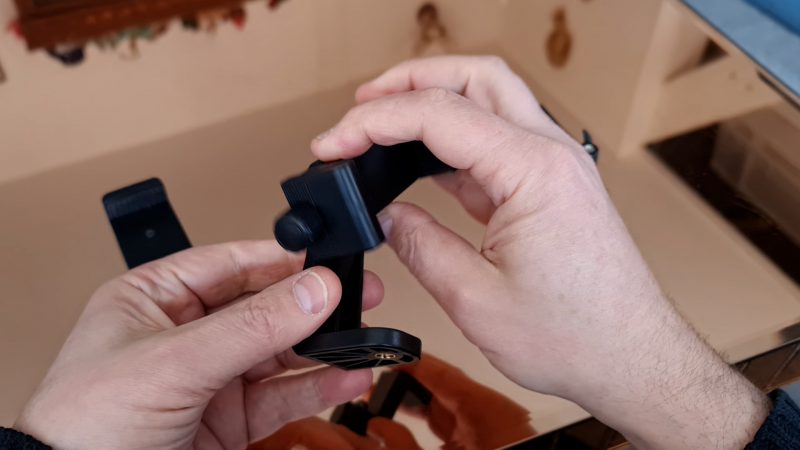
Manfrotto PIXI
The next size up is this mini tripod by Manfrotto. It also folds up and becomes a handle. It’s very sturdily made and feels pretty solid.
The USP of this tripod is the quick release ballhead. You just press this in, shift the camera to the angle you want, release and it’s locked in place. You can also use this as a handle extension for a gimbal.
Joby GorillaPod
The gorilla pod has these bendy legs which you can use to wrap around things to get a different angle. You can wrap it around a tree or a post, so this is pretty cool for getting the kind of shots you couldn’t get with an ordinary tripod.
Andoer Tripod
This is my new favourite tripod. I had a small tripod before but it’s not high enough to film myself standing. So I got this one from Andoer and it’s still pretty lightweight.
Another reason I got this was because the central extension part can be set horizontal. When you need to have your iPhone camera shooting straight down onto a table, this is perfect. Plus it extends high enough that I can film myself talking to camera standing up.
Manfrotto Monopod
I bought this Manfrotto monopod to use with a gimbal. You can get some pretty amazing Hollywood style shots just with an iPhone, a monopod and a DJI OM4 or other gimbal.
Plus, you can use it like a regular monopod. Mount the phone and it gives your extra stability for videography or photography.

Best Mounts / Cases for iPhone
There are cases, cages and rigs for your iPhone which perform various functions. They can be used to mount lenses, microphones and lights. They can be used to mount your phone to a tripod. Or you can simply use them to give you a more stable grip on your iPhone.
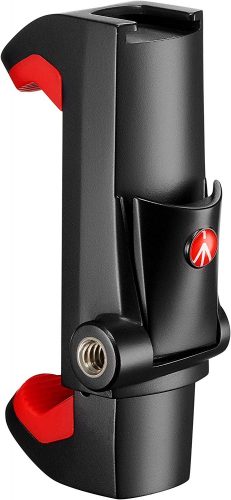
Manfrotto clamp
There’s loads of these clamps for smartphones on the market, which allow you to mount your iPhone to a tripod. They usually start around $8 or so. This is the pro version of a clamp by Manfrotto. It’s plastic but pretty solidly made. The clamp uses a spring to hold your iPhone inplace, but there’s also a lock to hold it more securely.
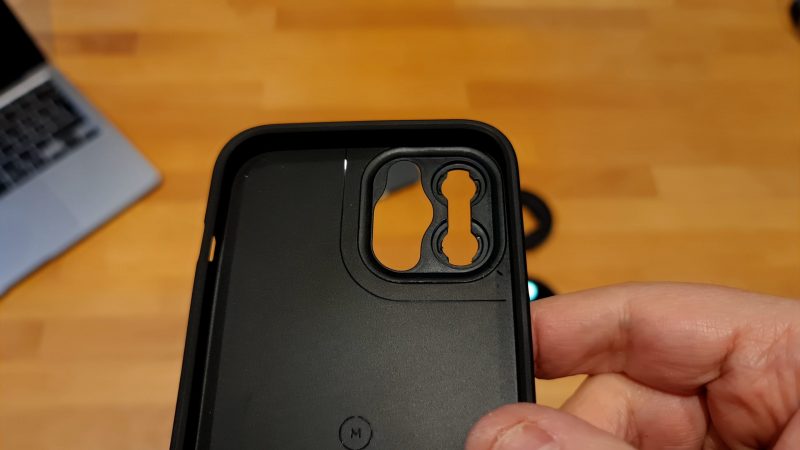
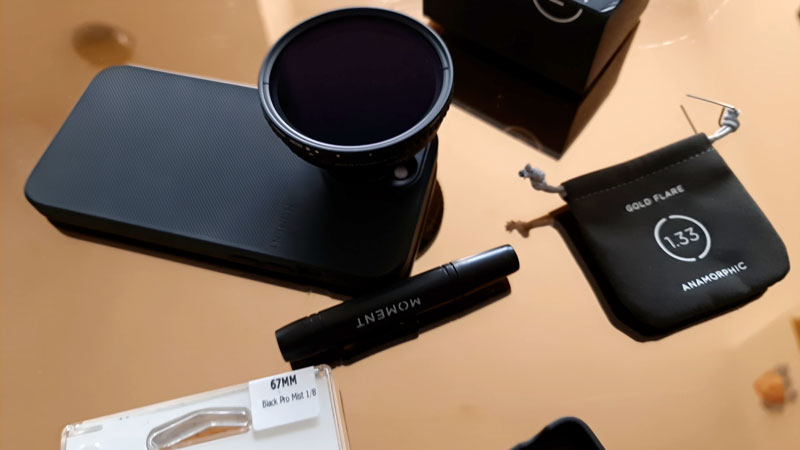
Moment cases
Moment makes some of the best lenses for iPhones. To mount them to your iPhone you will need a case. I have the thin case for my iPhone 12 Pro Max. It’s light and flexible and slips on pretty easily over the square edges of the phone.
Mounting the lenses was a little bit tricky, so I recommend being patient. And perhaps order an extra one of these (the drop-in M-Series lens interface) because it isn’t too rugged.
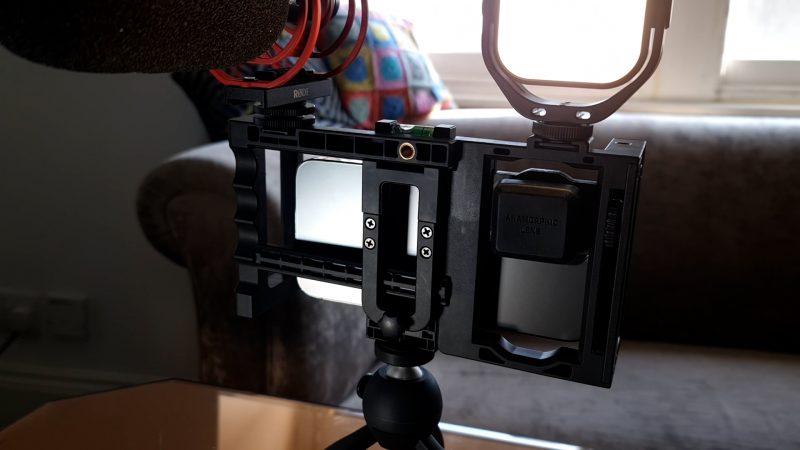
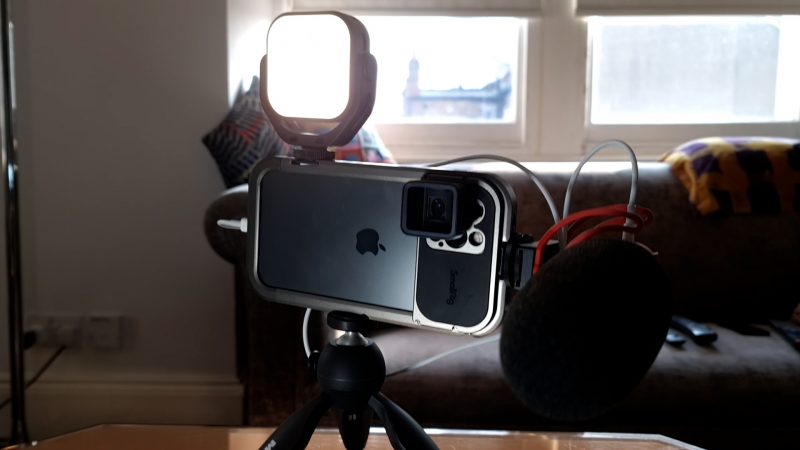
SmallRig Cage / Case
This rig from SmallRig is like a cross between a cage and a case. While it’s made of metal it’s also quite light. You press a button to open it up, slide your iPhone inside and snap it shut. There’s rubber inside so your phone shouldn’t get scratched.
There’s various places to mount lenses, mics and lights. For lenses there are bayonet mounts, so it’s compatible with Moment lenses, Moondog Labs (the bayonet version) and others. In fact, it feels a bit more solid when I mount my Moment lens to the SmallRig case compared to the Moment case. It just snaps in nice and easy.
So you can mount this case directly to your tripod as well. And as your phone is locked inside, it’s certainly one of the most secure ways to mount an iPhone to a tripod.
SmallRig makes extras for this case too, like a side handle or a top handle. Then you can add a light on top of the handle. Built it out to suit your needs.
Add this to a small tripods that doubles up as a handle grip. Add your lights and mic. Now you have a vlogging setup.
I really like SmallRig stuff. It’s not too expensive and it feels pretty well built.

Other Grips & Rigs
Beastgrip was one of the first to make a camera rig for iPhones. This is actually not a Beastgrip, but it looks pretty similar. It’s by Zecti, but they no longer make it.
But you get the idea. Mount your phone into the rig and now you can use these handles to hold it steadier. Plus there’s places to mount lenses, lights and you can put the whole thing on a tripod.
There are a few companies that make these kinds of cages. Dreamgrip make a good one. And, companies like SmallRig, Neewer and Ulanzi offer alternatives for those on a tight budget.
Best Microphones for iPhone
New iPhones have pretty good microphones. There’s no harm in just using the inbuilt mics, if you have no other option. Just try to get as close to the mic as you can.
Audio is really important. I think our ears are somewhat more sensitive to low quality than our eyes. But it’s not too difficult or expensive to upgrade. All you have to do is add an external microphone and follow a few basic practices.
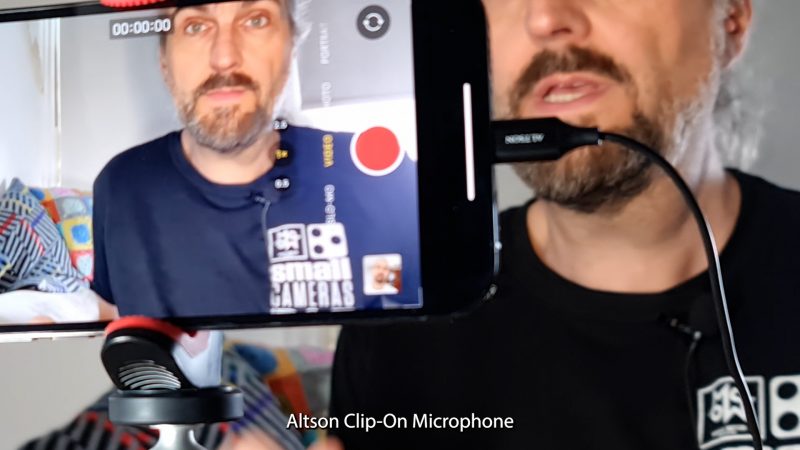
Wired Lavalier / Clip-On
The cheapest and easiest way to boost your audio quality is to use a wired clip on mic. This one has the lightning connector so it doesn’t need an adapter to use with my iPhone. I can just plug it in and my iPhone should automatically switch to using this mic.
You can get them with different length cables, depending on how far you need to stand from the camera. 1.5 meters is enough for me. If the cable is too long it can be a bit annoying having to unwrap it and wrap it up again each time you use it.
Just clip it to your clothes a few centimeters from your mouth. If you’re bothered about it appearing in shot, you can hide it behind clothing, but might need some tape.
When you use a clip-on mic you need to be careful about things brushing against the mic, which will cause a horrible noise and ruin the audio. For example clothes. But also, if you or your subject have long hair, be careful it’s not brushing over the mic every time you move your head.
Comica Boom-X-DMI1
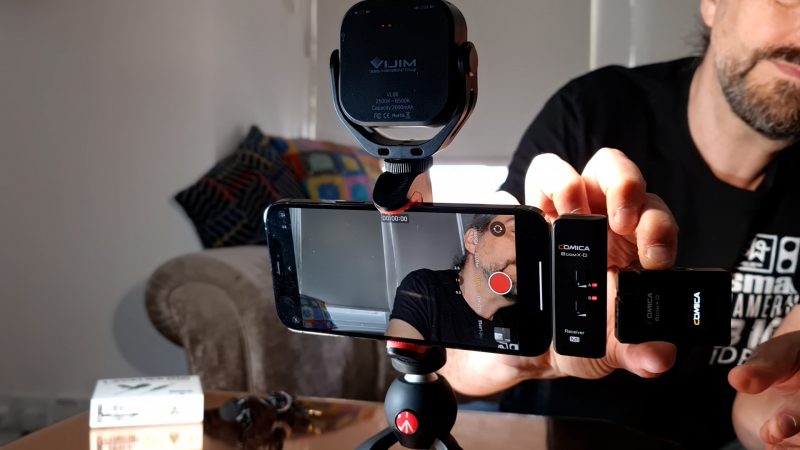
To remove the problem with long cables, you can use a wireless setup like this Comica Boom-X-DMI1. There’s a receiver and a transmitter. The receiver has a lightning attachment so that clips directly into the phone, no adapter needed.
The transmitter has an inbuilt mic which you can use or the kit comes with a clip-on mic, which you just plug into the 3.5mm jack socket.
So you’ll need to attach the clip-on mic to your clothes, as I showed before. And the transmitter you can clip onto your back pocket or something. Now you are free to move around with no cables.
This wireless setup is similar to the popular Rode Wireless GO system. But these kinds of wireless lavalier kits cost quite a bit more. Like 5 or 6 times the price of a simple wired lavalier.
The Boom-X-DMI1 has an internal battery which lasts about 4 hours before it needs recharging. Note that Comica recommends you switch off wifi and bluetooth on your iPhone when using this, to prevent interference.
The receiver and the transmitter pair as soon as you turn on the transmitter. In my experience, it’s very fast and that makes it easier to use. With this receiver you can add a second transmitter so you can mic 2 people at once.
Buy Comica Wireless Lav + Lightning
Rode Lavalier GO
You can also add a different lavalier. So this is the Rode Lavalier GO. It’s more expensive than the wired lavalier I showed you earlier – about double. So it should be better quality. Let’s compare it.
Shotgun Microphones
Apart from clip-on mics, another popular type of mic to use when shooting video is what’s called a “shotgun” microphone. What’s the difference?
Well, whereas a lavalier is omnidirectional, which means it records audio from every direction, a shotgun mic tries to record audio only from the direction it is pointed. The purpose of this design is to reduce background noise and improve the clarity. Basically, you just want to hear someone speaking, and you don’t want the sound cars driving by or dogs barking.
Rode VideoMic
Rode makes a number of microphones specifically for smartphones. The Rode VideoMic is a mini shotgun mic that clips directly onto your iPhone. Or you can use an adapter if it’s not the lightning version.
I’ve used one of these and while it does improve the quality slightly, I would say it’s only about a 10 or 20% improvement. But better than your iPhone’s inbuilt mic, if you are recording voice. For ambient sounds, just use the inbuilt mics.
Buy VideoMic Me (mini shotgun)
Rode VideoMic NTG
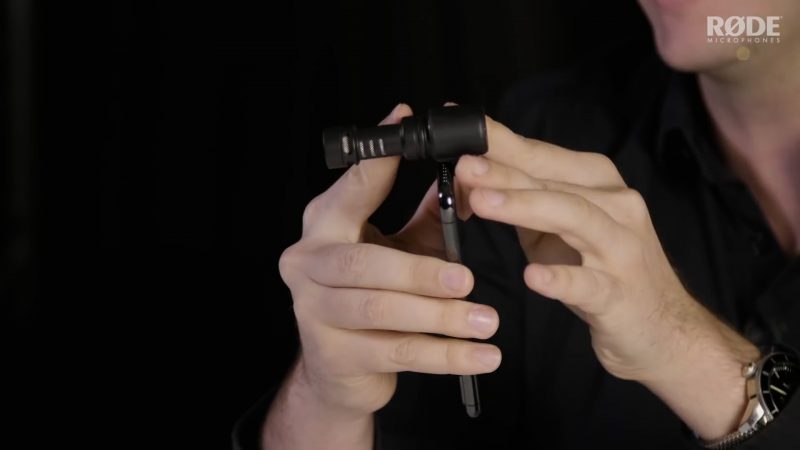
This is the Rode VideoMic NTG. Rode designed this shotgun mic to be compatible with our media creating devices. It’s a great multi-purpose microphone.
You can connect it directly to a laptop or computer, your DSLR or mirrorless camera, your iPad or your iPhone. You can even attach it to a boom pole and use it for filmmaking. However, if your iPhone only has a lightning socket, you will need a special cable made by Rode.
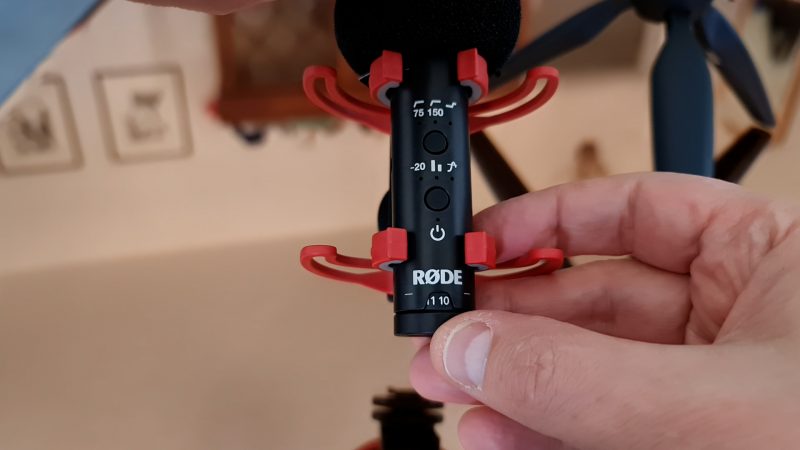
The mic comes with a shockmount and a cold shoe mount, so you can fix it to your iPhone using a compatible clamp, case or cage. There is an internal battery which should last over 30 hours on a full charge. When you plug the mic in, it automatically switches on and off again when you unplug it.
There’s a volume control at the end of the mic. There’s a high-pass filter, pad, high frequency boost, and a safety channel option. The safety channel means your audio records at 2 levels, so if there is distortion in the louder channel you should find usable audio in the lower level channel.
You can also use the 3.5mm connector to connect to a wireless setup like the Rode Go or the Comica unit I just showed you.
Tips for Recording Audio on an iPhone
So here’s some tips for recording better audio.
Firstly, try to avoid sound reflections.
This is a mistake I see quite a number of people make. They might have an amazing, high quality microphone, but then they go and record themselves in a big studio space, all hard surfaces, which causes reflections and it ruins the audio. But if you go into a place where they record audio professionally, the first thing you’ll notice is that the walls are covered in sound-absorbing tiles.
In fact, you can record better audio just using your iPhone if all you do is remove reflections. So how can we remove reflections?
One option is to record in a room with a large amount of soft areas, like carpets, curtains, sofas and so on. Another option is to hang blankets each side of you out of shot. These blankets will stop the audio bouncing off the walls.

If you are using a shotgun mic, make sure it is pointing at the mouth of the speaker or just below. If the shotgun mic is pointing at the wall, then it’s going to pick up those quality-killing reflections. This area just below the chin is a good echo absorber, so aim there.
Don’t forget to unplug the mic before you listen back. Sometimes we record a video and we go to play it back and wonder why there’s no sound. The iPhone thinks you have headphones plugged in so it doesn’t play the sound.
Best Lenses for iPhone
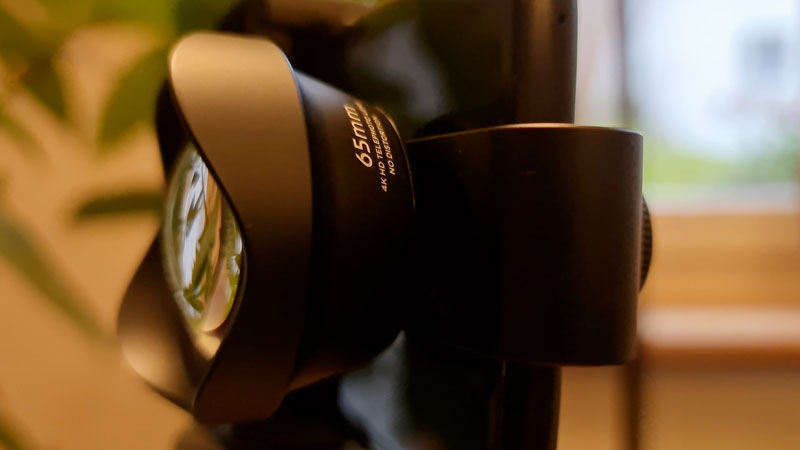
Back in the day when smartphones “only” had 2 cameras, one on the front and one on the back, clever people invented these things called conversion lenses. Conversion lenses are lenses which sit over the existing lens and change the way they look. These mostly consist of wide angle, anamorphic, telephoto and macro lenses.
But now our iPhones come with multiple lenses inbuilt, we don’t need these conversion lenses. Well, actually, I still use them. Thing is, the main sensor performs so much better than the secondary sensors, especially in low light conditions. Plus, on the iPhone 12 Pro Max, the main camera has the sensor shift stabilisation.
So that’s why, most of the time, I prefer to place a lens over the main camera. Unless I’m just filming something quickly, then I’ll just use the inbuilt lenses for convenience.
Also, there are currently no iPhones with an inbuilt anamorphic option. So if we want anamorphic we need to buy a conversion lens.
Another reason to add lenses is that they add character to the image. Digital images are often quite sharp and clean which can be a bit too clinical. That’s why pro cinematographers like using anamorphic lenses, because they rough up the image a bit. Those slight aberrations and distortions just look cool. Not to mention the characteristic lens flares.
Moment Lenses
Probably the best known conversion lenses are made by Moment. They’re great quality and the company has the best range of lens and filter accessories for smartphones out there. And it’s all nicely designed to work together.
I have 2 anamorphic lenses: both the blue flare and the gold flare versions. I have the 58mm tele, which is great. I just place it over the main camera. Plus I have a 67mm filter mount which slides onto the Moment lens.
If you don’t want it to be so big, you can choose a smaller filter mount.
Buy Moment Anamorphic (Blue & Gold)
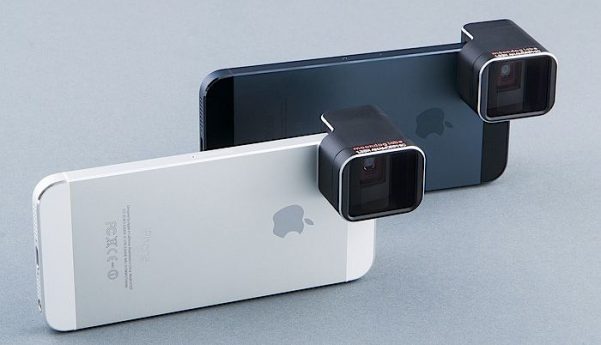
Moondog Labs
Moondog Labs created the first anamorphic lens for iPhone. Sean Baker then had a hit with his feature film Tangerine using this lens, shooting on 2 iPhone 5s devices. One of the reasons he chose to shoot the film on iPhone was the Moondog Lab lens.
I’ve shot a couple of short films using this lens and I really like the look of it. The character it adds to the image is unchallenged, in my opinion.
Apart from Moondog Labs and Moment, there are several other companies who make anamorphic lenses for smartphones. There’s Sandmarc, Sirui, Beastgrip and a few others. The budget option is made by Ulanzi, and they’re pretty nice too.
This is a 1.33x ratio, but you can also get a wider 1.55x anamorphic. Beastgrip, Sandmarc, Ulanzi and probably others make these. This is one by USKEYVISION.
Ulanzi 2x tele
A great cheaper alternative to the Moment tele is this one by Ulanzi. It’s about a 3rd of the price but I have the quality to be comparable. It has a 17mm screw mount and it comes with a clip. However, Ulanzi also make cases with 17mm thread mounts or you can try to find a rig with a 17mm mount, like the Beastgrip cage.
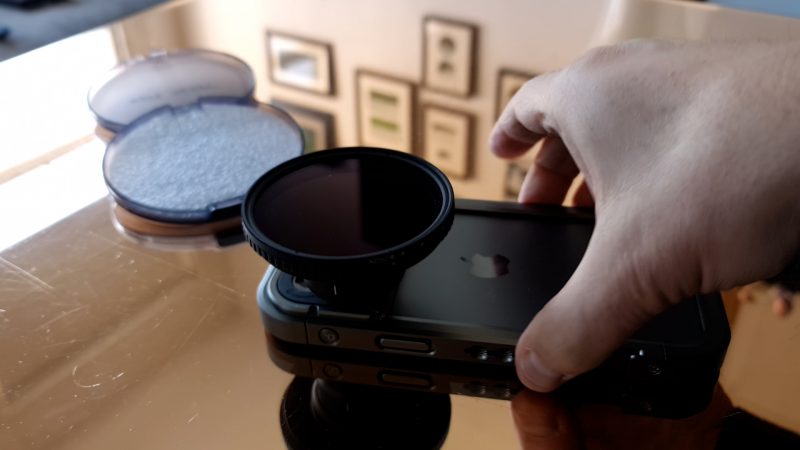
Best Filters for iPhone
Just like lenses, we can add filters to our iPhone cameras to improve the look of our video. There’s ND or Neutral Density filters, there’s PL or polarising filters, there’s also diffusion filters. I have some filters made specifically for smartphones and some made for larger cameras which I mount using the Moment 67mm filter mount.
ND filters allow us to reduce the light hitting the camera sensor if we want to keep our shutter speed slow. This is what we need for the film look. I made a whole video about to achieve the film look, so if you want to know more check that out.
Polarising filters remove glare and kind of clean up the image, adding richness to colours, amongst other things. For example, making skies more vibrant. Meanwhile, diffusion filters soften the light to remove some of that nasty looking digital sharpness and also add blooms around lights.
Neewer VND & PL kit
Neewer makes this affordable iPhone filmmaking kit which comes with a number of filters. There’s a variable ND which means you can adjust it for strength. You can also add a polarising filter.
These are 37mm filters so if you have a 37mm mount use that or you can just use the clip which comes with it.
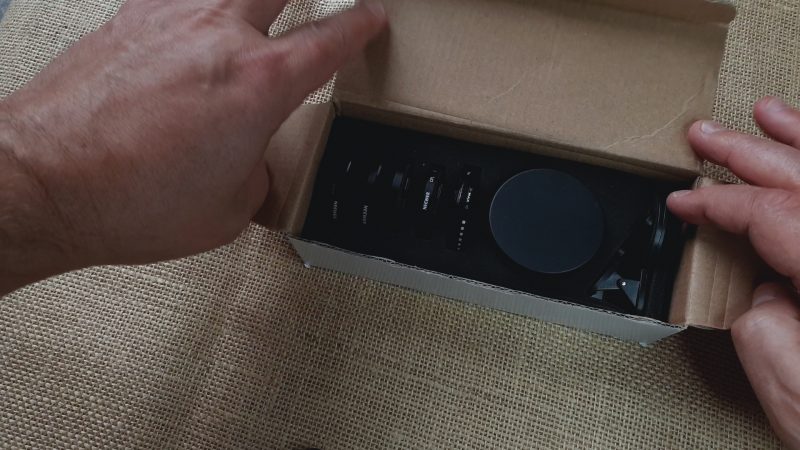
K&F Variable ND
This is a 67mm variable ND filter made to use with regular cameras, which I can mount with my 67mm Moment filter mount. The advantage of having a bigger filter is you get slightly better quality plus less problems with vignetting around the edges.
The downside is the size. I can’t really use this filter with the DJI OM4 gimbal as it hits the arm.
Buy K&F 67mm Variable ND Filter
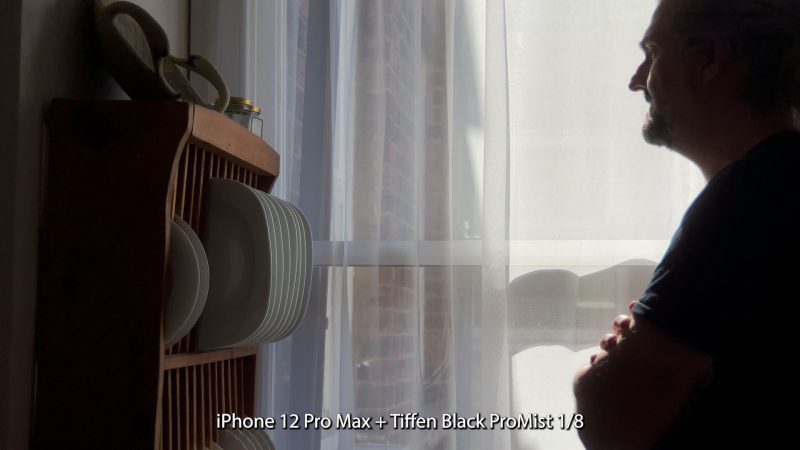
Tiffen Black ProMist
Tiffen makes all kinds of filters but they are well known for their Black ProMist diffusion filters. Professional cinematographers use these to add a slightly hazy look to the image without harming definition. They also create a bloom effect around lights.
Diffusion filters usually come in a range of strengths. This one I have is a 1/8th.
If you like everything made by Moment, they also do a range of diffusion filters. They’re called Cinebloom and come in a range of strengths, as well.
Buy Tiffen Black Pro-Mist Diffusion Filter
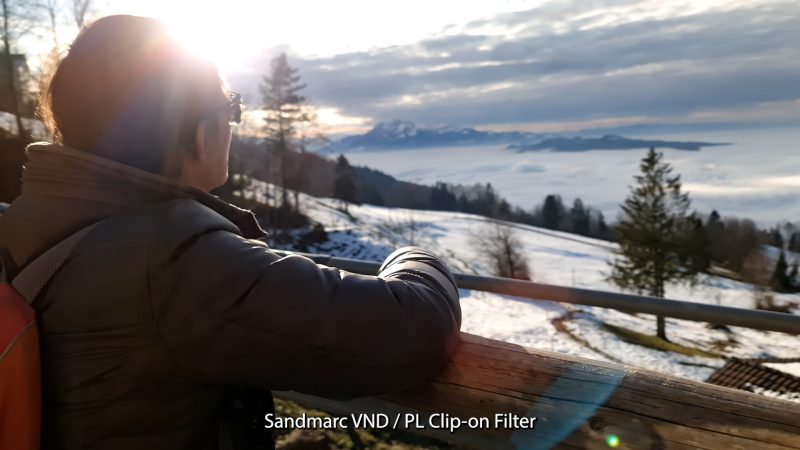
Sandmarc ND / PL
I really like these clip-on filters, which were actually sent to me by Sandmarc to try out. They are ND and polariser combined, which reduces light and glare at the same time.
Buy Sandmarc ND / PL clip on filters
LightChaser Pro
The LightChaser Pro is a filter mount with a hand grip that makes your smartphone feel more like a camera. It comes with variable ND and polarising filters to help you capture cinematic videos.
It’s available from their website for iPhone 11 and iPhone 12 range of phones. You can also add a diffusion filter. Note, you can also mount your bayonet mount lenses using this, such as Moment M-series lenses for example.

Best 3 Axis Gimbals
Recent iPhones have brilliant inbuilt stabilisation so why do we need a 3 axis gimbal?
A gimbal can be used for more than just stabilising your shots. A 3 axis gimbal enables you to move the iPhone in sweeping Hollywood-style movements. Some of these you can shoot just with your iPhone but it’s a lot easier with a gimbal.
They’re also useful for vlogging, walking and talking. Sure you can use your arm or a selfie stick, but if you want the smoothest footage then a 3 axis gimbal is probably the best.
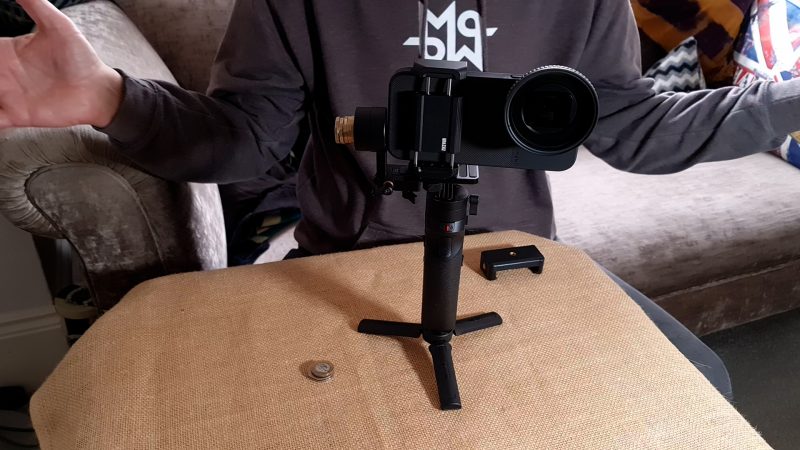
DJI OM4
This DJI OM4 is my current favourite gimbal. It folds up really small and is lightweight. The motors are pretty strong, although not the strongest. However, it handles my iPhone 12 Pro Max, which is the heaviest iPhone.
The Mimo app which you use with the gimbal works really well on iOS. There’s a manual control option, which allows you to choose lenses and set things like ISO and shutter speed. There’s object tracking which is great if you are filming yourself solo. There’s other features as well, like Story Mode which can be fun and a programmable timelapse option.
This allows you to set points so the camera can pan or tilt during the timelapse. Compared to the other gimbal apps I’ve tried on iPhone, the Mimo app is the best.
The downside with these small fold up gimbals is movement can be restricted sometimes. But here’s one tip: if you want to film a low to high shot (or visa versa), hold the gimbal side on. If you try it forwards, it won’t work.
Another tip is, if you add a lens or filter to your smartphone you can use counterweights to the gimbal. This helps to keep everything balanced.
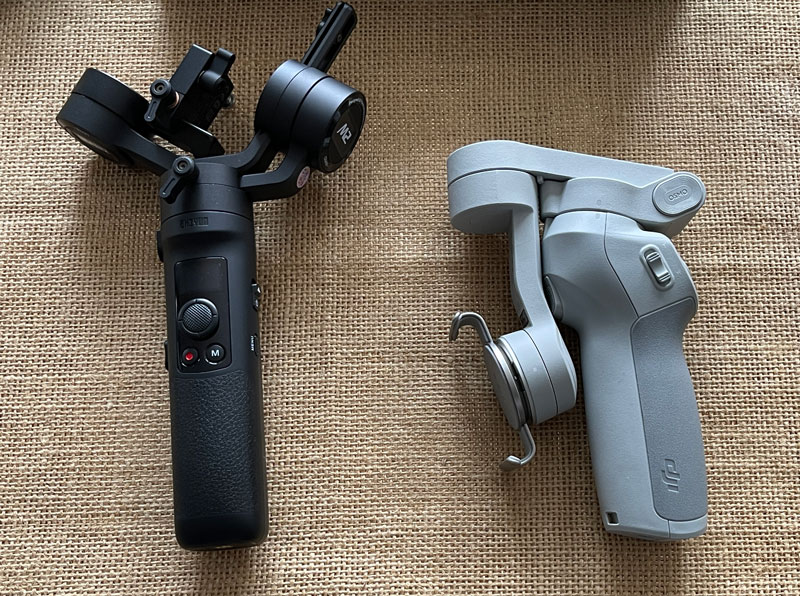
Zhiyun Crane M2
If you want to add filters, lenses, mics or lights to your setup, a DJI OM4 isn’t going to be powerful enough to handle all that. There’s a number of hybrid gimbals designed to work with both DSLR and smartphones. One I like is the Zhiyun Crane M2.
The is a little bigger, but still quite small and folds up neatly. The big difference is in the time it takes to set up. It can be a bit tricky to balance using a smartphone, but I found 3 different ways to do that. So if you’re interested in a larger gimbal, check out my video on how to balance the Crane M2.
But once it’s set up, this is a great little gimbal and you won’t have to worry you are wearing out the motors. That said, his gimbal is probably more useful for filmmaking than vlogging.
Best Small Light for Vlogging on iPhone
Maybe you want to add a small light to your vlogging setup. Something like this little guy by VIJIM. It has a cold shoe mount so it can work with a cage which has a cold shoe. Like the SmallRig case I showed you earlier in the video.
The light allows you to adjust brightness and temperature. You can also adjust the direction the light is pointing.
Best Camera Apps for iPhone
You can certainly use your iPhone native camera app to shoot great video. But if you want complete control of things like ISO, shutter speed, white balance, focus, as you would get on a dedicated camera, then there’s some apps that help you do that.
I have 5 favourite apps for shooting video on iPhone. So I will just quickly run through them,
FiLMiC Pro
One of the first if not THE first camera app to bring you DSLR-like control over your iPhone. The interface has evolved over the years. This is necessary to accommodate a steadily increasing feature list. In fact, some might find there’s just too many features and it’s a bit overwhelming.
Personally, I think the balance is just about right. Of course, I’m somewhat biased having used the app regularly for a number of years, as well as making a lot of tutorials.
Pro Camera by Moment
The interface is nice to look at, quite similar to Apple’s native camera app interface. It’s not too cluttered, either. Rather than distribute buttons all the way around the screen, on every side, most settings are accessed via controls at each end.
The app has settings for each of their lenses. So if you use Moment lenses, it might make sense to use the Moment app, as well.
One nice feature is the timelapse with a motion blur effect. Movement, like cars or lights moving creates a nice blurred streak effect. And this makes your timelapse a bit more silky and cinematic.
ProTake
ProTake is another app that has a nice, simple interface. It just feels quick and easy. So if speed is more important to you than messing around with settings, this could be the app for you. Everything is just so quick to access.
On the latest iPhones, there’s support for 8-bit, 10-bit, and there’s Dolby Vision. There’s 4 different levels of stabilisation: off, standard, cinematic and extreme. If you use extreme, the monitor becomes heavily delayed but the result is nice smooth footage.
Downside is that the app is paid for by yearly subscription. That said, there is a free version. And the pro version counts for all devices, iOS and Android.
ProCam 8
ProCam was used in the recent Shot On iPhone production by Apple and they produced some amazing results. With just an iPhone and ProCam… and tons of lighting kit production crew and professional post production technicians.
The interface is the cleanest out of all the apps. Controls are very minimal.
One feature unique to this app, compared to the other apps I’m looking at here, is what they call 4K Max video, which requires an extra in-app purchase. This option shoots at a higher 4K resolution than normal – 4032×2268 – which is a 10% higher pixel count than standard 4K.
Beastcam
Beastgrip started out making their famous grip for smartphones, which launched on Kickstarter back in 2014. Since then they have also become known for their DoF adapter, but they also produce other smartphone filmmaking kit such as conversion lenses. Their products are usually high quality, but also at the top of the price range.
The Beastcam app interface has a very scientific look to it and is certainly the busiest of all those reviewed here. There’s all the basic controls we need, laid out precisely around the screen. Personally, the nerd in me enjoys having so much detail in the interface, but it might be distracting for some.
Read more: 5 Best Camera Apps for iPhone
Smartphone Video – Beginner to Advanced
If you want to know more about smartphone filmmaking, my book Smartphone Videography – Beginners to Advanced is now available to download for members on Patreon. The book is 170 pages long and covers essential smartphone filmmaking topics:
Things like how to get the perfect exposure, when to use manual control, which codecs to use, HDR, how to use frame rates, lenses, shot types, stabilisation and much more. There’s also my Exploring the Film Look Guide as well as Smartphone Colour Grading.
Members can also access all 5 episodes of our smartphone shot Silent Eye series, with accompanying screenplays and making of podcasts. There’s other materials too and I will be adding more in the future.
If you want to join me there, follow this link.

I Love your Moblie Motion website, it helps me in a big way, great tips, amazing youtube, and filming is my life but I go to the center called THE VIBE, I do an acting lesson and used a video camera, tech by Cowell and his tech other pupils, I enjoy in the Wednesday. Now I started taking note of your website and my lesson on Wednesdays.
Thanks, Moblie Motion.