How To Record Great Audio On Your Smartphone or iPhone
Are you using your smartphone to shoot video and want to record great sound too? In this article I will look at various strategies to get the best sound. More and more people now shoot video on their mobile device, but the saying goes that audiences have little tolerance for bad audio quality.
There are various ways you can record audio for your video, and various situations too. Whether you are shooting a short film to submit to a festival, filming interviews or working in mobile journalism, you need good audio. So what’s the best set up for your particular needs?
In recent years, companies like RØDE, COMICA and others have designed microphones specifically to be used with smartphones. Usually, these microphones plug directly (or indirectly) into your device to record better audio direct to your smartphone. Meanwhile, other microphones record audio via a separate recorder to sync later.
Use the Inbuilt Microphone
The simplest and most cost-effective method of recording audio is to use the device’s own mic or mics. For example, I capture the voice for my YouTube videos using my Samsung S9 and the native voice recorder app.
At first, I used a the RØDE VideoMic Me mini shotgun. Then I tried my cheap wired BOYA BY-M1 “lavalier” microphone. But, for a voice over audio, I really wanted a richer, close microphone quality.
So then I tried using my Samsung’s inbuilt microphone, but it was picking up too many reflections from the room. In a dedicated recording studio, walls are covered in material which stops reflections (AKA echo). This is because audio quality degrades when reflections of your voice bounce back and enter the microphone too.
Reduce Reflections
To counter these reflections, I placed the smartphone on a soft surface (like a sofa or my bed). Now, my voice hits the sound-absorbing soft surface behind the phone and there’s no reflection. To improve this further, I place pillows or cushions around the smartphone, to create a mini sound recording booth.
With this set up, most of the reflections are removed which gives me a warmer, richer and clearer audio quality. Next, set your voice recorder app to record the highest quality.
On my native Samsung app, the best quality is 256kbps and 48kHz. There’s also the option to record stereo, should you wish to. One useful setting is the “interview mode” which allows you to record audio from the mics at both ends of the device.
The only problem I had with the Samsung voice recorder app was that it only records .m4a files, which are compressed like .mp3 files. So I downloaded a free app called Voice Recorder which has the option to record .WAV files. So the narration audio in this video is recorded using that app.
Lastly, when I am recording I sit (or even lie) with my mouth very close to the microphone. I then use a popping shield from another mic, holding it across the Samsung mic to remove “pops”. If you record without a shield, you’ll probably get pop sounds from spoken “b” or “p” sounds.
This isn’t the highest quality audio you’ll ever record, but it’s pretty good considering I’m just using a native smartphone mic.
Recording Outside
One way to reduce the reflections is to record your audio outside. You’ll find that audio recorded outside has a nice quality to it as open spaces have no close, hard surfaces to reflect back your voice.
However, if your are filming video, recording outside comes with problems. For example, you can’t control the light so well and the weather can also be an issue.
Directional Mics
While the inbuilt microphone of your device might be good quality, the problem is it’s an omnidirectional mic. This means it picks up audio from all directions. So unless the subject’s mouth is a few centimetres from the mic, you will get a lot of background noise and voice reflections.
Background noise combined with an echoing voice make your audio difficult for people to listen to. To reduce this problem, directional microphones were invented. A shotgun mic is a highly directional microphone, meaning it records audio from the direction it is pointed.
Mini Shotgun Microphone
Mini shotgun microphones can be plugged directly into your smartphone with no cable involved. I have the RØDE VideoMic Me which plugs into the 3.5mm headphone socket of my Samsung S9, no adapters needed. However, if your smartphone has no 3.5mm headphone socket, then you will either need a different model or an adapter.
RØDE VideoMic Me
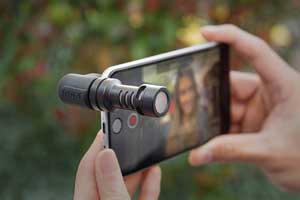
One of the great things about this microphone is it can mount directly to your smartphone. Other similar mini shotgun mics, including RØDE’s VideoMicro, use a cold shoe designed to mount on a DSLR. While you can use these mics with a smartphone, they require an extra grip for mounting.
This mini shotgun is more directional than your smartphone’s inbuilt mic, but for best results you need to be pretty close. If you want to stand at a distance from your camera, you are probably better off with a lavalier (clip on) microphone.
In terms of audio quality, I would say the VideoMic ME is pretty good. Personally, I have used it to shoot one scene in an episode of Silent Eye. The scene was inside a car where it wasn’t practical to take our sound recordist. But I was also close to the actors and the interior of the car, being small and covered in soft material for less reflections, is very good for audio quality anyway.
Apart from that scene, I used it as backup for the rest of the shoot on that episode (The Unlocking Thought). Which means, while I mostly used the audio from the Sennheiser MKH 416 (boom) I had the VideoMic ME audio as backup in case I had problems with the 416 audio.
Shotgun Microphones
There’s a whole range of shotgun microphones, from budget mics and mini mics up to high end mics for professionals. While the VideoMic ME is around £45, the Schoeps CMIT 5U has a RRP of around £2000. Spending that extra money will get you better audio quality, but it won’t remove an air conditioning unit humming or stop your voice reflecting off walls. You’d also need an expensive recording device and other high end accessories.
There are many mid-budget shotgun mics designed to be mounted on top of a DSLR. These can also be used with a smartphone, but will need some kind of grip for mounting.
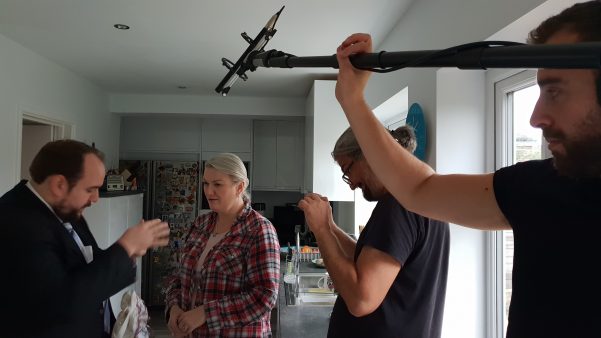
If you are recording audio for a short film and have the resources, then a shotgun mic is best mounted to a boom pole. The microphone is then usually connected to an external recording device. And the whole setup really needs at least one extra person to hold the boom and operate the recorder.
Alternatively, if using for vlogging or podcasting purposes, the shotgun microphone can be mounted to a stand. For example, when talking to camera, then mount the mic about 0.5-1 meter above your mouth, directed down. Again, depending on the mic and connector, you can choose to record directly into your smartphone or onto a separate audio recorder.
Remember, background noise and reflective surfaces still apply, no matter how expensive your microphone. And the further you are from the microphone, the more those 2 elements will ruin your audio.
Sennheiser MKH 416
The Sennheiser MKH 416 is a short shotgun interference tube microphone. This has been a workhorse go-to boom mic for sound recordists and filmmakers for decades. That’s why when I came to shoot my “no budget” feature in 2009, I spent £700 on one of these mics.
I still have this mic, over 10 years later and use it on various projects. I’ve recorded sound for 2 feature films, a web series, a number of short films and promo videos. Plus, when our sound recordist hasn’t been available, I’ve used it for episodes of Silent Eye.
While the 416 is intended more for exterior work, I can vouch that it operates well as a filmmaking all-rounder. This is a condenser mic, so it requires some kind power, usually phantom power from the audio recorder. But there are also batter powered versions.
I have my Sennheiser hooked up to a Zoom H4n via a XLR cable (XLR is a way of connection audio with higher quality and reduced interference). Then the mic is mounted to my RØDE boom via their pistol grip shock mount. To monitor the sound, I use headphones plugged into the Zoom H4n.
Audio recorded with this setup allows me greater freedom when filming, as I’m not tied to the mic. The down side is I need to sync the audio to the video when I come to edit. While this does take a little time, Adobe Premiere has an auto sync feature which speeds things up.
Lavalier “Clip On” Microphones
Sometimes known as lapel mics, clip on microphones are very small and omnidirectional. So, while they can’t be pointed at a sound source, they can be placed close to the subject’s mouth. This is done by clipping them to clothing, either visible or hidden beneath depending what you’re shooting.
A lavalier mic can be connected via a direct cable or you can use the more expensive wireless version. They are useful as external mics for DSLRs, television, theatre, smartphones, iPhones, public speaking, newscasters, sports anchors, interviews, product reviews, general filmmaking and much more.
Advantage number one, you can pretty much forget about the mic once it’s set up. Secondly, the subject doesn’t have to stand close to the camera (if the mic is attached to it). As the microphone is attached to the subject, they can move around and the mic will always be the same distance from the audio source.
Read our full article on how to use a clip on mic.
Best Budget Clip-On: BOYA BY-M1
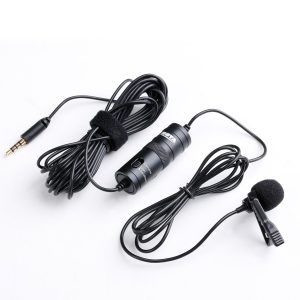
BOYA BY-M1 is an omnidirectional lavalier microphone, with a design friendly to smartphones, DSLRs, camcorders and audio recorders. They are cheap enough that I was able to buy 3 of these mics. I’ve used them for filming Silent Eye (for voice work) and we’ve also used them for interviews (using 2 phones and 2 mics simultaneously).
The BOYA BY-M1 comes with a long cable, so you can get a distance from the camera without too much trouble. The mic connects using a 3.5mm jack, so for smartphones without the 3.5mm headphone jack socket you will need an adapter. For example, for iPhone with no headphone socket you will need an Apple Lightning to 3.5 mm Headphone Jack Adapter.
The BOYA BY-M1 has 2 audio level settings, make sure it’s switched to smartphone (unless you are using it with another camera).
But if you want greater freedom for the subject to move around then you will need a wireless lavalier setup. Make sure to read our 7 Best Affordable Wireless Lavalier Lapel Microphone Kits article.
Wireless Lavalier Microphones
When is comes to wireless lavalier lapel microphones, these microphones have advantages and some disadvantages.
Advantage: No cables means our subjects can move around freely.
Disadvantages: these mics cost more and connection issues add complexity to audio recording.
For recording a vlog you don’t need a wireless system costing $1000s. And for low-to-no budget filmmakers, the cost of pro wireless sets is prohibitive. Anyway, you can get some great sounding wireless kits for much less.
Some systems come with more than one or may allow you to add further mics later, while others are a single mic unit only.
Note on Band Frequency
Traditional wireless microphones operate in the 470-698 MHz bandwidth. Whereas new wireless microphones are coming on the market which use the 2.4 GHz bandwidth (essentially WiFi).
2.4 GHz microphones are a great choice if you only need a few channels and like hassle-free setup. For those who need lots of channels and ultra low latency, UHF mics are still the best choice.
These new wireless systems from makers such as Sennheiser, RØDE and Saramonic generally come with a mic built into the transmitter. But there’s also the option to add a clip on mic, as well.
Comica CVM-WS50(C) & CVM-WS60
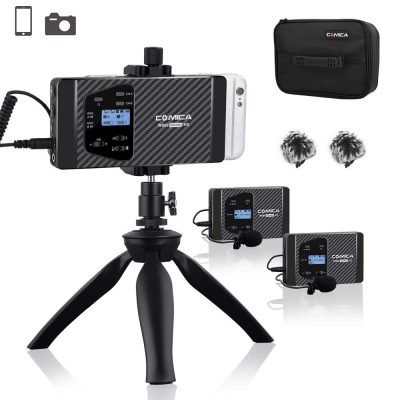
What I like about this wireless lavalier lapel kit is it’s smartphone-friendly design. However, you can use the mics with other cameras such as DSLRs and mirrorless. There are 2 models, a single transmitter/mic and a double transmitter/mic.
What I was looking for was a good quality double mic kit which can connect directly to a smartphone and this fit the bill. Note that ideally you would want the mics to record separately to the left and right channels. Unfortunately, this Comica wireless setup mixes the 2 mics together and there’s no way to get separated audio from each mic.
The kit is 8-channels with a maximum 194 feet (60 meter) range. The quality of the microphone is good, too. In addition, the Comica CVM-WS50(C) & CVM-WS60 both come with useful mini LCD screens.
Again, this can plug directly into a 3.5mm headphone socket. However, for devices with no headphone socket you will need an adapter.
Differences Between Single & Double Unit
The single mic version has a rechargeable inbuilt lithium battery, operates in the 520MHz~526MHz frequency and has has 6 channels. Meanwhile, the double mic kit needs AAA batteries or external power, operates in the 606MHz~614MHz range and has 8 channels to choose from.
External Microphone With FiLMiC Pro
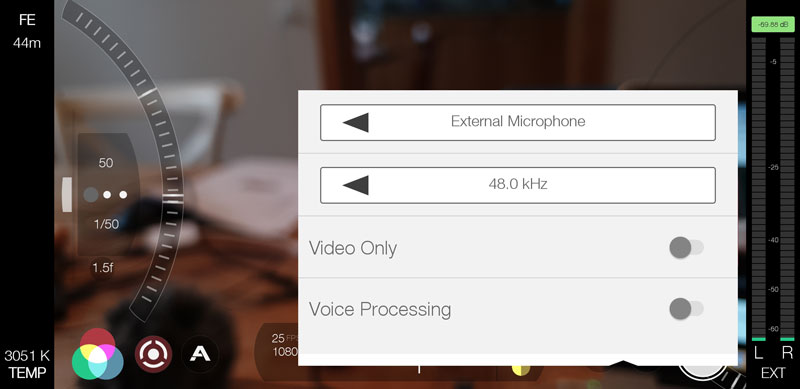
To use an external microphone with FiLMiC Pro you need to make sure the settings are correct. Otherwise, you could find yourself recording with the inbuilt mic even with an external mic plugged in.
- Open FiLMiC Pro
- Connect external microphone
- Tap settings cog
- Tap Audio icon
- Select between external and camera microphone
- Close settings menu
If your device and therefore FiLMiC Pro does not recognise your microphone, then no option to select external mic will be available. So, make sure your microphone is switched on and FiLMiC Pro is open before plugging it in. If the external microphone option still doesn’t appear, then there is likely to be a connection issue between the mic and the device.
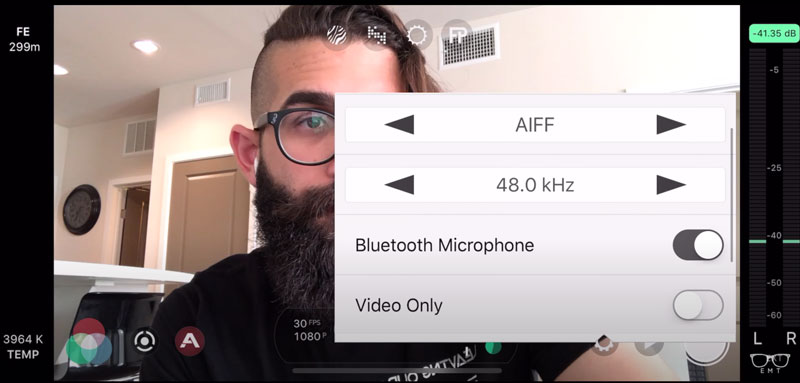
If you have a bluetooth microphone connected to your smartphone, FiLMiC Pro allows you to toggle the bluetooth mic on and off.
Connecting Directly Via Bluetooth
Some microphones allow you to connect directly to your phone using bluetooth. This means you don’t have to worry about connectors, like 3.5mm jacks or iPhone lightning ports.
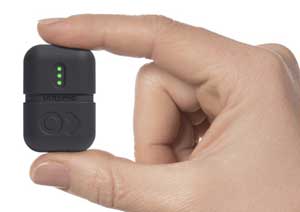
One such microphone is the Instamic. These small devices are a transmitter and microphone all in one little box. Just clip the little box to your subject as if it was a lavalier microphone and hook it to your phone via bluetooth.
How to use Instamic with Filmic Pro on iOS
This is how you can set FiLMiC Pro to shoot video and record audio via the Instamic.
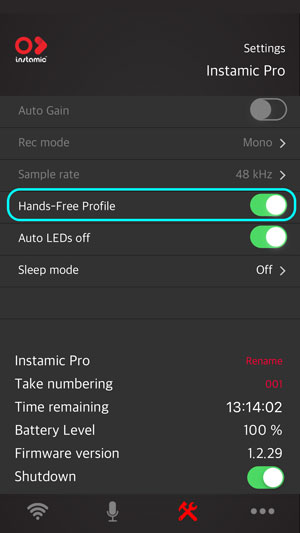
- Launch the Instamic Remote application and connect to your Instamic.
- Go to Settings, Disable the Auto-Gain and Enable the Hands-Free Profile Mode.
- Go to the Bluetooth Settings of your device and pair with the Instamic.
- Two channels should be available and connected. Instamic BLE to trigger the unit and Instamic to stream the audio from Instamic to the phone.
- Go back to Instamic Remote and make sure your Instamic is in Hands-Free Profile Mode on the Connect Page.
- Enable the audio streaming on the Capture Page or press the button on the unit.
- Your Instamic is now streaming its audio feed straight to the phone, ready to be used by any application that supports the Hands-Free Bluetooth Profile.
- Launch Filmic Pro and Enable the Bluetooth Microphone Feature on the Audio Settings.
- Close FiLMiC Pro settings menu.
Alternative Bluetooth Microphones
There are other microphones like Instamic which connects directly to your smartphone via bluetooth. Devices such as the Sennheiser Memory Mic for example.
The difference between this mic and other smartphone-connectable mics, is after you make the connection to your phone via bluetooth. The mic then records audio to itself, rather than sending the audio to your smartphone. The audio then syncs back to your phone’s audio or video after you have finished recording.
In this way, Sennheiser say the range of the mic is virtually unlimited. Read more about the Sennheiser Memory mic.
Issues with Recording via Bluetooth
One major problem that can occur when connecting your mic via bluetooth is audio going out of sync. Sometimes with bluetooth there is a delay between information being sent and being received. Obviously, this is not good for audio syncing.
For that reason, it might be better to record onto the device and sync later, as with the Memory Mic.
Eager to learn more?
Join our weekly newsletter featuring inspiring stories, no-budget filmmaking tips and comprehensive equipment reviews to help you turn your film projects into reality!