Smartphone-Shot Video – Why You Should Think Of It Like Film
In the last 2 and a bit years, I’ve been shooting short films on my smartphone. At the same time, I’ve been researching and writing hundreds of articles on smartphone video production. I learned plenty of things on the way, and I still have a lot to learn.
Smartphones are amazing filmmaking tools. There are certainly pros and cons to using them, the main pros being versatility, ease of use and availability. Without a doubt, you can also teach yourself a huge amount of filmmaking craft using a smartphone.
But it’s also easy to get distracted by shiny new toys. This is true for filmmakers at all levels, and all ranges of equipment. But, if you want my advice, filmmaking knowledge which has formed the foundation of great looking movies over decades is more use than the latest news on bitrates, resolution and LUTs.
How do we make smartphone video look like film?
Your Creativity is Still the Most Important Thing
I remember the late great Jonathan Miller saying he loved stationary shops (shops that sell pencils, pens, paper and more). He said he was addicted to buying fancy pens and clips and whatnot because they promised to release a torrent of creativity. Of course, the fancy pens and paper made no difference because his creativity came from inside.
Yes, it’s tempting to believe a new app, a new gadget, the latest camera or smartphone will open the lock of the deposit box containing our hidden genius. The truth is however that none of this stuff will enable you to make your smartphone video look like film.
I mean, because Pablo Picasso sometimes used ordinary house paint to make his art. Did that make him less professional than someone who had all the “proper” oil paints? I suspect his phenomenal success was down to knowing it didn’t matter whether he used the correct paint, or used correct painting techniques taught in art schools.
But let’s talk about…
Why You Should Think Of Your Smartphone Video Camera Like A Film Camera
More specifically, like a film camera being used in the age before digital editing and colour grading. You know, when all those beautiful films were made like The Godfather and Days of Heaven.
Smartphones shoot very compressed video. Digital compression means discarding information. And this means when you try to adjust colour and exposure later, you can’t adjust too far before the image starts to show banding and artefacts.
In short, smartphones produce video in a format designed for viewing (not editing and grading). Your smartphone shoots 8bit video and uses Chroma Subsampling (4:2:0), plus compression codecs like H.264 and H.265. These are all designed to reduce the size of video files so they can be streamed via platforms like YouTube and Netflix.
This is why films shot with multi-million dollar budgets are eventually compressed into 8bit video, and use Chroma Subsampling and compression codecs too.
Eventually…
The difference is, those multi-million dollar films are shot on uncompressed video. In other words, video which retains all the information captured by the camera sensor. The files are huge and unwieldy. They could never be streamed via your broadband connection.
But those huge uncompressed files are shipped to professional editors with 10s of thousands of dollars worth of editing kit. Those experts then use their science to turn that uncompressed video into something beautiful. Finally, to make it streamable, that video gets compressed into something similar to the video files produced by your smartphone.
So why doesn’t the video you shoot on your smartphone look as good as those multi-million dollar movies?
Smartphone Video Limitations
Smartphone-shot video has a number of limitations, as you would expect of footage shot on a camera housed in a device which you can also use for online banking and email.
- smaller sensors (and therefore smaller pixels)
- smaller housing (things can overheat)
- 8bit colour
- video compression codecs
- Chroma Subsampling (1 colour pixel is spread out over 4 pixels)
- no cinema lenses (unless you use a DoF adapter)
And so on…
But that doesn’t mean you should rush out and upgrade your camera. Because here’s the thing – it’s not about your camera, any more than it’s about paint brands for Picasso. However, the problem comes when you believe this gadget or that app is going to make your smartphone video look more like film. They might even make them look less like film.
Understand Your Tools
Picasso didn’t just “get away” with using house paint, he blew the competing painters away with it. He was able to because he was a fully skilled painter, who knew when to use expensive oils and when to use $1-a-bucket house paint. What I’m saying is, he didn’t choose house paint out of ignorance (or budget). He understood the qualities of house paint, how it would work and how it’s qualities would make million dollar paintings.
Smartphones are designed to shoot video in a delivery format, not a post-production format. You know, a bit like film before digital cinema came along. Except with smartphones we can immediately see what we just shot at the tap of a button.
Because there was a limit to what you could do with physical film once it was shot, they had to get it mostly right “in camera”. And because smartphones shoot a delivery format video, you will create better looking videos by getting it right “in camera” too.
Dynamic Range
Film stocks in the 1970s-1980s only had about 8 stops dynamic range. Meanwhile, they say an iPhone 11 has 10 stops of dynamic range. So how did they shoot The Godfather in 1972 and Days of Heaven in 1978 and make it look better than your iPhone video, without a LUT or a Log colour profile?
The Godfather (1972)
See how soft the light is on the actor’s faces?
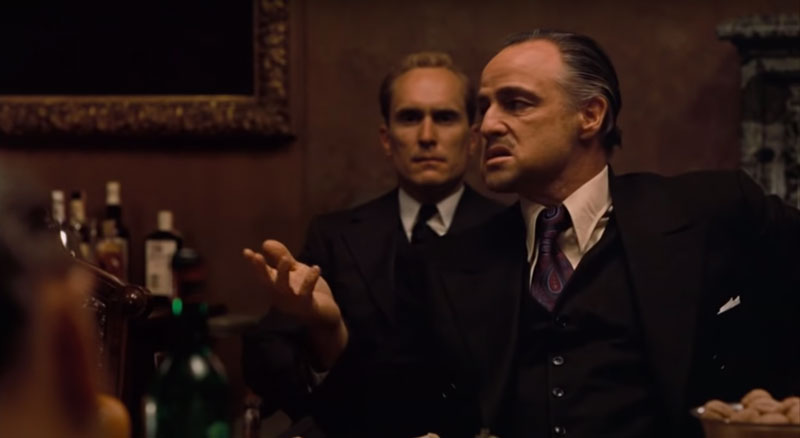
When the studio funding The Godfather (1972) saw the rushes they hated the way it looked, thinking it was too dark. But cinematographer Gordon Willis changed the look of film forever, after this famous mafia movie became a huge hit. After that, more movies were shot with less light and a darker look.
So, if you were filming this scene with an iPhone 11, would it look as good? Well there’s 2 main factors which put you at a disadvantage. The Godfather was shot on 35mm film, which will do better than your small iPhone camera sensor. Plus, they used a range of Bausch & Lomb Super Baltar lenses, which beat your iPhone 11 lenses, especially for shallow depth of field.
But adding extra dynamic range using a Log profile or a LUT isn’t going to make your sensor any bigger or give you shallower depth of field. On the plus side, you already have extra dynamic range to work with, as your iPhone’s 10-11 stops beats their 8 stops.
Days of Heaven (1978)

The cinematography in Days of Heaven (1978) is legendary among filmmakers and film historians alike. The beautiful cinematography helped place director Terrence Malik as one of America’s greatest. The film was shot by cinematographer Nestor Almendros, mostly during what’s known as the “golden hour”.
Notice that the highlights in this frame are around the hair and shoulders of the subject, while her face directed away from the main light. This means her face is lit by a more even, softer light which is more flattering.
If you were capturing this shot with an iPhone, the same would apply as with the previous scene. This is 35mm film stock with Panavision lenses, limited to 8 stops of dynamic range.
Golden Hour
The golden hour is the time of day when the sun is low in the sky, otherwise known as twilight. The natural sunlight at this time is much softer and gentler than during normal daylight hours. Therefore, the light sits very well within the limited dynamic range of film stocks of the time.
So, the trick is to light your scene to work within the dynamic range you have available. If you don’t have time to set up a scene with controlled lighting, then maybe choose a location or time of day that works instead.
Light & Composition
One of the most searched for pieces of knowledge on the internet when it comes for filmmaking, is that magic word “cinematic”. Many of the answers provided free via YouTube and Google involve such things as 180 degree rules, black bars, lens flares and LUTs.
But if you ask an actual working, award-winning cinematographer how they create cinematic images, most will tell you frame composition and light are the key ingredients.
And guess what… both of those elements can be cost free, in terms of money. But to become a master in their use might cost you some practice time. And with your smartphone, you can use trial and error to work on your cinematography skills.
That said, I’m all about enabling people to start creating right away. So I hope to give you enough ideas and inspiration that you don’t feel put off. The creation of art should be simple, so you can spend as much time as possible being creative.
A Happy Accident
Here’s an example from our last film shoot, directed by David Thackeray. This was only supposed to be voice work so we were only recording audio. Then we decided to shoot video too, because why not?
We were shooting using my Samsung S9 at David’s new apartment and, as it turns out, it looks very nice on camera. Compare this frame to the frame from Days of Heaven – is it so far off? One thing that’s missing is the backlight from the low sun in the Days of Heaven shot. But that would be quite easy to add, with a gentle light to the left of frame.
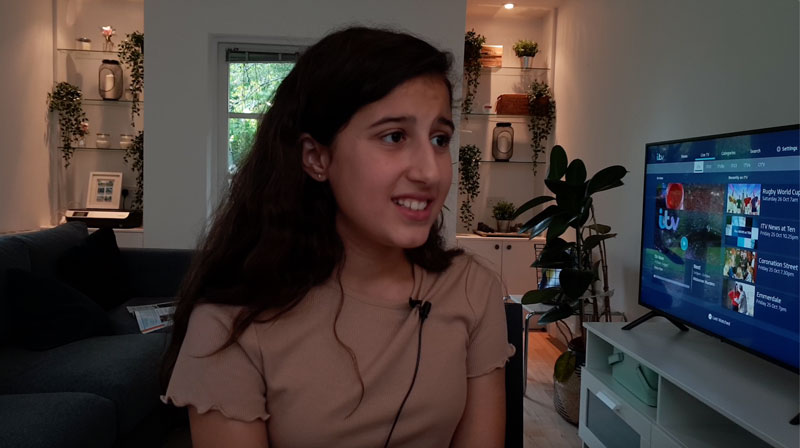
Bear in mind, this was just a reference video and we had no intention of using it in the film. So we didn’t set anything up or add extra lighting. I didn’t even bother to set focus. But I think it illustrates well how a location or a scene can enhance the look of your video.
This frame is pleasing to the eye mostly because the available light sits nicely within the dynamic range of the sensor. And this was without spending any time composing the shot. What I’m focusing on here are the elements within the location which enable better cinematography.
Getting it Right “in camera”
There’s no big central light in the room, instead there’s small down-lighters. Apart from the visible ones in the background, there are others above us, in the ceiling. None of the lighting is harsh, but rather offers a naturally diffuse light which gently brings out the details of the scene. This works very well for the Teia’s skin tones too.
The walls are a light grey, so this helps to reflect more diffuse softer light, as well as offer less contrast in the background. Behind Teia is a window, but being a little below ground and having foliage block the sunlight, the light is again not too harsh.
Direct sunlight coming through the window would mean 1) the window “blows out” (ie goes out of the dynamic range of the sensor so all you can see is white) and 2) room is flooded with overly bright light. And more windows would make it even worse.
In addition, there’s detail (plants, pictures and so on) in the background to make the frame a little more interesting.
But if we wanted to shoot a scene here, perhaps we could work on adding some subtle “fill” light to those black areas. Like the sofa and Teia’s hair, for example. The job would be to try to bring up the light level of some of the shadow details so they fall within the bottom range of the sensor.
Perhaps, if we were truly dedicated, we could bring in a lighter coloured sofa to help keep it within the dynamic range of the camera sensor. Or easier, we could cover the sofa with something lighter (but not white).
Lights, Diffusers and Gels
Rather than use LUTs and/or colour altering software like Adobe Premiere or DaVinci Resolve, get your colours right “in camera”. This means using using lights with adjustable temperature, for example. I’ve written about some affordable small LED lights before and many of them have adjustable colour temperature, like my VL-1 lights.

The number with the K at the end is the temperature of the light in Kelvins. You can also easily adjust the brightness of the light (in this photo the light is at 50%).
When you light a scene, avoid washing everything with a bright light which overstretches your camera’s dynamic range. Instead, start low and slowly increase the light, checking your camera’s exposure reading. Once you have enough even light so that your ISO is low enough to avoid adding noise, then keep your light at that level.
Diffusers
Direct light can cause problems for your camera’s dynamic range. This is because the brightest parts (highlights) and the darkest parts (shadows) reach beyond those 10 available stops. The answer is to use diffusers, dim the light or to bounce the light of another surface.
I worked with a director who used to talk about stuff called “trace”. Basically, tracing paper. This could be clipped over lights to diffuse the beam and create softer lighting.
Gels
You can also use what filmmakers call “gels”. A gel is a coloured filter placed over the light to change it’s colour.
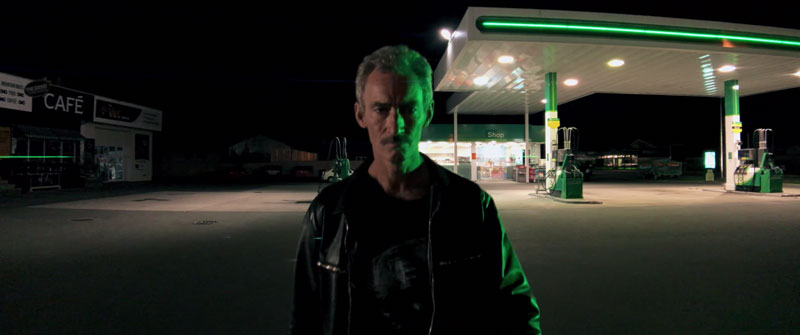
This is a frame grab from one of our favourite feature films shot on a smartphone, Blue Moon. See how they’ve used the green light on the right side to add drama and cinematic quality to the frame. While it feels like the green is coming from the strip light in the top right, it’s too strong (and the wrong angle). Therefore, we can presume they set up a light to the right of the frame and stuck a green gel on it.
The filmmakers will have done this deliberately to match the green strip light and the green of the gas station in general. As I say, it adds drama to the scene but also connects the actor to the environment in a cinematic way. If you tried achieving this effect using LUT or masking and adjusting colour, while it’s possible this way is much easier, faster and almost certainly look better.
There’s also a gentle light on the left of frame. Note, because the actor is wearing a black leather jacket, that is a challenge for lighting. Anything black will most likely lose a lot of detail when the shadows are getting crushed by the sensor.
Reduce the Range of Luminance in Frame
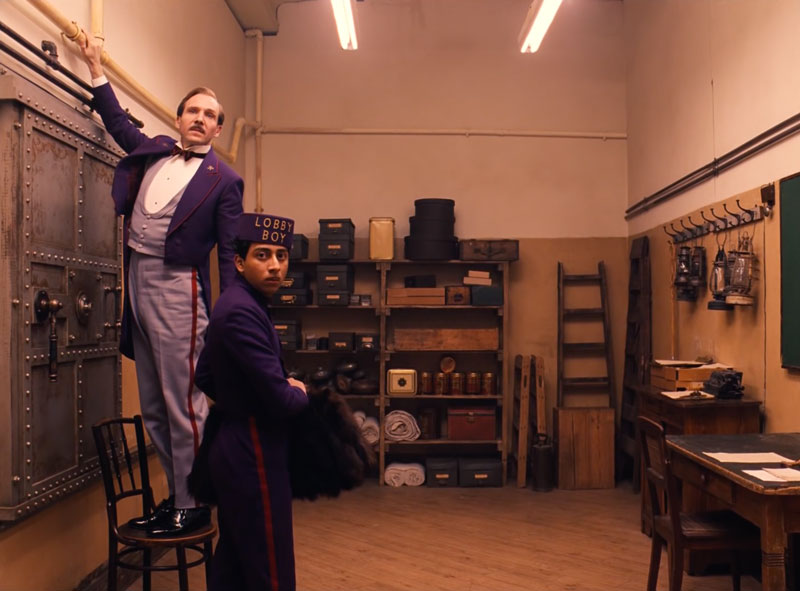
This is a still grab from The Grand Budapest Hotel (2014) by Wes Anderson, shot on 35 mm film. Bear in mind, this has been compressed a few times via YouTube and photoshop.
Notice how most of the clothes worn by the actors avoid black or white. The purple jackets will do a better job at avoiding getting lost in the crashed shadows.
The walls are off-white, cream coloured. Again, this just brings down the range of luminance in the frame. The ceiling lights are likely replaced with reduced luminance lamps and perhaps also using an off white tone. Even the white shirt is likely to have been prepared to be slightly off white.
And this all reduces range of luminance to fit within the dynamic range of the film stock being used.
True Cinematography
While a lot of talk is about elements like Log profiles, LUTs and lens flares, true cinematography is about controlling light. Indeed, it is said that a cinematographer paints with light. And we as smartphone video shooters can film this way too.
One tip is to work from darkness up, as some cinematographers do. This means:
- find a location where you can control the light.
- now, begin to add light slowly.
- keep adding light to create a composition within a frame, like a painter.
This is obviously harder of you have a location with lots of big windows open to daylight. Just remember, in daylight you will struggle to create a nice soft light (unless you shoot during the golden hour).
If you think of digital information like fuel in your car, 8bit 4:2:0 video has much less fuel than 10bit 4:4:4. This means you can’t go as far. Or, in other words, you can make small adjustments later, but try to do as much as possible in camera.
And before you start to feel limited by your camera, remember this is exactly how great filmmakers of the past worked. Thinking more carefully about composition and lighting should help you make your smartphone video look more like film. Because, like the great cinematographers past and working today, it’s all about painting with light.
Eager to learn more?
Join our weekly newsletter featuring inspiring stories, no-budget filmmaking tips and comprehensive equipment reviews to help you turn your film projects into reality!
Biggest problem I find with smartphones is almost all of them are in the 21-28mm range
This is too wide to do every shot on.
It looks weird. I’d rather something like 35-40mm but they are not going that way