How to use White Balance for Cinematic Video: FiLMiC Pro Tutorial
In this article I’m going to talk about the technical aspects of choosing White Balance when shooting video. I’m going to use FiLMiC Pro to show you how you can achieve great looking video with your smartphone and a low-cost camera app.
One of the key elements for shooting great looking video is setting something called “white balance”. This can also be referred to as grey balance, neutral balance or colour balance. As you can see from the common word in all these terms, it’s all about balance.
We don’t talk about focus balance or shutter speed balance, so that’s a good clue to let us know colour works in a different way. Therefore, it will help us as filmmakers and video producers to think a bit differently when it comes to colour.
But what exactly are we balancing?
Red, Green and Blue
If you’ve had anything to do with digital images, at some point you’ll come across the RGB colour model. RGB is an additive colour model in which red, green and blue light are combined to reproduce a range of colours. We use the RGB colour model for sensing, representing and displaying images in electronic systems, such as televisions and computers.

When we set white balance, we are basically telling the camera how to balance red, green and blue. Take a digital image, any image – are the parts that are supposed to be white actually white? If they are, then most likely the other colours are correct too.
For example, a mix of 100% red, green and blue = white. Conversely, 0% red, green and blue = black. Meanwhile, 100% red, 0% green and 0% blue obviously = red. And so on…
So, this is why this setting is referred to as white balance. Because if we get the balance correct for white, everything else should be accurate too.
Why is white balance even more important in low budget cameras?
Chroma subsampling
Many consumer-level cameras, like those in smartphones, use different forms of compression to reduce the size of the video (and image) files. Part of that compression process – such as in h.264 and h.265 files – can involve discarding colour information. This is called chroma subsampling.
As I’ve talked about before, to make digital media manageable, clever people had to work out a way to remove information without humans noticing too much. This is used in h.264, h.265, .jpg, .mp3 (audio), .mp4 and many other files. With digital images, the clever people discovered humans are less sensitive to missing colour than than they are to missing luma information (brightness and darkness).
The subject of video compression is pretty complex and highly scientific. But, to put things simply, smartphones (and other consumers DSLRs and mirrorless cameras) record compressed video to save disc space and bandwidth. On the other hand, more professional cameras record video uncompressed, but then compress the video at the end of the filmmaking process.
Why? Because streaming platforms like Netflix or YouTube need to save bandwidth. And streaming an uncompressed video file over your average broadband connection just wouldn’t be practical.
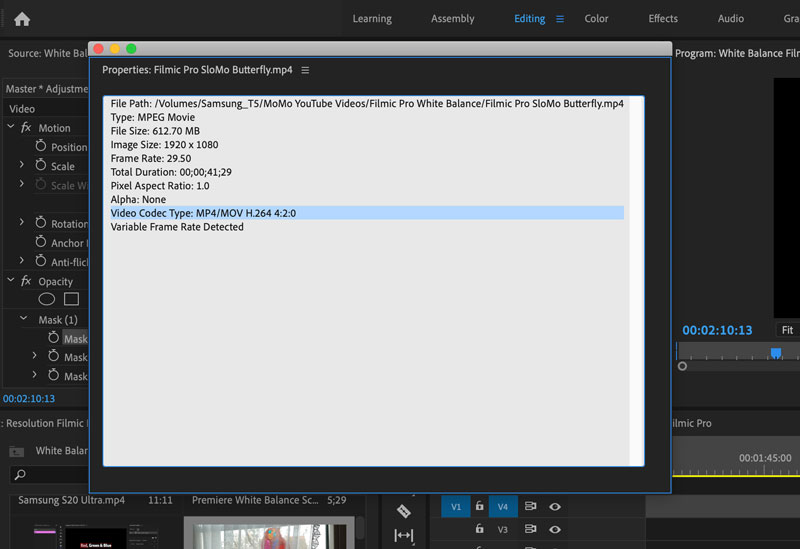
In this image above you can see the properties of a video I shot with FiLMIC Pro using the H.264 (AVC) codec. You can see a set of 3 numbers on the right of the line highlighted in blue. This tells you about the chroma subsampling going on.
By the way, when set to H.265 (HEVC) codec, Adobe Premiere says the file is also a 4:2:0.
4:2:0
When the 4:2:0 chroma subsampling video compression is used, only 1 pixel of colour information is retained for every 4 pixels captured. What happens is, while each pixel records and retains the luma information, 1 pixel of colour information is spread out over 4 pixels. Therefore, when it comes to colour, your h.264 file in fact only has 1/4 of the videos resolution.
For example, if you shoot at HD 1080p, the colour information is actually only recording at 540p. This is one reason why you might want to record video at 4K and then master at 1080p. Because 4K records colour at 1080p resolution, so you will capture colour information for every pixel in your master.
So what does this all have to do with setting white balance?
Get it right in camera
Uncompressed (or less compressed) video files retain (or keep more of) their colour information, therefore there’s greater scope for fixing colour balance in an editing program. These files then go through the post production process, before getting compressed at the end.
Meanwhile, with compressed video, colour information is discarded before it reaches your editing software. For this reason, fixing incorrect white balance in compressed video can be less effective. And so it becomes more important to get white balance correct when you’re filming.
Temperature scale
The colour of light is measured in Kelvins.
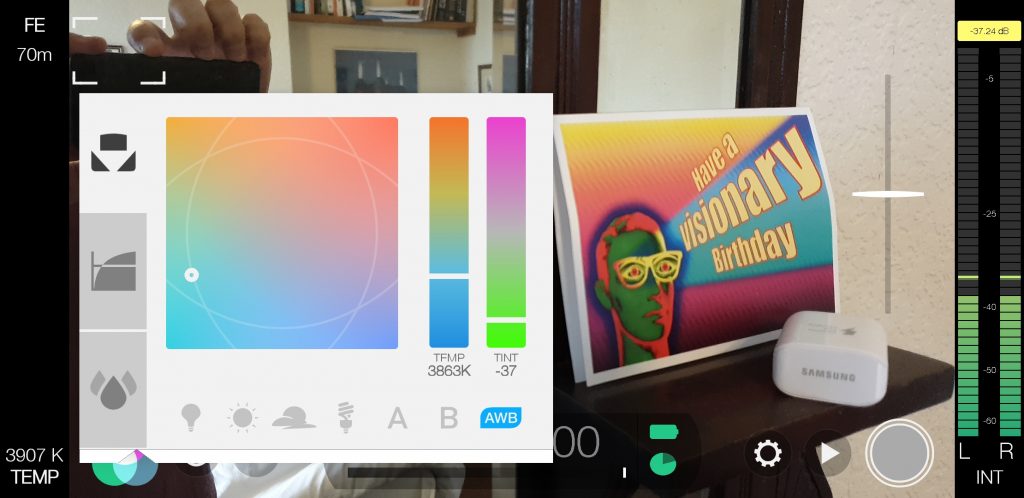
Above is a screenshot from the FiLMiC Pro camera app. You can see there are 2 “K” numbers. In the bottom left is the colour temperature reading of 3907K and in the middle 3863K.
They’re different numbers because I still have it on auto. White balance is constantly adjusting and one number has to keep up with the other. Once you tap the AWB button (blue) it turns red to fix the white balance. Both numbers then synchronise.
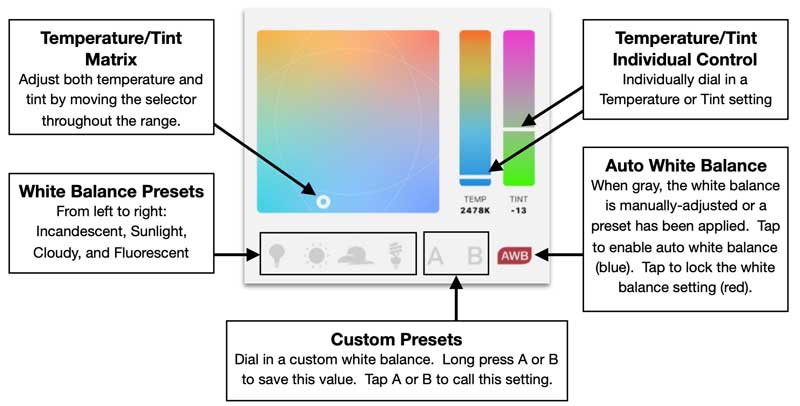
White Balance Presets
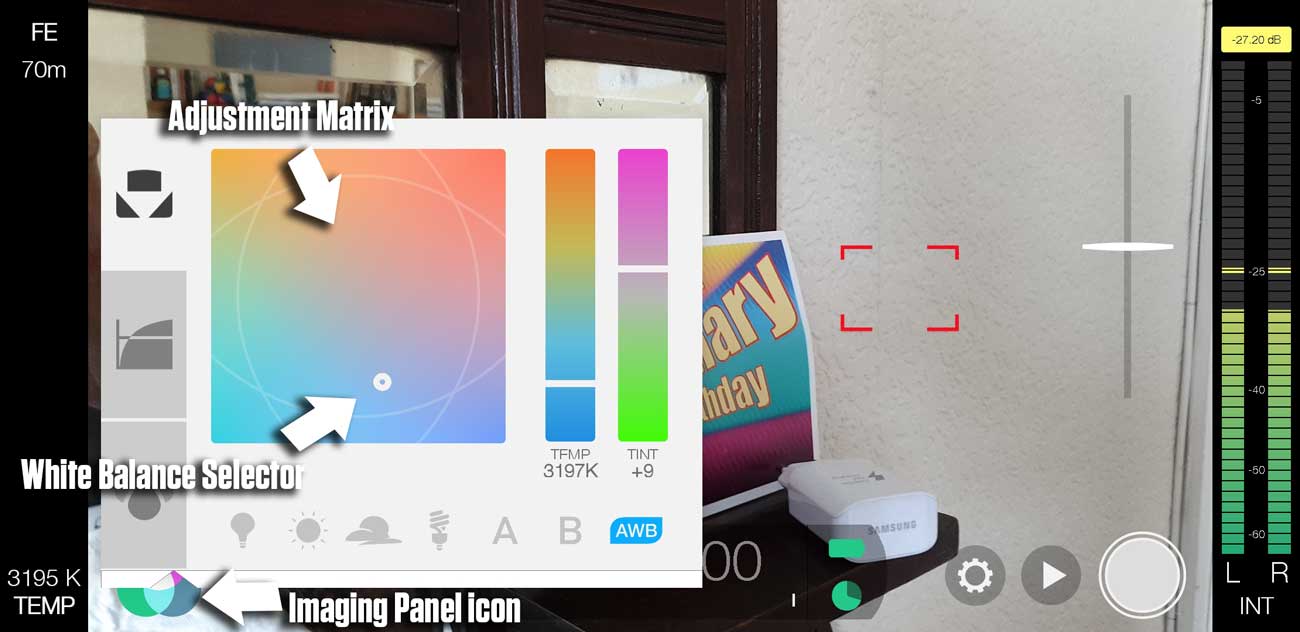
Look again at the screen grab above. In the colour control box you can see a row of 4 icons at the bottom: light bulb (tungsten), sun (daylight), cloud (cloudy sky) and what looks like a modern energy saving bulb (fluorescent). These icons represent different types of light which will have different preset K numbers.
Bright light, like daylight or studio lights, tends to have a temperature of around 5,550K. A candle flame is warmer and redder, placing it at about 1850-1930K. Alternatively, pure blue sky from a north-facing source comes in at 10,000K.
Rather than set the white balance using the camera sensor, you can use a preset. For example, if you are filming in daylight you could simply click the sun icon. The advantage would be that you don’t have to keep checking white balance for every shot.
Another advantage could be gained when using 2 or more cameras you want set to the same white balance. There’s no way to input exact Kelvin numbers into FiLMiC Pro and setting a specific number using the selector and your finger is fiddly. But using the same preset on both cameras means you can quickly set them both to the same exact white balance with 2 taps.
This can save you time later, as if you are cutting between 2 or more cameras you will most likely want the shots to match in colour tone.
Custom Presets
To the right of the white balance preset icons are 2 letters: A & B. These letters can be used to store custom preset Kelvin numbers. Simply hold your finger on the letter and an option to save the current settings pops up.
Again, this might be useful if you are filming with 2 more cameras and want to match white balance settings. Spend a few minutes finding the white balance you need and store it in one of FiLMiC’s custom preset spaces.
Skin tones
Our brains are highly tuned to read the faces of other humans, while colours of other objects is less important. A species that relies on social interaction needs to know how others are feeling as quickly as possible. If skin tones are off in an image, our brains are hardwired to sound the alarm.
“Hey man, you don’t look well!”
Of course, there are other messages we receive from natural changes in skin tone. Angry people’s faces go redder, for example. And a blushing face might mean they’ve done something wrong, or might mean something else…
No wonder then that our brains are highly tuned to detect slight changes in skin tone. Our ancestors’ survival depended on it. When it comes to film and video, getting skin tones right can be important too.
Therefore, we have good reason to pay close attention to our white balance setting. And as our smartphones shoot 8bit video, with compression which discards colour information, it’s even more important to get the colour right “in camera”. Especially if our video contains people.
White Balance in Film
White balance works differently when using film instead of digital video. Film cinematographers use filters and different film stock and (after shooting) colour grading. Colour grading in film is achieved using exposure at the labs and also digitally. For this reason, film cinematographers need to focus much more on set design and lighting to achieve the desired colour of the film.
It’s important to know this because these days the temptation for digital filmmakers is to assume digital colouring is our only option. The idea that colour grading and correction, and cameras built to produce uncompressed or “RAW” video files, are required to produce good colour is unique to digital. In truth, if we employ the same techniques used by film cinematographers of the last century, our smartphones are close to 16mm film cameras in quality.
Just remember that there are people who want you to believe the quality of your film or video can be improved by buying their expensive cameras…
Setting White Balance using FiLMiC Pro Camera App
- Open FiLMiC Pro
- Tap the Imaging Panel icon
- Aim camera at non-reflective white surface
- Tap AWB (Auto White Balance) icon (turns from blue to red) to lock white balance
- Close Imaging Panel
AWB button – Fixed on Record Mode
If you tap the AWB button a third time it changes from red to orange. This is a newer setting in FiLMiC Pro which locks the white balance as soon as you start filming. However, with this setting, when you’re not recording, the white balance reverts to auto.
This is a useful feature if you want white balance to be locked when filming., but don’t have time to keep manually setting and locking white balance for each shot. That way, at least your white balance will be stable throughout the shot. Because it’s far far easier to fix slightly off white balance later with a fixed setting, than with one which is auto-adjusting though the shot.
White balance card
When setting white balance you need a neutral surface to point the camera at. There are items you can purchase or you can use a piece of white paper. FiLMiC Pro suggest tissue or kitchen towel as it’s less reflective than printer paper, for example.
X-Rite ColorChecker Passport Video
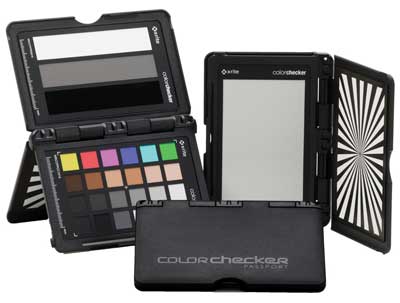
If you want to be fully scientific about setting white balance, you can look at getting one of these.
However, for a fraction of the price you can get a fold up white balance reflector.
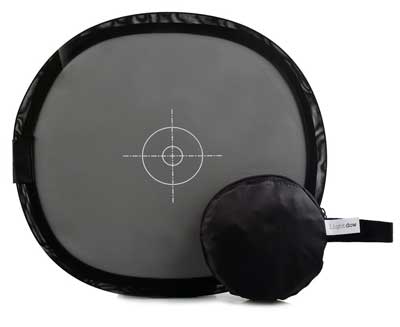
When tested, FiLMiC Pro found the colour temperature result was identical between the X-rite and the fold up reflector. Even the kitchen towel was only about 10% out (easy to fix in post).
Fixing white balance later
Most editing software now has easily used white balance correction features. In Adobe Premiere and After Effects, I regularly use the white balance selector contained within Lumetri color.
If you have a part of the image that you know should be white (but is currently not white), you can use the eyedropper to select it. Lumetri color will now adjust the white balance of the whole image based on the area you selected.
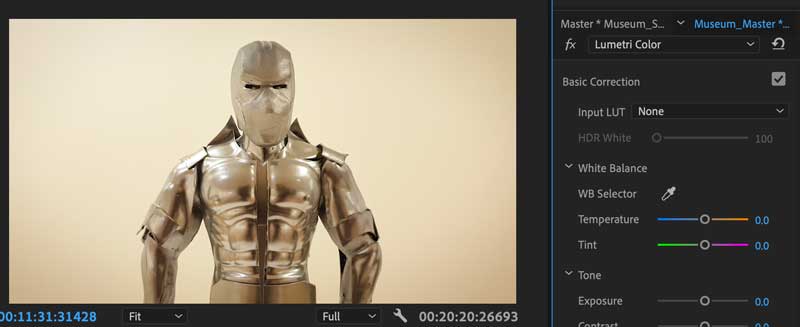
In the above image taken from a video I shot using FiLMiC Pro and a Samsung S9, the image appears a little too yellow. The wall behind the figure is cream coloured, yet I know the wall was white. So by taking the eyedropper from Lumetri Color, I select part of the wall by moving the eyedropper there and clicking.
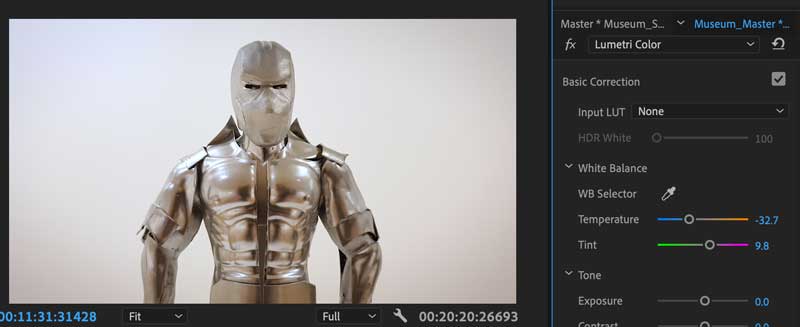
This is the result. Now the wall looks much closer to white than before. You can see to the right, under the eyedropper, the Temperature and Tint settings have changed. Temperature is -32.7 (more blue) while Tint is +9.8 (more magenta).
- Temperature adjusts the warmth of the image from blue to red.
- Tint adjust the image from green to magenta.
Use your Eyes
In this age where we believe an app or a new gadget will solve all our problems, it’s very easy to lose sight of the best piece of kit we have available to us. It’s been developed over millions of years and still does a better job than any live metering money can buy. Yes, you got it – our eyes.
When I’m setting white balance, I use the auto setting in combination with my eyes. Once the scene looks as close as I can get it to how I’m seeing it with my eyes, I lock white balance and start shooting.
As I mentioned before, cinematographers shooting on film don’t have white balance at a click of a button. Therefore, they usually spend time setting up the shooting location and the lighting. And while we might not have the time or resources to set up a complex lighting rig, that’s not a reason to completely ignore setting and lighting.
As I say, 8bit compressed video (ie: the video most consumer level cameras shoot) does not allow adjustment in colour nearly as well as video produced by professional cinema cameras. But rather than reach for your wallet (or bank loan) all you need to do is make sure the colour is as close as possible when shooting.
Eager to learn more?
Join our weekly newsletter featuring inspiring stories, no-budget filmmaking tips and comprehensive equipment reviews to help you turn your film projects into reality!
I have totally enjoyed your videos, re filmic pro and osmo 3, amongst others. So clear and thorough.
Thanks.