Master CapCut free video editor – EPIC Tutorial
CapCut is arguably the best free video editor for its seamless work with TikTok. If you’ve seen videos going viral on TikTok, many of them are using certain effects and filters which you can find in CapCut. But you can use it for pretty much any type of video project. It’s a very flexible, easy to use video editor.
The app is hugely popular and can be used on iPhone, iPad, Android and desktop computers.
I’m going to show you how to make the most of the cool features, tools and effects available in the app. As well, there will be tips on how to streamline your video editing process. By the end of this tutorial, you’ll have all the knowledge and skills needed to create amazing videos using CapCut.
So, let’s get started and take your video editing skills to the next level!
I’ll be using an iPad for this tutorial because it has a bigger screen, but the process is going to be the same on both iOS and Android.
How Does CapCut Work?
Like other video editing apps, CapCut is a software program that allows users to create and edit digital videos on their devices like smartphones or computers. There’s CapCut for your iPhone, for Android, for computers on Mac & Windows, and as well you can even use it online using a web browser. So that makes this a highly versatile editing program.
CapCut provides a variety of tools and features that help users to cut, crop, trim, add effects and enhance their videos.
You can import your video footage into a project, either from your camera roll or external device. Once the footage is in the app, you can begin to edit it by using the tools provided. These may include basic tools like trimming and cropping, or more advanced tools such as colour correction and sound mixing.
For example, you can use the trimming tool to cut out unwanted parts of the video, or use the cropping tool to change the aspect ratio of the video. You can also add text, transitions, and other effects to make your video more visually interesting.
CapCut allows you to take raw footage and turn it into a polished and professional-looking video. When you are finished, you can share it on various platforms such as YouTube, Instagram and TikTok.
How to Start a CapCut Project
When you open CapCut, you have the big blue “New Project” button.
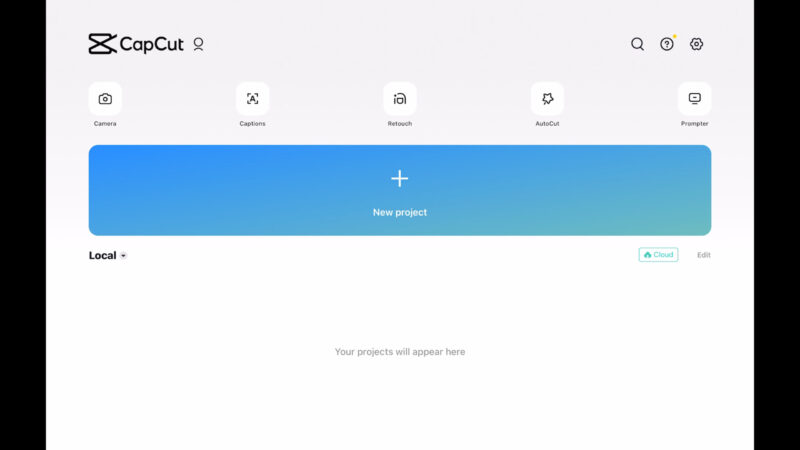
Above that is a row of buttons you can use to access other features.
- Camera allows you to record videos via your device’s camera using pretty much the same interface as TikTok.
- Captions for adding captions.
- Retouch for adding “beauty mode” style effects to a person’s face.
- AutoCut for editing a video using AI.
- Prompter scrolls text which you can read while talking to camera.
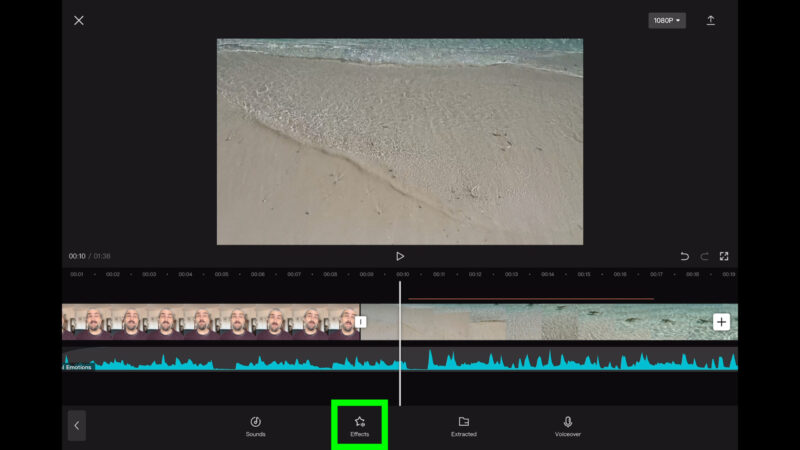
For now, we’re just going to look at the video editing features.
Tap on “New Project” and then select one or more video clips from your media library. For now, I’m just going to pick 3 clips to get started. Notice the numbers as you select the clips. This is the order they will be arranged in the timeline.
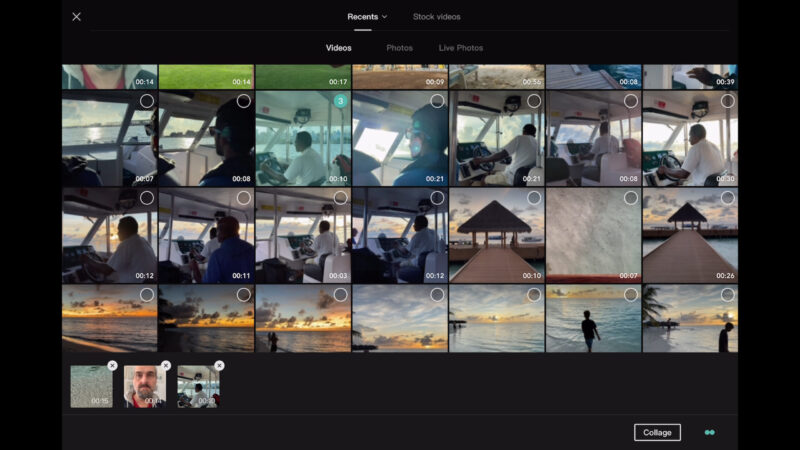
As well, the project will be set up based on the first clip you choose.
OK let’s look at the main interface of the editing app.
CapCut Interface Overview
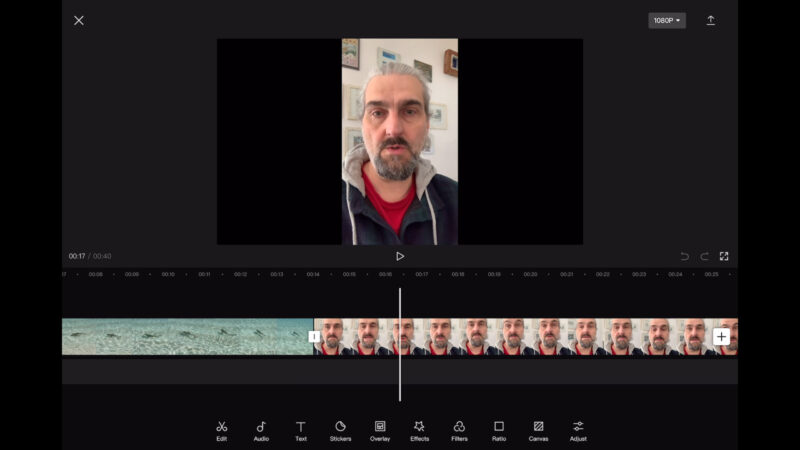
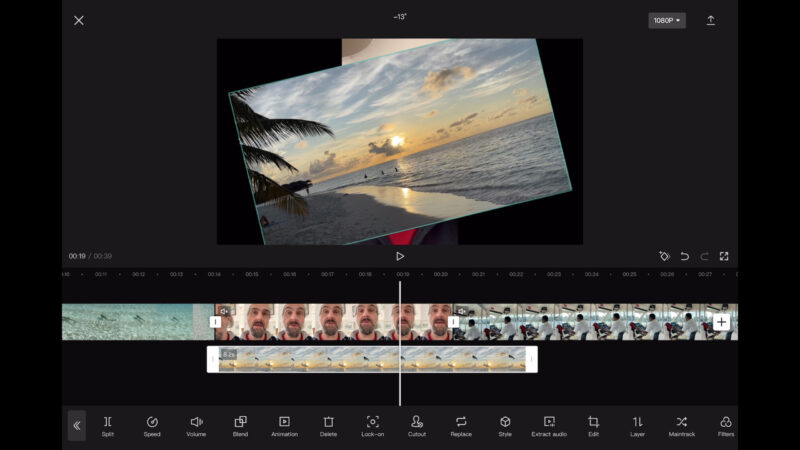
Now we have the main CapCut interface. Clip number 1 is at the front, followed by 2 then 3.
As clip number 1 was in horizontal format, the project is now horizontal. But if we look at clip 2, we can see this clip is vertical but on a horizontal timeline.
If I had put this vertical clip first, I would have got a vertical timeline.
If you want to change the aspect ratio of the project go to the Ratio option at the bottom and choose from different types of ratios.
There are various options here. Portrait video for TikTok and Reels, widescreen for YouTube, or a square format for Instagram. In this case, I’ll keep the widescreen format, which is 16:9. Note that you can come back and export different formats for different platforms.
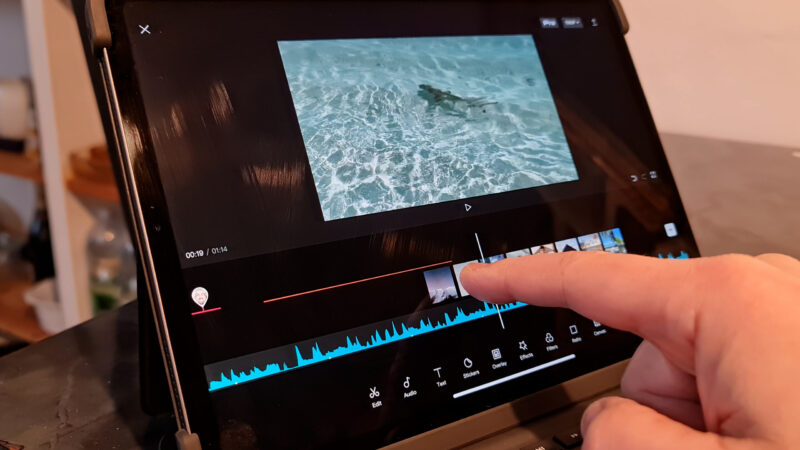
In the middle we have the preview screen. To play the video, tap the play button below the screen which is triangle shaped. Tap again to pause.
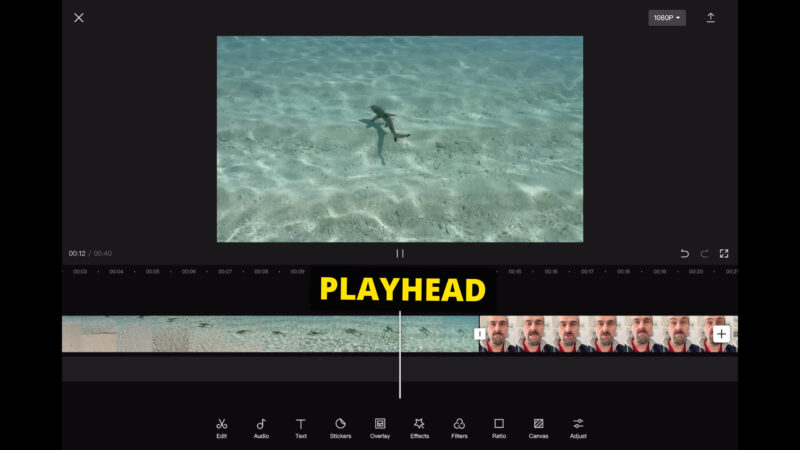
When you play the video, you will see the timeline move along below. The white line is the playhead and this shows the current position in the video. Swipe on this timeline to move backwards and forwards along the timeline.

The position of the playhead in minutes and seconds is displayed on the left below the preview screen. So, the number on the left is the position of the playhead, on the right is the total duration of the whole video.
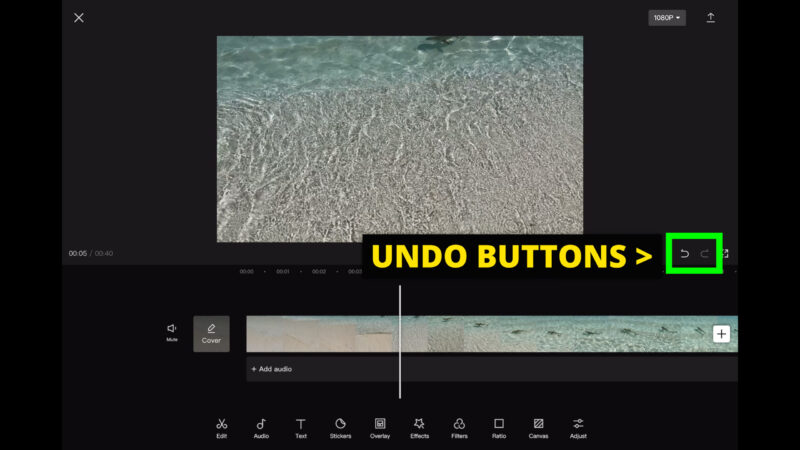
Undo, Redo
Below we have a row of buttons to access various features that we’re going to come to later.
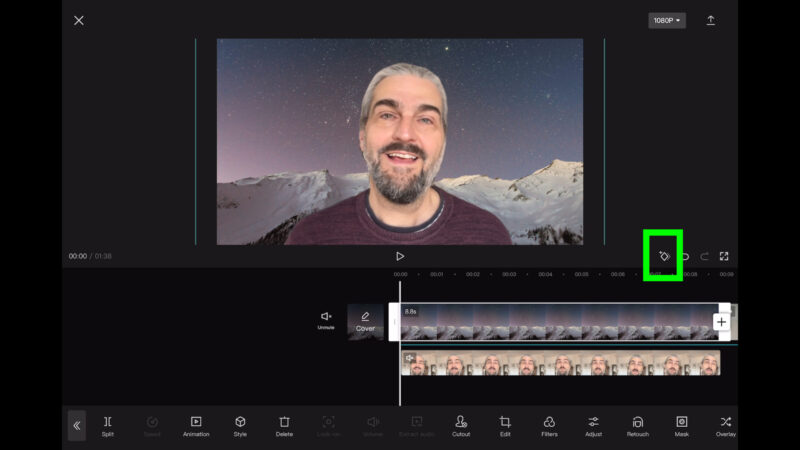
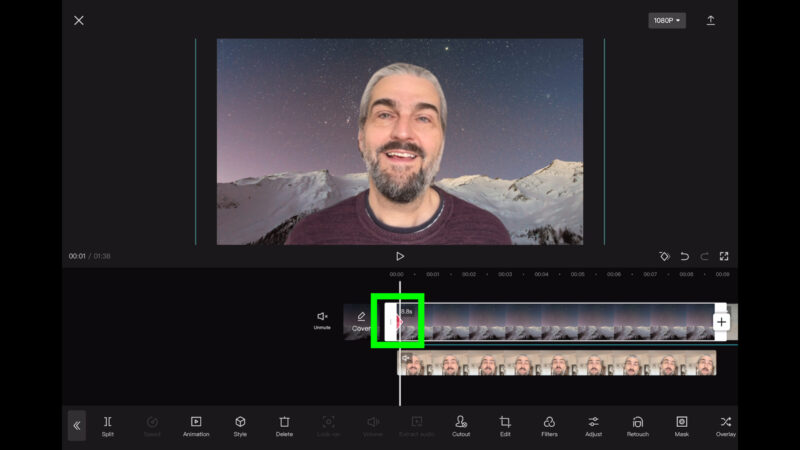
On the right of the screen are the undo and redo buttons. If you want to undo a change, just tap the left one. If you want to redo it again, tap the right one.
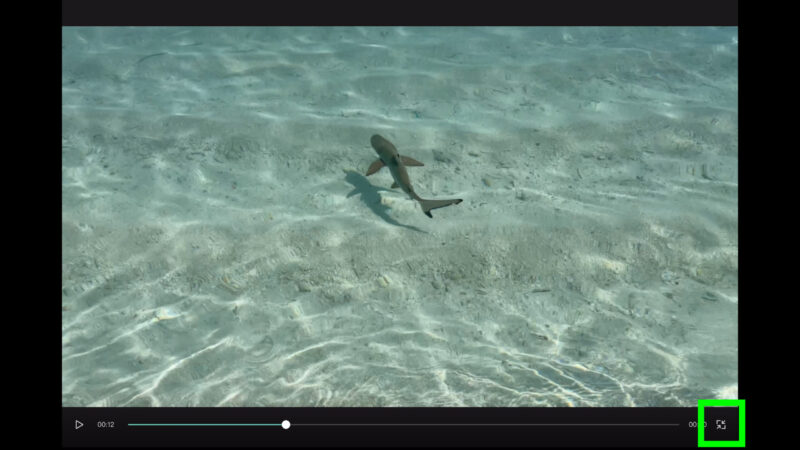
Beside those buttons is a button to switch to full screen mode. Now we can use the whole screen to preview the video. This is useful if you want to watch your video and get a clearer view.
Tap the button bottom right to return.
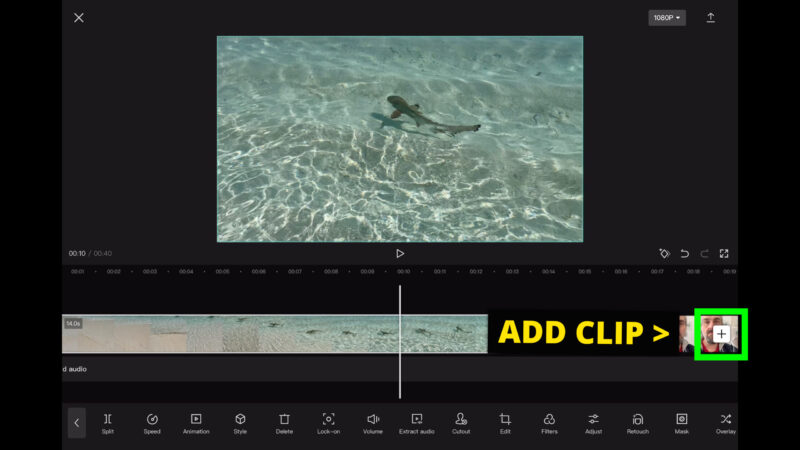
If we want to add another clip, we just need to tap this white button with a plus sign in it.
You can zoom in and out of the timeline by pinching on the timeline with 2 fingers. This doesn’t change the edit, it just allows you to zoom in on a particular part of the timeline.
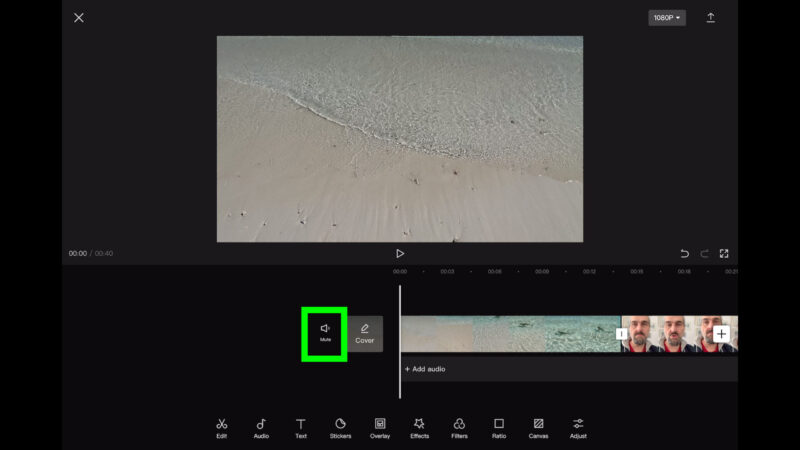
On the left of the timeline, we have 2 more features. First one mutes the audio of all the videos on the timeline. Second one allows us to create a cover for the video. So that would be your basic thumbnail creation.
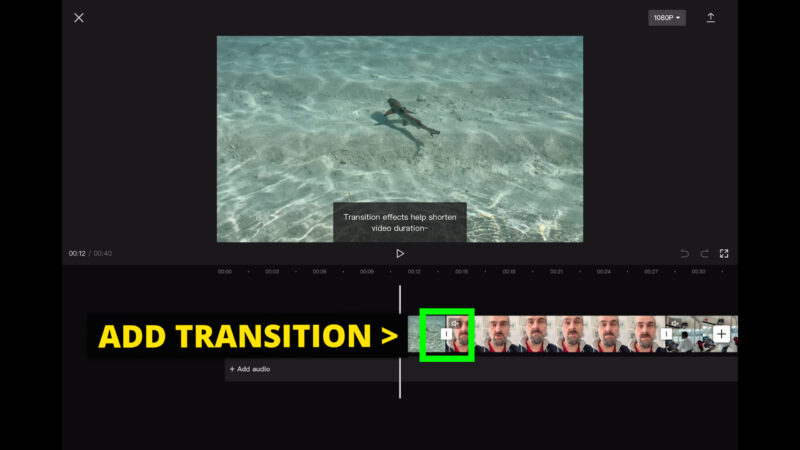
And finally, if we tap the white box between the video clips we can add transitions. One of the great features of CapCut is all these cool preset transitions to choose from. When you choose one you get a brief preview.
We’ll come back to that. To close any window, just tap on the screen away from the window.
How to Edit Clips in CapCut
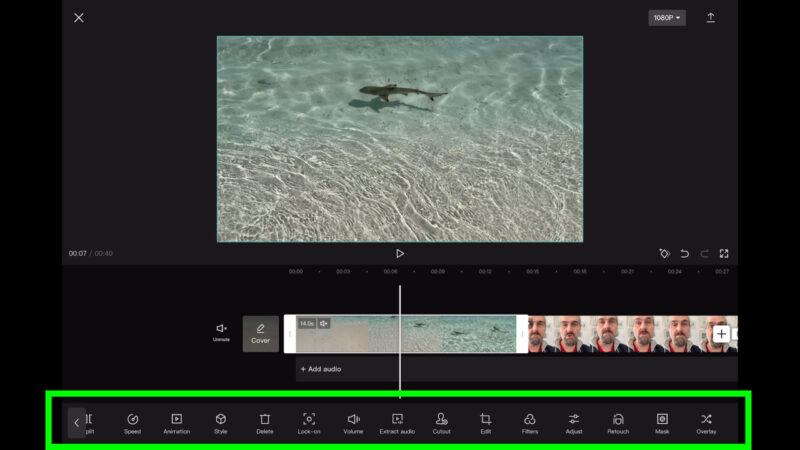
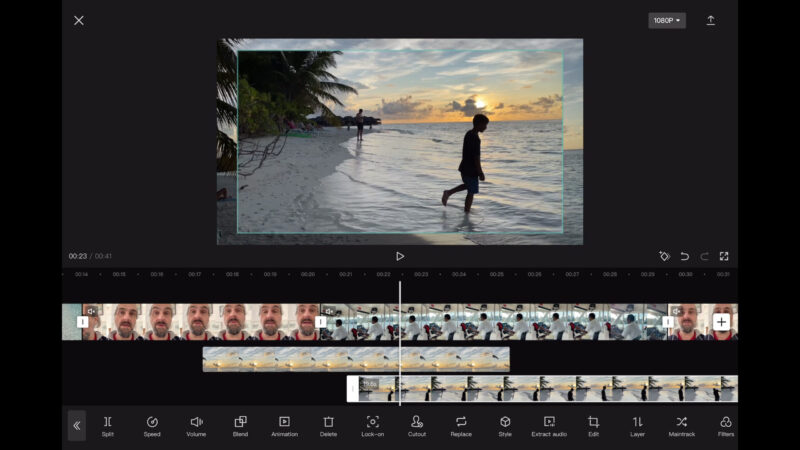
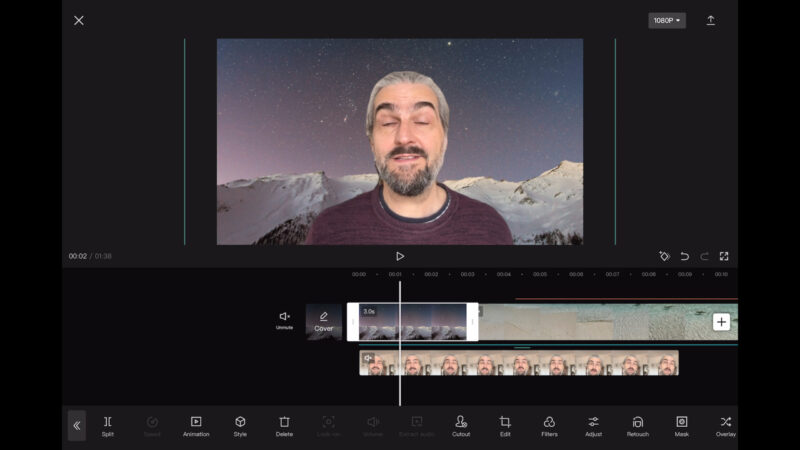
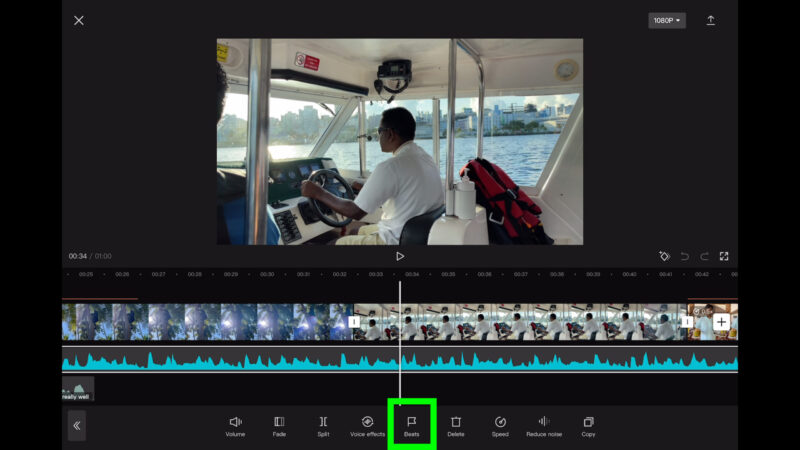
On the timeline, our 3 clips are lined up in a row. If we want to edit a clip, we can move the playhead over that clip and then tap edit. Or, we can simply tap on the clip itself.
At the bottom we now have a long row of buttons. There’s so many buttons they don’t fit on the screen. But you can swipe left and right to access them.
All these buttons allow you to edit and add effects to the selected clip. You can tell which clip is selected because it now has a white border and these two white handles at each end.
Handles can be dragged left and right to make the clip shorter or longer.
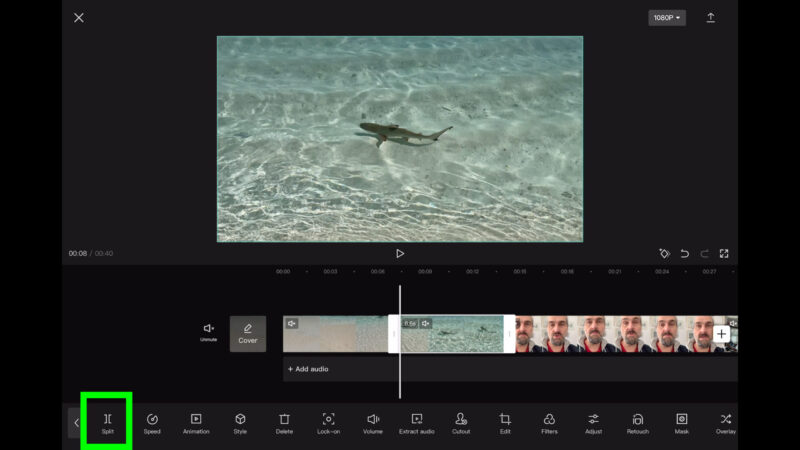
How to Trim a Clip
To trim a clip in CapCut, move the playhead to the place where you want to make the cut. Now tap the Split button, which is on the very left of the bottom menu.
Now your clip is split into 2 clips and you can treat them as separate clips. Adjust the length, add effects and so on.
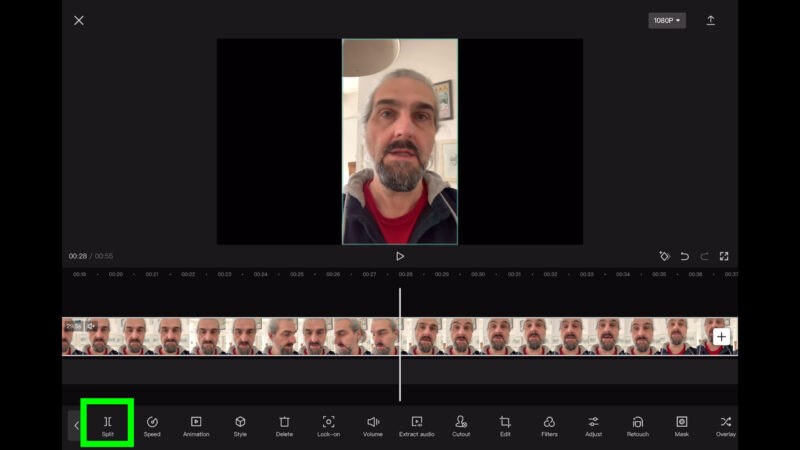
Let’s say you had a clip here, which is a long take of you talking to camera and you want to trim off the bad bits. First you want to find the good bit. For example, you might want the clip to start as you start speaking and you want to remove everything before that.
Move the playhead to the moment where you start talking. Tap Split. Now select the clip which contains all the unwanted stuff before you start speaking and tap the trash-can-shaped delete button. The clip is now removed from the timeline and the clip starts exactly where you want it to.
The other way to do this is to drag the left handle to the point where you start talking. As you drag the handle, you can see where the playhead is in the preview window. We can also do this with the handle at the end of the clip.
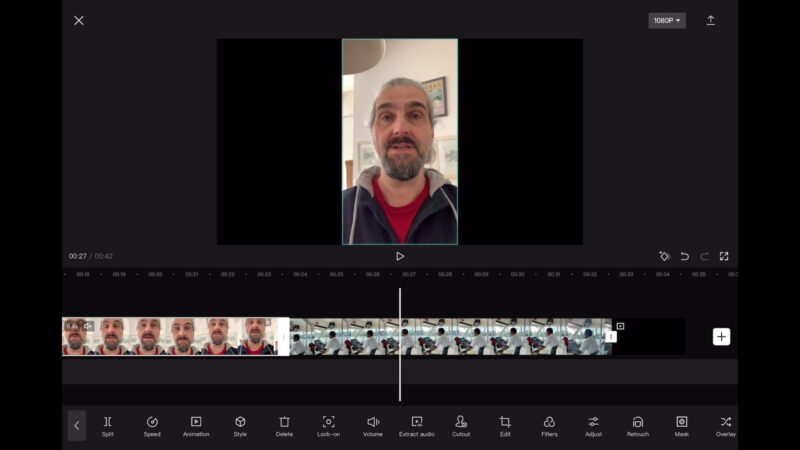
We might also want to remove bits from the middle of a clip. One way to do this is to move the playhead and make a cut. Then move the playhead to the end of the bad bit and make another cut. Now select the bad bit and delete. The 2 sections snap together, so it should now go from one good bit to another good bit.
The other way is to make a cut at the end of the bad bit and then drag the handle to the left to remove it.
So we would then go through the rest of the clip placing cuts using the split button and then deleting all the bad bits.
How to Change Clip Order
Finally, you will be left with a sequence of clips with all the bad bits removed. But what if they are not in the right order?
All you do is tap and hold on a clip. The timeline now changes so that all the clips become blocks which are the same size. Now just drag the selected clip to the desired position in the timeline.
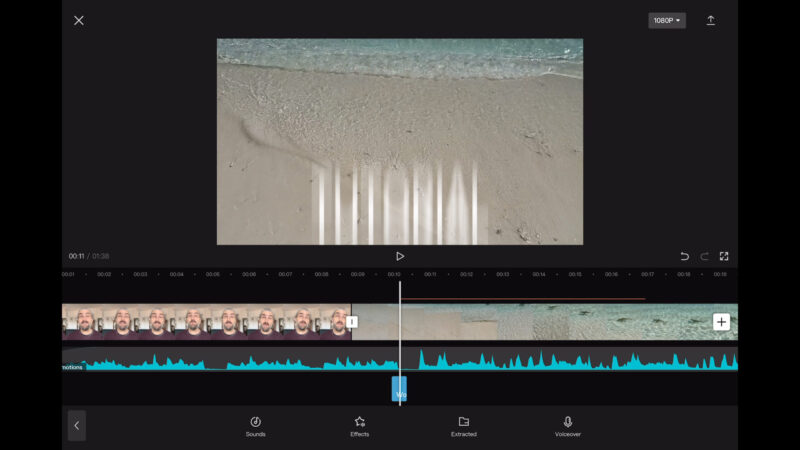
How to Add B Roll in CapCut
What we have so far is a timeline of our main footage, or what we might call “A roll”. At some point we might want to add B roll, which is usually illustrative shots or images.
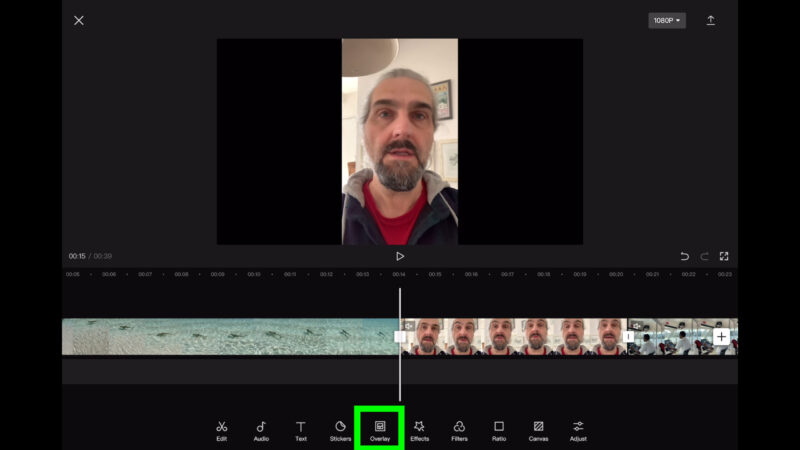
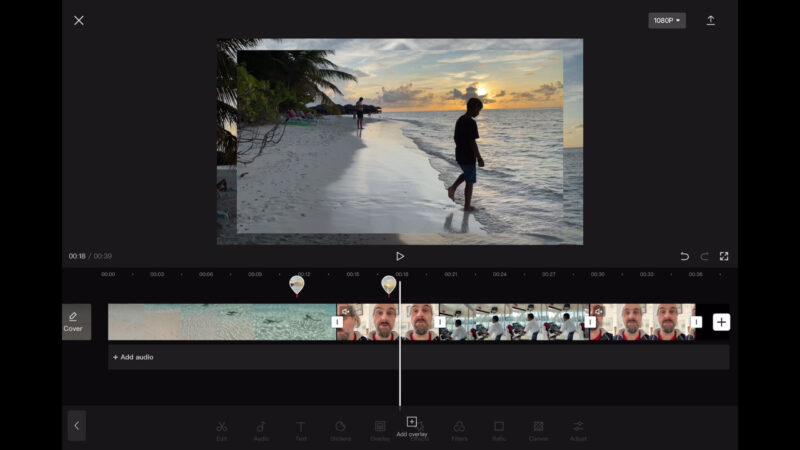
To do this, first we need to deselect any clips. So just tap on the screen away from a clip. This returns the main menu at the bottom.
Now tap the Overlay button and then tap the Add overlay button which will open up your media sources. Here you can choose a video or photo then tap the Add button, bottom right.
You might get a loading message, which is just CapCut processing the clip for editing.
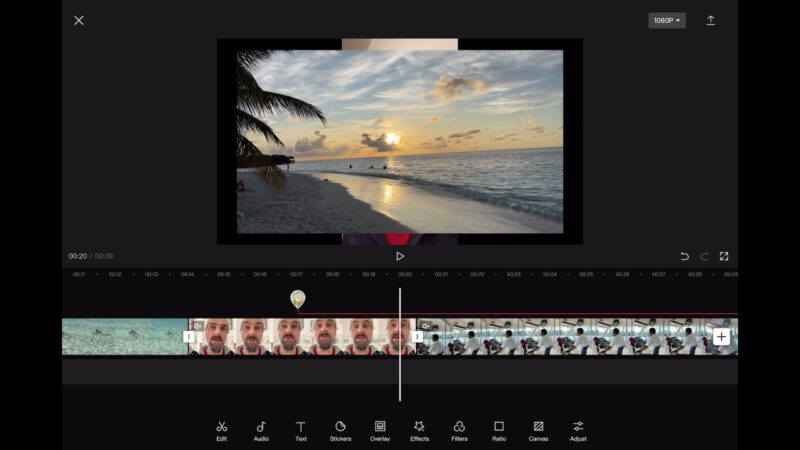
In the preview screen we can see the overlaid clip, with the clip below seen at the edges. On the timeline, the overlay clip actually appears underneath the main timeline track. This might seem counterintuitive, because in most other editing systems the overlaid clips appear above.

But I think it makes sense when you’re editing on a mobile device, because this way the main track is always at the top. However, when we deselect the overlay clip and then tap out of this Add overlay menu, you will see the timeline changes.
The overlay is now contained within a B roll bubble. That’s not its official name, but that’s what I call it. The length of the Overlay is represented by a red line.
To open up the overlay timeline again, just tap that bubble.
Each overlay clip you add will be represented by a new bubble. And this is CapCut’s way of saving you screen space, so your mobile screen doesn’t get cluttered with tracks of overlay.
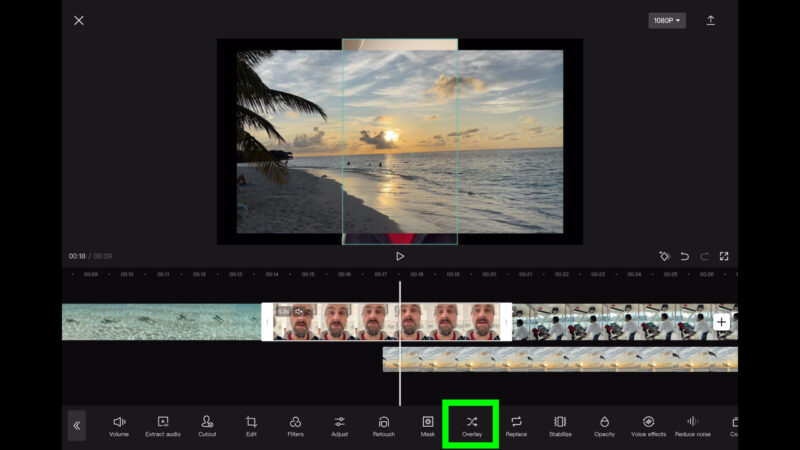
By the way, you can also turn clips on your main track into overlay clips. Select the clip, swipe along the menu until you find the Overlay button. Tap that and now the clip is shifted over on the overlay track.
How to edit Overlay Clips
The overlay clip acts like the other clips. Tap to select, slide the handles to trim and you get the same edit menu at the bottom. Tap and drag to change the position of the overlay clip on the timeline.
Use the 2 finger pinch to expand or shrink the overlay clip. You can also twist your fingers to rotate the clip. When you rotate an overlay clip, you will see the rotation angle at the top.
So maybe you want it to fill the screen or maybe you want to create a picture in picture effect. By the way, you can do exactly the same to the clips on the main timeline: Expand, shrink or rotate.
Go along your timeline, adding and editing overlay clips or photos where you need them.
But what if we want more than 1 overlay track?
If you place the playhead over the first overlay clip, tap Add Overlay and add another clip, this new overlay clip will be placed in another track, below the 1st overlay track. If I shrink it down, you can see I now have 3 layers of media.
I can also drag this new overlay item onto a different overlay track.
When we go back to the main timeline, you will see we now have 2 B roll bubbles.
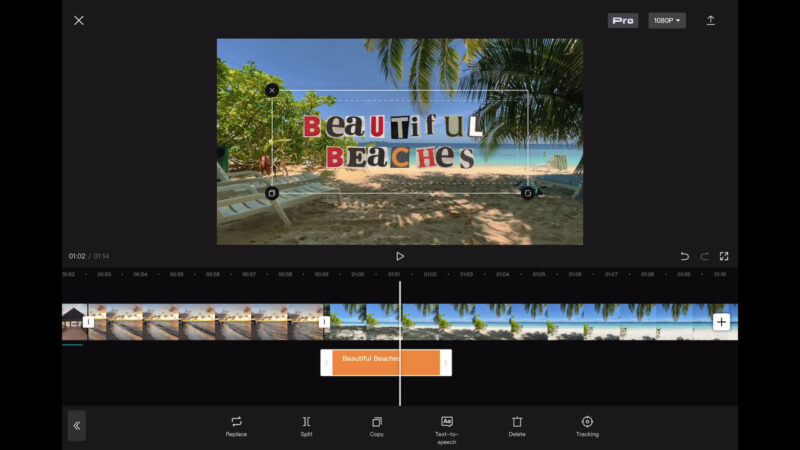
How to Add Titles in CapCut
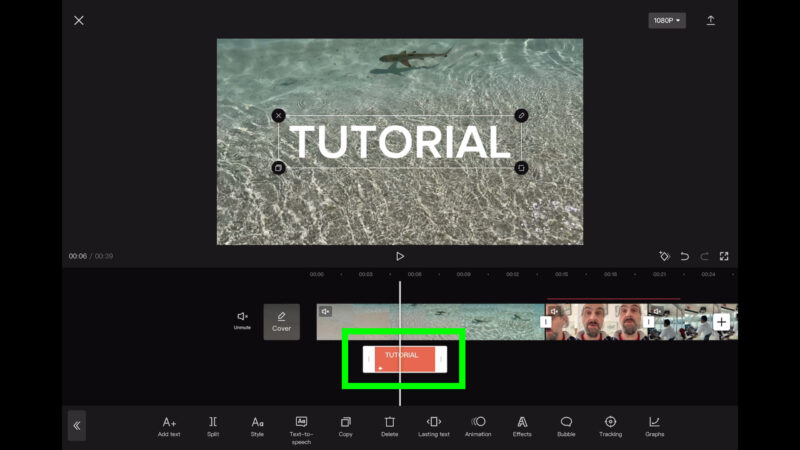
Move the playhead to the point where you want the title to appear and tap the Text button. This opens up a menu of buttons for text. If we tap the Add text button, that places a text box in the middle of the video and brings up the keyboard.
I’m going to type “tutorial” here. Above the keyboard there is a menu of options: Font, Style, Effects, Animation and Bubble. If we tap Font, we can now choose a font. We can also import our own font.
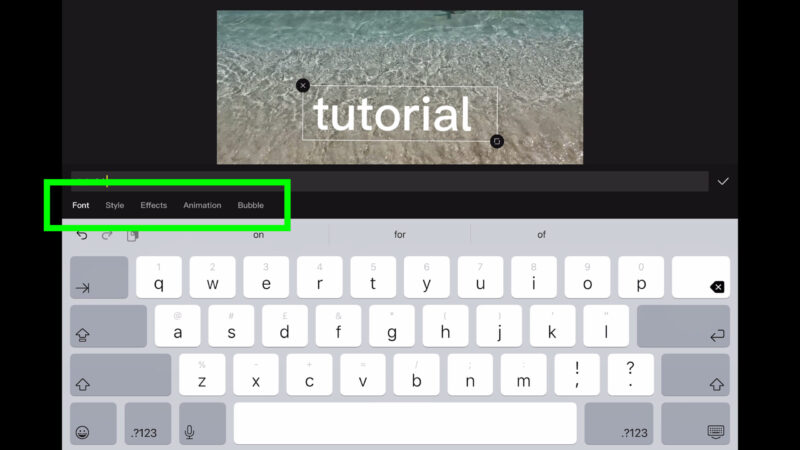
- Style allows us to change the style of the font. Add an outline, change the colour, add a drop shadow and more.
- Effects allows us to add various styles and 3D effects to the text.
- Animation brings up a list of animations we can add to the text.
- Bubble gives us some preset speech bubble styles to choose from.
Tap the Tick next to the text and the text now appears as a clip on your timeline, like the overlay track. You can edit and move the text just like other overlay items, slide the handles to trim, split and drag to reposition.
When we go back to the main menu, any text is represented by an orange line above the timeline. But this time there is no bubble.
How to Edit Text in CapCut
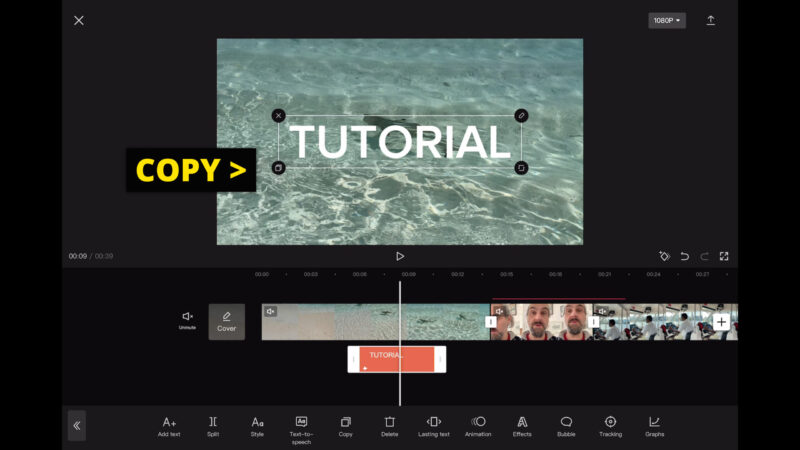
Select the text on the timeline to bring up the text options menu at the bottom. This also brings up some tools in the corners of the text box on the screen.
X deletes the text. Tap the pencil to change the text. Bottom left is the copy button which creates a copy of the text on the next track.
So this is useful if you have created some text in a style you want to use throughout the video. Just copy, move the text to the new position and then change the text of the title.
And finally we have the rotate & resize button. Tap and hold the button and then slide to resize or rotate the text. Tap and drag the middle of the text to move it to a different position in the frame.
One of the characteristics of CapCut is the large amount of effects and different styles options. And for text there are many, many options for you to play around with to create all kinds of different looking text.
How to Edit Text Style in CapCut
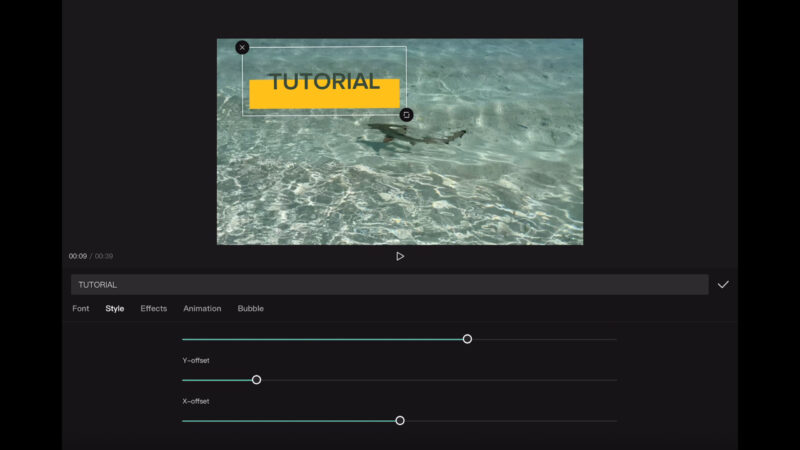
Move the playhead over the orange line which represents the text. Tap the text button. You’ll now see the text box below the main timeline again. Tap it to select the text. You can also just tap the text in the preview window.
In the menu below, tap the Style button. This opens up a variety of options.
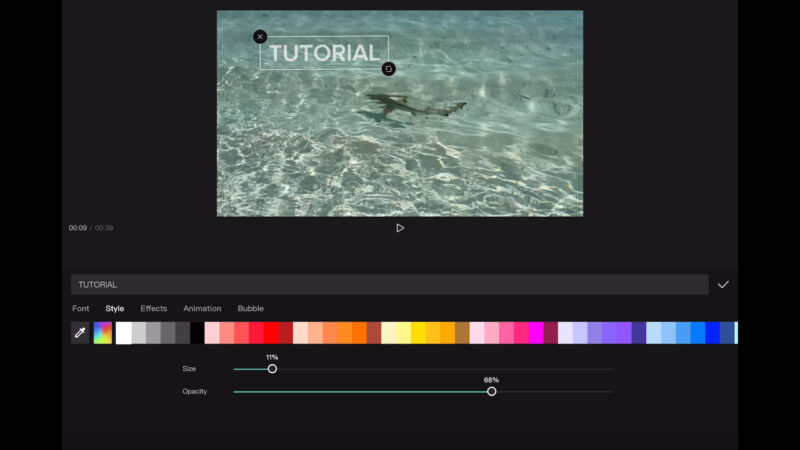
Here you can change the size and opacity of the text with the 2 sliders.
If you tap the eyedropper button, you now get a circle in the preview window. Drag that around and the text will change colour to whatever colour is at the centre of the circle.
Tap the multi coloured button beside it and you can choose a colour using the colour slider and swiping or tapping in the box.
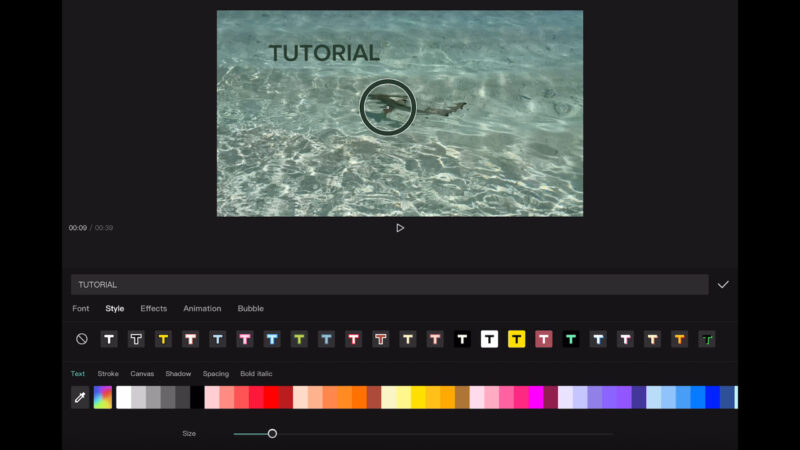
If you want a background to your text to help it stand out, tap Canvas and then choose a colour. You can also adjust the opacity of this background. As well you can adjust the size of the box and the roundness of the corners. The two sliders at the bottom allow you to offset the position of the background box in relation to the text.
Effects brings up a list of different looks for your text. You can add a 3D look or add a glow to the text, for example. If you tap and hold on an effect it will save to your favourites. Tap and hold again to remove from favourites.
How to Add Animation to Text in CapCut
Animation brings up a bunch of preset animations you can apply. I really like how easy they are to apply and you immediately see what they look like. I use Adobe Premiere Pro for editing and by comparison adding text animations is very clumsy and slow.
Above the animations, you have 3 choices: in, out or loop.
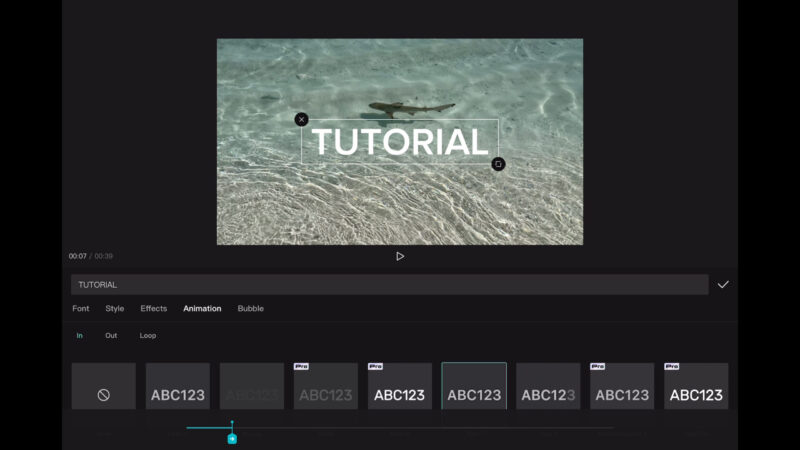
Tap IN and any animation you choose here will be applied to the start. Then tap OUT and any animation you choose here will be applied to the end. Tap LOOP and any animation you choose here will keep looping round for as long as the text is on screen.
At the bottom you can see where the animation is applied at the start and end of the text. There’s a blue and a red line, with arrows and markers. You can now drag these markers to adjust the length of the animation.
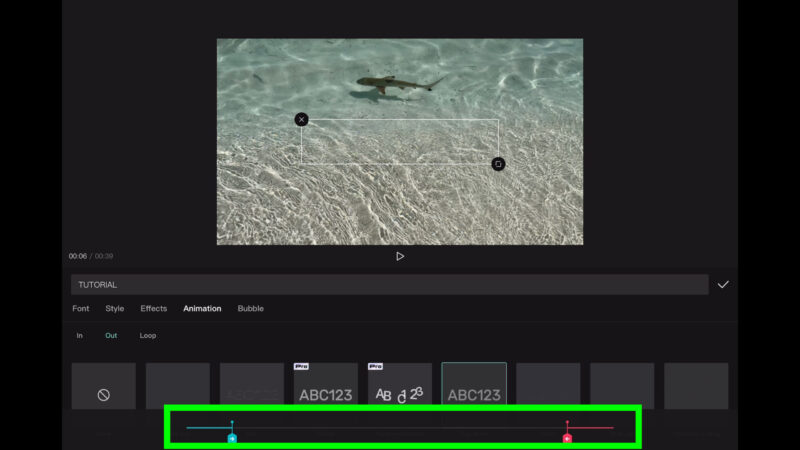
As you drag it, you will see the duration of the animation in seconds.
When you adjust the length, the animation will replay in the preview window so you can see how it’s looking.
If we exit this menu by deselecting the text on the timeline, we can now see these 2 white arrows. And these represent the animations we just applied.
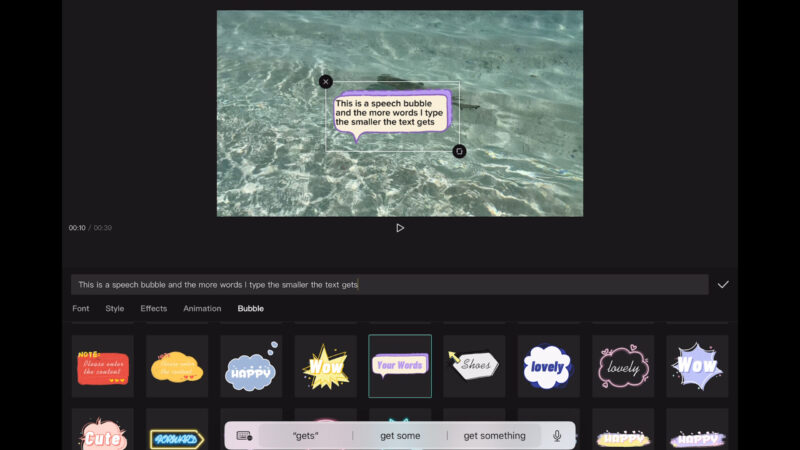
How to Add a Text Speech Bubble in CapCut
The last option is Bubble. Tap that to access preset text styles which also include some kind of background. Many of them are speech bubbles, but not all of them.
These presets will probably look better without a background canvas added to the text. You might also have to change the colour of the font so that it works with the bubble background colour.
With bubbles, the size of the text is determined by how many words and letters you have in the bubble, as well as how big the bubble is. So you can resize the bubble or change the amount of text but you can’t use the size slider under the style tab.
How to Use Tracking in CapCut
Another great feature in CapCut is the tracking feature for text. This allows you to attach your text to an object in the frame and then have it move as if it’s attached to the object.
Tap to select some text on the timeline. Swipe the menu to find the Tracking button and tap it. This yellow circle appears which marks the area where CapCut will attempt to track.
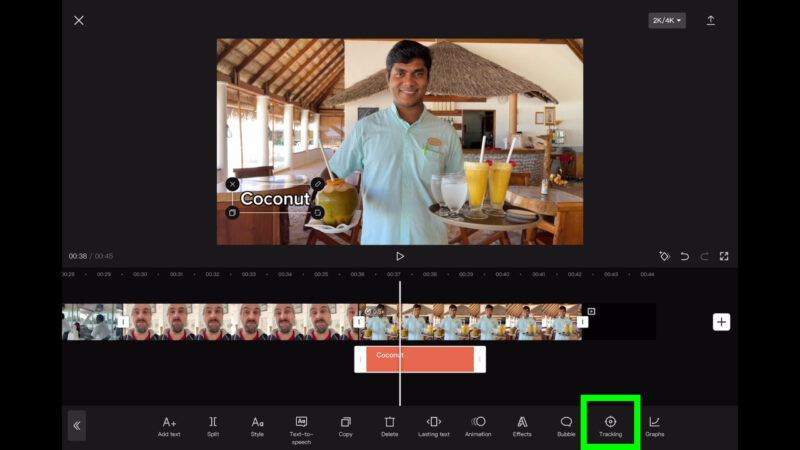
Place the playhead where you want the tracking to begin.
Move the circle over the object to be tracked so the yellow dot in the middle is directly on the object. Now use these handles to resize the circle so that it covers the object and not too much else. We’re basically telling CapCut what to track and what to ignore.

Now tap the Tracking button below and CapCut will attempt to track the object. Play the video and see if your tracking has worked. If it doesn’t work as well as you wanted, you can reset the tracking and try again. Maybe try to resize the circle.
Some shots and some objects will work better than others. An object that contrasts with the background is going to be easier to track and shots without too much movement work better too.
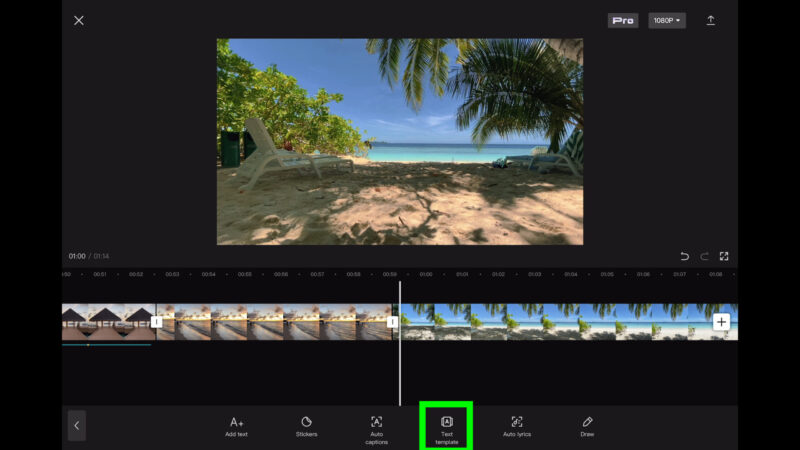
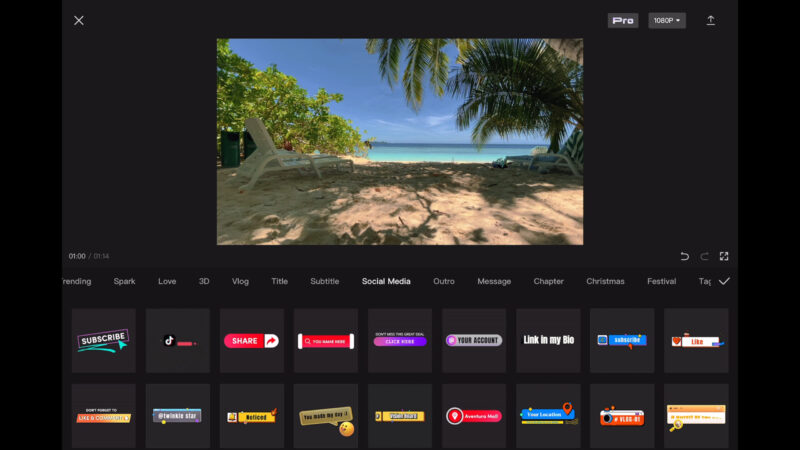
How to Use a Text Template in CapCut
CapCut has a text template feature which allows you to use a preset text style. These templates contain complex design and animation which would probably be impossible to achieve using the regular text editing features.
Move the playhead to where you want the text to be.
Tap Text and then Tap Text template. Swipe to find a template that suits what you’re looking for. Again there’s so many to choose from and many of them are really useful. For travel or lifestyle videos, you’ve got chapter titles, there’s tags, social media.
When you select a template you will get a preview of what it looks like.
Tap the text in the preview screen to edit the text. Tap the tick to return to the main timeline.
Play the video to see how your text looks. As usual, you can change the length, split and so on.
If you want to edit the text again, double tap on the Text clip on the timeline, or on the text in the preview screen.
How to Add Transitions in CapCut
Transitions are styles and effects that take us from one clip to another. The most basic of all transitions is a simple cut. This is, of course, the default transition in any editing system.
But if we want something a bit more unusual we can add an effect which takes us from one clip to the next. Common transitions are things like fades or dissolves, which are used all the time.
Find the edit point between the two clips where you want to place the transition. Make sure both clips are not selected. If one is selected you won’t see the transition box.
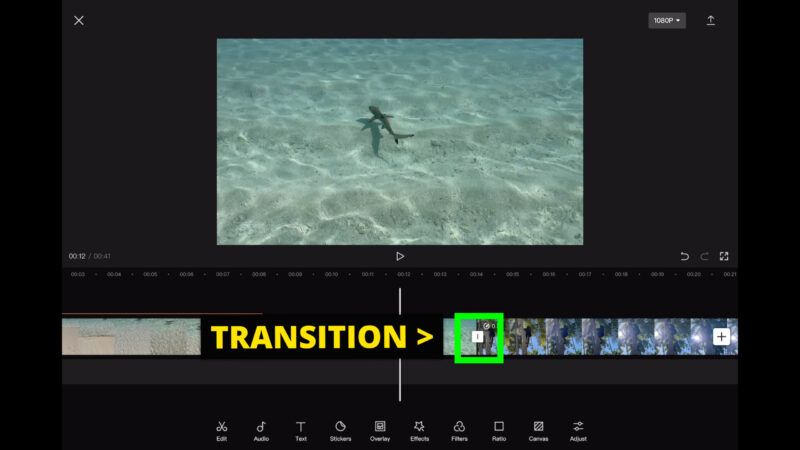
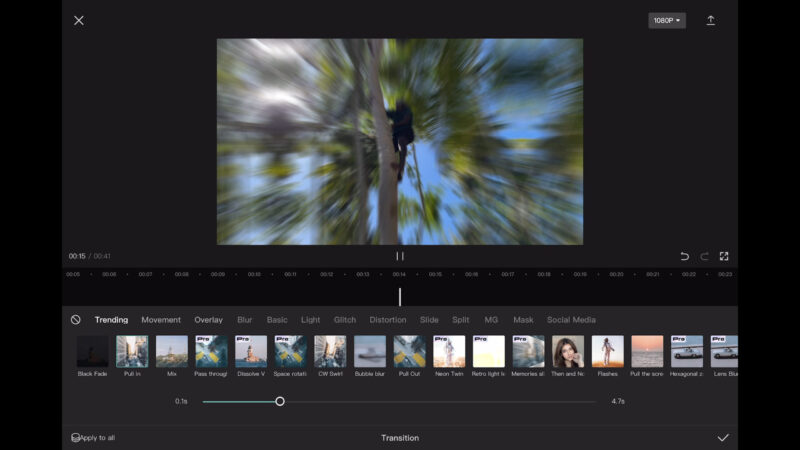
Tap the transition box to open up a window containing loads of transitions. Swipe the menu bar to find transitions under different headings. Currently popular ones will be under trending.
You can also swipe the row of transitions left and right to find more.
Choose a transition by tapping it. The transition is shown in the preview window. Below is a slider to adjust the length of the transition.
If you are happy with it, you can tap the tick bottom right. If you tap “Apply to all” this transition will be applied to all the cuts in the timeline.
How to Add & Edit Audio in CapCut
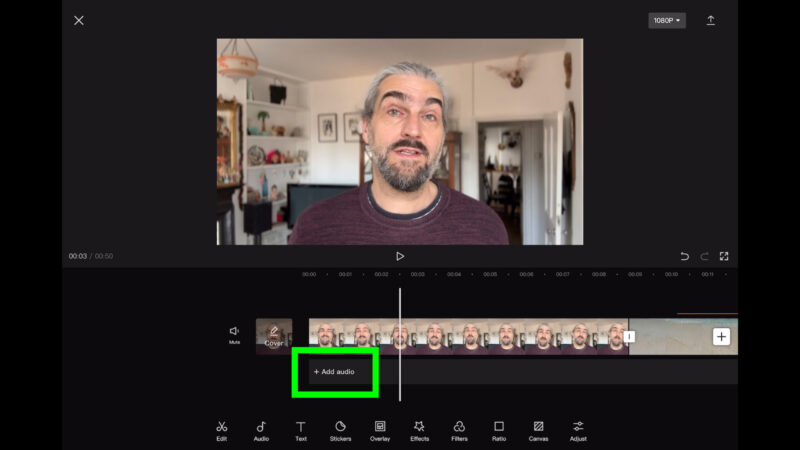
How to Add Music in CapCut
There’s all kinds of ways you can add music to your CapCut videos. But here I’m going to cover the simplest options.
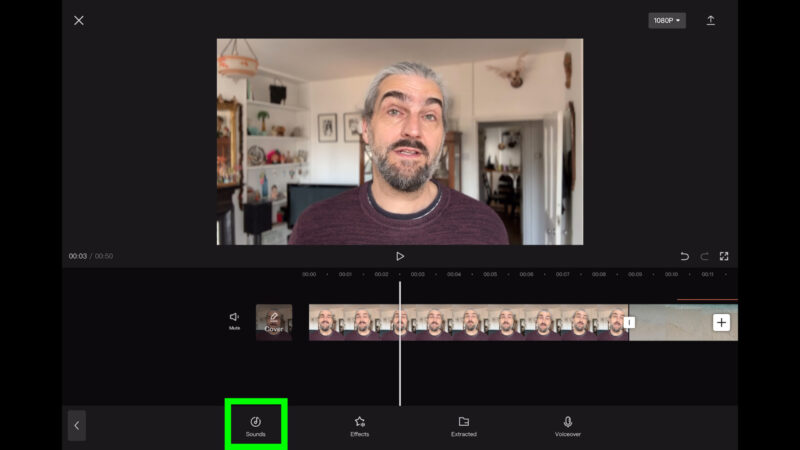
Back at the main menu, we can see below the video on the timeline it says “Add audio”. Tap here to open up the audio selector window. Alternatively, you can tap the Audio button in the bottom menu.
Now tap the Sounds button.
To add music, you can either search for a song or artist, or you can tap one of the albums and scroll through the list of songs on the album. Tap to download the music and preview it. Tap the Plus button to add the music to your video.
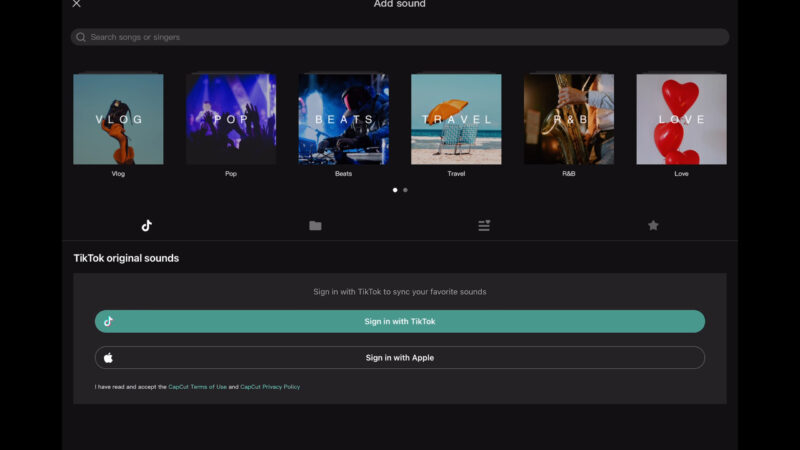
You can also add music from your device. Tap the folder button, choose “From device” and CapCut will look in your device for audio files. Whatever it finds will appear as a list below.
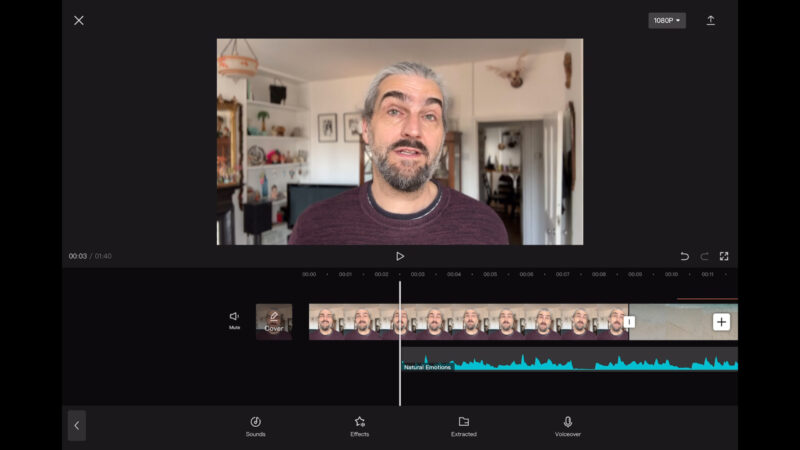
I’m just going to pick a track from CapCut’s library. The music file is now placed below the video and it will start at the position of the playhead. But you can just tap and drag this audio file, like with video and text files.
Move Audio File
So if I want the music to start at the beginning, I can just drag it and it will snap into that position.
If the music is too loud and it’s drowning out my voice, I can select the file by tapping it, tap Volume and then move the slider to bring the volume down.
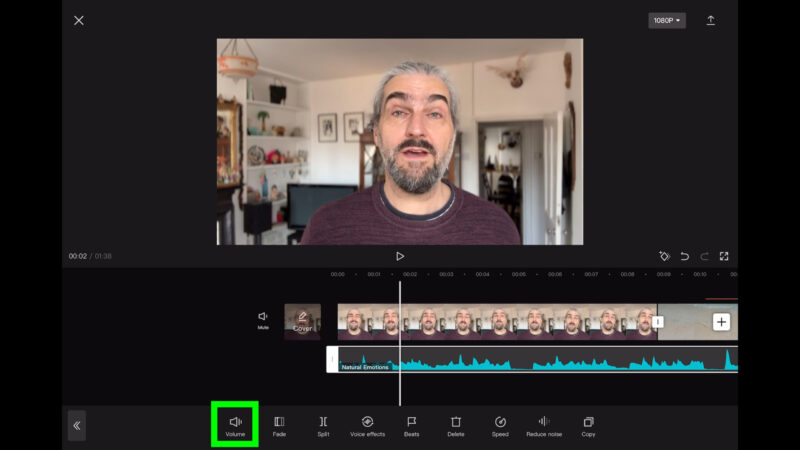
Every time you make an adjustment, it replays from the beginning of the audio clip and this makes it easier to get the level right.
If you want, you can add a fade in or fade out as well, just tap the Fade button and use the sliders to adjust the length of the fade. There’s various other effects you can use in the audio here as well. Some of these are for the spoken voice, like Voice effects and Reduce noise.
How to Add Sound Effects in CapCut
CapCut has tons of sound effects to download and use in your videos. These are generally fun effects for social media content. Great for TikTok, YouTube, YouTube Shorts and Instagram Reels, for example.
As well, some of these effects can be added to transitions or camera movement to give the more impact.
To add audio effects, tap Audio and then Tap the Effects button. This works in a similar way to adding music. Swipe the menu of headings and choose a heading which fits the type of effect you are looking for.
Scroll through the list. Tap to download and preview. Tap the Plus button and the audio effect will be added to the timeline, below any other audio tracks you might have.
In this case, it’s now below the music I just added. Again, you can select, trim and drag the file to position it on the timeline. Once selected you can adjust the audio level like you can with other audio files.
How to Add a Voiceover in CapCut
Tap Audio and then tap the Voiceover button. Position the playhead where you want to start your voiceover. There’s 2 ways to record voice over.
First way is to just tap the microphone button and you will get a 3-2-1 countdown before the recording begins.
Second way is to just tap and hold the mic button. It will immediately start recording and keep recording until you take your finger off the button.
Whichever way you choose, you will now get a new audio file on the timeline containing your voiceover. This file will be placed below the video and any other audio files you have.
Now you can add effects. Tap Voice effect, swipe and then choose an effect. CapCut will now play back your voiceover with the added effect.
You can keep choosing different effects and it will keep previewing how it sounds, each time you choose one. You can also add these effects later. Just select the audio file on the timeline and tap Voice effects.
If you want to delete the voiceover you have just recorded, tap the Back button. This will delete the last voiceover you recorded.
Again, these audio files can be trimmed, repositioned, split and so on like other files.
How to Use Text-to-Audio in CapCut
CapCut has a feature which allows you to generate a speaking voice from text. This feature even allows you to create a singing voice from text as well.
Tap the Text button and add some text as I showed you earlier. Next to style on the edit text menu is a button called Text-to-speech. Tap that, swipe and tap to choose a voice.
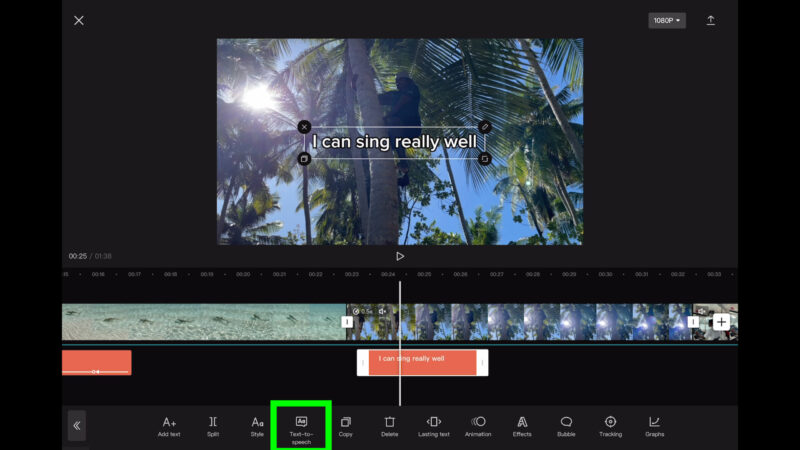
The voice will now read your text. If you choose one with Vocalist in the name, it will sing your text along with a backing track. So that’s pretty fun.
Tap “Apply to all” if you want all your text files on the timeline to be converted to this voice. Tap the tick to finish. The voice audio now appears as a file on your timeline.
Now we can adjust the volume with the slider, the same way we do for other audio files.
How to Remove Video Background in CapCut
One of CapCut’s most powerful features is its ability to remove the background from an image or video clip. There’s various ways you can go about this, depending on the end result you are looking for.
Select the clip you want to remove the background from. Swipe along the menu and tap the Cutout button. You now have 3 options for removing the background.
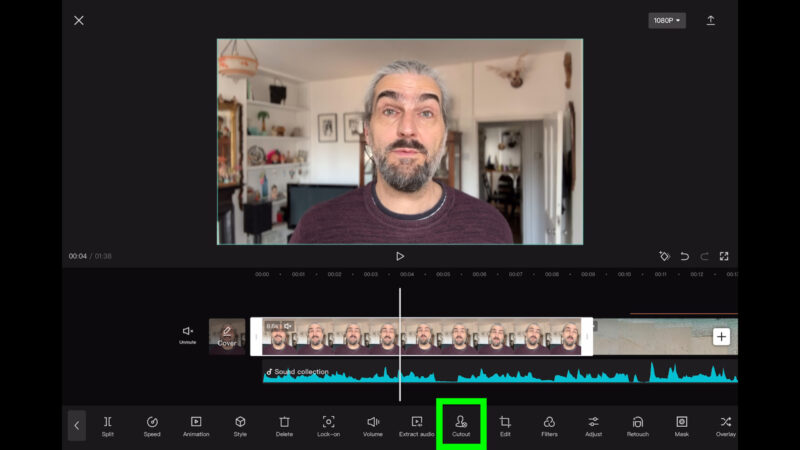
The first option detects a person in the frame and automatically removes the background. The second option lets you paint your own mask by drawing on the video. The third option is for removing green screen or blue screen, so obviously this requires that a green or blue screen was used when filming your clip.
Let’s look at the first option and tap Remove background. CapCut now immediately sets to work removing the background, as well as it can. The longer your clip, the longer this will take.
This is not perfect by any means, but it does a pretty good job. The background will now go black. And if we play it, we can see how it looks.
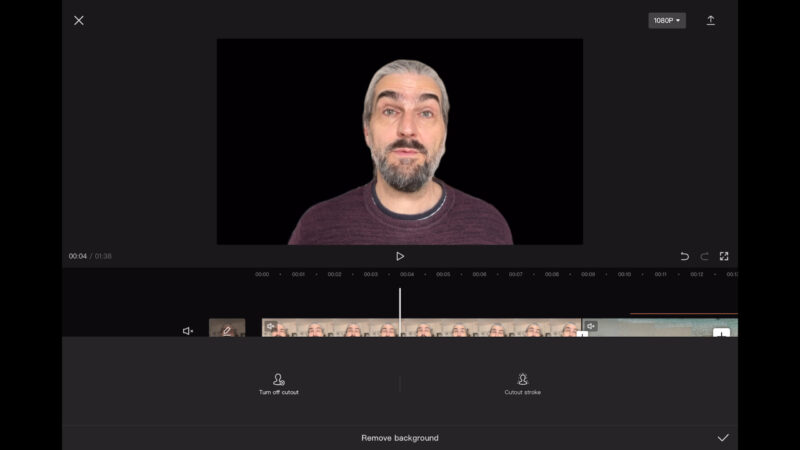
We can also add an outline around the person in the video. Tap the Cutout stroke button to bring up various options here.
First, swipe and choose one of the preset options, here. Then you can use the colour picker and sliders to customise it. Change the colour of the outline, adjust the width and you can bring down the opacity as well to reduce the visibility.
How to Add a New Background in CapCut
Now that we’ve removed the background we can add a background so that there’s something there other than black.
One way to do this would be to put this clip onto the Overlay track and put another clip or photo behind it. Another option is to go back to the main menu, swipe until you find Canvas and tap that.
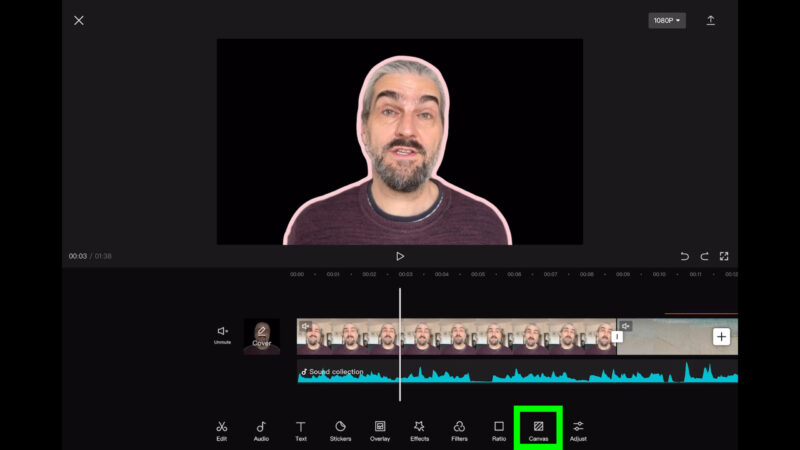
You now have 3 options. The Color button just allows you to add a plain colour background. The Background button allows you to add a textured background and finally the Blur button allows you to make the background blurred out (but we can’t use that in this situation as we don’t have a background).
So I’m just going to add a textured background here.
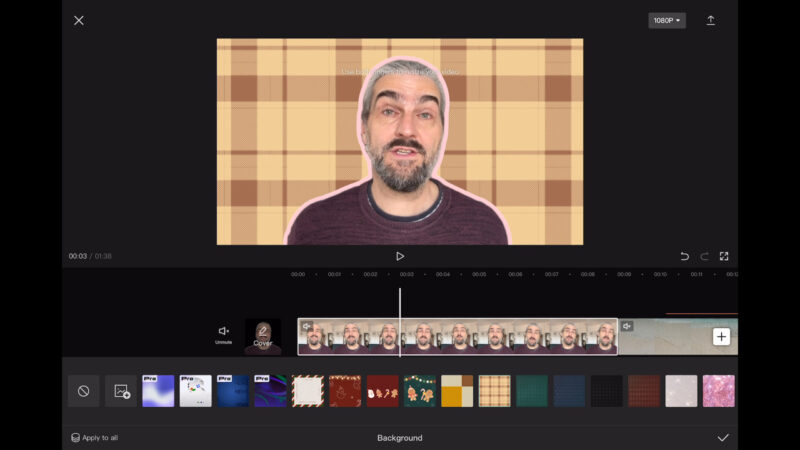
But what if you want to place a photo or a screenshot as background?
Make sure the playhead is over the clip you just edited. Tap the white Plus button and add an image from your media library. This photo will now appear beside the clip.
Select the clip and move it to the overlay track, as I showed you earlier. Drag this clip so it’s below the image you just added. You can see the photo I just added in the background.
Now I can use the pinch method to resize the foreground image if I want to. Select the overlaid clip and pinch to shrink it, then move it to where you want it in the frame.
But what if we want to have this background image zoom in, during the shot. Then we need to use keyframes.
How to Use Keyframes in CapCut
Select the image on the timeline track by tapping it. And, by the way, this also works with video clips.
Bring the playhead to the very start of the clip. Now tap the Keyframe button which is in the bottom right corner of the preview window. A keyframe is added, which appears as a red diamond on the clip or photo.
Move the playhead to the end of the clip. Use the pinch method to expand the image. You will see that a second keyframe is automatically created.
Now if we play the clip we can see the background image zooms in slowly. To delete a keyframe, tap on it and then tap the Keyframe button, which should now have a minus sign next to it.
So, keyframes can be used to animate zooms or movement. Not just clips, you can also use it for text as well. You can make an image or text, slide left, right, or even rotate.
Keyframes can even be applied to audio clips. So you could create a fade, for example.
Move the playhead where you want the fade to begin. Add a keyframe. Move to where you want the fade to end. Open the volume control slider and bring down the volume and you will see a second keyframe is added.
Play the video and you will hear the volume of this audio slowly fade.
How to Stabilise your Footage in CapCut
CapCut has a stabiliser feature, so if you have wobbly footage this app can smooth it out and make it more cinematic and professional looking. Within reason, of course.
Select a clip and then swipe the menu at the bottom until you find the Stabilise button. Tap to bring up the stabilise controls. It’s very simple, you just have a slider which allows you to set the amount of stabilisation you want to apply.
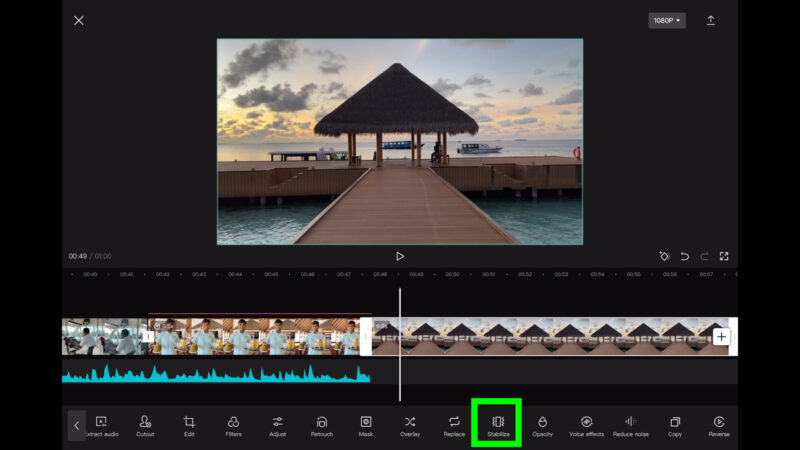
To stabilise your footage it needs to crop some of the image, so that it has a safety zone to work with. The higher you set this stabilisation setting, the more it will crop in.
As soon as you set it, it starts working on your footage. Progress is indicated in the bottom left of the preview screen. Once it’s finished, play the video to see the result.
How to Edit to the Beat in CapCut
One of the most important aspects of creating a powerful, cinematic video is the music. Choosing the right music for your video is key to getting your message across, because the music often does 50% of the job.
If you’re trying to inspire people with your video, then make sure you pick inspiring music. If you’re trying to energise people, choose energetic music and so on. Using the right music is so essential, I often choose the music before I start any editing project.
But if you are trying to create a punchy montage sequence you really need to edit to the beat of the music. The makers of CapCut know this, which is why they’ve added a feature which makes this easier.
Add Visual Beat References
After you have added your music track, tap on the audio clip to select it. In the menu below tap the Beats button. Now you have 2 choices, you can add the beat manually or let CapCut try to auto detect the beat. If your music has a clear rhythm it should be able to do this no problem.
Tap Auto detect and you will now get a row of yellow dots. Each dot represents a beat in the music. Notice you have these 2 options below: Beat 1 and Beat 2. One is a faster beat than the other, so if you want fast cuts then use the faster beat.
Tap one to choose which beat you want to use. Go back to the main timeline and you will see these yellow dots are there marked on the music track.
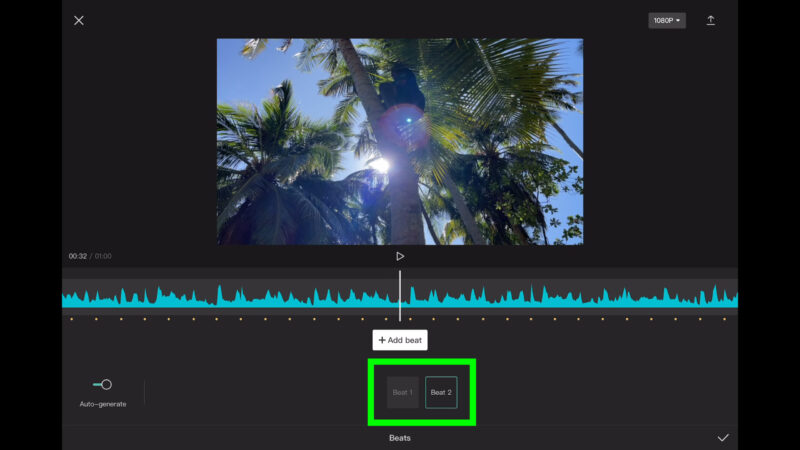
Now when you slide a handle on a video clip it will snap to these yellow dots. So this makes editing to the beat of the music much easier. Otherwise you can find yourself spending ages trying to get your cuts exactly in the right place.
How to Color Grade in CapCut
Another essential aspect of professional looking video is grading your footage. If you’re just using smartphone footage shot with a regular profile then you might just need a few minor adjustments to boost the look a bit. But CapCut has plenty of options for altering the look of your video.
There’s 2 main ways to adjust the colour of a video in CapCut. The first is when you adjust the colour of an individual clip, while the second allows you to create an adjustment layer. This layer can then be used to adjust more than one clip.
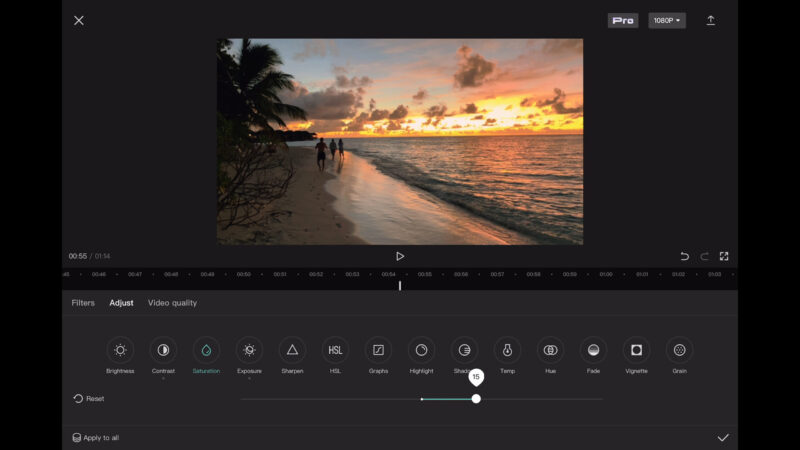
To adjust a single clip, tap on the clip to select it. Now you have 2 main choices here: Filters or Adjust.
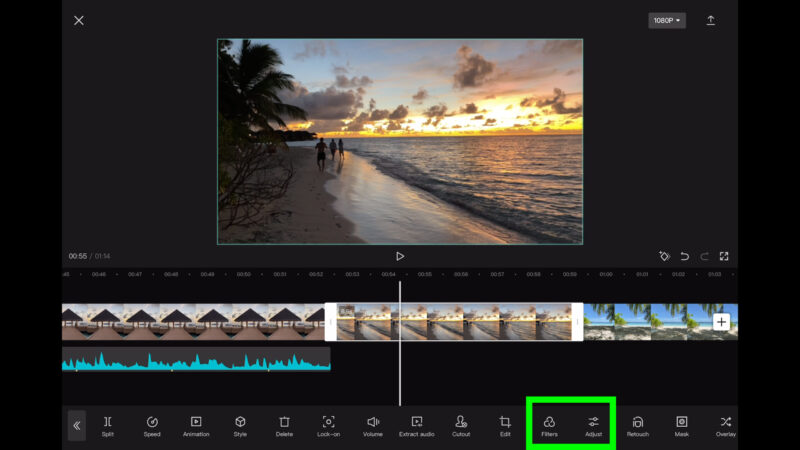
Tap the filters button for presets which give your video a certain look. There’s loads to choose from so just swipe along and try different looks until you find one that you think looks good.
Alternatively, if you want to make manual adjustments then choose adjust. You can tap the Adjust button on the main menu, or you can actually switch between Filters and Adjust to the left of the menu.
And of course you can combine the two.
Add a Filter
So let’s add this filter and then tap Adjust and now we can adjust certain aspects of the image. Maybe we want to increase exposure a bit. And let’s reduce the contrast a bit as well.
The first thing a lot of beginners do when they grade their video is increase the contrast. I used to do that as well, because it immediately looks more dramatic. But this is a mistake because the blacks and the shadows get totally crushed and this can make your video look lower quality. Especially as smartphones already add lots of contrast.
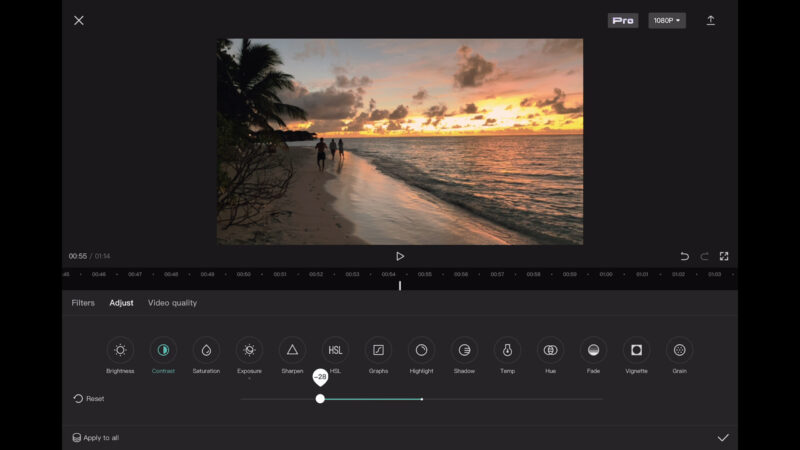
Of course it depends on the video clip. If we reduce the contrast, we can actually see a bit more detail. However, it does now look a little washed out. So I will add a little bit of saturation, just to make it pop again.
OK so that’s one way of adding colour grading. The other way is to create an adjustment layer.
Use Adjustment Layer
This time we deselect the video clip. Now tap Filters in the main menu. So you can do all the same stuff here, switch between Filters and Adjust to get the look you want.
But when we tap the done tick at the bottom, this now creates an adjustment layer. So you can now adjust the size of this layer and move it around like other elements on the timeline. The colour work you have done will be applied to whatever video clip it’s adjacent to.
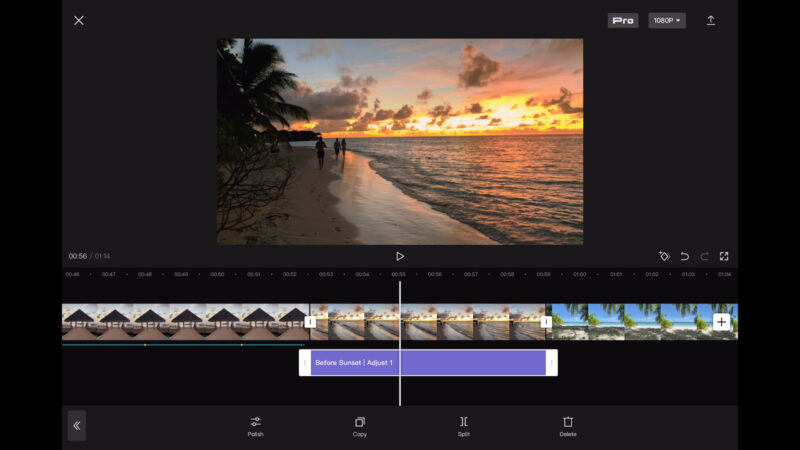
So if you want to use this look for the whole video, just stretch it to cover everything. Or maybe you want to use it on different clips. Just tap the Copy button in the bottom menu and you will get a copy on the next track.
Rather than go through each clip having to make the same changes over and over, now you can move this to another part of your edit and it’s a great time saver.
As well, this copy can be edited independently to the other layer. If you want basically the same look but slightly different, tap the Polish button which brings up all the controls again. As well, you can go back and re-adjust the original layer the same way.
How to Add a LUT in CapCut (desktop)
There are colour filters known as LUTs which transform the look of your video in a couple of clicks. In theory, they are more sophisticated than a simple filter. In CapCut, you can only do this in the desktop version.
Go to the adjustment tab, tap the LUT tab and now tap import. Find your LUT and select it. These are LUTs I got when signing up to Artlist and they emulate looks from some famous movies. For example, The Joker.
Import your LUT and it will now appear in this window with your other LUTs. Hover over a LUT and you will see a plus sign, tap that and it will add an adjustment layer containing your LUT.
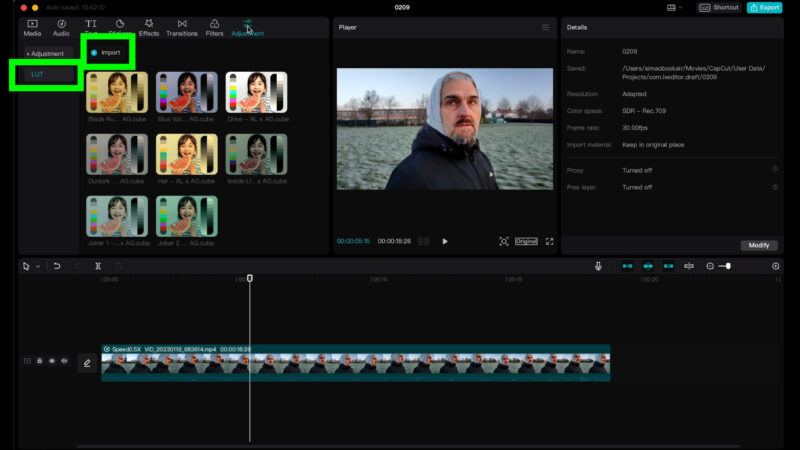
Stretch this out to cover the video clips to which you wish to apply the LUT.
Now we have the Joker look on this clip. But my face now looks a bit weird because the skin tones have been messed up by the LUT.
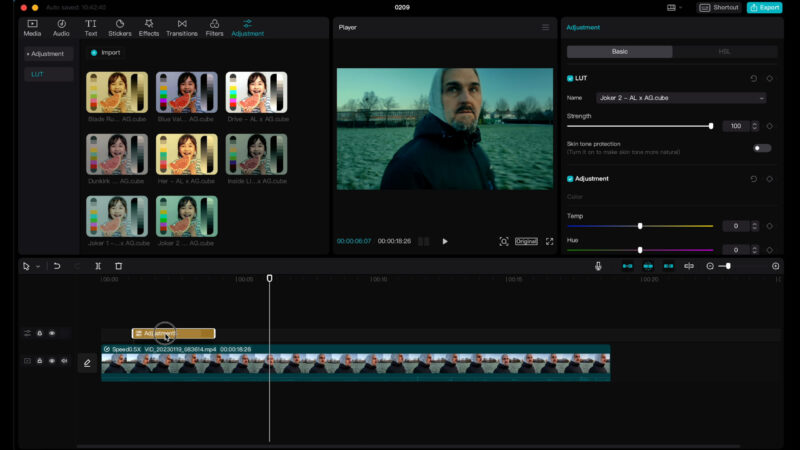
In the window, top right, you can see the LUT is here and below is a switch called Skin Tone Protection. Toggle that on and now the LUT is removed from my face.
But it still looks ridiculous because now my face looks bright red.

So I can just bring down the strength of the LUT until the effect is more subtle.
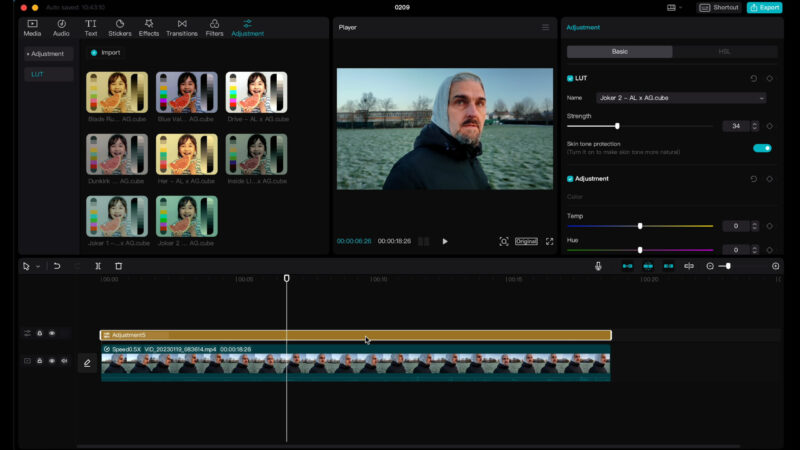
You can also apply LUTs directly to a clip instead of using an adjustment layer. Select the clip, go to the same Adjustment window on the right. Find the LUT with the drop down menu. Now the LUT is applied only to this clip. Everything else works the same.
How to Use Templates in CapCut
You can now access CapCut’s popular filter templates directly in the app. At the bottom, there is now a Templates tab. Tap that to access a huge number of Templates, which allow you to add the type of filters and effects you might know from TikTok.
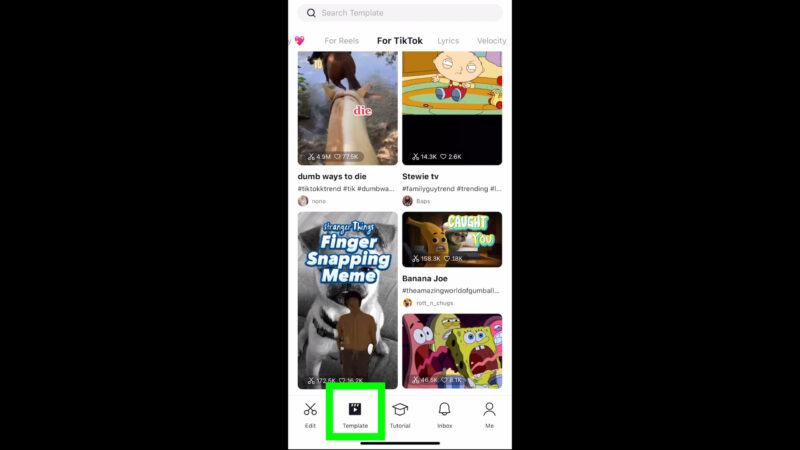
The Templates are organised under headings like Trending, this one’s for Valentine’s Day, there’s templates for Reels, for TikTok and plenty more.
Just select a template you like the look of and follow the instructions. They are usually very quick and easy to use.
At the moment, this feature is only available for CapCut users in the USA. But it will be coming to Europe and other areas soon.
Videography – Beginner to Advanced
If you want to know more about filmmaking, my book Smartphone Videography – Beginners to Advanced is now available to download for members on Patreon. The book is 170 pages long and covers essential smartphone filmmaking topics:
Things like how to get the perfect exposure, when to use manual control, which codecs to use, HDR, how to use frame rates, lenses, shot types, stabilisation and much more. There’s also my Exploring the Film Look Guide as well as Smartphone Colour Grading.
Members can also access my regular filmmaking podcast, as well all 5 episodes of our smartphone-shot Silent Eye series, with accompanying screenplays and making of podcasts. There’s other materials too and I will be adding more in the future.
If you want to join me there follow this link.

Hey!
I’m trying to figure out the way to add “Animation” to all clips at the same time as opposed to adding the same effect to each and every clip. Do you know if this can be done?