Master your DJI OM 4 Tutorial (or Osmo Mobile 3) – Smartphone Gimbal
This is the article where you learn everything you need to know about your DJI OM 4 gimbal.
And if you have the older Osmo Mobile 3, it’s virtually the same gimbal. The only difference is the magnetic holder for the smartphone and the OM 3’s slightly less powerful motors.
I’m going to talk about the different modes, when to use them and how to get the most from them. I’ll talk about the DJI Mimo app, when to use it, when not to use it.
But first, let’s talk about 2 core features of the DJI OM 4 and 3 gimbals which you should spend some time on before you start using your gimbal.
Did you know there’s 2 ways to switch gimbal modes on the OM 4, and 3 as well?
How to Switch Modes on the DJI OM 4
What I’m talking about here, specifically, is changing the way the gimbal motors work. There are various modes which tell the gimbal exactly how you want the gimbal to keep your smartphone stable.
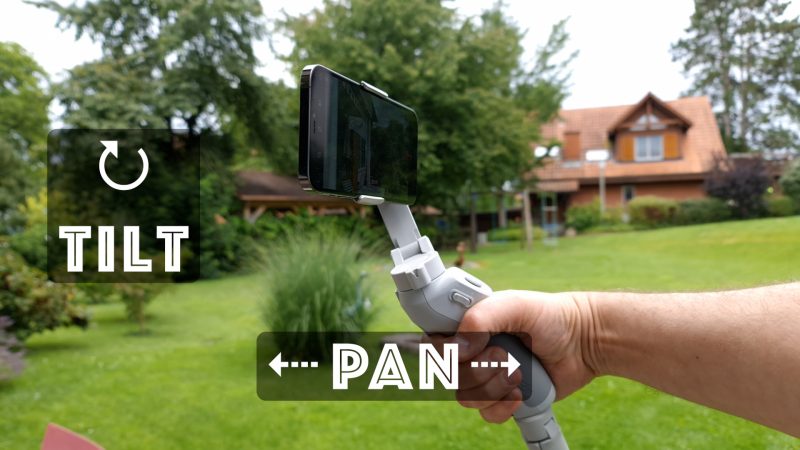
For example, you can tell the gimbal to follow all your movements by switching to Follow mode. Or you can tell it to only follow your pan movements – that’s sideways movements – but not to follow your tilt movements by switching to Tilt Locked mode.
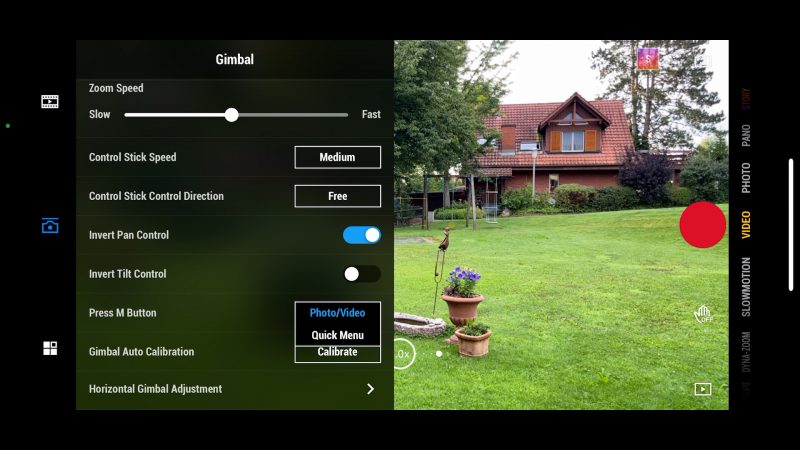
One way to switch modes is to open the Mimo app on your smartphone. You need to be set up and connected via bluetooth.
Tap the gimbal settings button in the left corner of the screen (3 dots). And now select the middle of these 3 icons on the left of the screen.

So if we tap where it says “follow” in the box, there’s 4 modes to choose from. There’s also an option to toggle on and off sport mode.
That’s one way to change modes, but it’s not the most convenient. It would be nice if we could change modes using the gimbal buttons instead.
Assign M Button
And actually you can just by tapping the M button. But if you tap your M button and find all it does is switch from Photo to Video mode, then you need to change something in the settings.
In the same screen where we just changed modes, scroll down a bit to where it says “Press M Button”. In the corresponding box, if it says Photo/Video, tap it and select Quick Menu instead.
Then tap out of the settings screen.
Now when you tap the M button, it opens up a menu with all the modes listed. Not just the gimbal motor modes, but all the other modes too. Use the joystick to navigate up and down the main list.
The gimbal motor modes are listed on the right. Use the joystick to navigate to this list and then select the mode you want. So I’ll select Tilt Locked and then press the M button again, which takes me back to the main screen.
The gimbal is now in Tilt Locked mode.
Calibration
Before you start using your gimbal, you might want to check that it is calibrated properly. Just check to make sure the horizon looks level. Now, if you’re standing somewhere where the horizon is not level (maybe you’re on a slight incline) it can look as if your gimbal isn’t set correctly, when in fact it is.
By default, when it’s correctly calibrated, the DJI OM 4 or 3 will be level with a perfectly level horizon.
But if your smartphone seems to be sitting at a strange angle, you can try the auto calibration. Back in the same screen where we set modes, scroll down a bit more until you get to where it says Gimbal Auto Calibration and tap calibrate.
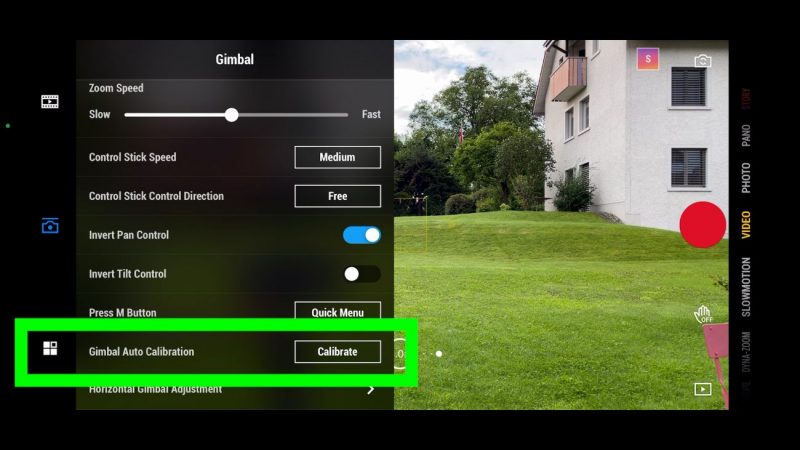
Place the gimbal on a flat surface and let it run through the auto calibration routine. It just takes a few seconds. Now, if you’re still not happy with the angle of the phone, you can also adjust the gimbal by hand.
Manual Calibration
This is one of the great features of the Mimo app. Why all gimbal apps don’t have this feature, I don’t know because this is so useful.
To use this feature, tap the arrow beside where it says Horizontal Gimbal Adjustment. First it asks you to make sure your smartphone is sitting in the clamp correctly, which is a good idea.
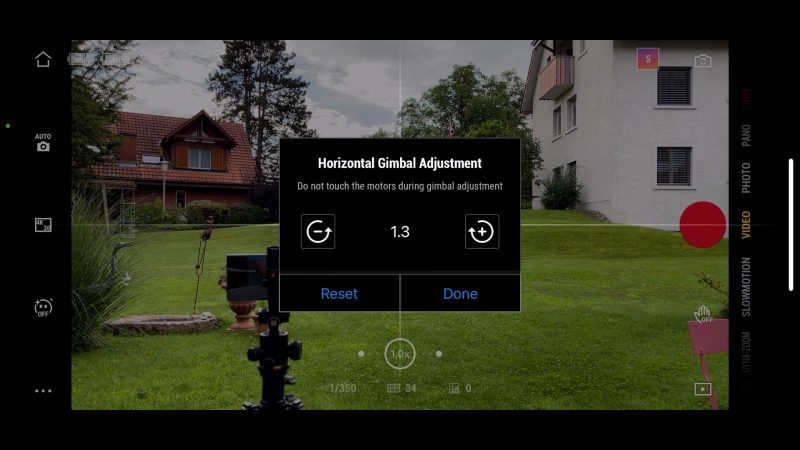
Now we get a control to allow us to manually adjust the horizontal angle of the smartphone. You can see I already have my gimbal set to plus 1.3. That’s because I already adjusted this before and it remembers for the next time you use the gimbal.
Use the 2 buttons, plus and minus, to get your smartphone perfectly level.
There’s another reason you might want to use this feature. As I said, you might be standing on ground which is not exactly level. But what if you want your smartphone to be at the same angle as the ground?
You can use this manual adjustment to align your phone with the unlevel ground. This can also be a creative choice, if you think the shot looks better that way.
Just tap done when you are happy with the setting.
Here’s an OM 4 feature I really love.
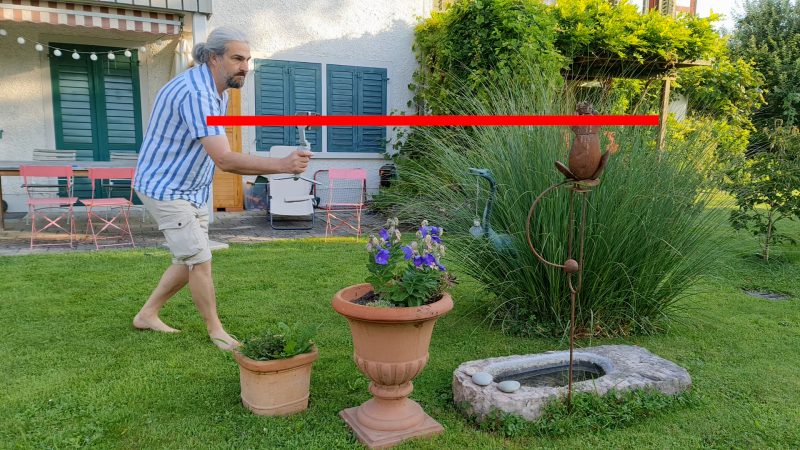
Movement
This gimbal has a way of moving that is a bit different to other gimbals. If you pan left or right, you might notice when you stop moving the gimbal keeps moving and then slows to a stop.
This allows you to ease out of the shot, and that looks much nicer than suddenly stopping.
However, this does take a little practice to get right, sometimes. What we need to do is to stop a little bit before we want the shot to end. For example, if I want to pan and then end on an object, I need to stop and then allow the gimbal to ease into the final frame.
Remember, not to stop your shots too soon. Unless you know you will definitely be cutting to the next shot before, just hold a few seconds. Count to 3 and then stop recording.
Sometimes you might want the gimbal to stop more abruptly and you can get it to do that as well. I’ll talk about that later, first I want to talk about the different gimbal modes.
Gimbal Modes
If you count Sport Mode, there’s 6 modes which control how the gimbal motors move your smartphone.
The first 2 modes are probably the most useful. Those modes are Follow Mode and Tilt Locked Mode. I almost always have my OM 4 in one of those 2 modes.
In Follow mode, the gimbal motors are guided by your movement, but only on the pan and tilt axis.
That means if I pan left or right, the gimbal follows. If I tilt backwards or forwards, the gimbal follows.
But if I roll my wrist, the gimbal does not follow. Instead, the gimbal keeps the smartphone level with the horizon.
This is a very useful mode if you want to keep some flexibility in your movement, but you still want to keep the horizon level.
If you think about it, Follow Mode is the most similar to the way people observe the world. When we look around, we generally use the same kind of movements with our head. We turn left and right, we look up and down, but we rarely tilt our heads to the side.
That’s why in movies you rarely see the camera tilt on the horizontal plane. When might a shot like that be used? When we want to show someone being drunk, maybe. Or on a ship in rough sea and the ship is rolling side to side.
The point is, when the camera tilts on the horizontal plane, it makes the viewer feel a bit uneasy.
So that’s why Follow mode is a good mode for a good majority of our shots. It creates the most natural movement, similar to how we observe the world.
Tilt Locked mode is quite similar, so let’s look at that mode next.
Tilt Locked Mode
In tilt locked mode, the gimbal only follows your pan movements. And if you tilt the gimbal handle backwards or forwards, it keeps the camera at the same tilt angle.
However, one limit of these small gimbals is that it will only lock tilt up to a point. If I keep moving, you will see it eventually does tilt. But as long as our tilt movement is minimal, it’s not going to be a problem.
Tilt locked mode is the best mode for simple moving forward or backwards shots. For walking shots where you are either tracking a subject or yourself, this is probably the best mode. This mode will keep your smartphone steady and pointing at your subject.
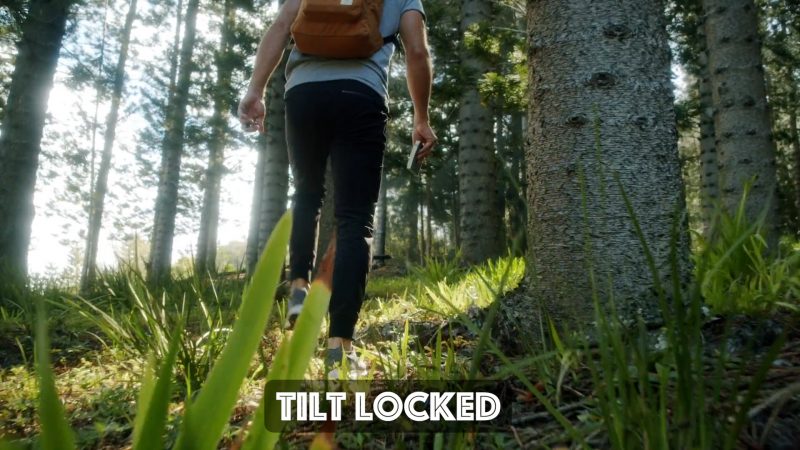
If you are following a subject, you really don’t want the camera tilting up and down.
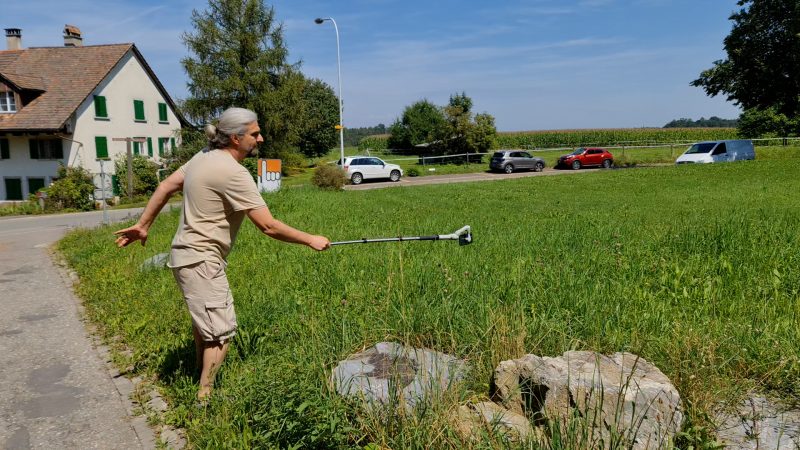
One other use for Tilt Locked mode is when you are shooting some kind of crane shot. This is a shot which rises up smoothly or drops down smoothly.
Crane shots (or jib shots) are used in movies all the time and it used to be a pretty expensive shot. Movie producers would get stress related illnesses every time their director wanted a crane shot because of all the extra equipment, crew and time needed to shoot one.
But now, with just a smartphone and a gimbal, we can shoot a crane shot in a couple of minutes. And if you want to shoot a real crane shot where the camera moves to or from a high position, all you need is a monopod.
Crane Shot
If you’ve seen some of my other tutorial on this gimbal, you will know about using the monopod. Screw it to the base of the gimbal and now you have extra reach.
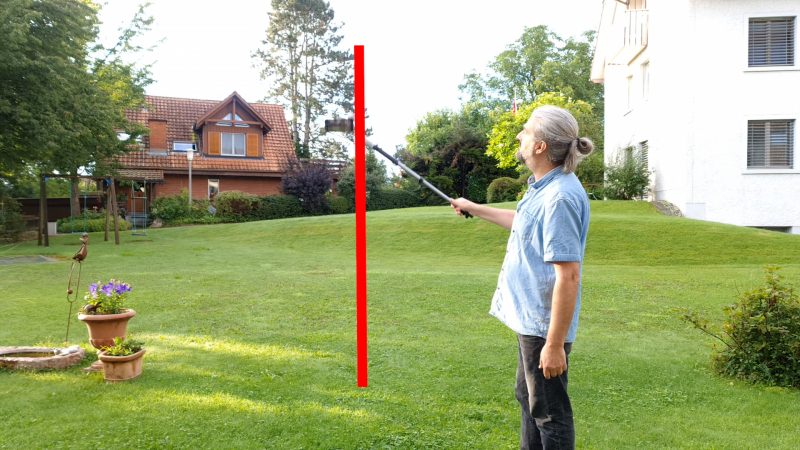
Just to be clear about how to get a crane shot with a OM 4 or 3 gimbal, it cannot tip forward like other gimbals. It reaches a limit where it can’t tilt any more. What we are trying to achieve is for the smartphone to remain at the same angle as it moves up or down.
So we have to use a sideways movement. When we go from low to high sideways, the gimbal is able to keep the smartphone at the same angle.
If possible, try to keep the smartphone going in a straight line rather than a curve. So you have to kind of compensate as you move.
Remember, creativity is playing. So don’t get too hung up on getting it right. Just try things and see what happens. Experiment, invent your own shots.
FPV
The next gimbal mode I want to talk about is FPV or First Person View. When we select this mode, the gimbal will now be free to follow our movements on all 3 axes.
In FPV mode, if we make a pan movement the gimbal will follow. If we make a tilt movement, the gimbal will follow. And now the gimbal will also follow if we make a roll movement.

This is that movement where the horizon tilts, which isn’t normally how we view the world. But the advantage of doing something unusual is that it gets the viewer’s attention. Unlocking the roll axis on the gimbal, unlocks creative potential in your OM 4 gimbal.
Now we can have our smartphone camera move in a more fluid way and we can start to be a bit more imaginative with our shots. Especially if we’re shooting some B roll and we’re planning to edit these shots to some music.
Think Ahead
I’m going to show you what I mean. But before I shoot anything, I will usually think about the energy I want to create with these shots before I shoot them. And if you want to move from beginner to more professional level video, I really recommend you work this way.
One way to do this is to find the music you will use before you start shooting. I could even download this music onto my phone so that I can remind myself of the energy when I’m about to get the shot. Better still, have the music playing over headphones while you are getting the shot.
When you edit these shots to the music later, they will fit the energy you want to create with your B roll sequence.
3 Modes
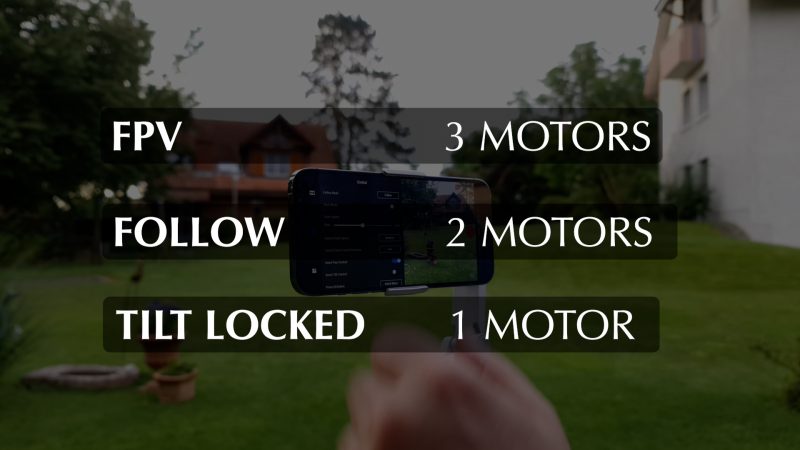
It might be helpful to remember each of these 3 modes unlocks 1 or more of the axes on your gimbal.
FPV mode unlocks all 3 motors.
Follow mode unlocks 2 motors: the pan and tilt axes.
Tilt locked mode unlocks 1 motor: the pan axis.
The DJI OM 4 and 3 allow 3 other gimbal modes. We probably won’t use them as often as the first 3, but they are still useful modes to have.
The first of these modes I want to talk about is SpinShot.
SpinShot
Navigate to gimbal modes in the DJI app and select the final mode in the list – SpinShot.
When we are in SpinShot mode, the gimbal follows our movements on all 3 axes. Just like in FPV mode. The only difference between SpinShot and FPV mode is that we can now use the joystick to make the smartphone spin.
Again, we can have fun shooting creative B roll shots with this mode. But using the joystick to spin the smartphone instead of rolling our wrist means the shot is a bit easier to get and it will look more even.
The SpinShot allows your smartphone to turn quite a long way, but not the full 360°. You can spin your smartphone both clockwise and anticlockwise.
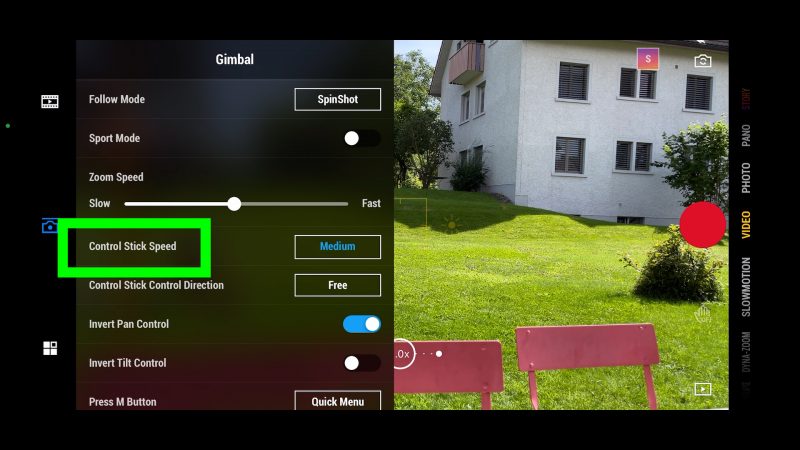
If you want to change the speed of the spin, go into settings where we change modes and look for a setting called Control Stick Speed. There’s 3 speeds to choose from and this will change the speed of the spin and anything else you do with the joystick.
Again, when we use this shot we are showing the world in a way we don’t normally experience it. So when would we want to use this kind of shot?
Most likely we won’t use this shot for talking to camera or scenes with actors talking, unless the characters are drunk or on drugs or something like that. I think the best use of this mode is, again, for B roll shots.
Having the camera spin, if used well, can add an extra dynamic to the shot. We can also use a spin shot to create a cool transition, if we match the spin in 2 or more shots.
OK, what about locked mode?
Locked
When the OM 4 or 3 gimbal is in locked mode, all the axes are locked. So, whichever way you move your hand, the gimbal will try to keep the smartphone in the same position.
There’s a couple of reasons why you might want to use Locked mode. The first one is if you want the camera to remain facing in the same direction while you need some mobility to get the shot.
For example, you might be walking in one direction and then change direction during the shot. But, for creative reasons, you want the smartphone to stay pointing at the same subject.
What if you want to get a tracking shot, moving forward, but there’s an obstacle in the way? Well, you could walk around it. But it might look cool if the shot passes over the obstacle.
By using lock mode, you can move around the obstacle while holding the gimbal over it.
How do we get into Locked mode? It’s not on the list or in the settings. It’s actually very easy.
All you do is press down and hold the trigger button on the gimbal. While you are holding the trigger down, all axes will be locked. As soon as you release, you return back to your previous mode.
This makes it really easy to switch to this mode on the fly. So you can be quite spontaneous, if you spot an opportunity to use this mode during a shot.
The final gimbal mode is called Sport Mode.
Sport Mode
In Sport Mode the gimbal is much more reactive to your movements. But at the same time, it’s not as smooth. Earlier, I talked about how the gimbal slows to a stop at the end of a shot. But in Sport Mode the gimbal will suddenly stop when you stop.
DJI call this sport mode because they are suggesting you use this to capture any fast paced action.
To switch to sport mode you need to go into settings in the Mimo app and toggle it on. Another easier way is to double tap the trigger and then hold on the last tap. The gimbal enters sport mode and then switches back when you release the trigger.
Personally, I’m not sure I would find much use for this mode. I use a gimbal to smooth out my movements. But sport mode will pick up smaller movements and make the video look more jerky.
If I want those kinds of shots, I think I would just hold the smartphone in my hand and use the phone’s inbuilt stabilisation to smooth it out a bit.
There are other modes that I want to tell you about. These modes are to do with the position of the gimbal rather than how the motors operate.
Position Modes
Upright position mode is how we normally use the gimbal, held upright in our hand or resting on a surface using the tripod legs.
An interesting position mode we can use is called Underslung Mode. All we do is turn the gimbal upside down. The DJI OM 4 or 3 will keep your smartphone in the same position and now we can try to capture some low angle shots.
How about following your feet as you are walking. This can be a really nice shot. Again, this is not an angle from which we normally experience the world, so you can give your audience a new perspective.
If we move along with the smartphone camera low, the sense of movement is exaggerated. The ground seems to fly past.
Another positional mode is the Side Grip Mode.
Side Grip Mode
To use side grip mode, just hold the gimbal handle at about 90°.
Holding the gimbal in this position gives us more options for interesting angles. With the gimbal at 90° we can have our smartphone fly over surfaces. You can get some really cool shots this way.
And if you add a monopod to extend the handle, you can get shots from angles where you wouldn’t normally be able to reach. Like a shot flying over water or wildflowers.
The final positional mode is Low Position Mode.
Low Position Mode
To switch to Low Position Mode, press and hold the trigger. Now angle the gimbal at 90° away from you.

This is useful if you want to shoot a push in shot and you want to be able to hold the gimbal more like when you are holding a flashlight. Some people even call this flashlight mode.
You can also get low angle shots easier this way.
Remember, when you want to reposition your smartphone back to the default position, just double tap the trigger button.
Now let’s look at the Mimo app and the different modes that we can use to create different types of shots.
Mimo App
The DJI OM 4 has tracking capabilities which allows you to lock the camera onto an object so that the gimbal will try to keep the object in frame. But not just in frame, the gimbal will also try to keep the object in the same position in the frame. And that’s an important difference.
Let’s take a look at this feature.
Active Track
Right now I’m in video mode in the Mimo app. If I draw my finger over an object, which can be a person or anything you want, the app locks onto the object. Now, when I move the gimbal, it tries to keep the object in the middle of the frame.
We can also adjust this position using the joystick. If I move the joystick up and down, it also moves the position of the object in the frame. This is really useful if you are filming yourself (or someone else) talking to the camera.
If we are framing someone, we don’t want their face right in the middle. That’s not a nice looking shot. Really we want them nearer the top of the frame.
By the way, we can also start tracking just by tapping the trigger once. And also, to stop tracking, tap the trigger once again.
One downside of using active track is that we can’t lock exposure at the same time.
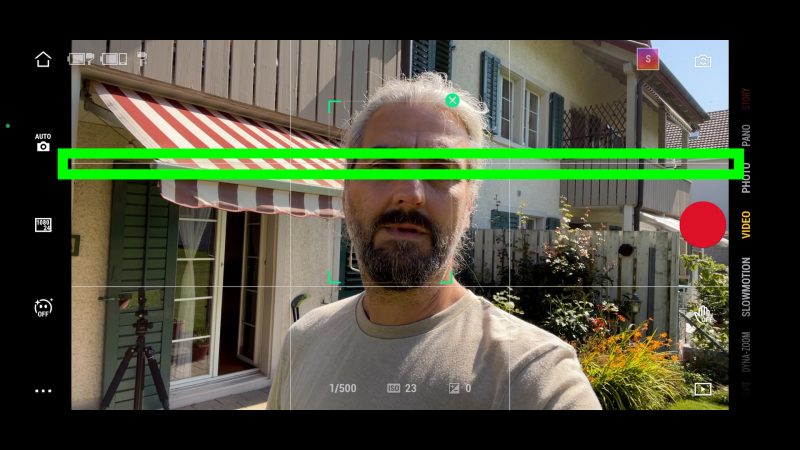
iPhone Exposure Tip
Before I talk about the modes available in the app, here’s a little tip for getting better exposure with an iPhone. This is especially relevant for the newer iPhones, so if you have an iPhone 11 or 12 this will make a difference to you.
If you are filming inside and the windows are overexposed they can look really ugly. When you pan, if the exposure isn’t locked, you can see the windows changing exposure as you move the camera. Sometimes you even get really bad flickering.
This is basically unusable for any serious project.
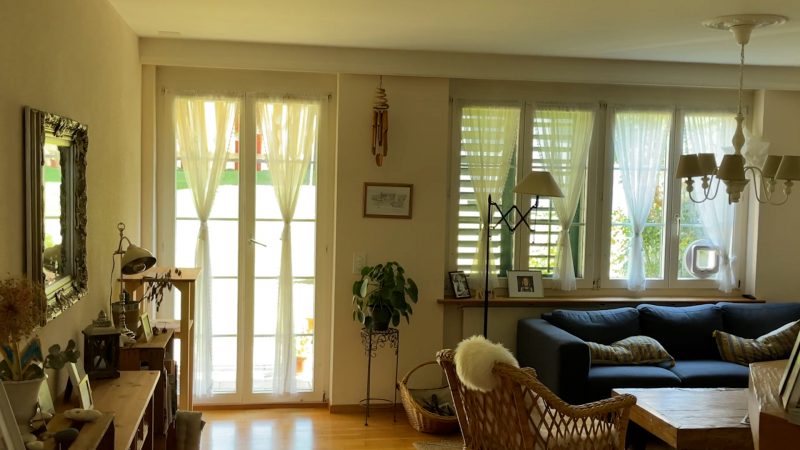
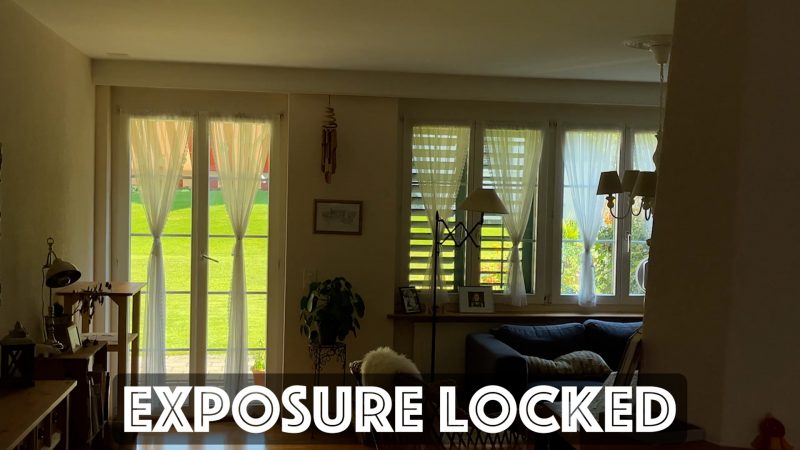
But if you move and face the window and tap on the window area, you should see this yellow exposure box move there. And now the window should be properly exposed. Hold on this yellow box to lock exposure.
Now as we move the gimbal, see how the exposure is much more even. The iPhone is able to do this using a process known as dynamic tone remapping. Once locked, the iPhone actually remembers to expose the windows correctly even if you pan away and back again.
So, if you are filming inside, try this method to make sure the windows look good. There might still be some flickering going on, from the tone mapping, but it’s usually much better if you do this first.
Now let’s look at how to get great hyperlapse and timelapse shots with your DJI OM gimbal.
Timelapse – Motionlapse – Hyperlapse
Hyperlapse, Motionlapse and Timelapse shots all compress time, so your final video will be speeded up dramatically compared to normal speed. There is a difference between these 3 modes. Timelapse or Motionlapse are shots where your smartphone and gimbal are stationary, whereas Hyperlapse is a shot where you move with the gimbal.
Let me give you some tips for shooting the best hyperlapse videos using the OM 4.
Hyperlapse
First, I recommend choosing the highest resolution.
Also, choose the amount you want time to be compressed for the final shot. We can choose from 5x faster than normal up to 30x faster than normal. We want to balance the effect with creating something which works visually.
30x might be too fast, and then the shot is over before we get a chance to enjoy it. For this shot, I’m going to choose 15x.
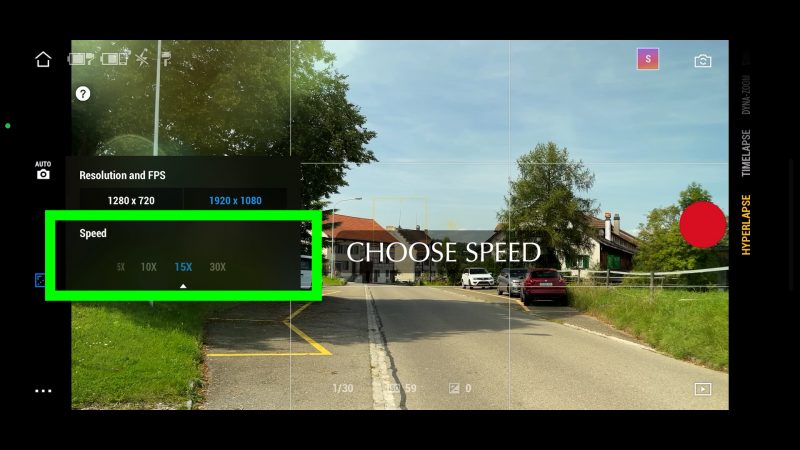
It might be a good idea to lock white balance as well. So go into white balance and choose the preset which most suits your shot. The important thing is that the white balance doesn’t change during the shot.
Hyperlapse shots can look really great if we use a prominent object, like a building or statue, as a focal point. Once you start recording, move towards the object at a steady pace. Circling the object also looks really nice.
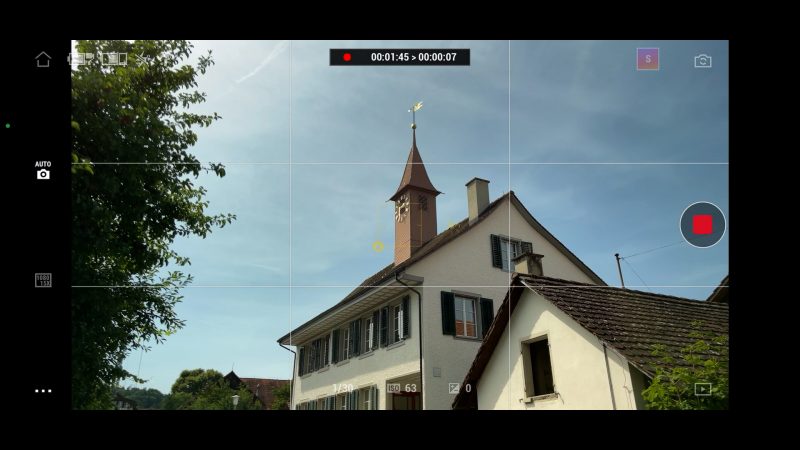
If we turn on the grid this will help us keep the camera pointing at the same position in the frame as we move. In this shot, I use the building as my focal point and try to keep it in the middle of these grid lines.
Another little trick with the OM 4 is to use the object tracking feature. We can lock onto an object, like a building, and this will help keep the focal point in the centre of the frame.
Timelapse
Timelapse shoots images at a very slow frame rate and then plays those frames back much faster, so time appears to be moving extremely fast.
Once selected, Timelapse controls appear at the top of the screen. The first setting is how often you want the camera to shoot a frame, measured in seconds. You can choose from every half a second up to once per minute.
The higher this setting the faster your timelapse will go. Next you can set how long you want the camera to keep shooting. If you leave it set to infinity, it will keep shooting until you stop it manually.
Motionlapse
The final setting is path. If you want the gimbal to move the camera during the timelapse, then use this setting to program in a path. You can add up to 4 points that you want the camera to move between.
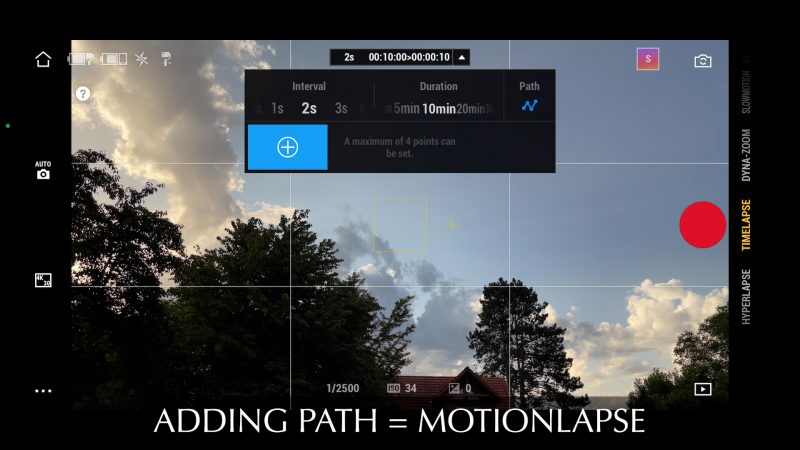
Personally, I don’t think I would ever use more than 2 points. With 2 points the timelapse will move smoothly in one direction. With 3 or 4 points, it will suddenly change direction during the shot, which I don’t think looks good.
If you do decide to set a path, notice that you can’t also have duration at infinity. The Mimo app needs to know a duration, because it uses this to measure the time between each point.
It’s a good idea to lock exposure and white balance before recording. Once everything is set, press record and Mimo will begin capturing your timelapse.
Vertigo Shot
Using the Mimo app you can shoot what’s known as a Vertigo shot. It’s called a Vertigo shot because the shot was made famous after being used in the film Vertigo (1958) directed by the legendary master of suspense, Alfred Hitchcock.
Another well-known use of this shot was by Stephen Spielberg in the movie Jaws (1975). It can also be known as the Trombone shot or the Dolly Zoom.
The last name tells you how the shot is achieved. You dolly towards or away from your subject whilst at the same time zooming in or out. The idea is to keep the subject in the same position and at the same size while you move.
If you get it right, the subject stays the same while the background either expands outwards or shrinks inwards. This is obviously not how we normally experience the world which is why the shot is often used in movies to indicate a character is suffering some kind of emotional stress.
In the film Vertigo, the main character suffers from a crippling fear of heights and the dolly zoom is used to indicate a moment where he is running up a high tower. In the film Jaws, the main character is observing a shark attack and the dolly zoom is used to indicate his feeling as he realises what’s happening.
There’s 2 ways to create this shot – move towards the subject while zooming out, or move away from the subject while zooming in.
You can actually create this shot just using your phone. Start recording and zoom in or out as you move towards or away from your subject. But using the Mimo app it’s a bit easier because it handles the zooming part for you.
In the Mimo app they call this shot the Dyna-Zoom.
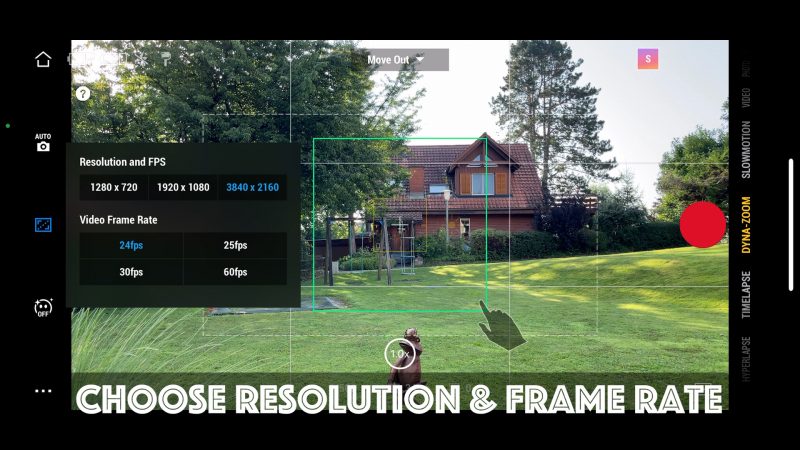
Dyna-Zoom
When you switch to Dyna-Zoom mode, the app asks you to decide which kind of Dolly Zoom shot you want to create. Basically the choice is between background shrinking or background expanding.
To select you have to tap the screen and then tap DONE in the top right corner.
If you change your mind and want to choose the other option, you can select it from a small drop-down menu at the top.
Now, if you choose to move in during the shot, make sure to start a good distance away from the subject. Alternatively, if you choose to move out during the shot, start close to your subject.
Next you need to draw your finger across the subject to start Active Track. Once the app has locked onto the subject, press record. The app will tell you to move in or move out, depending which version of the shot you chose before.
Tap record and move slowly forwards or backwards.
This shot will look better if you have an interesting background. If the subject is against a plain wall, you won’t see much of an effect. Try to use a location that has plenty of features around.
I recommend that you have your subject at the same level as the camera. Otherwise, when you move backwards or forwards, the angle of the camera will also change.
Also, try to move in a straight line away or towards your subject. Because, again, if you are at an angle, the effect doesn’t come out so well. Imagine a straight line from the subject to the camera lens (not your body).
Slowmotion
The Mimo app has a slow motion mode. But if you want to shoot slow motion, my advice is to use the native app in your smartphone. You will get the best quality results this way.
My preferred method of shooting slow motion using the DJI OM 4 and iPhone 12 Pro Max is to at 60fps and then slow the clip down to 40% on a 24fps timeline. I will either use the Mimo app or the iPhone app, it doesn’t make too much difference.
If I select the Slowmotion mode in the Mimo app I only get 1 choice – 1080p and 8x slower.
Now, this is an interesting question – if we are using a smartphone gimbal like the OM 4, do we need to use the app that comes with it? In fact, when I bought my first smartphone gimbal I never used the camera app. I always used either the native app or FiLMiC Pro.
So let’s talk about the pros and cons of using the Mimo app against using our smartphone’s native app.
Native vs Mimo
Should we use the Mimo app or our phone’s native app? The advantages of the Mimo app are the extended features such as Active Track, programmable timelapse, Story Mode and so on. But you might find when it comes to basic video or photo quality, your native app is better.
This is especially true with Android devices. In my experience, the Mimo app does not work as well on android devices as it does on iPhones. In fact, all the gimbal apps I’ve tried – that’s Hohem, Zhiyun and Moza – work better on iOS.
I know that a lot of gimbal users simply never use the app that comes with the gimbal. So how do we use our gimbal with the phone’s native camera app?
What we can do is set the mode we want to use in the Mimo app – like Follow, Tilt locked and so on. Now switch to the native camera app and the gimbal will remember the mode. If the gimbal is already in the mode you want you don’t even need to open the Mimo app.
Using my iPhone 12 Pro Max, I power up the gimbal and you can see if we go into bluetooth that the phone is connected to the gimbal without using the Mimo app.
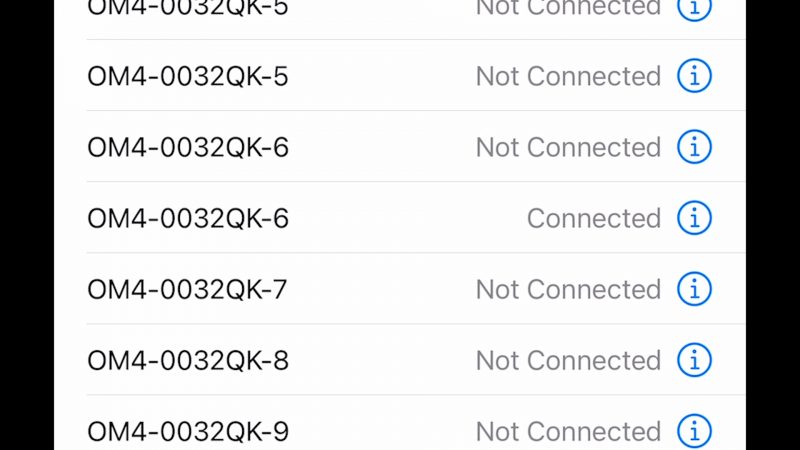
When I open the native camera, the shutter button on the gimbal starts recording. In photo mode, it takes a picture.
Double tapping the M button will change the orientation, without the Mimo app running. Double tapping the trigger will re-centre the gimbal. The joystick will pan and tilt.
All the basic controls work, but you can’t use the zoom rocker, you can’t change gimbal modes.
So if you’re just filming simple shots and you want the best quality, you’re probably better off using the native app. But if you want the extra features and controls, then stick to Mimo.
Gimbal Power Bank
At the top of the screen in the left corner, the Mimo app lets you know the battery levels in your smartphone and the gimbal. I find that my smartphone battery drains faster than the gimbal.
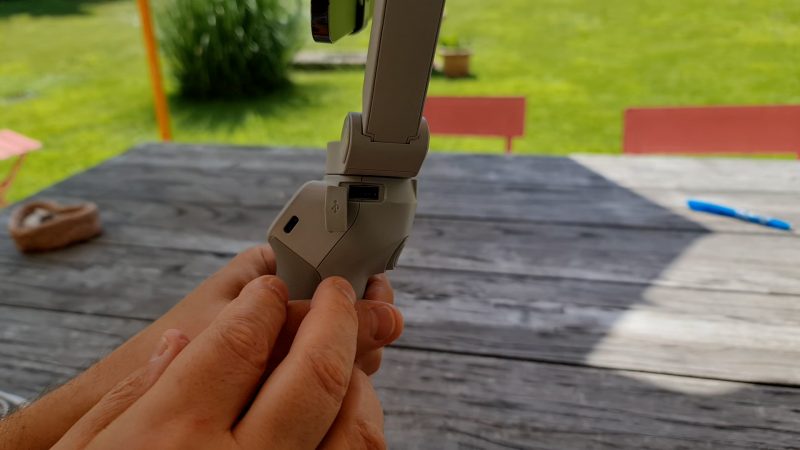
The OM 4 should last about 15 hours of constant use. But shooting video and being connected to bluetooth really uses a lot of energy in the phone. So one tip is: if you find your phone is running low but the gimbal is still well charged, you can use the gimbal as a power bank.
Just under the bottom motor is a port where you can connect a power cable from the gimbal to your smartphone. This is a USB A socket, so in this case I need a USB A to lighting cable to connect my iPhone 12 Pro Max.
Everything I’ve talked about so far has been using the OM 4 with a smartphone. But there are times when we would like to add extras to our smartphone, like lenses and filters. The problem is, this adds extra weight to one side of the phone and you might find your OM 4 or 3 struggles to keep the phone level.
So let’s look at how to deal with this extra weight.
Extra Weight
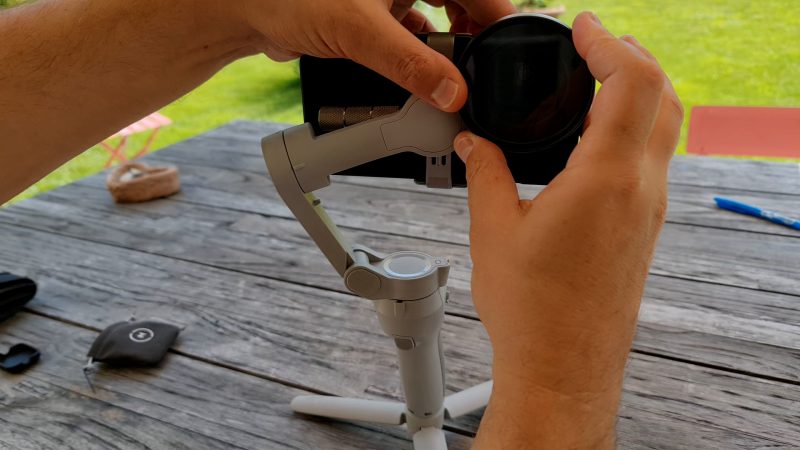
If you are filming in daylight but you want a slow shutter speed for more cinematic motion blur, you will need to use an ND filter. I use one from Sandmarc which clips over the lens. But it does add extra weight to this side.
If we want to add an anamorphic lens, this is even heavier than the filter. And if I want to add a filter onto the anamorphic, I’m putting more and more weight on this side of the gimbal.
Thing is, your phone is already heavier on this side because of the camera. Eventually it becomes impossible to balance the phone on the gimbal.
So one solution is to add counterweights to the gimbal.
If you look at the top motor of the OM 4, you can see a hole here. This is where you can add the counterweights. It’s the same on the OM 3.
These are weights by Ulanzi which come in 3s. So you can add however many you need, depending on how much the extras weigh.
This is not a complete solution. Sometimes the extras are too big for the gimbal or it’s just too heavy for the motors to handle. Bear in mind, overloading the motors might wear them out quicker and use up the gimbal’s battery faster.
Smartphone Video – Beginner to Advanced
If you want to know more about smartphone filmmaking, my book Smartphone Videography – Beginners to Advanced is now available to download for members on Patreon. The book is 170 pages long and covers essential smartphone filmmaking topics:
Things like how to get the perfect exposure, when to use manual control, which codecs to use, HDR, how to use frame rates, lenses, shot types, stabilisation and much more. There’s also my Exploring the Film Look Guide as well as Smartphone Colour Grading.
Members can also access all 5 episodes of our smartphone shot Silent Eye series, with accompanying screenplays and making of podcasts. There’s other materials too and I will be adding more in the future.
If you want to join me there, follow this link.

As I am a first time user of any phone gimble, I searched every video on YouTube to understand DJI om 4, but I did not find any satisfactory video.
After reading this blog, I got every minute detail about my gimble, thanks for explaining everything so nicely.
Thank you, love your YouTube channel as well.