Master Your RØDE Wireless GO 2 Dual & Single – Tutorial Review
This is the article where you learn everything you need to know about your RØDE Wireless GO 2 microphone system.
The RØDE Wireless GO 2 is pretty simple to use, straight out of the box. However, there’s lots of settings you can play around with, as well, to get the system working in different ways. Or you might want a different setup for different projects.
RØDE Wireless GO II Single
Recently, RØDE released a version of the Wireless GO 2 with only 1 transmitter for solo creators, called the RØDE Wireless GO II Single. Basically for YouTubers and people who create videos on their own and therefore have no need of a second transmitter.
The single setup is identical to the dual-channel version, just minus one transmitter. This means you could add an additional transmitter at a later date if you wanted.
Depending on the country you’re purchasing in, the single version might be about $100 cheaper. In the UK, it seems to be only about £50 cheaper. So, if you are looking to buy the single version to save money, then it might be worth checking how much you are actually saving.
For this article, I’ll be using the dual version but, as I say, the single version works exactly the same.
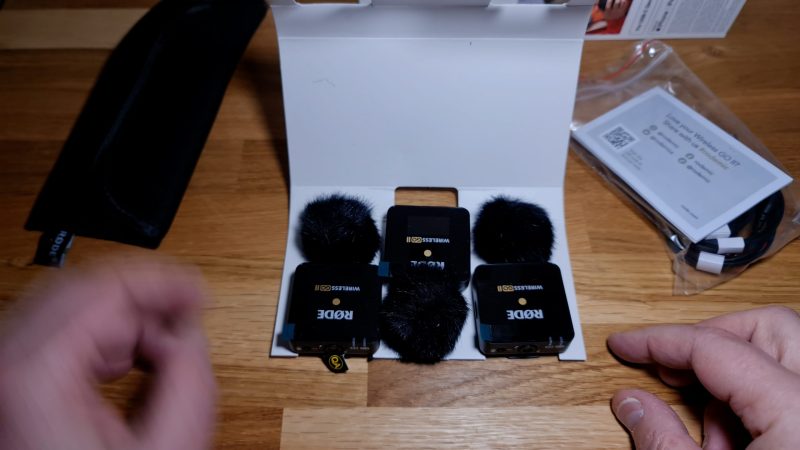
What You Get
The box contains 2 transmitters and 1 receiver. There are 3 fur windshields for filming outside in windy conditions.
There’s 3 USB A to USB C cables, for charging and connecting the devices to smartphones or computers. There’s also a 3.5mm TRS cable for connecting the receiver to a regular camera, with a 3.5mm input.
If you want to connect the receiver to an iPhone, you will need an extra cable or some kind of USB C to lightning adapter.
Finally, there’s a carry pouch. The single version has a smaller one of these.
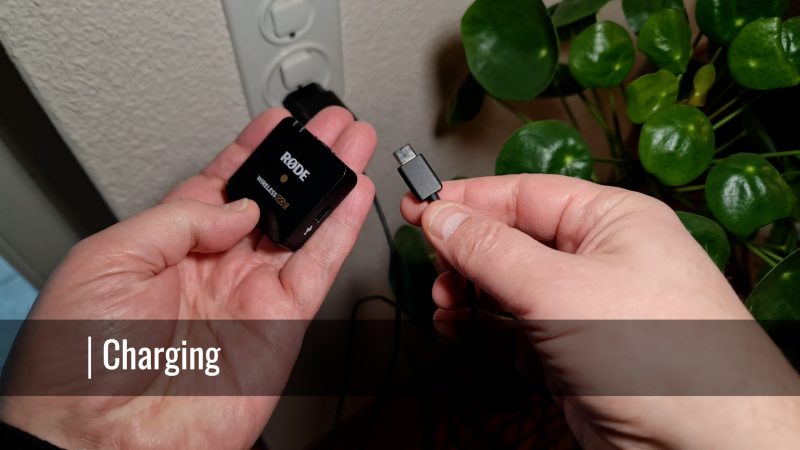
Charging
Before you get started, I recommend charging each device. Each one needs to be charged separately, so if you only have one charging method, that’s going to take a bit of time. Perhaps RØDE will one day make a charging case (as DJI do for their setup) so we can then charge the mics simultaneously.
Each device has a USB C port. Not sure why we’re still getting USB A cables, when I believe most of us are now using USB C. Most smartphones now ship with a USB C charger, which means the cables that come with this won’t fit the charger.
However, I used the charging cable from my Samsung smartphone and it works fine. I was also able to connect the device to my laptop using this cable.
As well, you can get adapters like these quite cheaply, which convert USB A to USB C.
After charging, each unit should last up to 7 hours.
Setting Up RØDE Wireless GO 2
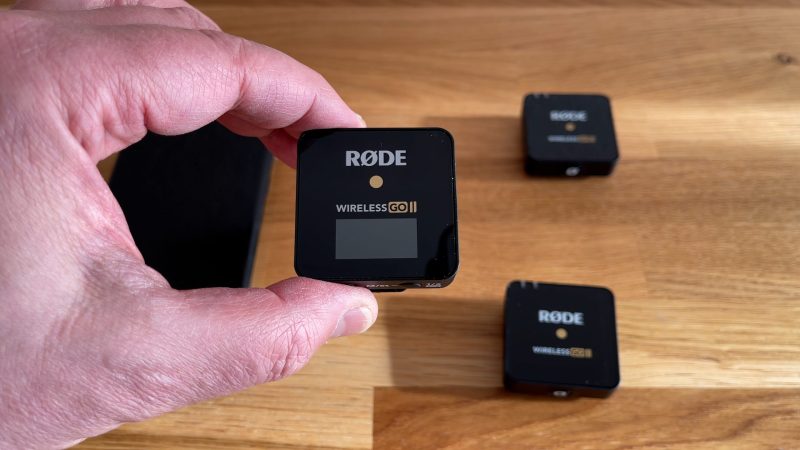
The 3 devices look pretty similar at first glance, but the receiver has the mini screen on it while the transmitters have no screen. You can remove the screen protectors by pulling the green tab.
The receiver connects to your camera or smartphone using a cable. With a camera, you will more likely be using the 3.5mm output rather than the USB C, depending on your camera.
Once you switch on the devices, one or both of the transmitters should automatically connect to the receiver wirelessly, depending on how many you are using.
The RØDE Wireless GO 2 system uses a 2.4 GHz radio band, which is used by many other things, such as cordless telephones, bluetooth and wifi.
The transmitter contains an inbuilt microphone, so you can clip the transmitter to the person talking, as near to their mouth as possible. The nearer you place the mic, the more background sounds and echoes are reduced and the better quality your audio will be.
2 Ways to Record Audio
Put simply, there are basically 2 methods to record audio using this system.
1: Onto Your Video Recording Device
The first method takes the audio from the microphone, through the wireless system and onto the device where you want to record audio. This could be a camera, a smartphone or a computer. Or you could even record onto a separate field recorder, like a Zoom H4n. However, in this case you would need a XLR to 3.5mm TRS cable.
2: Onto a Transmitter
The RØDE Wireless GO 2 transmitters can also record audio directly onto internal storage. This means they can be used to record a backup audio (for safety reasons) or you can even use the transmitter as a stand alone recorder.
That’s what actually sold me on this setup and why I purchased it. As a solo filmmaker, I can now record quality audio easily, without having to fuss around too much connecting microphones.
I’ll go into all that in more detail later, but first let’s get started with the basics.
How to Power On RØDE Wireless GO 2
Now you have a grounding in how the system works, let’s power on the devices.
All 3 of these devices power on in the same way. Find the button which has a distinctive Ø, the one with the line through it that RØDE uses in their name. Press and hold until it powers on.
2 blue LEDs light up at the top of the transmitter. The light nearer the middle tells you that the transmitter is switched on, while the light nearer the edge tells you the transmitter is connected to the receiver. If it’s not connected it it will flash on and off.
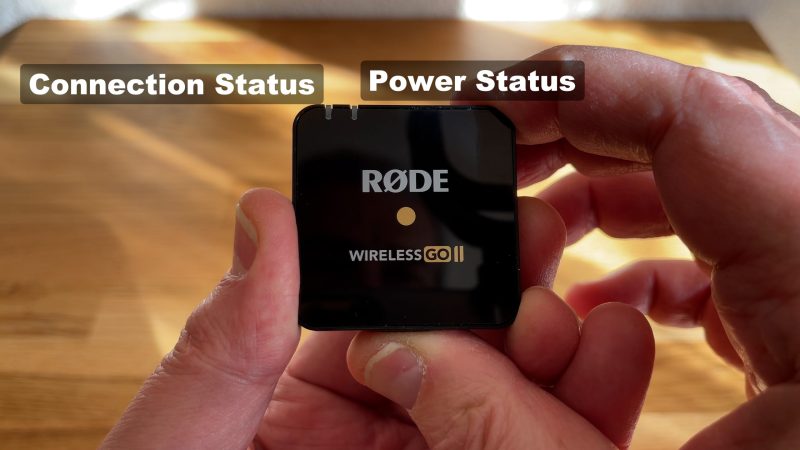
You can see each light has an icon beside it – connection and power.
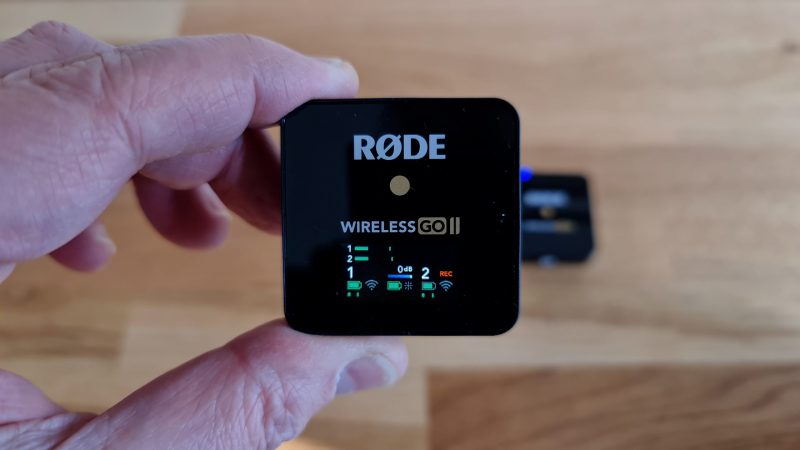
With the receiver, you will see the mini screen switch on and start displaying information. Immediately, you should see the audio level bars moving on the receiver to show that it’s receiving audio from the transmitter’s inbuilt mic.
Now, if I connect the receiver to my Samsung using the phone’s charging cable, you can see I now get a similar audio level bar in Samsung’s Pro Video mode screen. As well, it now says audio is recorded via a connected USB C mic.
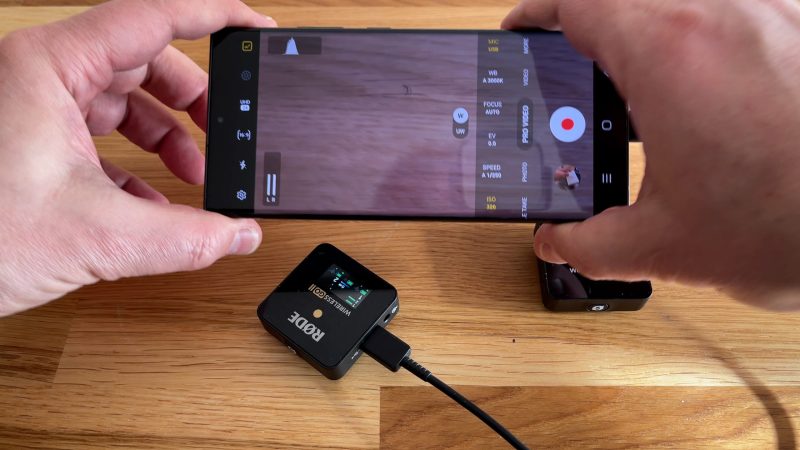
If I start recording video, the audio will be from the RØDE transmitter mics.
So that’s really how simple it is to get started recording with this mic and a smartphone or a camera. But to get more functionality from this setup, we need to dig a bit deeper. Let’s look at the mini screen and find out what information we’re getting here.
Receiver Mini Screen
By default, the RØDE Wireless GO 2 records in stereo. So we get 2 audio level meters, named 1 and 2. And if you have 2 transmitters, they are going to be assigned to separate channels.
When I switch on both transmitters, both audio level meters start moving. This means the transmitters are recording onto separate channels, which is important if you want to work on the channels separately later.
Battery & Audio Levels
Below the main audio level meters, we have mics 1 and 2 on the left and right. We can see the battery level of the mics, whether the mics are connected and the audio level of each mic.
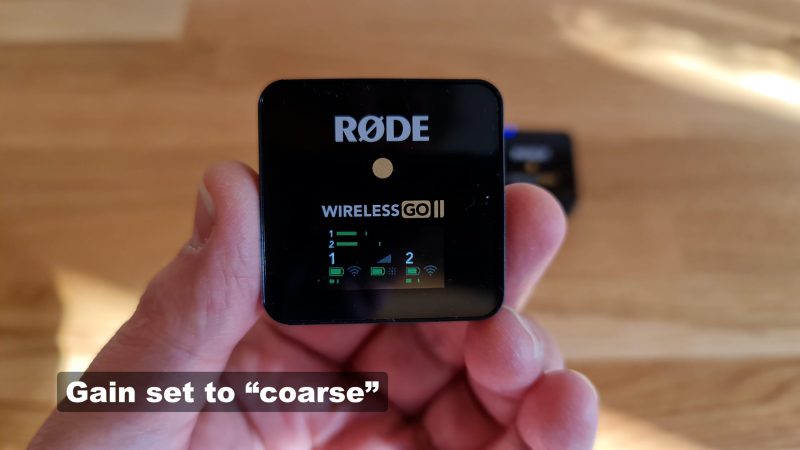
In the middle, we are given 3 bits of information: the battery life, backlight mode and output gain for the receiver, indicated by a thin blue line. However, if your receiver is set to coarse gain you will see a triangle here.
If it’s on all the time, this little mini screen can drain the battery. To switch between battery saver mode on and off, just click the power button once. The icon that looks like a light bulb will switch to a single point.
In saver mode, the mini screen will switch off after 10 seconds of inactivity. In fact, it doesn’t completely switch off, rather it dims to save power.
Do You Need an External Mic?
While you can use the RØDE Wireless GO 2 transmitter’s inbuilt mic, you also have the option to connect a mic to the transmitter. Why would we want to do that?
Reason 1: the transmitter is big and has the RØDE logo on it, so it’s not very discreet. Basically, you might not like the look of the receiver. A smaller, regular clip on mic is much easier to hide in the speaker’s clothes. Even if I clip it in the same place, it looks more discreet and therefore less distracting.
Reason 2: you can use a better quality microphone. Here, I’m using the RØDE Lavalier II which is specifically designed to be easier to hide. The head of the mic is flatter than the original version. But you could use an even better quality mic here, if you wanted.
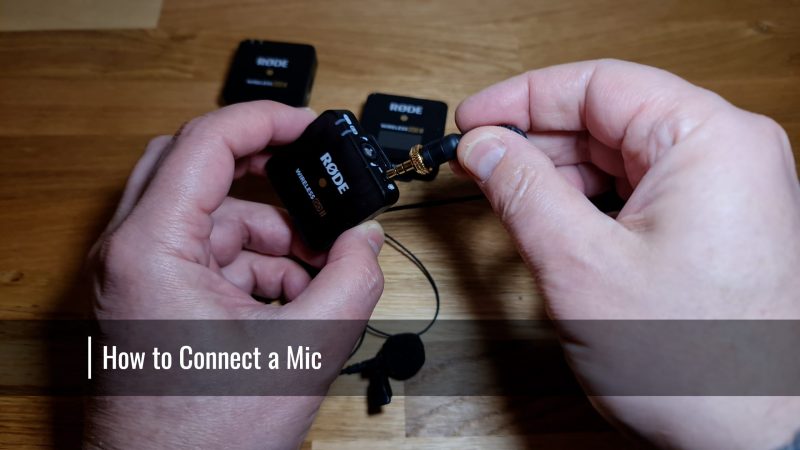
How to Connect an External Mic
To connect a microphone to the RØDE Wireless GO 2, use the 3.5mm port on the top of the transmitter. While the external mic is plugged in, the inbuilt mic will be switched off.
First, clip the transmitter out of sight somewhere, perhaps a back pocket. Next, clip the added mic near the speaker’s mouth.
It’s up to you how discreet you want to be with the mic. If you’re filming a short film, for example, you might want to hide the mic and the cable completely. Just feed the cable under clothes and hide the mic head under something like a shirt collar or behind a tie.
When recording audio, there’s one setting which is probably the most important setting of all. And that is the audio level or what is known by sound engineers as “gain”.
2 Rules for Recording Audio
When talking about adjusting an audio level professionals will often refer to the “gain” or the “gain control”. Put simply, audio level or gain is the strength or loudness of the audio.
There’s 2 basic rules when recording audio:
- if audio is too loud and it goes beyond the maximum level, this usually causes distortion in the audio. Rock guitarists add this to their guitar sound deliberately and it sounds cool. But if it’s added to the spoken voice, it’s usually not cool.
- if audio is recorded too quietly, when we come to mix the audio in our editing software we need to push up the gain. The problem is, there’s often a low level of noise created when recording, and when we then push up the gain later, this noise is also pushed up and becomes more audible.
Therefore, recording good audio is usually about finding a nice balance – not too loud and not too quiet.
How to Set Audio Level
When using the gain controller on the receiver, the RØDE Wireless GO 2 can be set to audio level from 0dB to -30dB. This depends on whether you have set the receiver to use a fine or a coarse gain control.
For those who are new to sound recording, dB stands for decibels. Using decibels as a measurement, 0dB is the maximum while everything else is a negative number.
Any audio which passes 0dB will risk creating a distortion sound at that point. Therefore, we want to try to record audio at a level so that it does not go above 0dB.

Gain Control Button
The gain controller is a button on the bottom of the receiver, with the microphone and the letters dB beside it. Pressing this button moves between gain levels. How much it moves depends on how we have set up the gain control, using the RØDE Central software.
I will talk about that software later, but for now I can tell you when set to fine, we can go from -30dB to 0dB. If we start at 0dB, one click takes us to -30dB. Each further click then increases the gain by 3dB.
So, -27dB, -24dB, -21dB and so on until we are back at 0db. As we click through, we can see the blue line growing until we have a full line.
If the gain is set to coarse, the gain button will only switch between 3 settings: 0dB, -12dB and -24dB. Also, the gain level meter now appears as a triangle instead of a blue line.
When connecting the RØDE Wireless GO 2 to a camera, it’s usually best to set the camera’s input gain as low as possible, then use the RØDE gain to set the correct level. This is because cameras often have noisy preamps, as we talked about earlier.
How To Reconnect a Transmitter
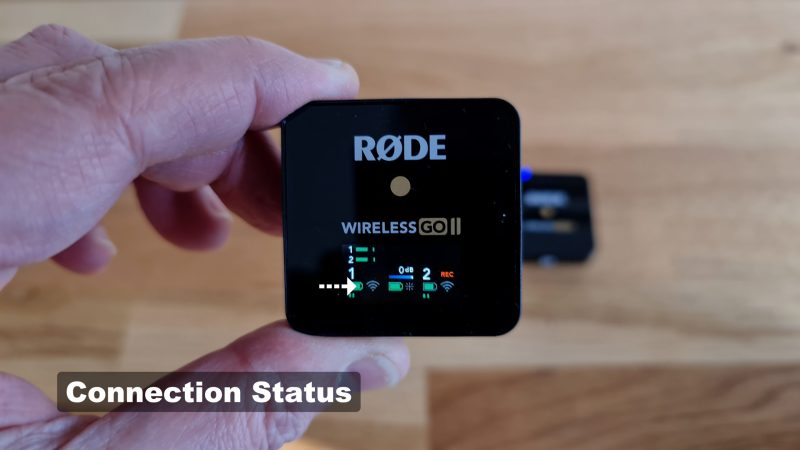
If the RØDE Wireless GO 2 transmitter and receiver become disconnected for some reason, the blue light with the connection symbol next to it will begin to flash. This might happen if you move too far from the receiver or there are obstacles between them. Meanwhile, on the transmitter the info from that transmitter will go blank.
To reconnect, press and hold the pair button on the receiver for three seconds to enable pairing mode. It’s the button which has that same connection symbol we saw on the transmitter. Once in pairing mode, click the power button quickly once on the transmitter and wait for a few seconds while it reconnects.

I actually found it quite hard to test this function because the connection between the transmitter and receiver was so strong. I had to go out the door, down some stairs and to the end of a corridor before it disconnected. And as soon as I stepped back within range, it reconnected again.
So I’m not sure if you would ever need to use the reconnect function. But that shows how good this system is.
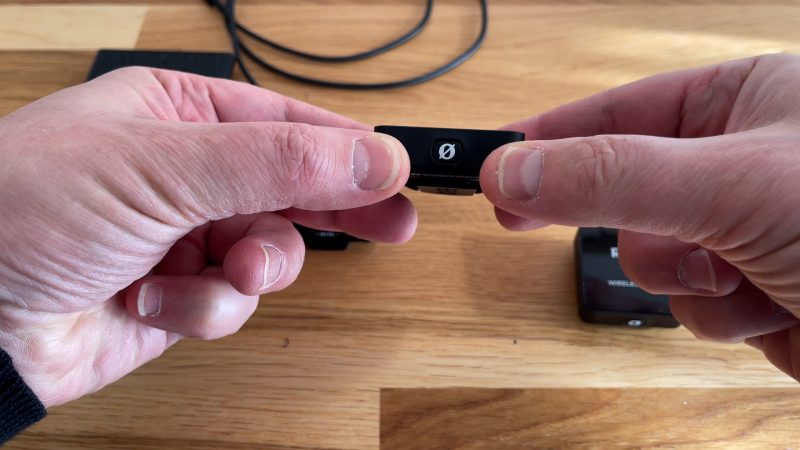
How to Mount RØDE Wireless GO 2 Windshields
The little windshields that come with the set are pretty easy to mount. On the top of each RØDE Wireless GO 2 transmitter you will see the microphone in the middle, this circle here. You can also see there are 2 dots and 2 arrows.
Now, pull back the fur of the windshield and hold it back. Align the 2 white dots with the marks on each side of the microphone. Push in and twist in the direction of the arrows, until you feel a gentle click.
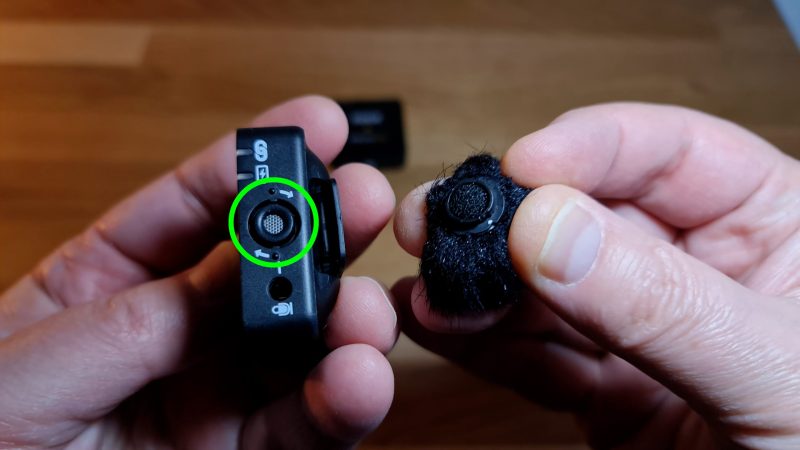
The windshields are now locked in place. Of course, you only need these windshields if you are using the inbuilt mics.
Muting RØDE Wireless GO 2 Mics
If you have both RØDE Wireless GO 2 transmitters connected, you can mute one or both mics using the receiver.
First, click the connection button on the bottom of the receiver, once. You will now see a grey square around the 1st mic on the mini screen. Next, click the gain button (the one with dB next to it) while that square is around the 1st mic and you will see a muted mic symbol appear.
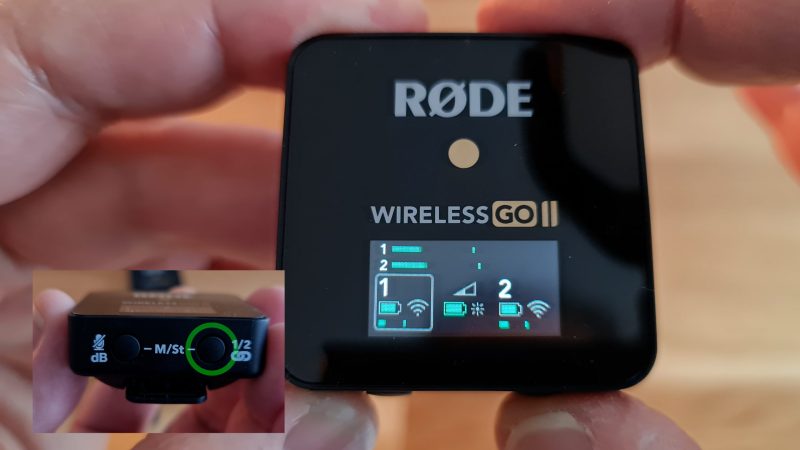
The connection button is a channel selector. One click places the grey square around channel 1. A second click selects channel 2. When you press the gain button, whichever channel is selected will be muted.
Channels are un-muted the same way. Select the channel and click the gain button.
Mute using Transmitter
There’s a second way to mute RØDE Wireless GO 2 mics, using the transmitter instead. Once connected, press the power button to mute and again to unmute.
Now, it used to be the default transmitter setting but since I upgraded the firmware on both units, I found it no longer mutes this way by default.
I believe RØDE has changed this because, unfortunately, when you use the transmitter power button to mute the mic, there’s no indication it’s muted. So, you have to be really careful you or the talent doesn’t accidentally mute the mic and not realise until it’s too late.
That’s why I think RØDE has now stopped this being a default setting. Instead, if you want the transmitter power button to act as a mute button you need to use the RØDE Central software.
So let’s talk about using this software.
RØDE Central
The RØDE Central software can be downloaded from the RØDE website. Once downloaded and installed, connect each unit and, if this is the first time, it will ask if you want to update the firmware. So go ahead and update.
Bear in mind, a unit doesn’t have to be switched on when you connect it.
When you connect a unit, you will see some indication it’s connected. Then, there will be different settings to change, depending whether you connect the receiver or one of the transmitters.
RØDE Central – Receiver Settings
Connecting the receiver to RØDE Central will allow you to change the way your receiver operates.
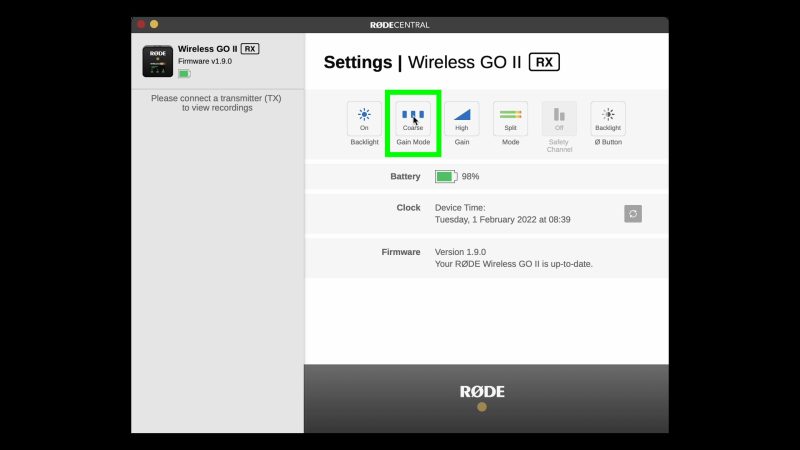
Top left we have the backlight control, which just switches between normal and battery saver mode, as we’ve seen earlier.
Next along is a button which switches between fine and coarse gain control. Again, as we talked about earlier, Coarse gives you 3 gain settings, while Fine gives you a greater gain range and greater number of gain settings.
The Gain button (like the Gain button on the receiver) changes gain in large or small increments, depending on whether it’s set to fine or coarse.
The next button switches between Split or Merged mode.
Split means each mic will be recorded to a separate channel, which is recommended if you want to separate audio for each speaker.
Merged mixes both audio channels together.
If you want to be able to adjust the volume of each voice separately, this is not the mode to choose. However, this button also determines whether you can use the next button along, which is the safety channel.
Using the RØDE Wireless GO Safety Channel
To switch on the safety channel function, the receiver has to be switched to merge mode. If it’s not in merge mode, the safety channel button will be disabled.
If you have safety channel enabled, rather than using the left and right channel of the stereo audio to separate the mics, instead the receiver records the exact same audio onto both channels, except one channel records 20dB lower.
What is the purpose of the safety channel?
A common problem recording the spoken voice can be the range in volume, from quiet to loud. If a speaker unexpectedly raises their voice, the audio might spike at that point and cause distortion. But if you have this safety channel recording at 20dB lower, you’ll be able to use that instead of the distorted audio.
How to Set Markers
The final button assigns the backlight button on the receiver. You can switch this to Marker, so every time you short-press the backlight button (which is actually the power button on the top) it will place a marker onto the audio track.
Everything else displayed is just information regarding the receiver.
Transmitter Settings
When you connect a transmitter to RØDE Central, this is what you get.

There are some useful settings as well as access to any audio files you’ve recorded directly onto the unit’s storage.
Apart from exporting audio files, you can select and play audio files here, as well as navigate between any markers you’ve placed. As well, you can rename files – just double-click and start typing.
How to Export Audio From a RØDE Wireless GO Transmitter
To export one or more audio files, select the audio files you want to export and then click export.
You will now get a bunch of options.
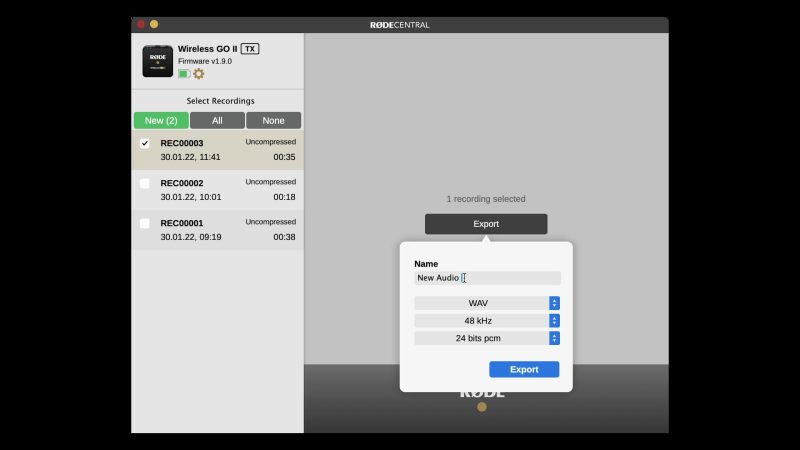
If you have only selected one file, you get the option to rename the audio file. Below that you can select different audio quality settings. Unless you’re worried about using up storage space, or some other reason, I recommend choosing WAV and 48 kHz.
The bottom setting gives you a choice between 24 bits pcm or 32 bits float. Now, 32 bits floating files are said to be 50% bigger and a seasoned pro will most likely tell you this file type is a bit over the top for regular sound work.
But, if you don’t mind the extra size, it might be worth experimenting. Once you click export, you can choose where on your computer you want to save the file.
You can also use the all and none buttons here to select every file or to deselect everything quickly.
Now, if we click the cog icon, we bring up the transmitter’s settings.
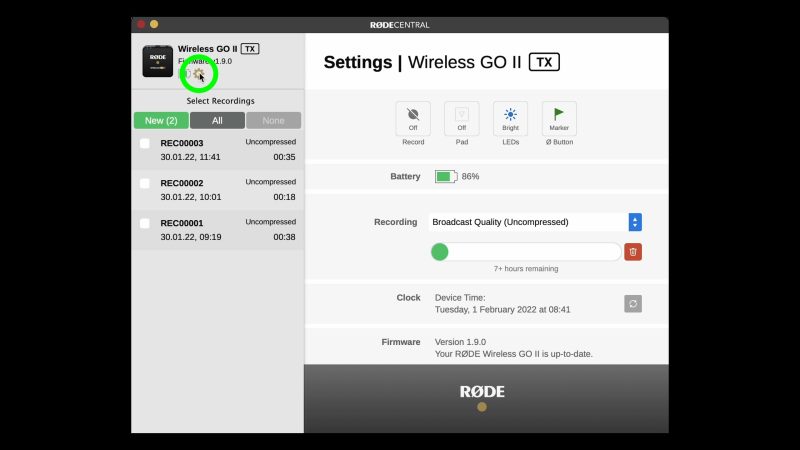
How to Use Transmitter as a Stand Alone Recorder
Like I said earlier, the RØDE Wireless GO 2 transmitter can also be used as a stand alone field recorder. First, you need to connect the transmitter to RØDE Central and click the cog icon. The first button on the left, called Record, is the one we’re looking for.
This button has 3 settings. By default, this is switched to Off. Click to switch to Always or Backup. The setting we want here is Always.
Now, as soon as you power on the transmitter, it will start recording and doesn’t have to be connected to anything. To stop recording, power off the transmitter. The audio recording should be saved inside for you to access later.
Note that when you choose Always, you can only record at maximum quality. This means you’ll have about 7 hours worth of audio recording per unit. If you have the dual transmitter version, you could actually carry both and have a potential 14 hours worth of broadcast quality audio in your pocket.
Like when using the transmitter with the receiver, you can use the inbuilt mic here or add an external mic, as we talked about before.
Using Backup Audio
When set to Record to Backup, the transmitter will immediately start recording when it’s connected to the receiver and stop again as soon as it is disconnected.
Why do we need a backup audio file? Well, there’s always the possibility something goes wrong with the original. The main issue with wireless microphones is a loss of connection. The backup recording is made directly to the unit without using wireless, so it won’t be affected by any connection failure.
How to Set RØDE Wireless GO 2 Sensitivity
The next button is called Pad and allows you to alter the mics sensitivity. Pad stands for Passive Attenuation Device and is used in microphones to avoid loud audio causing distortion.
Basically, a Pad reduces the gain by a set amount of dB. So, if you find that no matter how low you set the gain the audio is still going over 0dB, then switching on the Pad should fix it.
How to Dim RØDE Wireless GO 2 LEDs
Next button dims the brightness of the LEDs on the transmitter. This might be handy if the light from the transmitter is causing a problem with the shot. As well, some battery power will be saved.
Mute or Marker?
The final button allows you to switch between 3 uses of a single tap on the power button of the transmitter:
OFF means a single click will do nothing.
MUTE means a single click will mute or unmute the transmitter.
MARKER means a single click will add a marker to the audio.
Markers can be useful if you have a long recording. Adding a marker for a different scene, change of subject or new shot can save time when you want to find them later.
Below the buttons is a battery life meter and below that you have the option to select the quality of the audio. If you choose broadcast quality you will have 7 hours of audio, if you choose compressed you will have up to 40 hours.
How to Delete RØDE Wireless GO 2 Audio Files
Below the quality selection tool, you will find an indicator showing you how much space has been used up by recorded audio. If you reach the limit, the transmitter will simply start wiping over old files.
So you may want to delete files and to do that you just click the red trash can button. There is no way to delete individual files. Clicking this button completely wipes the onboard memory, so make sure you have exported all the files you need before doing this.
RØDE Central Mobile
This software is also available as an app for iOS and Android. So most of what I’ve just shown you can also be done on your smartphone.
But there is a slight complication. You will need to update the firmware on the units first, and that can only be done on the desktop version of RØDE Central. Once updated, they should connect to RØDE Central Mobile on your smartphone.
Now, to connect one of these RØDE units to an iPhone, you will need a special cable for lightning ports, such as the RØDE SC15 or SC19.
One thing you can’t do with the mobile version is access or download audio files from the transmitters. So, if you do connect a transmitter, the app will take you directly to the setting controls.
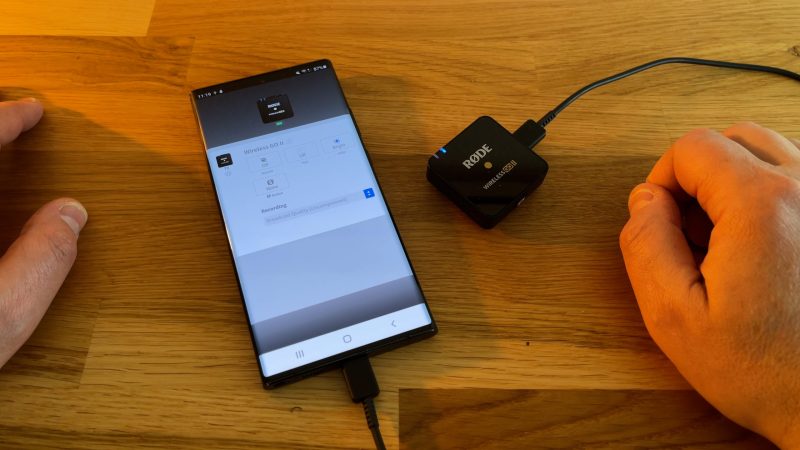
Using a Smartphone as a Controller
If you have your receiver connected to a camera or other device using the 3.5mm output, the USB C port is then free to connect a smartphone to use as a controller.
Switch on all your RØDE units and let them connect. Now connect the receiver to a smartphone with the RØDE Central Mobile app. From the app you will see which transmitters are connected, as well as change settings.
This way you can start and stop a transmitter recording audio, for example.
Equivalent Noise Level
When professionals buy microphones and other audio recording kit, one thing they look at is how much noise the unit produces itself. That’s why this is also known as “self noise”.
This is measured in dB again except with an A at the end. An equivalent noise level of 0dBA would be no noise at all. RØDE this setup has an equivalent noise level of 22dBA. For comparison, DJI say their new wireless mic setup (which is considered a direct rival) has 23dBA, so virtually the same.
Compared to the very cheap wireless mics I talked about in another video, the Rode Wireless GO II is much quieter. This setup is 10 times the price, so we would expect much higher quality
A low equivalent noise level is particularly important in a studio situation, where background noise becomes more apparent. If we’re recording audio for social media or low budget movies, 22dBA is good. But, for example, this would be considered good enough in a studio recording situation for the spoken voice.
In short, the RØDE wireless GO II is good enough for pretty much all audio recording situations we’re likely to find ourselves in.
Experience So Far
My experience of the RØDE Wireless GO 2 is so far mostly good. There have only been 2 issues that occurred in about 5 days of testing.
Firstly, my Samsung briefly stopped recognising the mic when I connected the receiver. I believe this was after I installed the RØDE Central Mobile app on the same phone. My phone still recognised another USB C mic, just not the RØDE.
Then I found that by opening the app and connecting the mic, then opening the camera, this resulted in my phone recognising the RØDE mic again.
Secondly, Andrea recorded a 20 minute audio track using only the transmitter as a stand alone recorder and the device created a file, but there was no audio on it. I don’t know if the lavalier mic wasn’t pushed in fully, or if this was a glitch in the device.
I will be using this a lot over the coming months, so I will let you know if this turns out to be a RØDE issue. So, if you are recording something like an event, or a situation where you can’t can’t retake the audio, I would make sure to capture audio internally to the transmitter as well as the camera.
Other than that, I have found it to be easy to use and produces great quality sound. It’s definitely one of the best wireless microphone kits for filmmaking on the market.
Smartphone Video – Beginner to Advanced
If you want to know more about smartphone filmmaking, my book Smartphone Videography – Beginners to Advanced is now available to download for members on Patreon. The book is 170 pages long and covers essential smartphone filmmaking topics:
Things like how to get the perfect exposure, when to use manual control, which codecs to use, HDR, how to use frame rates, lenses, shot types, stabilisation and much more. There’s also my Exploring the Film Look Guide as well as Smartphone Colour Grading.
Members can also access all 5 episodes of our smartphone shot Silent Eye series, with accompanying screenplays and making of podcasts. There’s other materials too and I will be adding more in the future.
If you want to join me there, follow this link.

What is the difference between dual and single? I need opinion, because I need to know what to buy.
Thank you for this article. It helped a lot.
Thank you for this article. It helped a lot.
I’m using the rode wireless go 2 with my gorpo and and only using one transmitter.
i’ve set to merge mood but the output is still only on one side instead of central.
Any idea why?
The latest (Windows) version of Rode Connect does not look like your screenshots at all. The option to switch recording on and off on the Wireless Go II is no longer available. Ony gain control is there.
All very well but I was sold this thing to work with my amplifier. I’m a singer/guitarist and was told the Rode go 2 was the best. I feel I have payed, wasted, much money on something unsuitable for my needs. Regards Roger Manson.
You are incorrect. You cannot add a a second transmitter to the Rode Wireless Go II. I contacted Rode and they confirmed that you would need to purchase the entire kit (1 receiver and 2 transmitter) if you need the transmitters.
I didn’t say you could buy individual transmitters. I just said it would be possible to add a transmitter and it would work the same. Where you get it from is another matter…
This is a very useful video, thanks for taking the time to put it together. I have been having issues with noise when using an external rode lavalier mic but your explanation has helped me to sort this out.
Man, this a damn complete guide for the Rode Wireless GO 2.
Thanks for writing this mate, appreciate the clarity and segregation of the subjects.
Thanks. Very helpful.