Beginner’s Guide to Using Manual Settings for Video (FiLMiC Pro)
Most smartphone, DSLR or mirrorless cameras can shoot video using automatic settings. This is the fastest, most convenient way to shoot video. But if you want to shoot more professional, cinematic looking footage, then you’ll want to use manual settings.
If you’re new to photography or filmmaking, these settings can be a bit overwhelming at first. So in this article I will cover each setting with a basic introduction and explanation. There are more in-depth articles on each setting which can follow up with if you want to know more.
Manual Settings on a Smartphone or iPhone
Most smartphones (including iPhones) do not provide manual settings when shooting video. There are some exceptions, such as the Sony Xperia 1 and Xperia 5 models via a native app (Cinema Pro). However, there are a number of 3rd party camera apps which can be installed to allow manual settings control.
The most famous of these apps is FiLMiC Pro. However, you need to check with your model of smartphone to see how compatible it is with the app.
There are some differences between manual controls on a smartphone compared to a DSLR/mirrorless. One notable difference is the lack of an aperture setting. Although older Samsung phones had Dual Aperture, there was only a choice of 2 which is somewhat less than that offered by bigger cameras.
Aside from these minor differences, all cameras function using the basic principles of photography which have been established for decades. With video (compared to film) there are new settings to look at such as resolution, bitrate and bit depth.
Note, for this article, I will use the FiLMiC Pro user interface for graphic illustration. So let’s get started.
Focus
Focus is probably the most understood of all the camera settings. Like our eyes, a camera lens needs to focus on a subject for the subject to appear clear and crisp in the image. What happens with focus depends on the situation, other settings (such as aperture) and the lens used.
These are the 2 Basic Rules of Focus:
- Smaller aperture + wider lens = more things in focus.
- Wider aperture + longer lens = less things in focus.
This phenomenon is often referred to as Depth of Field. If you want to know how to create blurry backgrounds (and the currently popular Bokeh effect), your quest is for a Shallow Depth of Field.
How to set Focus
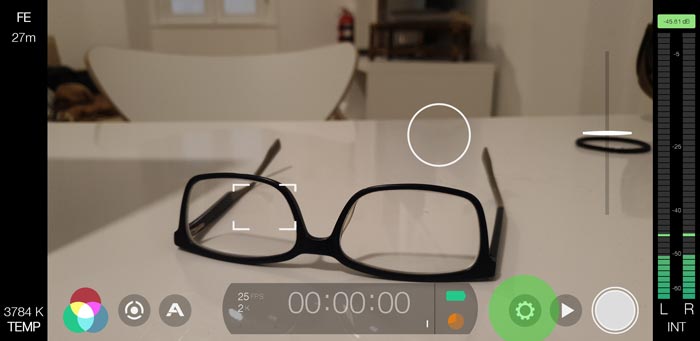
In FiLMiC Pro, the focus is set using a the rectangular icon, usually found in the middle of the screen somewhere (marked with a green circle):
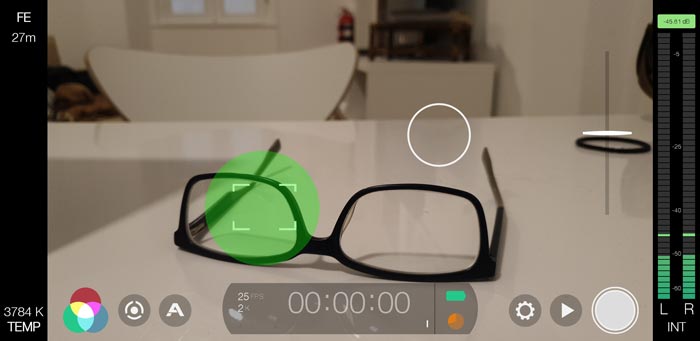
To set focus, move the rectangle over the subject (in this example I have moved the rectangle over my glasses). The inbuilt focus mechanism should then work out how far away the subject is and set focus correctly. You should see the lens system adjusting.
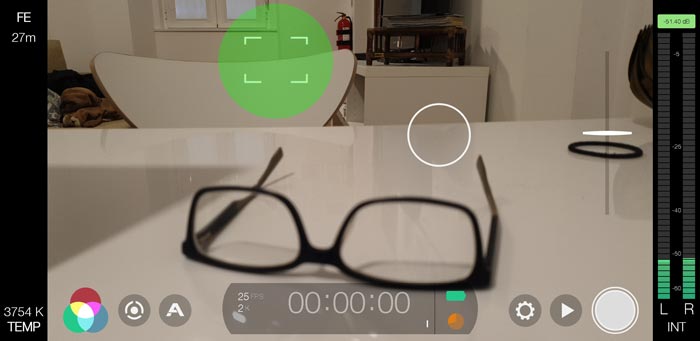
To focus on a different subject, move the rectangle. In the example above, I have moved the rectangle over the chair. The camera system has adjusted the focus distance. You can see that my glasses are now out of focus and the chair is in focus.
When we’re filming and we want the shot to look smooth and professional, we need to lock the focus at one distance. To do this in FiLMiC Pro, tap the focus rectangle and it will turn red:
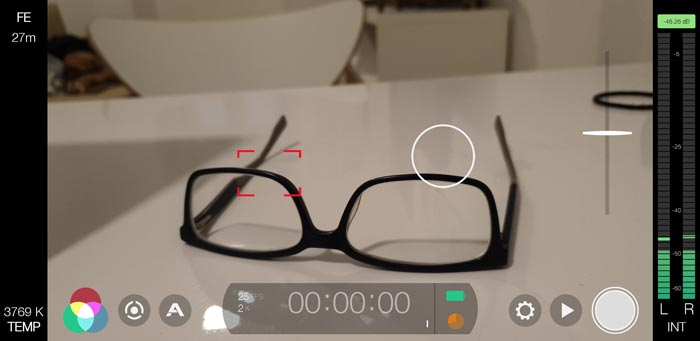
Now, when I press record the focus will remain at the same distance, even if I move the camera or if the subject moves within the frame. To unlock the focus, tap it again and it turns white again.
Auto Focus Mode
If you want the focus to change during the shot, tap the focus rectangle. The rectangle now changes to a larger rectangle with intermittent lines. In this mode, the focus will adjust the focal length depending on the distance of the subject within the rectangle.
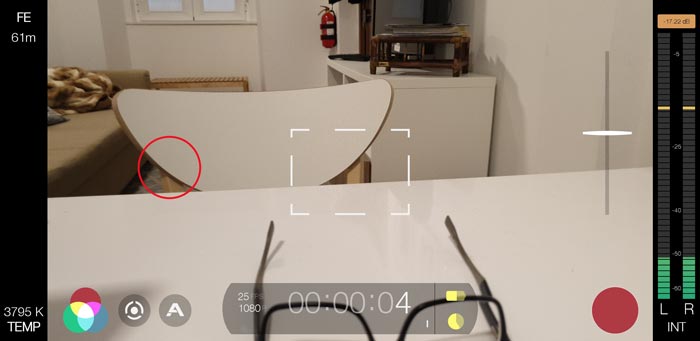
Note that when you have FiLMiC Pro in auto focus mode, the rectangle is fixed in place. So you can only focus on what is at the centre of the frame.
Resolution
Before you start filming you need to decide on the resolution of the video. Ultimately, resolution defines the number of pixels contained within one frame of video. As a general rule, more pixels equals higher quality and larger file sizes.
Higher resolution also requires greater processing power when recording, playing back, editing or adding effects.
Currently, consumer cameras (smartphones, iPhones, DSLRs) are mostly restricted to 4K as their highest resolution setting.
Setting Resolution in FiLMiC Pro
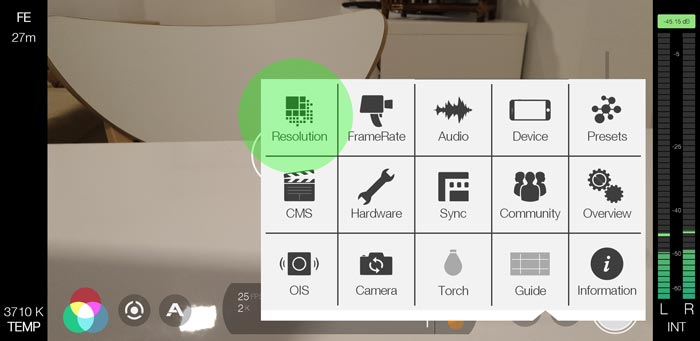
Open the Settings Menu by tapping the small cog icon (bottom right).
In the settings menu tap Resolution.
The next screen provides a number of options:
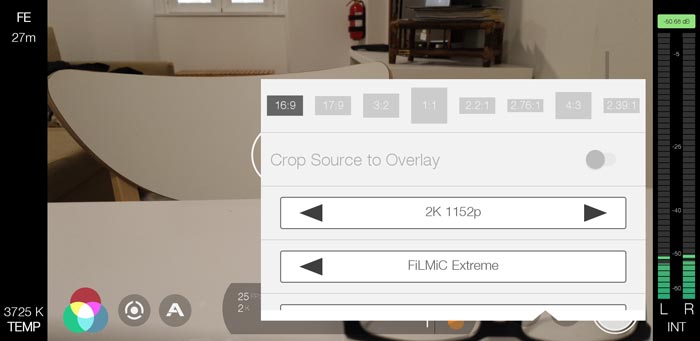
In the above example, the middle controller (with left and right arrows) can be used to set Resolution. On my device (Samsung S9), the following resolutions are available:
- SD 540p
- HD 720p
- HD 1080p
- 2K 1152p
- 3K 1836p
- 4K 2160p
Aspect Ratio
Aspect ratio defines the shape of the video frame. In the screenshot above, you can see FiLMiC Pro offers a number of preset aspect ratios.
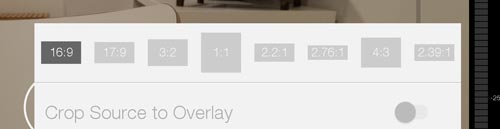
Aspect ratios provided by FiLMiC Pro are:
- 16:9
- 17:9
- 3:2
- 1:1
- 2.2:1
- 2.76:1
- 4:3
- 2.39:1
Most often we use the 16:9 aspect ratio when shooting or watching video. This ratio has been the current standard for many TV screens, smartphones and computer monitors. However, the choice can be creative or down to specific presentation needs.
While choosing an aspect ratio other than 16:9 only places a guide overlay in FiLMiC Pro, switching Crop to Overlay on produces a video with the selected ratio.
Bitrate
In FiLMiC Pro, below the resolution setting control is the bitrate control (where it says FiLMiC Extreme). FiLMiC Extreme is the highest setting. Like with resolution, the higher you set this the higher the quality at the cost of higher file sizes and greater need for processing power.
If you are going to put your video through various processes like grading and effects then it’s best to have the highest bitrate your devices can manage.
Frame Rate (fps)
Frame rate or Frames Per Second is the number of frames captured or played back in one second. As with resolution, high frame rates create bigger files and require more processing power. However, capturing more frames in a second doesn’t necessarily create higher quality video.
Film Look 24/25 fps
If you want to mimic the look of film then choose a frame rate of 24 or 25 frames per second. Then set your shutter speed to 1/48 or 1/50. These settings will add motion blur to your video similar to when using a film camera.
30fps
30fps has been the standard frame rate for TV for years. The slightly higher frame rate gives higher clarity, which is good for sports and factual programs like news reports.
Usually, the default setting of smartphones and other consumer cameras is to shoot at 30fps.
60fps and higher
Anything at 60fps or above is usually used for slow motion effects.
However, in recent times many people have started to prefer the clarity of high frame rates played back at the same rate. Meanwhile, detractors argue this looks too synthetic or too much like video.
Artificial Light & Frame Rates
Depending on where you are, artificial lights flicker on and off a certain number of times per second. If you find your video contains artificial lights which flicker on playback, you can prevent this by changing the frame rate. For example, in Europe setting your frame rate to 25fps matches the 50hz electricity supply. In the USA a 30fps frame rate will match the 60hz electricity.
Setting Frame Rate on FiLMiC Pro
To set Frame Rate on FiLMiC Pro you need to go back to the settings menu and tap the Frame Rate button.
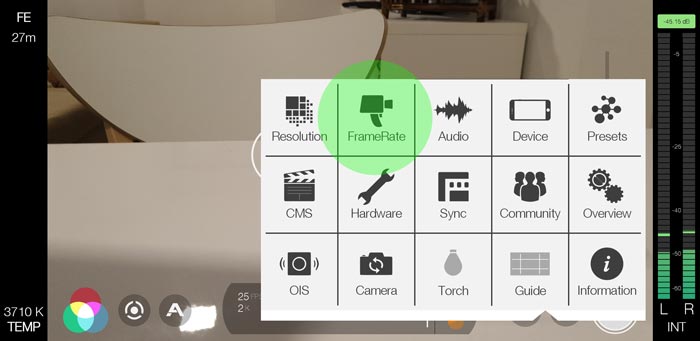
You will now get a screen where you can set the frame rate.
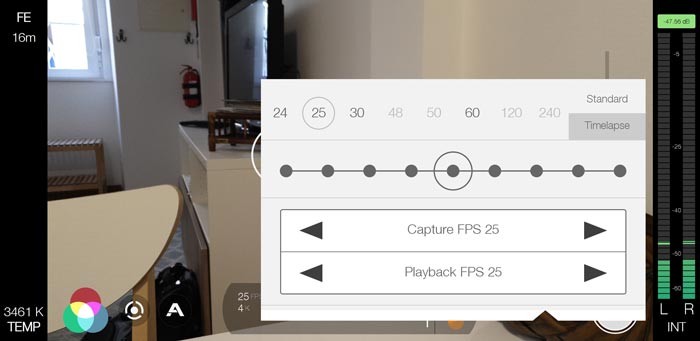
Available frame rates are in dark grey. The lighter grey rates are only available depending on other factors such as resolution or device. For instance, dies to the processor demands higher frame rates are sometimes only available at lower resolutions.
For this example, I have the resolution set to 4K. But once I set resolution to HD 1080p, 120 and 240 frame rates become available.
Exposure
A video’s exposure is controlled using a number of settings, all of which have an affect on the look of the video. Those settings are:
- ISO
- Shutter Speed
- Aperture
ISO
Without going into the history of it, ISO is a measure of how sensitive your camera’s sensor is to light. When an image is too dark, we can increase the ISO to make the sensor more sensitive to light. When an image is too light, we can decrease the ISO to make the image darker.
Video Noise
There’s an unfortunate side effect to increasing the ISO. This comes in the form of greater, more noticeable digital artefacts in the image. This is called video noise and it is one of the reasons people are interested in the low light performance of cameras.
This is particularly a problem for smartphones and iPhones. Compared to bigger cameras, these devices have small sensors which are not as good at picking up light in low light situations. As a general rule, when shooting with a smartphone it is best to try to keep the ISO at or below 100. With my Samsung S9 I can usually take it up to about 200 before I get obvious problems.
Shutter Speed
The shutter speed setting in a video camera is the amount of time the shutter is open, letting light onto the sensor. But with most digital cameras, there is no physical shutter. Instead, the sensor is simply switched on and off for the length of time set.
For example, 1/48th will set your camera to expose the sensor for 48th of a second per frame. The basic rule is:
- faster shutter speed = darker image
- slower shutter speed = lighter image
But shutter speed doesn’t only control the exposure. It also changes the amount of motion blur in the frame. The basic rule is:
- faster shutter speed = less blur
- slower shutter speed = more blur
Now, to mimic the look of film motion blur is desired. Basic principles are:
- fast shutter speed + high frame rate = smooth clear video
- slow shutter speed + slow frame rate = motion blur, film look
- fast shutter speed + slow frame rate = choppy, harsh images
All these 3 settings are desirable to create different styles and effects, depending on what you want to achieve.
Aperture
The aperture is the size of the hole which allows light through the lens into the sensor. In photography or videography the aperture can be changed in size by what are known as F-Stops. The aperture also has the effect of altering the focal length.
Basic rules are:
- small aperture = less light + deeper depth of focus (more is in focus)
- big aperture = more light + shallow depth of focus (for blurry backgrounds and bokeh effect).
Smartphones usually come with a fixed aperture. However, some now have 2 aperture settings per lens, like my Samsung S9.
Setting ISO, Shutter Speed & Aperture in FiLMiC Pro
To adjust these 3 key exposure settings on FiLMiC Pro, first open the manual controls. This is done by tapping the circular icon to the bottom left of the screen (here in red):
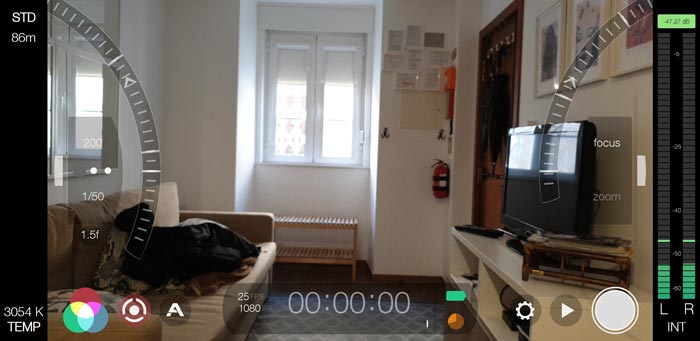
Two wheel controllers appear at the sides. The right wheel is used for focus and zoom. The left wheel is used for ISO and Shutter Speed.
Move the left slider wheel up and down will change the exposure settings. You should see the screen go brighter and darker as you move it. The settings to the left of the wheel are ISO (top), shutter speed (middle) and aperture (bottom).
You may have a desired frame rate and shutter speed combination. For example, 25fps and 1/50th shutter speed (film look). Once you have set the frame rate (mine is at 25fps in this image), move the left slider until shutter speed says 1/50.
Now lock the shutter speed by tapping it. The shutter speed setting should turn red. Your frame rate and shutter speed are now fixed.
Correct exposure
Now your frame rate and shutter speed are locked, you are left with 2 manual settings which can be adjusted to set exposure: ISO and aperture. Now, using a smartphone or iPhone might mean you have no aperture (even if you do, it’s only 1 stop difference). This means we are left with only the ISO as our exposure control.
In FiLMiC Pro, move the left wheel up and down to adjust the ISO level. Issues with ISO:
- If you are in a low light situation, you might find you have to move the ISO above 100 or 200. Past this level we can start to expect extra noise artefacts in the video.
- If you are in a bright light situation, you might find you cannot reduce ISO enough for correct exposure. You have pulled ISO down to it’s lowest level and the image is overexposed or washed-out looking.
Problem 1 solutions:
- add more light
- reduce shutter speed
- fix noise in post
Problem 2 solutions:
- shade the subject from the light
- increase shutter speed (but lose motion blur)
- use an ND filter
White Balance
Setting white balance ensures you are recording colours as accurately as possible with your camera. Different light sources have different colour temperatures.
Modern digital cameras come with sensors which can attempt to set white balance automatically. However, they are not locked in place while filming a shot. Again, your shot will look messy if the white balance changes during the shot.
So, to shoot professional looking video the white balance needs to be locked. But first you should set the white balance as accurate as you can. This can be done simply by holding a piece of white kitchen towel in front of the camera to get the reading.
Setting White Balance in FiLMiC Pro
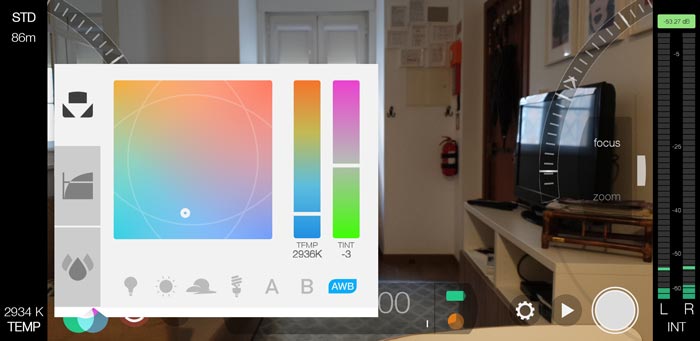
To set and lock white balance using FiLMiC Pro, tap the colour circles icon (bottom left). This opens up the white balance settings control.
Even if you don’t have time to set white balance correctly, you should at the very least lock the white balance so it doesn’t change during shot.
The circle in the big square indicates the white balance settings graphically. It’s also represented by the 2 long columns on the right. If you just want the temperature number, it’s displayed bottom left.
To get a more accurate white balance setting, with the AWB icon blue (see above) aim the camera at something white and non-reflective (like kitchen towel). Now tap the AWB icon so it turns red. White balance will now be locked for the duration of the shot.
Alternatively, tapping the AWB icon until it changes to orange means it will set the white balance automatically but lock the setting during the shot.
Everything locked
As I said earlier, for high quality video most professionals lock off their manual settings so that nothing changes during the shot. If focus, ISO, white balance and so on are changing during a shot then it looks more like a home movie (more messy).
Of course there are times when you want to use auto settings, either for creative reasons or for speed. So this article isn’t to say you can’t use auto settings, simply an introduction into how to use manual controls.
Further reading
This is the very basics of manual settings for video. With this knowledge, you should be able to get shooting professional looking video right away. But if you want more detailed information about any of these topics, here is a list of longer articles we have on the subject.
Reading list:
- Frame Rates – the Basics Explained
- Shutter Speed – the Basics Explained
- ISO – the Basics Explained
- Depth of Field – the Basics Explained
- White Balance – the Basics Explained
- Video Bitrate – the Basics Explained
- How to Focus Pull using the FiLMiC Pro app
- Setting Shutter Speed Using FiLMiC Pro app
- Setting White Balance Using FiLMiC Pro app
- How to Fix Video Noise (Grain)
Smartphone Video – Beginner to Advanced
If you want to know more about smartphone filmmaking, my book Smartphone Videography – Beginners to Advanced is now available to download for members on Patreon. The book is 170 pages long and covers essential smartphone filmmaking topics:
Things like how to get the perfect exposure, when to use manual control, which codecs to use, HDR, how to use frame rates, lenses, shot types, stabilisation and much more. There’s also my Exploring the Film Look Guide as well as Smartphone Colour Grading.
Members can also access all 5 episodes of our smartphone shot Silent Eye series, with accompanying screenplays and making of podcasts. There’s other materials too and I will be adding more in the future.
If you want to join me there, follow this link.

Thank you, I learned a lot!
Does it matter if you change the ISO before or after you lock the white balance? I’ve been locking my white balance and then changing my ISO & shutter speed. Should I do the reverse?
it doesn’t matter which way round you do it
Loads of helpful info, but just one amendment I would make when advising others; 25fps and 1/50 would still be a setting that creates a ‘video look’ as we would use that for broadcast TV in the UK. 24fps (23.98) and 1/48 is the more commonly used frame rate for films, so if you’re looking for a more ‘filmic look’ choose that one not 25fps. There are of course many other factors involved in getting that look. Thank you for this article. I was looking for info regarding in-app aperture settings and iPhones. Got what I needed so thank you.
thanks for your comment. I generally advise people to shoot 24fps for the film look. That said, almost nobody would ever notice any difference between 25fps and 24fps