DJI Osmo Mobile 6 – Review & Tutorial
DJI have just released a new smartphone gimbal, following on from the OM 5: the Osmo Mobile 6.
Since the Osmo Mobile 3, DJI’s OM gimbals are designed to make it easier and faster for you to shoot vlogs, family content, travel videos and more. They aim to create a lightweight, fold up gimbal that when combined with the Mimo app, allows you to create content fast – from shooting, to editing, to sharing via social media.
With the Osmo Mobile 6, DJI has added some more features as well as improved existing features. Added to that, there’s now a new app that works with your OM gimbal called LightCut. All that’s coming up, later in this video.
The OM 5 was quite a change from the OM 4, with an extendable handle added and a sleeker design. For the Osmo Mobile 6, DJI has kept a pretty similar design, including that selfie-stick handle.
If you already have one of the previous Osmo Mobile gimbals, is it going to be worth upgrading to the Osmo Mobile 6? DJI have added some exciting new features which might persuade you, a couple of them might look familiar if you know anything about Zhiyun gimbals.
I’ll quickly go over what’s new and then talk about how to get the most cinematic footage from your Osmo Mobile 6.
First Impressions
Unboxing, I found the Osmo Mobile 6 design looks pretty much identical to the OM 5, but this darker colour gives it a more serious, professional look. I also get the feeling it’s a little studier and better made than the OM 5.
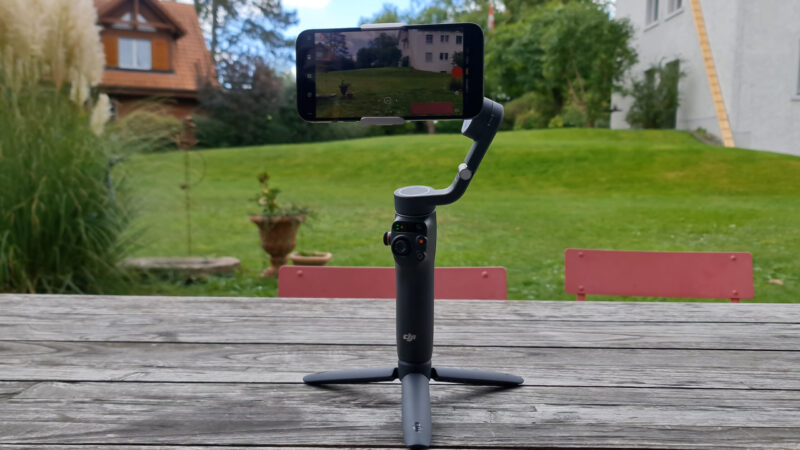
The first thing you notice when you unfold the gimbal is that it immediately powers on, without having to press any buttons. This is a new quick start feature. And if you have an iPhone when you attach it to the gimbal magnetically, it automatically boots up the Mimo app as well.
Next thing I noticed was this little wheel and button on the side. More on that later, but overall this feels like a more polished, more advanced version of the OM 5.
Quick Start
Unfolding the gimbal automatically powers it on. You get a couple of beeps and then the arm moves into place, waiting for you to mount a phone. You also get a pulsing red light, until you mount a phone.
Once you mount the phone, the red light stops pulsing and now you get an icon which tells you which mode the gimbal is in.
So that’s pretty cool and makes getting started with your gimbal a few seconds faster.
As well, folding up the gimbal powers it off. If you want to power the gimbal on and off manually, just long press on the M button.
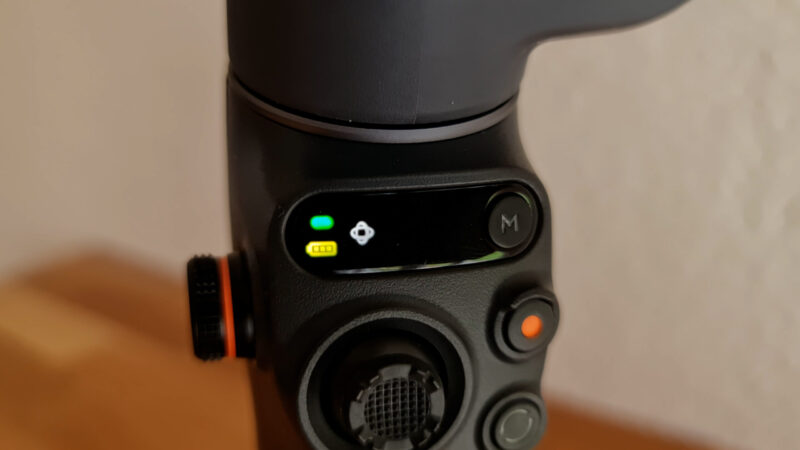
Mode Button, Indicator & Battery Level
If you know Zhuyin gimbals you will know that one of the advantages of them over the DJI OM gimbals is that they have an indicator which shows you which mode you are in, as well as a button to cycle through the modes.
That’s no longer an advantage as the Osmo Mobile 6 now has a dedicated Mode button as well as mode indicator. There’s 4 different modes you can cycle through: Follow, Tilt Locked, FPV and Spinshot.
If you have the Mimo app connected, you will see the mode flash up in the middle of the screen when you change it.
One difference is that the Osmo Mobile 6 doesn’t allow you to double tap to cycle in reverse, as Zhuyin gimbals do.
Also, there’s now a dedicated battery level meter on the left of this little screen.
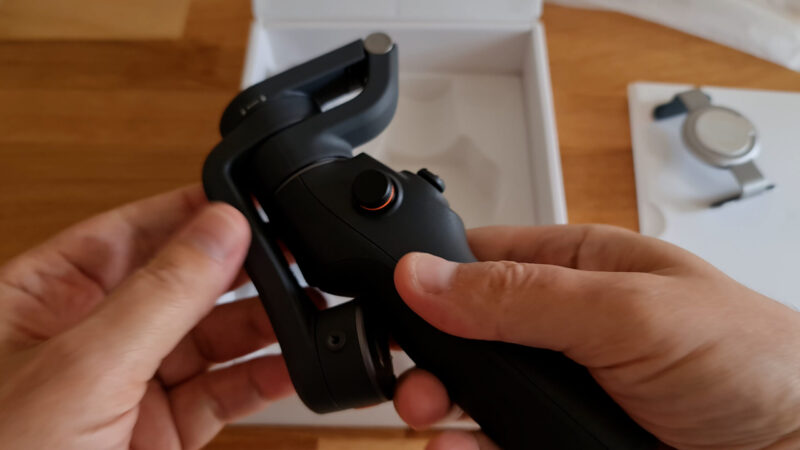
Touch-sensitive Control Stick Returns
Previous versions of the OM gimbal had a touch-sensitive control stick which allowed you to pan and tilt at different speeds, but this was lost when the OM 5 came out. Good news is the touch-sensitive control stick has returned for the Osmo Mobile 6.
Actually, this control stick is really nice to use and I would say a definite improvement on the OM 5, which felt a bit low quality.
Focus / Zoom Wheel
If you’ve used a Zhiyun Smooth 4 or 5, you will know they have a dedicated zoom and focus wheel. On the Smooth 5, just tap the centre button to switch between zoom or focus.
The Osmo Mobile 6 now has pretty much exactly the same feature, just a little but smaller. And I have to say that, again, this is really well designed and nice to use.
Just press in the wheel to switch between zoom and focus. In the Mimo app, top right you will see a lens symbol with letters ZM or MF, which tells you whether you are in zoom or manual focus mode.
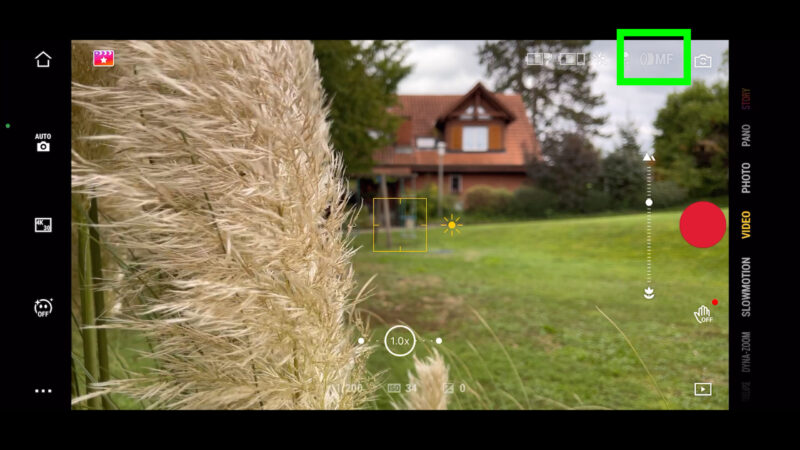
Just holding the gimbal with one hand, I found it pretty easy to use my thumb on this wheel. This allows you to make nice, smooth focus pulls while you are recording. A nice focus pull shot can really add a pro look to your videos.
A focus pull is normally pretty tricky to achieve with a smartphone, but the Osmo Mobile 6 makes it really easy.
You might get a warning saying “camera doesn’t support manual focus”. That’s probably because you are using the ultra wide camera, which doesn’t have focus control. So just tap the white circle to switch to the main camera or the telephoto.
How to shoot a focus pull with the DJI Osmo Mobile 6
The easiest way to do this is to rest the gimbal on a flat surface using the tripod legs.
Place the gimbal so that you have an object pretty close to the phone’s camera. Start recording and now use the wheel to move focus between the foreground and the background. Try to move the wheel slowly and as smoothly as possible.

You can also do this while holding or moving the gimbal, but it’s a little bit trickier. If you have a steady hand then it should be ok.
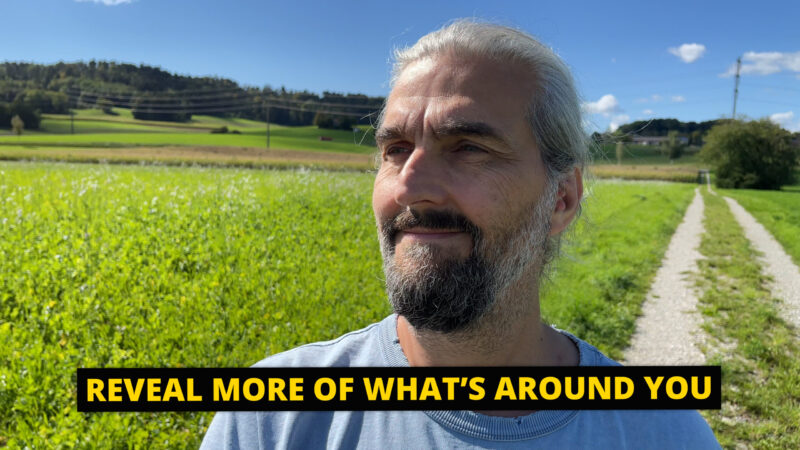
A focus pull is a reveal shot. You reveal something by bringing it into focus. It’s a classic shot, used by pro filmmakers for many decades and you will see it used all the time.
Using a variety of shots will improve your videos and now you can add the focus pull to your shot list.
Lens Picker
As well as using the zoom wheel to zoom in and out, you can use it to select the lenses on your smartphone. As you move the wheel, on the Mimo screen you will see a line of dots. The bigger dots mark the different lenses.
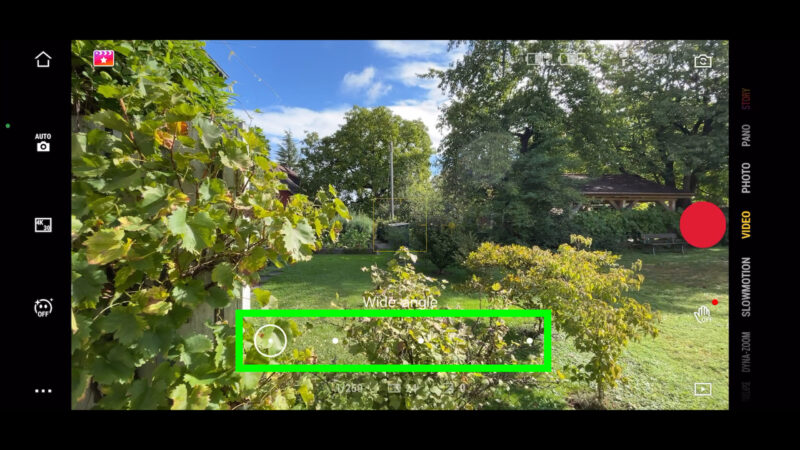
On my iPhone 12 Pro Max, I have the ultra wide, the wide and then the telephoto at 2.5x. Zooming past 2.5x will use digital zoom to go up to 8x zoom.
The OM5 is actually a little better when it comes to picking lenses. Tapping the slider once up or down would switch lenses. Now that the Osmo Mobile 6 has a zoom wheel, it’s a little bit more tricky to move quickly to the next lens without overshooting.
That said, you can tap the big white circles on the screen.
Active Track 5.0
Active Track isn’t a new feature, but it’s been updated to 5.0. The Osmo Mobile gimbals were always good at tracking people, but DJI say they’ve improved this even more.
To activate Active Track, aim at the subject you want to track and press the trigger. This works with front and rear facing cameras. So if you are filming yourself with the selfie camera, for example, tap on the trigger and you will see this green box around your face.
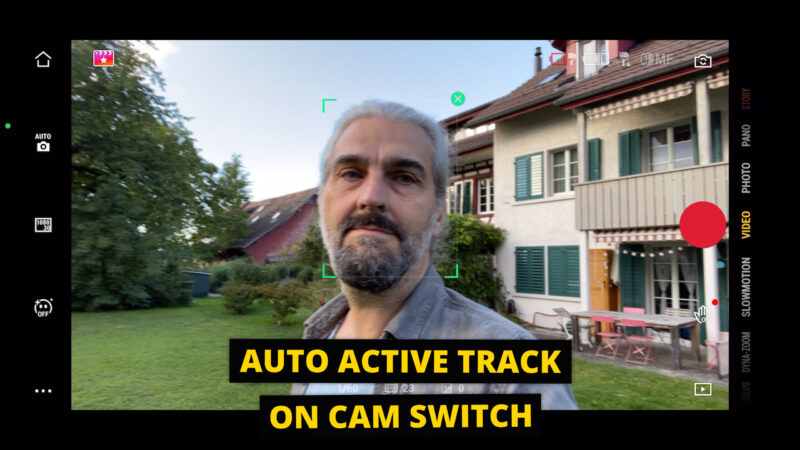
In fact, when you switch to the front camera, it automatically starts tracking you. When you move, the gimbal should make sure the camera follows you.
If you want to film yourself with the rear camera and you are filming solo, you can use the gesture control. Toggle it on and then make sure it’s set to Follow & Shoot. Make the hand gesture and the Mimo app will start recording and lock onto your face.
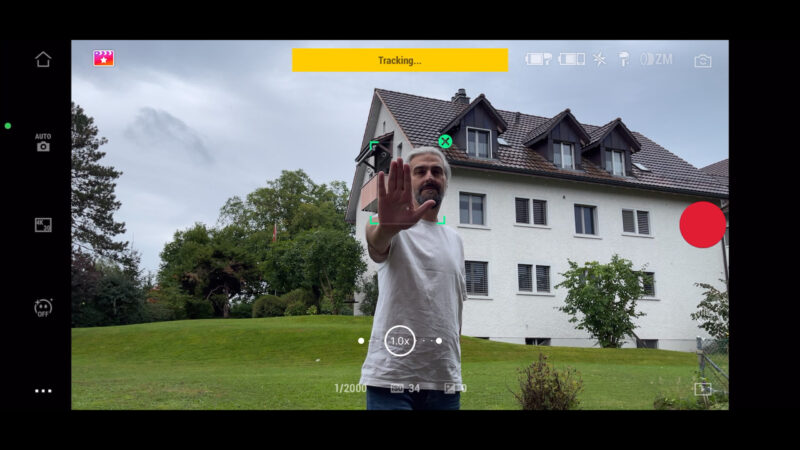
When I moved around, it was able to keep following me, even when I hid behind a pillar. But when I went behind a bush it lost me and couldn’t find me again. So it seems that it needs to see at least a part of you to keep tracking.
ShotGuides
Combined with the Mimo app, the Osmo Mobile 6 supports DJI’s ShotGuides feature. This helps to give you inspiration when filming, suggesting certain shots and walking you through the process. Again, this is a feature introduced with the OM 5, but DJI have improved it for the release of the Osmo Mobile 6.
With Mimo open, tap the little clapperboard symbol in the top left corner. Now there’s really loads of options to choose from here. Tapping one of these headings at the top, brings up another menu of options.
So if I select Home and then select party, I can play the video here to get an idea of what this option will create.
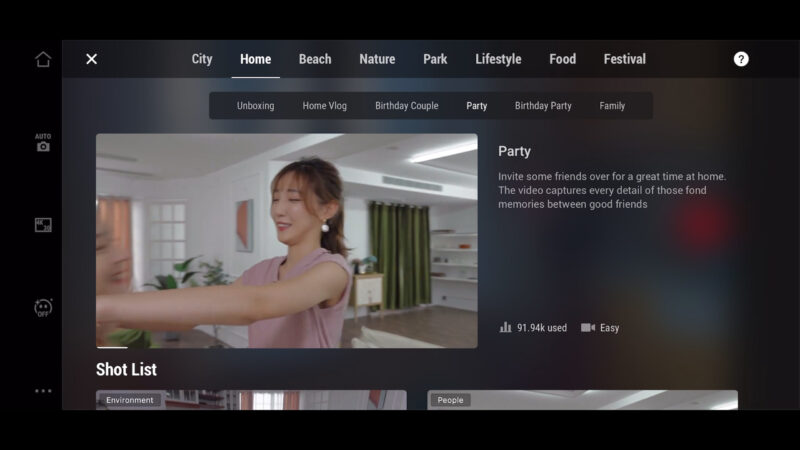
Swipe on the screen to scroll through a shot list. Tap apply and now on the left you can see 2 videos – above is what DJI suggests you want your shot to look like and below is a little video showing you how the shot was captured using an OM gimbal.
So there’s plenty of ideas here, to help you put together some nice video sequences.
Handle Extension for Easier Solo Filming
Filming myself solo, I find the extending handle gives me some extra shot options. It’s easier to get those low, moving shots. Getting the camera close to the ground exaggerates the feeling of movement.
I also like to film my feet which is great for travel videos where you are exploring new places. To really add extra quality to the shot, you can circle around. With the extending handle, this shot is pretty simple to get.
That circle shot works for selfie style shots as well. Especially if you shoot at 60fps and slow it to 30fps or 24fps.
With the extending handle, crane style shots are another option and these are great for establishing your scene. Much better than using a simple pan shot, which is a shot that beginners often overuse.
In my video lesson for members on Patreon, Motivating Camera Movement, I explain why you should stop using the pan shot and use a more cinematic shot instead. There’s all kinds of other learning material to download as well as my regular filmmaking podcast.
To get a crane shot, extend the handle, start recording and move the gimbal in an upward arc. Because the OM gimbals have limited tilt movement, you need to go sideways.
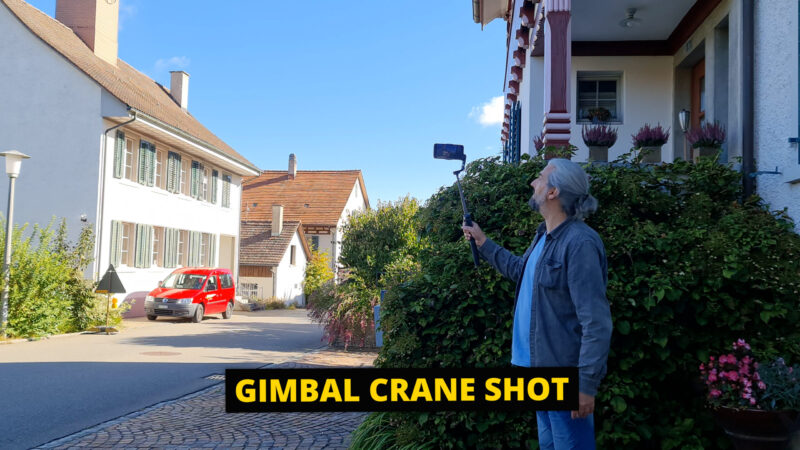
If you want to go even higher, or shoot drone-style shots, you can add a longer handle extension. This is a Manfrotto monopod which I can screw into the base of the gimbal.

Here’s another shot you can create with the Osmo Mobile 6 and a monopod: rest the monopod on the ground and move right to left or left to right. This means any up and down movement is removed. Much smoother than trying to get this shot by hand.
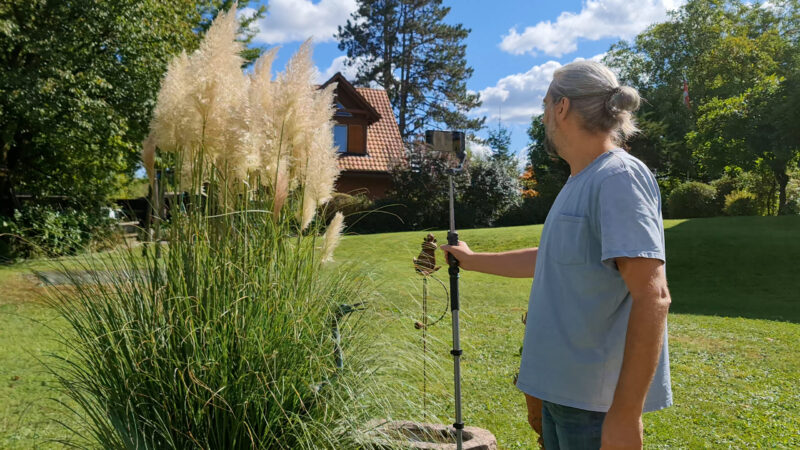
You can also use the monopod when you are shooting focus pulls to stop the camera bobbing up and down.
LightCut AI Editing Tutorial
So let’s look at this new app called LightCut. In fact, it’s been around since last September, but I don’t think too many OM users know about it. The app supports OM gimbals, the Osmo Pocket series and the Osmo Action series.
Even without one of those devices, you can still use the app’s AI editor. Just choose a template, import footage from your gallery and let the app do the work.
But if we connect it to a supported device, the app now walks us through the shooting process as well. Once connected to your device, LightCut seems to work a bit like Story mode in the Mimo app. Choose a template and let the app guide you through the shot list, shot by shot.
At the end, you simply export your sequence, ready to share on social media.
Here’s how to use it
Open the app and connect to a supported device.
The big One-Tap edit button opens up your gallery. From here you can select a number of clips. Tap Next and the AI will then analyse the clips and choose what it thinks are the best moments from within each clip.
When it’s finished watch your AI created video sequence and if you like it export it. On my iPhone I can choose to export up to 4K here.
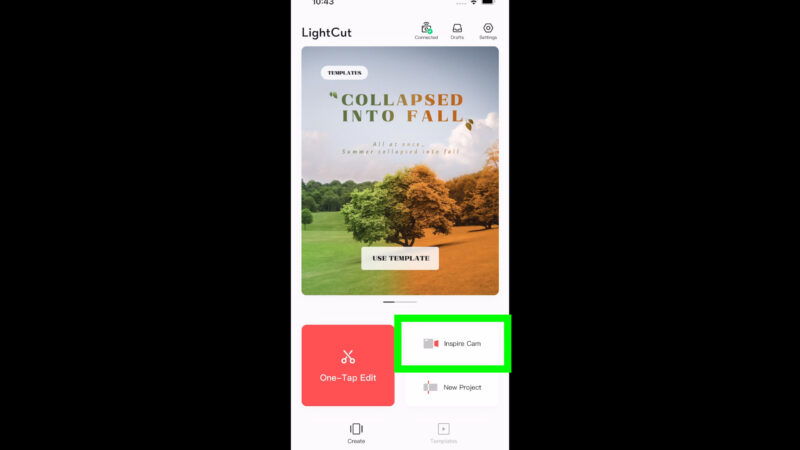
Inspire Cam
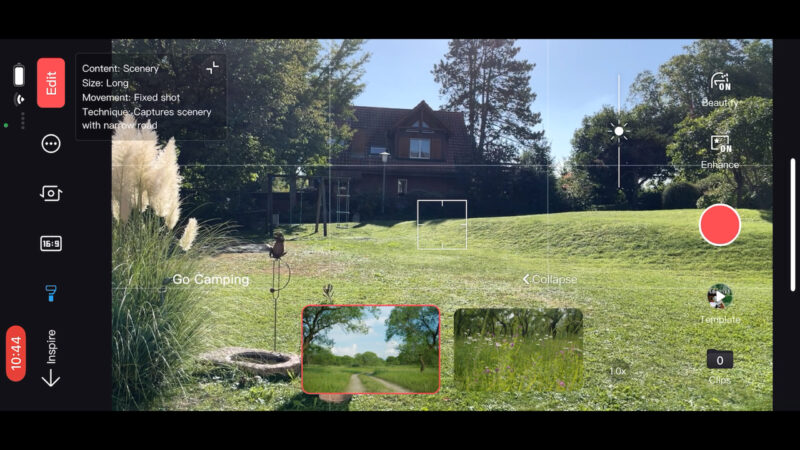
But if you want the app to help you get the shots before it does the editing, then tap Inspire Cam. This opens up a few templates. At the moment, there’s only 8, but I presume they will add more here.
I’m going to choose Go Camping. At the top we now have a brief explanation of the template, a short video showing you how it might look and below is a shot list. This is a very long shot list with 29 shots altogether.
You can swipe the screen here to look at all the shots and see what the app will be asking you to do. If you tap a shot, it plays a short clip to show you what the shot might look like.
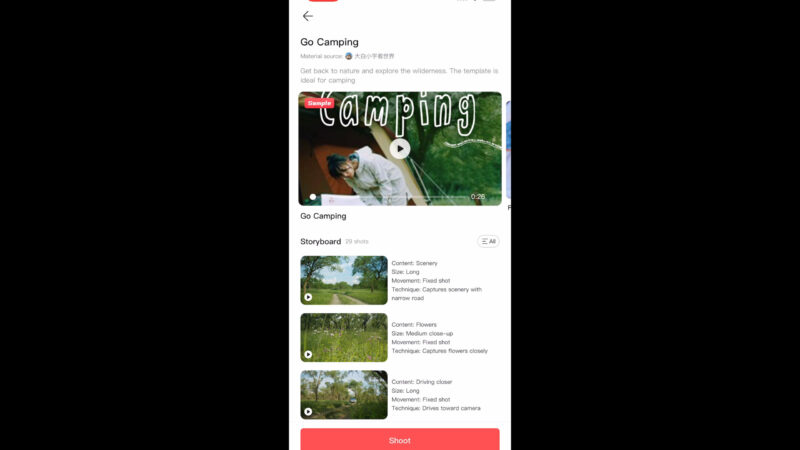
So, right away we can see that you need a car for this template. You also need a tent and probably someone to go camping with.
If you are ready to shoot, tap Shoot and this opens up the LightCut camera app.
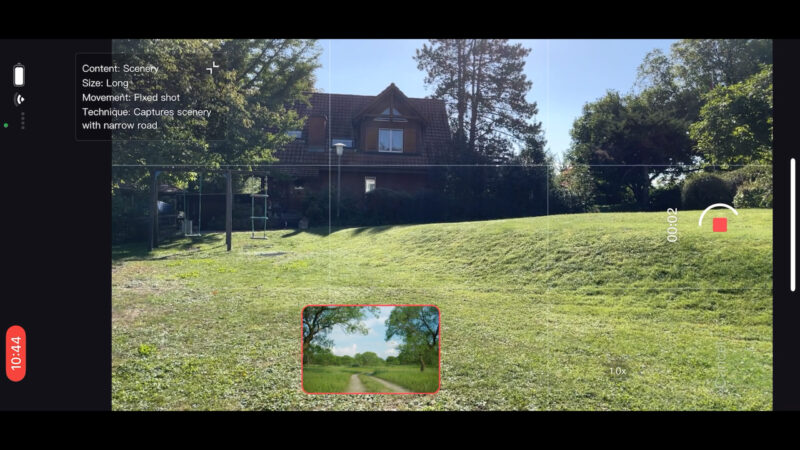
DJI LightCut Camera App
I’ve spent some time with this app and I can tell you it’s very basic. There’s no manual control, no way to lock exposure, no way to change cameras.
There’s a zoom control which allows you to zoom in by tapping this button. To return to 1.0x double tap. As far as I can see, it only uses the main camera. However, you can switch to the front camera with this button on the left.
But the main thing is that the shot list now appears at the bottom of the screen. You can tap and swipe to select different shots from the list.
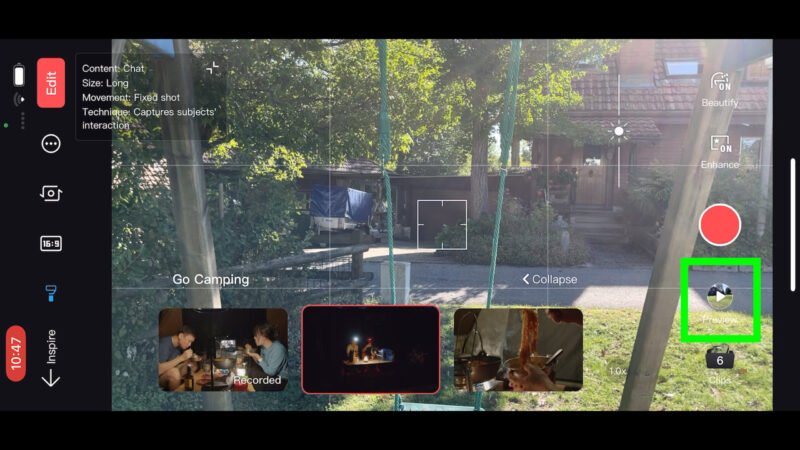
When you start recording, the app records for a set number of seconds, then replays the shot and you can decide whether to keep or retake the shot. Tap Next to keep and now the app moves onto the next shot.
So, you just keep going, capturing shots. You actually don’t need to shoot all 29 shots, so just shoot as many as you think you need. When you think you’ve got enough just tap preview. The app will show you a preview of a sequence containing your clips.
Strangely, even though the template shows a video in horizontal aspect ratio, and I have the app set to horizontal, the app plays the preview in vertical mode. Something for the developers to fix in the future.
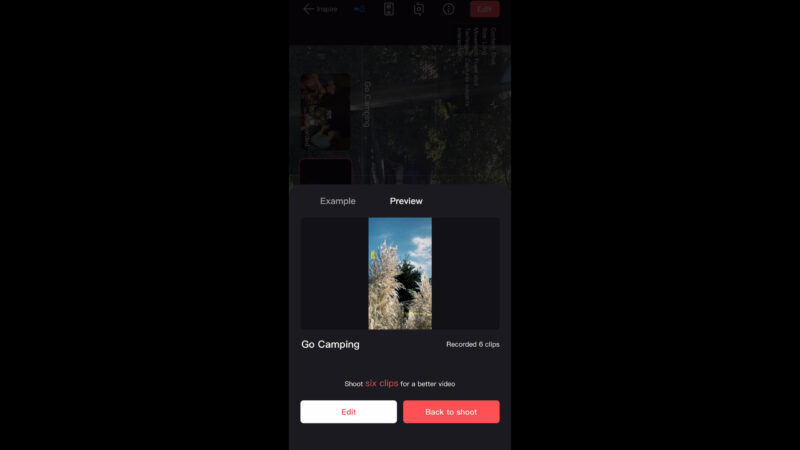
If you want to go back and shoot some more, click Back to shoot. If you are happy, click Edit. The AI now analyses your shots and compiles a sequence, complete with music and titles. Now, while you can change the music and keep the same template, it seems that the text itself cannot be edited or removed.
However you can add new text. You can also go in and manually edit the sequence, moving clips around for example. Just tap on a clip and drag it around.
Even though you shot your clips using the Go Camping template, the app will recut the clips to any of the other templates.
There’s all kinds of other stuff you can do here to manually edit your video. But this is mostly stuff that you can do in other editors like CapCut and VN.
Finally, as before, you can export your sequence in up to 4K resolution.
Videography – Beginner to Advanced
If you want to know more about filmmaking, my book Smartphone Videography – Beginners to Advanced is now available to download for members on Patreon. The book is 170 pages long and covers essential smartphone filmmaking topics:
Things like how to get the perfect exposure, when to use manual control, which codecs to use, HDR, how to use frame rates, lenses, shot types, stabilisation and much more. There’s also my Exploring the Film Look Guide as well as Smartphone Colour Grading.
Members can also access my regular filmmaking podcast, as well all 5 episodes of our smartphone-shot Silent Eye series, with accompanying screenplays and making of podcasts. There’s other materials too and I will be adding more in the future.
If you want to join me there follow this link.
