Filmic Pro vs McPro24fps (Android Camera App for Video)
When it comes to camera apps for shooting better video, there’s one app which stands out. This app has been around for years. Indeed, this app can lay claim to having been one of the main enablers of top level smartphone filmmaking.
I’m talking of course about FiLMiC Pro. Would Sean Baker have made Tangerine if this app didn’t exist? Difficult to say for certain, but certainly it would have been less likely.
For this reason, FiLMiC Pro got a huge head start and has maintained that lead, 5 years after the release of Tangerine. If you’ve only heard of one video shooting app, it’s probably going to be FiLMiC Pro.
But it’s not perfect and, while I use it happily nearly every day, I’m always curious about alternatives. A few months ago I made a video comparing a few other video apps, such as the Moment app (but they’ve now stopped supporting the android version).
There’s also Open Camera and the very similar HedgeCam 2, both free apps for Android. And they’re both pretty good too (yes you can set manual exposure and focus with both those apps). There’s also Manual Camera and Adobe Premiere Rush as well.
But none of these apps really compete with FiLMiC Pro when it comes to the sheer depth of features combined with a strong user interface. But recently an app called McPro24fps has made a good stab at snatching the lead from FiLMiC Pro. And in this article, I’m going to compare the 2 apps and see which one comes out on top.

User Interface
FiLMiC Pro seems better organised and more intuitive. But that could be down to the fact I know FiLMiC Pro very well while I’ve only just started getting used to McPro24fps.
To my eyes, the new app isn’t quite as nice to look at. Even though they do use similar adjustment wheels: focus on the right, exposure on the left.

I think this is because the McPro designers have decided to put more controls in the main screen, which perhaps clutters it a bit. Then again, it’s quite nice to have some features easily accessible.
For example, you can easily toggle around the various orientations. Auto-rotate is the default. But by tapping the orientation button, you can cycle through the options. So it makes it nice and easy to quickly lock the app into landscape, for example.
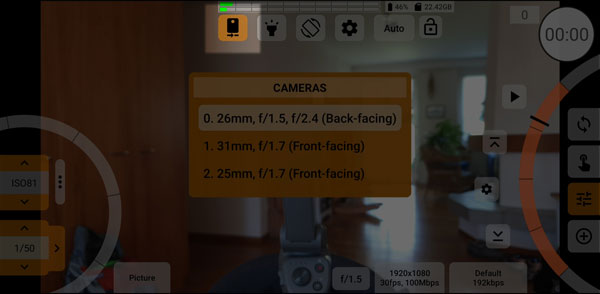
The top left button makes it very easy to select from your phone’s available cameras.
Recording
It took me awhile to discover the record button. But it’s here, top right, with the record counter inside. Which is quite a nice space-saving idea.
While you are getting familiar with the record button, check out the dropped frame counter right next to it. This counter should let you know, live, how many frames have dropped during a recording.
Focus
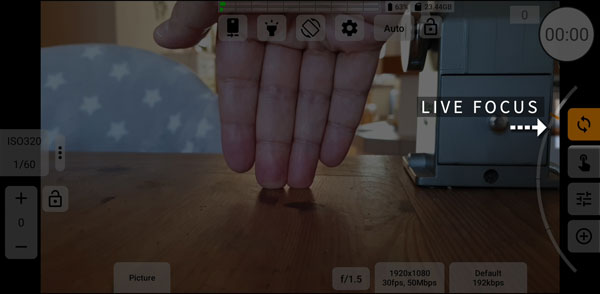
Focus is controlled using the wheel on the right of the screen, just like FiLMiC Pro. The top selector button allows live focus while recording.
Note that when in live focus mode, the wheel slides in and the the focus distance marker becomes a focus distance meter, letting you know the distance the focus is at at any given time. Another nice “attention to detail” type feature.
Next is touch focus, which allows you to set focus, depending where you touch the screen. Below that is manual focus, which means you can use the focus wheel before and during recording.
Below the focus controls, the plus sign in a circle switches to zoom mode. Now the wheel controls the camera’s zoom.
Exposure
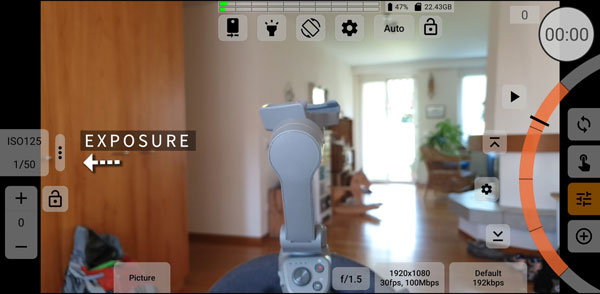
Again, it took me awhile to work out how to access manual exposure controls. I spent about 5 minutes tapping those 3 dots before I worked out you needed to swipe right to left. And, somewhat counterintuitively, you need to swipe right to left to close them again.
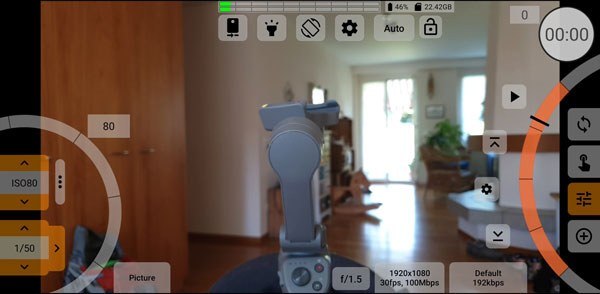
Now you open up the manual shutter speed and ISO controls. The arrows above and below the ISO allow you to adjust the ISO one stop at a time. Alternatively, you can use the wheel to adjust in smaller amounts.
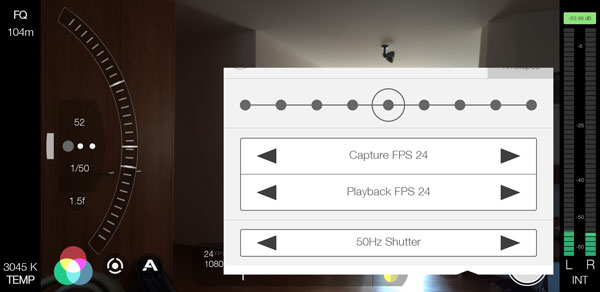
To adjust shutter speed you need to use the 3 arrows surrounding the setting. Up and down will move the shutter in multiples, depending on the frame rate. But the right arrow toggles between that and an alternative multiple.
For example, you might have the frame rate set to 30fps. If you want to stick with the 180 degree rule, then you’d opt for a shutter speed of 1/60th. But McPro24fps allows you to choose 1/50th instead.
Why Lock Shutter Speed to Frame Rate?
Now this is something I have discovered is quite important. Really we would prefer the flexibility to alter shutter speeds. I know that the 180 degree rule dictates shutter speed should be double the frame rate, but that really is a guide.
Reason it’s important is, if you’re in Europe artificial lights can flicker at 50hz which then causes strobing if you shoot at 1/60th. We would rather shoot at 1/50th, in that case.
And now here’s the thing. While FiLMiC Pro allows me to shoot 25fps and therefore allows a 1/50th. So why do I need to record at 25fps? Only because FiLMiC has locked the shutter speed to frame rate. This makes little sense, because the beauty of an electric shutter means we no longer have to be restrained by the limits of physical film cameras.
I should be able to have a shutter speed of 1/47.634 if I want. All I’m doing is telling the camera how long to keep the sensor switched on for, which in turn determines the amount of motion blur… If we want to shoot at 24fps with 1/50th shutter speed, there’s no reason why we shouldn’t have access to that.
The reason I’m making such a big deal over this is this is one of the main reasons I would switch to McPro24fps. With this app I can shoot at 24fps and not have to worry about artificial lights strobing.
UPDATE: as was pointed out to me this morning, you can set 1/50 shutter speed and 24fps using FiLMiC Pro. There is a 50hz setting in the menu for setting fps. Thanks to Marc Blank-Settle for giving me that tip.
Frame Rate, Resolution & Bitrate
The middle tab of 3 at the bottom of the screen opens up a menu. Here you can set frame rate, resolution and bitrate. While FiLMiC Pro has different controls for each setting, McPro24fps combines frame rate and resolution.
Here it tells me I have access to 24, 25 and 30fps. Select frame rate and then choose resolution from the list below. Rather than 4K, 2K, 1080p it lists the resolutions available in their exact pixels. Again, while FiLMiC Pro has a graphic representation of the ratios, McPro24fps allows you to choose from the pixel sizes. For example, 3024 x 3024 gives you a 1×1 ratio.
To film at higher frame rates McPro24fps is a bit more complicated than FiLMiC Pro. At first it seemed I could not shoot above 30fps, even though FiLMiC allows me to shoot at 30, 60, 120 and 240 fps (higher frame rates at lower resolutions only).
But once I disabled GPU, I was given access to 120 and 240fps. However, there was no 60fps.
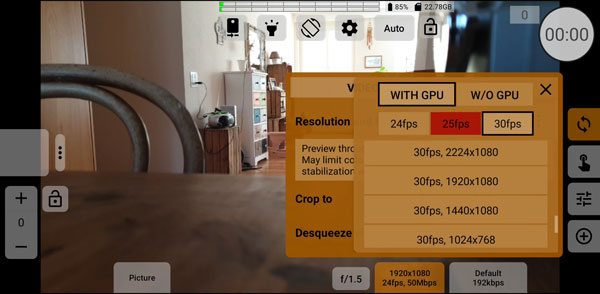
GPU on or off
A setting I’ve never seen before allows me to shoot with the GPU or without. When I select with GPU a message tells me this may limit the colour space to Rec .601 and limit stabilisation too. Some video shooting capabilities are improved by disabling GPU, others disabled.
Without GPU, more resources are used for smoother recording. In addition, without GPU some devices can record in 10bit colour. When switched on, GPU is used for colour grading on the fly or for functions available only with GPU (such as crop or de-squeeze)”.
Other settings
In the same menu, below the frame rate and resolution is a long list of settings. There are settings for DoF adapters, anamorphic lenses, switch between h.264 and h.265 codecs, bitrate, noise reduction and so on.
Many of these will be familiar to us from FiLMiC Pro or other apps. Note, after disabling GPU certain settings here become unavailable. Like de-squeeze video for example.
One very interesting setting claims to allow us to record in a fixed frame rate (in brackets “experimental”). The designers say it’s important that no dropped frames are registered during recording.
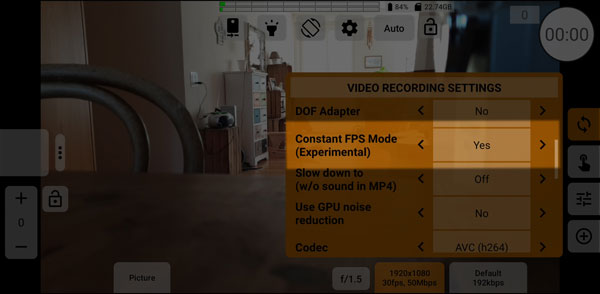
So I tried a sample test and after no dropped frames recorded, loaded the clip into Adobe Premiere Pro. Checking the info screen, Premiere still detected variable frame rate. However, whereas video recorded at 30fps in FiLMiC Pro usually comes out as 30.01fps in Premiere for me, using the McPro24fps fixed frame rate, Premiere reads tells me it is indeed exactly 30fps.
When I questioned the McPro24fps guys about this, they said I should only use QCTools as software like Premiere cannot detect fixed frame rate 100% correctly.
Bitrate
The McPro24fps app allows you to set bitrates well over 100Mbps, all the way up to 500Mbps. However, over 100Mbps the tab turns red, which I presume indicates the user does so at their own risk.
Some devices using the McPro24fps app can choose constant bitrate too. This is less compressed and therefore higher quality, in theory.
White Balance
The white balance control is accessed using a button at the top labelled “auto”. Tap this to open the white balance control. Here you can alter the white balance manually, in a similar way to FiLMiC Pro, as well as similar presets.
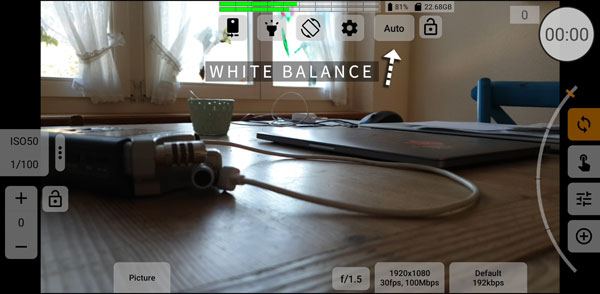
However, setting how white balance locks is done in another menu. To the left of the white balance button is a settings cog. Tap that to open another long list of settings.
Some way down is an AWB (auto white balance) autolock. You can switch between locking white balance completely or only at the start of record. In McPro24fps, you can also do the same for auto exposure, which is something you can’t do with FiLMiC Pro.
Again, not as user friendly as FiLMiC Pro, but the setting is there if you don’t mind looking for it. I think FiLMiC Pro does a better job with White Balance, especially as you can see the Kelvin number and tint number.
More settings…
Scrolling down this list you can see a lot of other settings, dealing with everything from logging to storage and screen brightness.
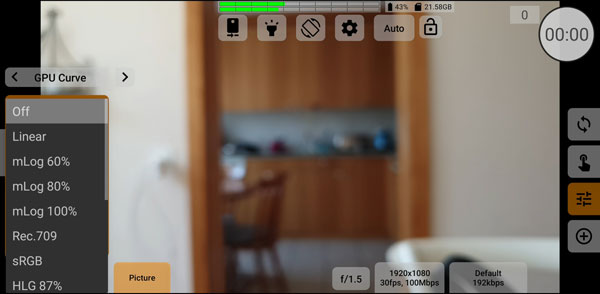
Log Profiles
McPro24fps has a range of Log colour profiles. I know many smartphone videographers love to use Log profiles combined with LUTs, so this app is really for you guys. On the McPro24fps website they have made available technical LUTs for all the Log profiles. Using these you can convert Log video to Rec.709.
So while FiLMiC Pro does have the option to shoot with their LogV2, you have to pay extra for that and there’s less choice of different profiles.
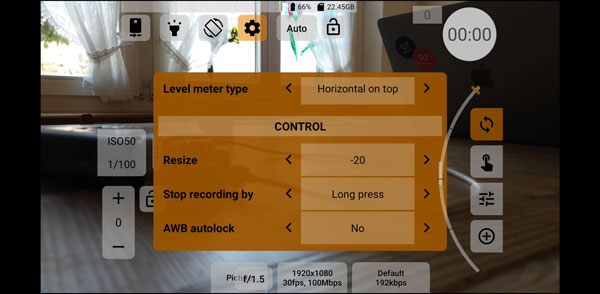
Resize the UI
Another problem I have when using FiLMiC Pro is when I’m using conversion lenses mounted with a clip. Nearly always, the clip covers the exposure control. I’ve even had to customise a clip, trimming it so it doesn’t cover the controls.
McPro24fps have a control where you can resize the user interface. Tapping this all the way to -20 pushes the controls inwards. When I do this, it makes getting to the controls easier.
10 Bit Colour
In Filmic Pro and other apps, we usually shoot in 8bit colour. There are some apps which allow 10bit. I believe the native LG app allows it. Depending on your device, McPro24fps also allows you to shoot in 10bit colour.
10bit will also create bigger files and demand more from your processor when editing. If 10bit colour is available on your device, it should appear below the anti-banding setting.
Stabilisation
While FiLMiC Pro allows you to toggle stabilisation on and off, McPro24fps gives you more options. Off, Optical, Digital as well as Optical + Digital combined. Again, whether this is available to you will depend on your device and how the app works with it.
This is a pretty cool setting, because usually we would prefer to use optical stabilisation over digital.
Conclusion
McPro24fps has many great features. It’s perhaps a good app to try once you have got familiar with FiLMiC Pro, which is easier to use. MCPro24fps is quite cluttered, with a lot of features, which will require quite some time to get used to and fully understand.
Using it is a bit like solving a puzzle. Switching on GPU allows some features but disables others. Switching off GPU does the same – some features are now greyed out and others become accessible.
So you might spend a lot of time switching things around, trying to work out how to get the feature you want. But there’s certainly some great and useful features. Just simple practical things like being able to adjust the shutter speed without being locked into the 180 degree rule.
When it comes to features which get your attention, like 10bit colour, we need to be cautious. You might technically be able to shoot 10bit colour with your smartphone, but the important question is how well does the app perform this task. It’s not enough to just say “wow 10bit colour on your smartphone”.
I mean, I can bolt on a rocket to my car, but that doesn’t mean it can get me to Mars. Just like travelling to Mars, shooting nice looking video requires so many different skills and specs that combine together to create something special.
So, in conclusion, I think I would end up using both these apps, for different purposes. The beauty of smartphone filmmaking is we don’t need to decide between apps. We can have as many camera apps as we like and boot up whichever suits the mood or the moment.
And I definitely recommend this app for serious smartphone video shooters.
Smartphone Video – Beginner to Advanced
If you want to know more about smartphone filmmaking, my book Smartphone Videography – Beginners to Advanced is now available to download for members on Patreon. The book is 170 pages long and covers essential smartphone filmmaking topics:
Things like how to get the perfect exposure, when to use manual control, which codecs to use, HDR, how to use frame rates, lenses, shot types, stabilisation and much more. There’s also my Exploring the Film Look Guide as well as Smartphone Colour Grading.
Members can also access all 5 episodes of our smartphone shot Silent Eye series, with accompanying screenplays and making of podcasts. There’s other materials too and I will be adding more in the future.
If you want to join me there, follow this link.

10-bit colour depth+lots of customizable log gamma curves (and even customizable point density)+ no NR, no sharpening, all Intra frame codification feature, native resolution sensor recording…
Filmic is out of the game. Welcome Mcpro24fps.