How To Make A Short Film With Your Smartphone
We are a film festival which selects and screens (mostly) short films shot on smartphones. When I’m not directing films and film festivals, I’m writing a blog about the same subject. So it might seem strange then that I haven’t yet written an article on how to make a short film with a smartphone.
Well, I guess all the articles and videos combine to together to provide that. Then it occurred to me it might be useful to have one article which is an overview of the whole process. A boiled-down, start-to-finish introduction which also provides enough information that you can read it and start making a short film right away.
Thing is, filmmaking is such a huge subject it’s very easy to get lost in the detail. But if you ask any professional filmmaker how they learned their craft, 99.99% of them will say the same thing: by making films.
With filmmaking you really just have to jump in and have a go. Therefore, in this post I will do my best to give you nothing but the essentials to get started.
1. What have you got?
Your very very first step should be to make a list of everything you can use to make a movie. Name everything you can get access to under these headings:
- Locations
- Actors (or friends who aren’t shy)
- Props
Everything on this list will define your story. Sometimes making this list can inspire story ideas.
2. Decide on the length
How long will the film be? You should decide before you start thinking about the story, because the length of the film will define the structure – or the way you write the script.
If this is your first film, I’d recommend making it a maximum of 10 minutes. Preferably 5 minutes or less.
Which micro-budget self-funded film made $1m at the box office and ended up on Netflix? Read on to find out.
3. Think up a story
This is the phase where so many people get lost and so many scripts get written but never made. I know from my own experience as a screenwriter. So, to make sure your script doesn’t end up the same way, follow this advice:
Think up a story around what you have got (see step 1). In other words, a story set in one of those locations you have access to, with actors/friends willing to volunteer as characters and using props you made a list of.
Tip: make the characters in the story fit your actors/friends. There’s an old saying in Hollywood that 90% of directing a film is casting. And good casting isn’t asking your friend to play a gangster because you want to make a crime thriller like Goodfellas, set in your kitchen. Unless your friend happens to be Ray Liotta.
Build your story around the people you are in reality, rather than the characters in a movie you have a fantasy about being in. I think a good example of this is the film Blue Ruin by Jeremy Saulnier. There’s still a gun battle (if that’s your thing) but the story is very much set in a world they inhabit in real life.
When I say set in the world they inhabit in real life, I don’t just mean the physical world but the people and how they relate to each other. For example, in Blue Ruin the main character has relationship troubles. He’s a pretty ordinary, mild-mannered guy. So when it comes to shooting guns he’s actually pretty hopeless at it – which fits him and the story perfectly.
My guess is the actor (Macon Blair) is not a trained firearms user. But if the filmmaker had decided to cast him as ex-army or a policeman, when it came to shooting the gun fights it would have looked bad. Therefore, it makes far more sense to write a character who as equally ill-prepared to shoot guns as the actor.
Yes, Blue Ruin is micro-budget film which started out by raising $38,000 on Kickstarter made almost $1m at the box office. The movie really to illustrates the process by which you write a script you can film with what you have. The message is, get inspired by the things around you (and not your favourite big budget movies).
Can you write a script if you’re not a writer? Yes. Read on to find out how.
4. Sketch out an outline of the story
I’ve been shooting short films on smartphones for the last 2 years. I aim to make them about 10 minutes each, although they usually come out a bit longer. But this is how I turn my story idea into a script.
First, I write 10 sentences or story beats for each minute of the story. To do this, I open up a Google doc and set it to “numbered list”. I now write out the story, filling in those 10 slots.
I need a writer to tell a story
Many people think they can’t write a story. Thing is, nearly all of us tell stories, every day to our friends and family. For example, we might talk about something funny or difficult that happened to a mutual connection. Or we might amuse colleagues with something funny that happened on the way to work.
That’s telling a story, the only difference is you aren’t writing it down. Some people are better at telling stories than others, but your story will even have a structure (a beginning, middle and end) you will create without even thinking about it.
Because this all happens instinctively, we don’t worry about it or overthink it. But as soon as we see a blank page and feel a pressure to be a professional story maker, we panic and this process dries up. By the way, this problem (known as writer’s block) happens to seasoned professionals too.
If you have this problem, here’s my suggestion. Record yourself telling a story as if you’re telling a friend, just to amuse them for 5 minutes over coffee. Most smartphones have voice recorders, so now is the opportunity to use yours for making a short film.
Once you have recorded the story, now you can listen back and write it down. You might find yourself having new ideas about the story during this process. Once the story is written down, you can adjust things or rework certain parts.
What 2 mistakes do new filmmakers make when writing screenplay? You’ll find out in the next step…
5. Write the script
How do you write a script? The only difference between a written story and a script is mostly just formatting the text to look like a script (but even that isn’t essential). There are a variety of programs out there to do all the formatting for you. But like I say, as you’re filming this yourself, you just need certain elements included:
- scene headings – where does the scene happen?
- action – what do the characters do?
- dialogue – what do the characters say?
That’s it.
So now, take your outline and flesh it out describing the important actions and words spoken.
Action tip: only describe the essential actions. You can always add things and improvise while filming.
Wrong: “James Bond tiptoes towards the door, his jacket brushes against the frame, there’s a glint in his eyes as he wipes the sweat from his brow, waiting for the guard to approach. Finally he sees the guard’s faint shadow from around the corner and sets himself to attack. Like a leopard, he springs from the doorway and glides through the air…”
Right: “James Bond moves to the door. Stops as he sees the guard’s shadow. He waits and then attacks the guard.”
Dialogue tip: people rarely say what they’re thinking. Most human communication takes place via body language or subtext.
Wrong: “How do you feel about me?” – “I love you.”
Right: “Oh man, I love those chocolates.” – “Here.” – “But that’s your last one.” – “Please, have it.” Their eyes meet. Blushing, she takes his last chocolate.
Wrong: “You’re stupid!” – “I hate you!”
Right: “Oh my God, you can’t even divide a number by 10?!” – Brandishing the kitchen knife, “Well, perhaps I could take a stab at dividing you by 10!”
One thing you’ll notice is that the more direct way of speaking is faster (imagine how much time we’d dave if we just said what we thought). So this is why screenwriters and filmmakers sometimes use more direct dialogue.
Remember: use what you have to hand as inspiration. Can you think of a story involving the tents you have in the basement, your sister and your colleague at work who both want to try acting, and that hard case you bought to keep tools in that looks a bit like it’s from a SciFi-thriller movie?
Try to keep everything as simple as possible. The more people involved, the more that can go wrong, and the harder it is to organise. More locations means more travel time between locations. More props, more filming equipment means more things you have to deal with while filming.
Keep. It. Simple.
Do you need to be a producer with expensive software to produce a film? No. Let me tell you how…
6. Organisation
So you wrote a script using everything you have to hand – locations, friends/actors, props. Now, you just need a little bit of organisation.
Number the scenes so that it’s quicker for everyone to understand which scenes are being shot when.
Schedule
If you have a 5 minutes long or less film (5 correctly formatted screenplay pages or less) you should be able to film it in one day.
If you have a 10 minutes long film, you will need about 2-3 days.
Organise the scenes by location. For example, schedule all the scenes that happen in the kitchen together. Then all the scenes that happen in the tent. Then all the scene that happen outside the tent. And so on.
I use Google sheets to schedule my shoots. It’s free and easy to use and share with cast and crew members.
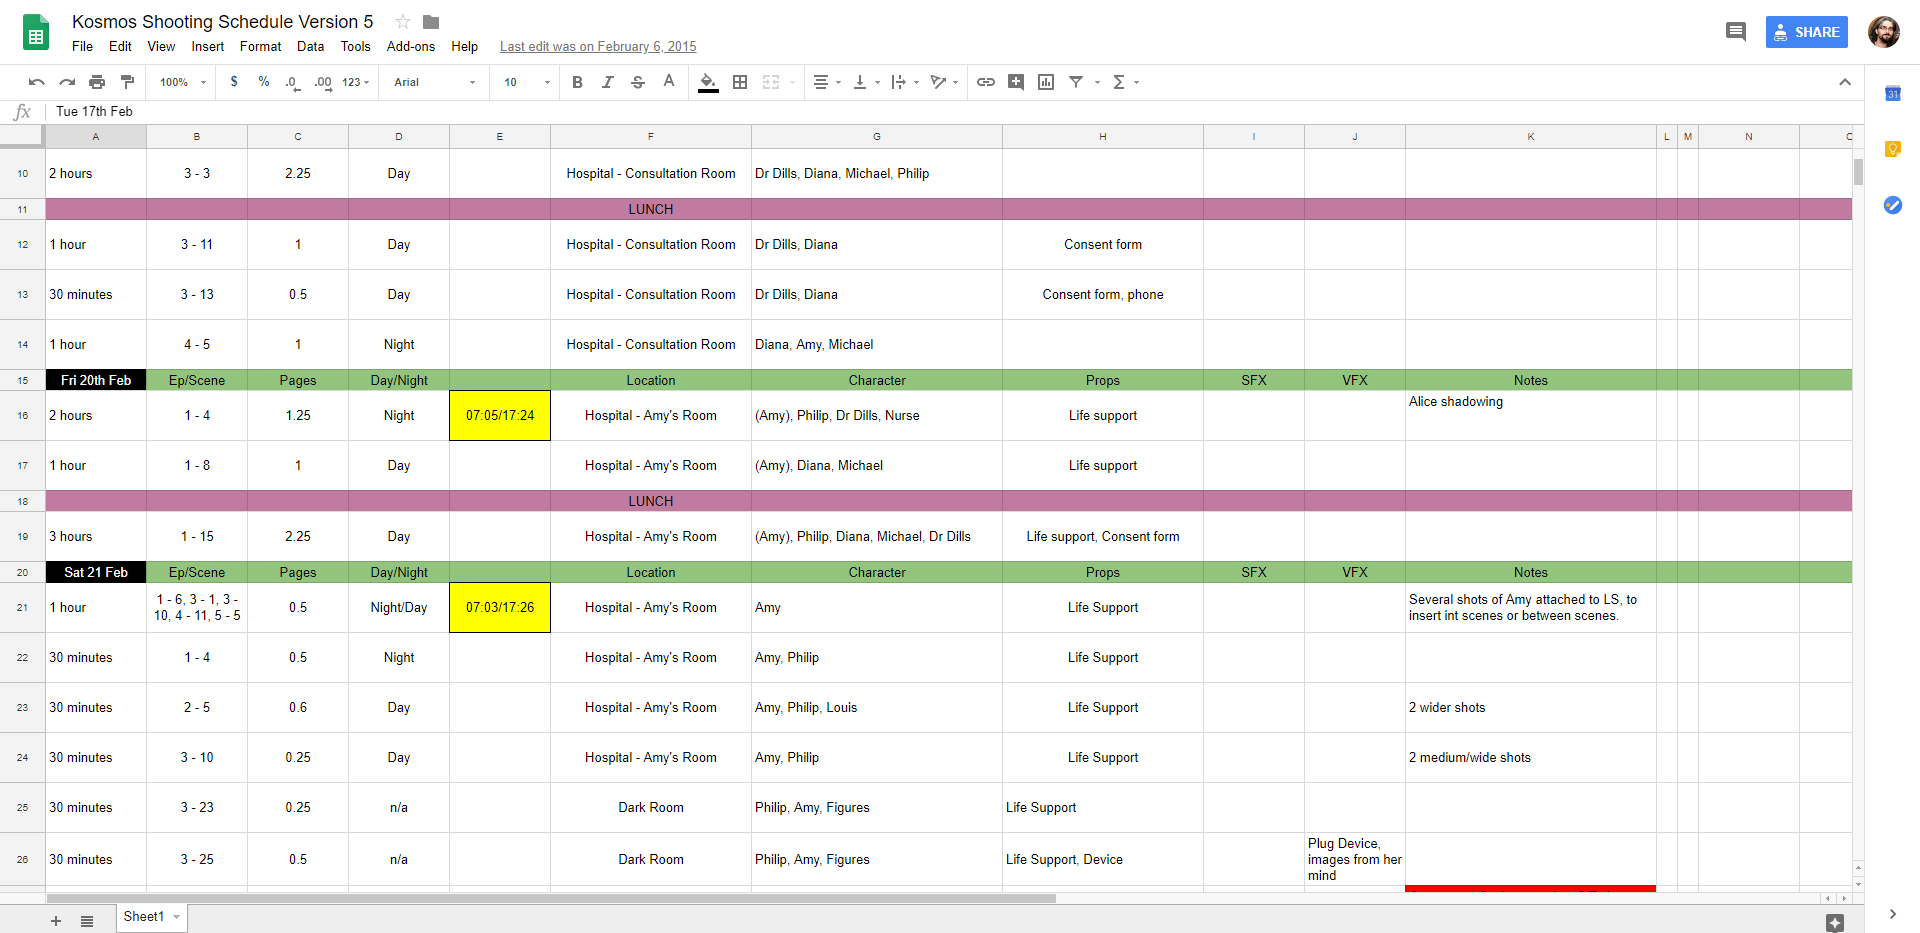
This how I scheduled a web series called Kosmos. But it doesn’t have to be as complicated as this. I was dealing with 10+ crew and 20+ actors for a 120 minutes film (in total).
Instead you can just include the basic essential information, like this:
Thursday 30 January
9am: Assemble @ Strawberry Fields
10am: Scene 1 – Location: Field. Cast: John, Paul, George & Ringo. Props: 3 x guitars, drum kit. Costumes: old army uniforms (pink, blue, green etc).
11am: Scene 2 – Location: white Rolls Royce. Cast: John & Paul. Props: LSD. Costume: White suits.
12pm: Scene 3… (etc)
Try to estimate how long each scene will take to film.
A scene might be as simple as “John opens the door of the white Rolls Royce and climbs in”. How long will that take to film? 20 minutes, maximum.
Or a scene might be 3 pages long and involve complex actions, like a fight. Depending on how complex the fight scene is, this could take anything from 1-2 hours to the entire day.
The more films you make the more you learn the cost of everything you write in a script. When I say cost I mean a cost in time (and time = money). It might only take you 20 minutes to write out the actions in a fight scene. But filming them could take anything from hours to days, depending on the complexity.
But if you are smart as a no-budget smartphone filmmaker, you will think twice (or more) about including complex scenes. You’ll spend time thinking how to tell your story in the simplest way possible, which will save you disappointment later down the line.
Which major Hollywood director drew his own storyboards? Find out in the next step.
7. Storyboard
Most filmmakers don’t just turn up on set and start improvising shots. Rather, they have at least a rough storyboard of the shots in sequence.
A story board is like a comic strip, but it doesn’t have to be brilliantly drawn. Simple stick figures and notes on whether you want a close up or a wide shot will do.
Below is a page from the original Blade Runner storyboard, which director Ridley Scott drew himself. You can see there are arrows indicating camera or character movement. There are notes on lighting and special effects techniques like front projection.
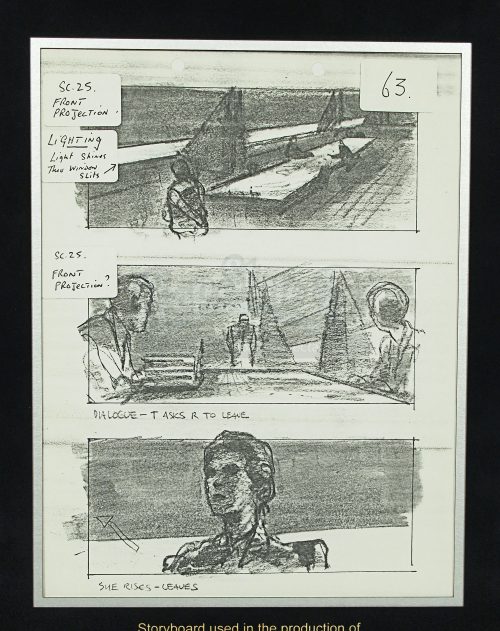
Again, you can download free storyboard templates online. Or just get some paper and draw boxes. As long as you understand what you meant when you drew it and made notes…
Do you need a professional camera to get manual control? No, you can do this with a smartphone. Find out how…
8. Manual controls
You can certainly shoot a film using the auto settings of your smartphone camera. However, using manual controls will allow you to make your film look more polished.
Some smartphones come with native camera apps which provide manual control (Sony Xperia 1 & 5, LG V50). But most smartphones need a 3rd party camera app. This video below runs through the basics of manual controls using FiLMiC Pro. I also have the same information in a blog post.
In the next step I’ll tell you about the disaster that almost destroyed my first smartphone short film.
9. Filming
The first day of filming has arrived and if you haven’t got much experience it will probably feel a bit overwhelming.
At least, that’s how I felt when I started filming my debut feature having never shot a film before (ie: I hadn’t operated a video camera before, although I had been involved in short films). My strategy was to get as much coverage as possible, because my inexperience meant I didn’t really know what I needed. Later, as I shot and edited different sections, I become much better at knowing which shots I needed.
But here are the basic principles of getting coverage which will edit together to make a scene.
Shots
Master shot: usually a wide shot which captures all the cast and actions that take place in the scene.
Medium shots: focusing on 1 or 2 characters, but wide enough to show any character action
Close ups: of actors’ faces for dialogue, or of other details for important actions/beats.
When I film a dialogue scene for example, I usually film the entire scene using a wide shot (enough to cover both or all actors). Then I re-film the entire scene using close ups of each actor.
Inserts: these are usually close ups of small actions, like dropping a poison pill into a cup or placing a wedding ring in an envelope. Basically, you want the audience to focus on this action – you don’t want them to miss it.
Inserts are also useful as somewhere to go when editing to help create a smoother look for the film. For example, if you have 2 actors talking but are struggling to find an edit point between the two, a close up of one actors swirling wine around their glass will give you something to cut to and then back to the actor.
Using a smartphone
Smartphones generally have wide lenses, which makes getting close ups a bit trickier. While using a camera with a long lens means you can get close to an actor’s face without moving the camera, with a smartphone you need to move the closer. Sometimes this can disturb the actor to find you and your smartphone so close while they’re trying to perform.
Having said that, new top range smartphones now come with inbuilt lens options, including a tele lens. In addition, you can add conversion lenses, such as tele lenses, which help you get closer. Another option is to shoot in a higher resolution than you intend on mastering your video at and then cropping in to get closer.
Personally, I have managed to shoot 5 short films with smartphones without using a tele lens. So, while it’s not impossible, it’s probably worth bearing in mind.
Pro sound recordists often say filmmakers need every actor’s audio, even if they’re not in shot. Is this true?
Sound
Sound is hugely important and shouldn’t be ignored. If you can, then shoot your film without live audio recorded on set.
The reason for this is recording location sound adds a lot of difficulty and complexity. For example, noisy locations, unskilled sound recordist or no sound recordist at all, or you simply don’t have the equipment. Therefore, you might be better off making a film based on action or having a narrator voice over, which you can record later.
Having said that, I have recorded location sound for all 5 of my low budget smartphone-shot SciFi short films. For 2 episodes we had a trained sound recordist who brought all his own equipment. For the others, we had to improvise.
Tip: Get voice sound in the close ups. If you are recording live voice audio using a shotgun mic, then use the close ups as an opportunity to get the microphone close to the actors mouths.
In a wide shot, its hard (or impossible) to get a shotgun mic on a boom pole close enough to capture acceptable quality audio. This is because you don’t want to get the microphone in the shot. Therefore, your close up shots are also your opportunity to move the microphone closer to the actor’s mouth. Close ups are also usually framed on one actor at a time, so you can really focus on getting the best audio for that actor’s dialogue in the scene.
Remember: when recording live voice audio you only need to focus on who is in frame. If you have someone speaking in frame you absolutely need their dialogue live, as it will match their lip movements. But if an actor is out of frame, or their lips are not in shot, you can always pick up their dialogue audio later (or from another take).
What is the best location in the world (according to John Cassavetes)?
Lights
If possible, use available lighting. You can still be creative in the way you use it, but bringing extra lights again adds extra complexity and the requirement of certain skills. Buying some lights and simply pointing them at the scene isn’t going to look good (unless a bright, washed-out look is what you’re after).
But here’s some simple tips.
Sit characters by windows: have them side on to the window so both characters get equal amounts of light. Having someone with their back to the window means either their face will be in shadow or the window will be blown out. Of course, you might want that – but it’s good to be aware of it.
When is it a good time to have no light at all on your actors?
Light faces: the grandfather of indie film John Cassavetes said the greatest film location in the world is the human face. The reason he said this was, as a filmmaker with minimal resources, he didn’t need fancy locations because his stories were about people.
Stories are told by people. Even movies with huge budgets, fantastic CGI, mind-blowing FX and international locations. Imagine watching the latest blockbuster movie but with all the faces of the actors constantly in shadow. Most people would walk out after 5 minutes.
Despite all the grandeur of filmmaking, humans get stories from the expressions on other human faces. Therefore, it’s important to pay attention to faces when lighting your scenes. As no budget filmmakers, it’s very easy to lose sight of the basic stuff when there’s so much to deal with.
Use silhouette: On the other hand, having characters in silhouette can be effective too. For example, a wide establishing shot of the actors by the window can be hard to light. Silhouette can look poetic and is easy to light – simply reduce exposure so the actors are black shapes over a light background.
Takes
Make sure you get at least 2 takes of every shot, even if the first take is perfect. Files get lost or corrupted, so it’s better to have at least 2 of everything.
Back up
Make sure to back up and store footage captured as often as possible. I usually put all the files from my smartphone onto a hard drive when there’s a break – like during a lunch break or at the end of the day.
At the end of the first day of filming my first smartphone-shot short You Have Been Chosen I was starving and decided to get food before backing up the footage. As I left my house, 2 guys on a bike drove onto the pavement and snatched the phone from my hands. Not only did we lose our camera for the next day’s filming, but we lost half of the footage from the day too.
Which phase of filmmaking takes the longest? Find out in the next and final step…
10. Editing
Editing is a whole art and craft on it’s own. That’s why most top editors dedicate themselves to nothing but editing their entire careers. However, many low-to-no budget filmmakers edited their own movies. Because we simply can’t afford to pay an editor so we have to do the best we can ourselves (unless we find a reliable volunteer).
You will need (or have access to) a decent computer with powerful enough processor to use an editing program. You will also need an editing program.
Although you are probably inexperienced, the good thing about editing is you can take as long as you like. There’s no schedule pressure so you can afford to take your time and experiment.
How can you use your live audio creatively?
Logging all the files
First job is to collect all the files together and name everything. At least, that’s how I do it. I go through each take, naming them by scene number and take.
I also add anything important I need to remember. For example, you can mark shots as your favourite, or as no use if there’s a problem. This saves you time later, hunting through takes trying to find that perfect performance you remember seeing but have now forgotten which take it was.
If you have location sound recorded separately you might need to sync the audio to the video at this point.
Tip: audio from one take can be used in another. Just because audio is synced to one take doesn’t mean you can’t use it creatively somewhere else. For example, over the wide shot. Or perhaps the audio from one take is no good but – with some clever editing – you can lay over the audio from another take and make it fit.
You can also lay your audio from the close ups over completely different shots. For example, two people talking in a car. Being creative, you could have the dialogue running over a wide shot of the car driving along the road.
A test of your footage
You won’t know how good your shots are until you come to edit them. That’s why shooting and editing video is the only way to learn how to make films. You can read as many blog posts as you like, watch as many YouTube videos as you like, but you won’t get any better at making films until you shoot and edit one.
Give yourself time
Post production (editing, sound design, music, colouring, grading, VFX) takes much longer than the previous stages. To give you some idea, it takes me 2 days to write a 10 page script, 3 days to film it and 3 months (or more) for the post production.
Of course, if I could pay professionals to do the work for me it would be quicker, as these areas can be worked on by different people at the same time. This is another good reason to make your short film very short, especially if it’s your first film. A one minute film is probably enough of a challenge to get some invaluable filmmaking experience.
Be creative
This goes for editing as well as all the other stages. Editing isn’t just about sticking all your shots together. It’s very much a creative process where you make the most out of the footage you have. Professional actors often talk about how much they owe their performance to the editor. And it’s the editor who can bring together all the best bits and create the illusion of it all happening in that moment.
Much fun can be had choosing the best takes, the best bits of the best takes, but also using them imaginatively. Certainly, you can watch other films to get inspiration, here.
Equipment I use
This is the equipment I own and have used for shooting my last 5 smartphone short films (actually episodes in a series called Silent Eye).
Smartphones
- Samsung S8, S8+, S9
External Drives
Lenses
Gimbal
Microphones
Audio Recorder
Boom pole
Lights
- 2 x VIJIM VL-1
Grips and Rigs
Further reading
While you should be able to get started right away, if you want to go further in depth on any subjects here are some recommended links:
- Beginner’s Guide to Smartphone Filmmaking
- Writing Screenplays: First Steps
- Micro Budget Filmmaking: Organisation
- Basic Video Editing Tips
- Smartphone Filmmaker Diary
- FREE Film School
- Guide to Shooting a Documentary on a Smartphone
Eager to learn more?
Join our weekly newsletter featuring inspiring stories, no-budget filmmaking tips and comprehensive equipment reviews to help you turn your film projects into reality!
Always a pleasure to read you Simon: useful-practical tips, simple and on the point! Thanks for keeping on Inspiring
thank you Arthur!
Great article