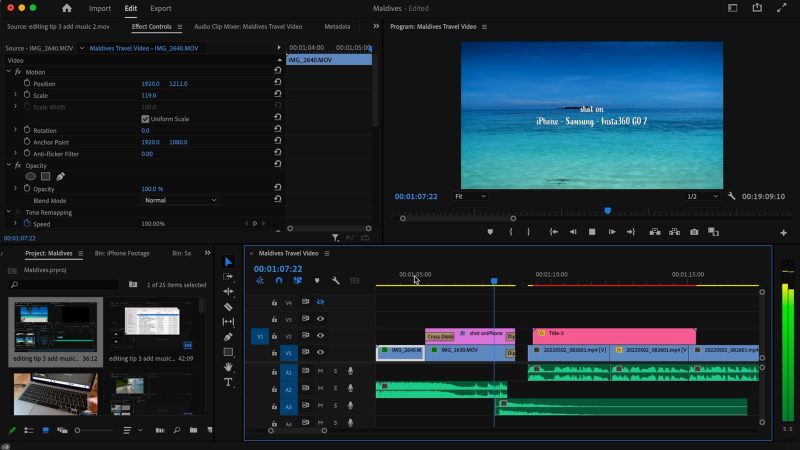
How to Shoot & Edit a Travel Video with Smartphone & Insta360 GO 2 : Underwater Footage
I recently visited the Maldives where I had a go at snorkelling for the first time. So I was able to try out the Insta360 GO 2 underwater. As well, I wanted to capture the feel of the island and the friendly people working there. I actually had 2 phones: an iPhone 12 Pro Max and a Samsung Note20 Ultra. But you can do just as well with 1 phone.
Whatever device you are using for shooting your video, I’m going to give you a number of tips for shooting and editing a travel video, including how to shoot underwater with an Insta360 GO 2.
Preparation Tip 1: decide the length first
When shooting a smartphone travel video, the length of the video will dictate how you shoot the video, so it’s a good idea to decide first. You don’t have to know exactly. But it’s best to have a rough idea of whether it will be 1 minute, 5 minutes, 30 minutes or even longer. As a rule, the longer the video the more of a narrative you will need to keep the video engaging.
When I shot the video (above) in the Maldives, I already knew this wasn’t going to be a long video. I just wanted to create a snapshot of my experience on the island, more like a movie trailer than a full movie. With such a short video, there’s no real need for a structured narrative.
But let’s say you wanted to make a 20 or 30 minute video. A video edited this way, with a fast pace will get tiring to watch after a couple of minutes. For longer videos you will need more to engage your audience. Some kind of more developed story, or at least a change of pace and mood.
Shooting Tip 1: keep it simple
When shooting a smartphone travel video ask yourself: Do you really need that gimbal? Do you really need that camera app?
To capture those spontaneous magic moments you need to be ready, with your eyes open looking for opportunities. One time, I was walking around the island when I saw these guys pushing a cart. I had no idea what they were doing, but I quickly got my iPhone out and started filming. While I was filming, one guy started climbing the tree and I managed to capture what they were doing, spontaneously.
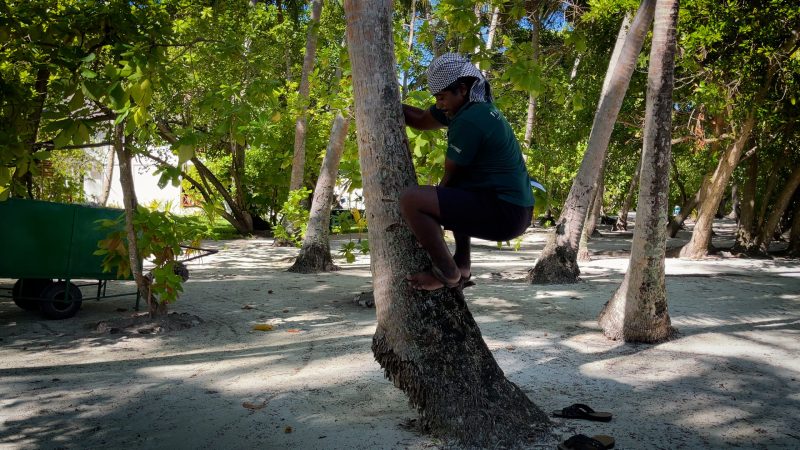
Now, imagine if I had to set up a gimbal or fiddle around with ISO and shutter speed, I would certainly have missed my opportunity to capture that moment.
For this smartphone travel video I just used the native app, holding the camera in my hands, with stabilisation on. As well, I had it set to 4K and either 30fps or 60fps and exposure left on auto. Only a couple of times did I even lock exposure.
Using the smartphone like this meant I was able to react quickly to anything interesting that I spotted going on.
Shooting Tip 2: film a subject
This might sound obvious, but try to find interesting subjects to film. There’s only so many shots of trees and leaves and landscapes you can watch, isn’t there?
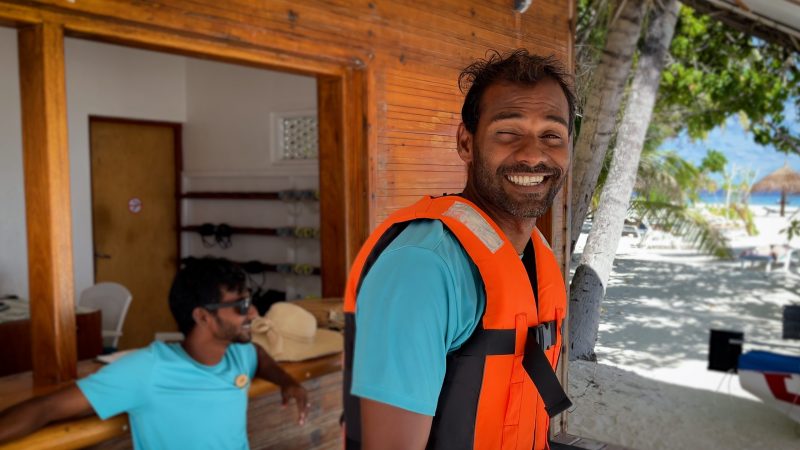
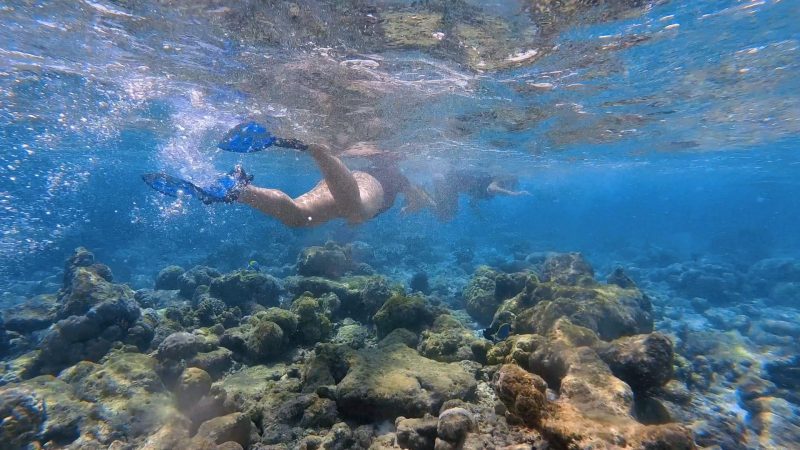
The most engaging subjects to film are people. For this video, the guys who worked on the island were generally happy to be filmed. Underwater, I had fish to film as well as other people snorkelling.
And when you are filming a subject, get nice medium or close up shots. If your video is full of wide shots, it can get pretty boring.
Shooting Tip 3: move the camera
When you are filming a subject, try to keep the camera moving. You can either push in slowly, or circle around slowly. With the camera set to 60fps, I then slowed this down to 24fps when editing. And this gives a nice smooth camera motion.
For the circle shot, you move the camera left to right or right to left, but turn the camera so the subject remains in the same position in the frame. As well, try to keep the movement as smooth as you can.
Shooting Tip 4: think about the edit
When you’re filming a smartphone travel video, don’t just capture things randomly. Try to think about how they might edit together.
For example, that circling dolly shot I just told you about. First, I already know these are going to be short clips edited together at a fast pace. That means I only need like 2 seconds of smooth video. And, when you shoot at 60fps and slow to 24fps, 1 second of video becomes more than double that length.
That means you only going to need to shoot 1 second of good video. And this is really important with these spontaneous opportunities, where you have to grab them as quickly as you can.
Here’s another example. Remember I got the shot of the guys climbing the tree and cutting down some branches. I wanted to film this stuff as it hit the ground. Then I remembered we’d ordered some coconut drinks at a bar some days before. So we went back and ordered another coconut drink and I asked the barman if I could film him as he was bringing the drinks.

He was happy to do that so I got this shot. Because – thinking about the edit – I thought I could make a nice little story sequence showing the guy climbing the tree, next shot: coconut explosion, next shot: preparing the coconut… then to end it, our friend here bringing the final product.
So, in fact, I did manage to get a little story into my short video. Because I was thinking about how these shots would edit together, that helped me get the shots I needed.
Shooting Tip 5: cut the wobble
One of the differences between shooting handheld with a smartphone compared to a regular camera is you tend to get this kind of wobble. This can look really ugly and it’s actually quite hard to remove using stabilisation, if it’s too exaggerated.
What you can do to reduce this is to hold the smartphone with one hand as normal, but with the other hand flat across the back and the thumb bracing against the top right corner. This feels much more secure and you get a lot less wobble.
6 Insta360 GO 2 Underwater Filming Tips
OK, these are my tips for filming underwater with the Insta360 GO 2. This is a great little action camera, but it does have some disadvantages to bigger action cameras.
1: When filming with the camera removed from the charging base, the battery only lasts up to 20 minutes. The last thing you want is to have to stop filming after 5 minutes, so make sure it’s fully charged first.
2: my settings were 1440p at 30fps in Pro Video mode. So that’s the max resolution. When you’re filming with this as a standalone camera, to shoot Pro Video long press to switch on the camera and then single press to start recording Pro Video. That’s if you still have it set to the default settings. Check out my full GO 2 tutorial if you want to understand these settings better.
3: only the camera is waterproof, the charging case is not. So you can’t film underwater with the camera in the charging case. After you’ve been filming in the sea, rinse off the salt water under a tap.
4: I used the magnetic medallion and hung the camera around my neck, loose so it’s just hanging down. To get a shot I held the camera with both hands.
5: because the battery only lasts 20 minutes, leave the camera switched off until you are ready to film. Long press to switch on and then single press to start filming. If there’s nothing more to film, long press again to switch the camera off until you are ready to film again.
6: to get a smooth shot, get a bit of momentum, start filming and then just allow your body to float along. You can use your body and the water to create a smooth camera movement. As well, use slow or minimal camera movements. If you move the camera all over the place you will get messy footage.
How to Export Full Quality Video from iPhone or iPad using AirDrop
When transferring my files from my iPhone or iPad to my laptop I usually use AirDrop. But I’ve found that if your video has been shot using an app like Insta360 or the DJI Mimo app, your iPhone will automatically compress the video when you share it using AirDrop. You will get this message which says “preparing”.
For example, a 800mb file sent via AirDrop arrives on my laptop as a 200mb file. What it’s doing is greatly reducing the bitrate which means reducing the quality of the video.
To stop this happening there are 2 settings. First, go into the settings of the Photos app on your iPhone, scroll down and switch to “Keep Originals”.

Secondly, when you share a video, before you tap AirDrop look at the top where it says “Options”. Tap that and now toggle on “All Photos Data”.
Tap done and now tap AirDrop. This time there will be no “Preparing” message and the whole video will be sent without compression. When it arrives it will be within a folder. Just open it and there’s your full quality video.
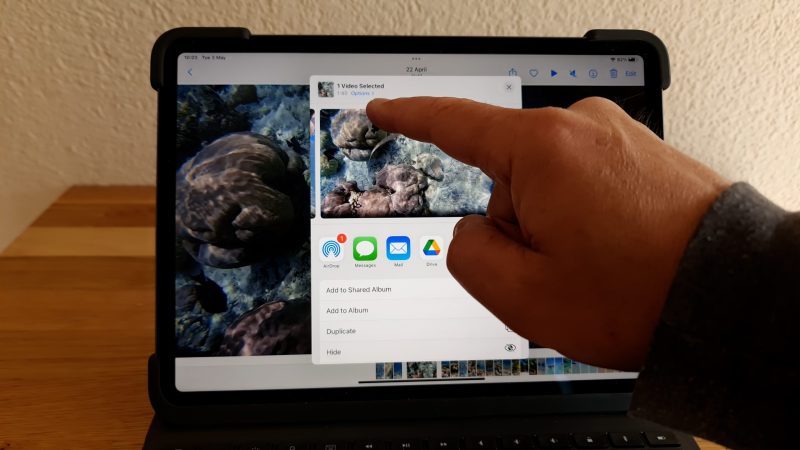
Insta360 GO 2: Managing Clips
After filming, transfer all the video from the camera to your phone or some other device. I used my iPad, so I could have a bigger screen. The Insta360 app can be used on your iPad, but it only has a vertical layout.
Again, if you want to learn more about moving files around, it’s covered in my full Insta360 GO 2 tutorial.
Next step is to go through each file, picking the best takes. Once I selected the best takes, I went through reframing and fixing any levelling issues. The Insta360 GO 2 has horizon levelling, but I found it often drifted during the shot. To fix this, I went through and added keyframes.
Long press and then swipe left and right below. If you want to add a reframing and horizon levelling change on the same keyframe, you need to reframe first and then adjust the horizon. Because once you take your finger away you can no longer reframe.
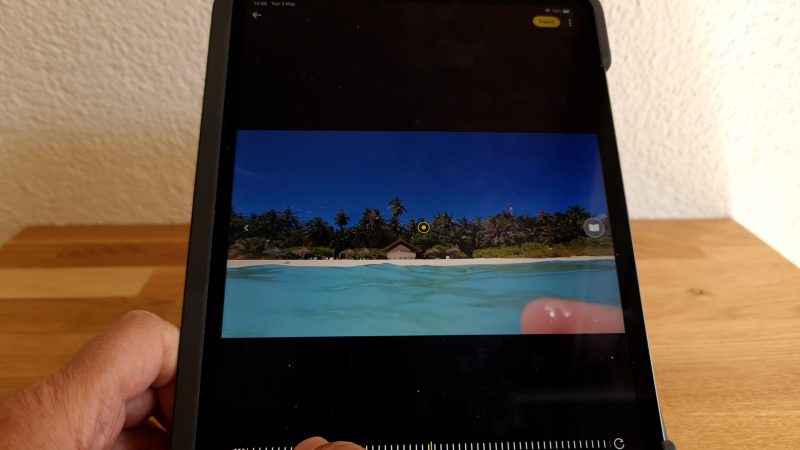
At this point, you can also trim off the stuff you don’t want to keep your files smaller.
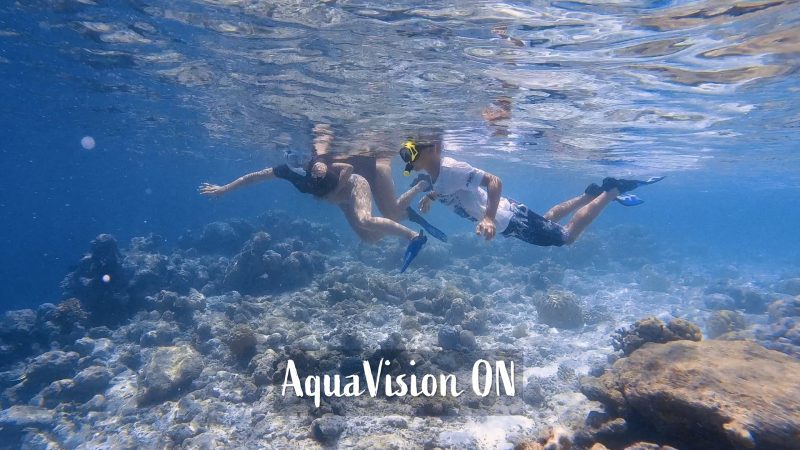
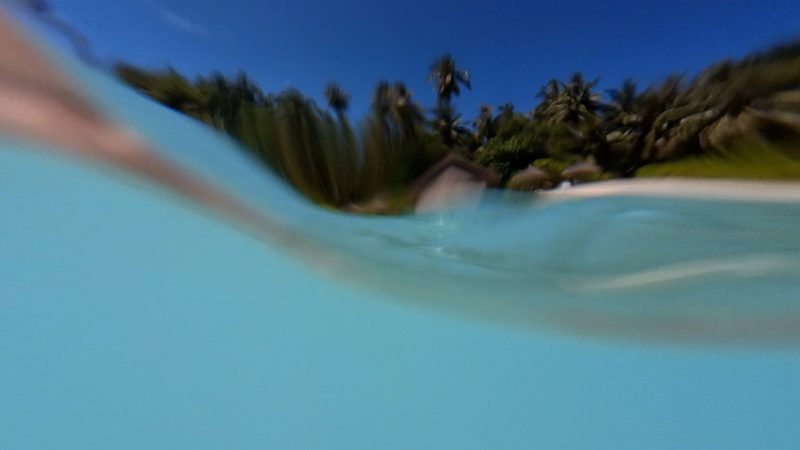
Another thing you can do is switch on the underwater filter (AquaVision 2.0). When you are underwater, everything looks blue. This filter removes that blue and leaves you with something more like the true colour. You can see that skin looks like skin colour.
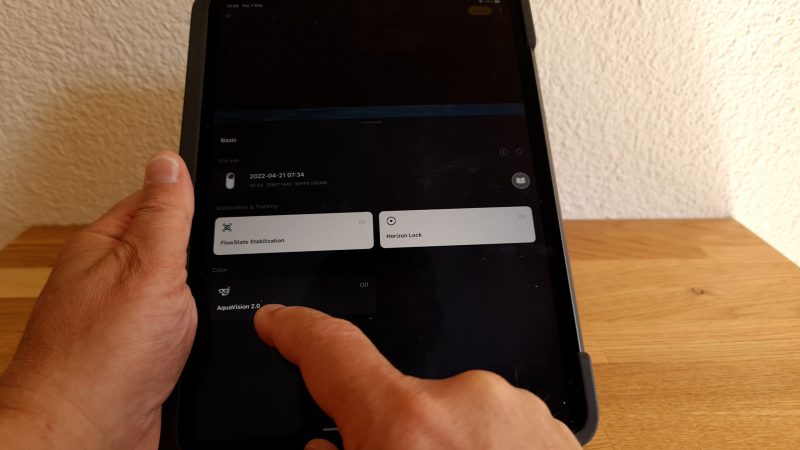
I only used this on about half the clips, because I wanted to keep that blue look for some shots. With this blue hue, to me it feels more like the experience of being underwater. But that’s up to you and the look you want.
Once you are happy with a clip, export. Make sure to use custom here to get the full quality. If you don’t mind the file size, choose 1440p, keep it at 30fps and original bitrate, and lastly switch noise reduction on, if possible (the app does not let you export with both AquaVision and Noise Reduction at the same time).
5 Tips for Editing a Travel Video.
Editing Tip 1: manage your files
If you have lots of video clips, it can get frustrating searching through to find the clip you want. To save time, create some kind of order.
For this video, all I did was to have a folder for each device. One for the Samsung, one for the iPhone and 1 for the Insta360 GO 2. When I want to find an underwater clip, I know which folder it is in.
You can get even more organised if you want, but I found this to be a good balance.
Editing Tip 2: know your footage
Once you have all your clips in your editing program, go through all the clips to see what you have. Then mark places in the clip that you think you might use for the edit. In Adobe Premiere Pro, I just tap I to create an inpoint. Then when I come back I can find that easily.
Editing Tip 3: music first
After you’ve been through all your footage, next thing to do is choose some music. I got my track from Artlist, because I pay a subscription to get access to their library. But there’s free music available as well, if you look around for it. YouTube has a whole library with loads of tracks free to download.
Lay the music down on your editing timeline and now use this to structure your edit. The track I used was actually too long – it’s over 4 minute, but I wanted it to be about 1 minute. So I cut the music at a point where it drops down. But as it ended too abruptly, I also added a boom sound at the end.
This was actually an impact sound I downloaded from Artlist as a bonus for being a subscriber.
Editing Tip 4: edit to the beat
Now I go through bringing in clips that I’ve marked previously, cutting them to the beat of the music. This gives the video more impact and makes it feel more dynamic.
But not every cut is on the beat. At some points, I wanted to have a motion within the frame of a clip coincide with an impact in the music. At one point where the water splashes, I placed that with a cymbal splash in the music.
This also helps to create a transition between the underwater section of the video and the section in the speed boat.
Editing Tip 5: create a structure
In my example, I didn’t just edit random shots together, I created mini sequences. The start is an introduction, with a taste of the island. I’ve used some wider shots as well, these are establishing shots to show the audience where we are.
Then I switch to the snorkelling section, then the little mini story about making coconut drinks, which then allows me to lead into the shots showing the characters who work on the island.
Editing Tip 6: use creative transitions
The first time I went filming with the GO 2, I only filmed purely underwater footage. But the second time, I wanted to film the action of going underwater or shots where the waves sweep over the camera, up and down.
When I came to edit, I used these shots where the water wipes over the camera to create transitions.At the point where the water covers the camera, I cut to another shot at the point where that shot is also underwater, then when the water drops, we are watching a different shot. So this creates an invisible transition.
Then, I used the movement of the water to create another transition. I drew a mask with the pen tool and used key frames to create a watery effect as it washes across the frame. This then transitions to the shot of walking the feet walking along the beach, carrying the snorkelling equipment.
This then brings us into the snorkelling sequence.
Bonus Tip 2
My second bonus tip is to try to use your smartphone travel video to show the character of the location where you are shooting your video. Try to have this character in mind when you are filming and editing as well.
To do this, focus on the elements which are unique to your location or your journey. In this example, the beach, the sunsets, the snorkelling and the people working there are all unique features of the Maldives.
Smartphone Video – Beginner to Advanced
If you want to know more about smartphone filmmaking, my book Smartphone Videography – Beginners to Advanced is now available to download for members on Patreon. The book is 170 pages long and covers essential smartphone filmmaking topics:
Things like how to get the perfect exposure, when to use manual control, which codecs to use, HDR, how to use frame rates, lenses, shot types, stabilisation and much more. There’s also my Exploring the Film Look Guide as well as Smartphone Colour Grading.
Members can also access all 5 episodes of our smartphone shot Silent Eye series, with accompanying screenplays and making of podcasts. There’s other materials too and I will be adding more in the future.
If you want to join me there, follow this link.
