Moment Anamorphic Gold Flare with iPhone 12 Pro Max: Review + Tutorial
What can we achieve by adding conversion lenses and various filters to an iPhone 12 Pro Max?
When we have a top range smartphone like this, do we still need conversion lenses? Well, maybe. Let’s have a look.
Oh, by the way, I discovered using the anamorphic lens desqueeze in an app like FiLMiC Pro might not be the best option. But I’ll get to why that is later in the article…
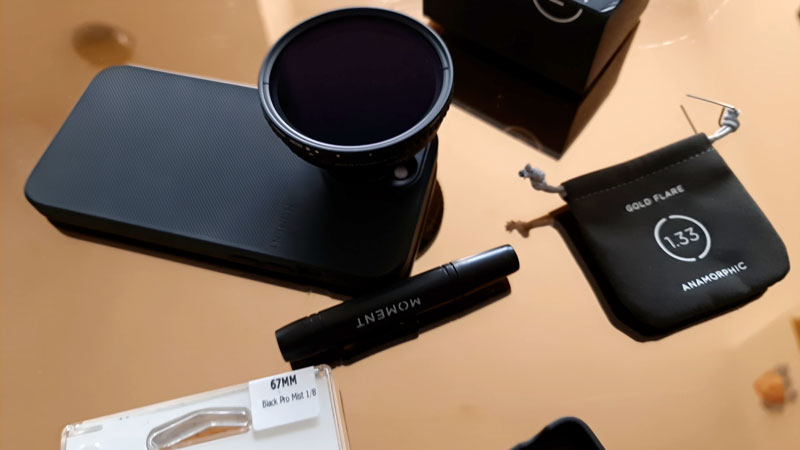
iPhone 12 Pro Max Video Kit
This is an iPhone 12 Pro Max with the Moment thin case, a Moment Gold anamorphic, a Moment 67mm filter mount, and on that I’ve placed a Tiffen Black Pro-Mist 1/8 and a K&F variable ND filter.
Adding lenses and filters to your smartphone isn’t always that simple. Do I use a case, or a grip-rig thing? It’s kinda fiddly and it’s not really that cheap. And these cameras are great, so why bother?
Well, there’s 2 reasons.
Two Reasons
The first reason is that the main wide sensor is by far the better quality. With the iPhone 12 Pro Max, the sensor is bigger, it has sensor shift stabilization, it’s better in low light. When I switch to the tele or the ultra wide lenses, in low light I get a lot more noise.
Therefore, it makes sense to use a conversion lens over the main lens, instead of switching lenses.
The second reason is that they add character. Digital images can be very cold and clinical. That’s why cinematographers often go to great lengths to add character, with filters and various lenses.

Those aberrations and tiny flaws in the lens actually make the digital image more interesting. They rough it up a bit. They make it more human, somehow.
And anamorphics have some of the most distinct characteristics of all the conversion lenses. That’s why Sean Baker used one for his breakout feature Tangerine. It was the Moondog Labs anamorphic which persuaded him he could shoot something special with an iPhone.
Now that CGI software is getting better at dealing with anamorphic footage, they have made a resurgence in big budget movies for exactly this reason: they give cold digital images character.
Moment “Thin” Case
I chose the Moment case so I could mount an anamorphic or tele lens to the iPhone 12 Pro Max and also add a filter mount. Moment gives you various options, but this is the thin version. I previously had a thin case for my Samsung S9 and liked it so I went for that again.
The case goes on quite easily, but the square edges of the device make this a bit more fiddly, compared to the Samsung. It’s just slightly harder to get on and off.
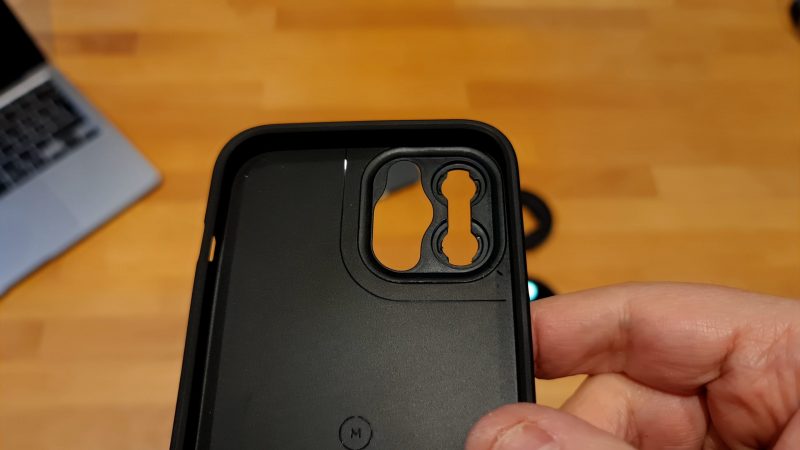
The case comes in 2 parts: the main case and the lens mount part, which needs to be clipped in. Both of these are quite soft plastic, which makes it more malleable and therefore less likely to snap.
However, I had the feeling it could easily snap if I wasn’t careful. So I was quite cautious mounting the case to the phone, inserting the lens mount and also mounting the lenses. My advice is, take your time and just ease things in slowly when you’re using this stuff.
But the case is rubbery and grippy. Once it’s on, it’s good. I like it.
Mounting Moment Lenses
Lenses mount with a bayonet style mechanism. Push in and twist. At first, I just couldn’t get the lens mounted, because I really didn’t want to force it and it just wouldn’t turn. So I spent some time examining it to work out how it was supposed to function.
In the end, I did have to force it, turning it about 90 degrees to lock it in place. I mean, I did this so slowly, because I just felt like this is going to snap off any minute.
It would be nice if they included spares of these. I’m sure they don’t cost much to make.
Anyway, with slow, cautious twisting I eventually got it in place. Although it still doesn’t sit exactly square. It’s slightly off here. This is to do with the moulding of this mount.
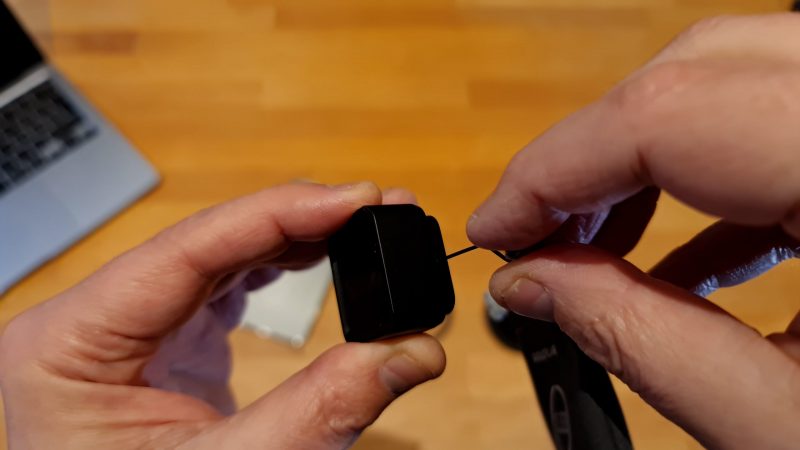
With the iPhone 12 Pro Max, the anamorphic had to be set differently. It needs to be rotated 90 degrees so the squeeze is lengthways and not from top to bottom of the frame. And this is done with the included screw and key.
This is actually quite fiddly so, again, go slowly. They do include spare screws, at least, in case you lose one.
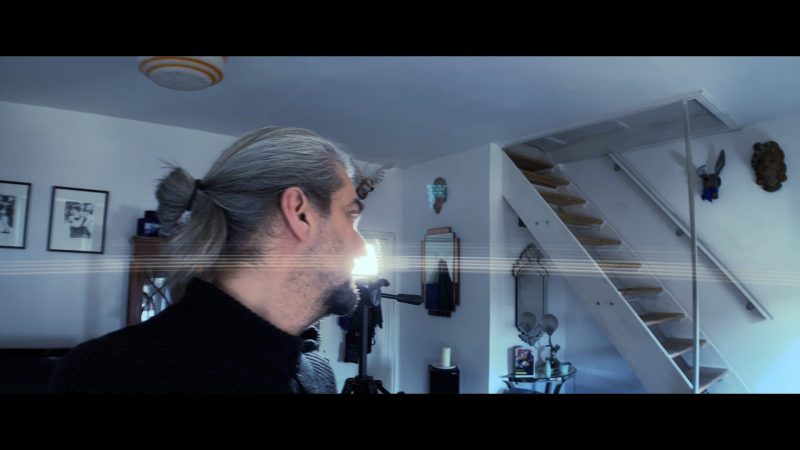
Moment Anamorphic Gold
Most of us are familiar with anamorphic conversion lenses for smartphones. But usually they produce a blue flare. So Moment brought out an anamorphic which produces a gold flare.
Anamorphic lenses are wide lenses that change the characteristics of the frame by only adding a wider field of view, sideways. That’s why they have this distinct look – they’re curved like a tube rather than a sphere.
So why would we want a gold flare instead rather than blue? It’s really just another colour in our cinematographer’s palette for painting with light. Blue is cold and gold is warm, obviously.
In general, thrillers, scifi films and tech reviews tend to be cold and clinical. Whereas romances, feel good comedies and cooking shows tend to be warm and comforting. Maybe you want to film some sunsets and would rather highlight that orange glow than confuse it with blue streaks.
Then again, blue is more of a contrast during a sunset so they’re going to stand out more. It’s really about your creative vision.
Controlling the flare
If you point the camera directly at the light source, you’re going to get the biggest flare. Ask yourself if this is too much. Then think about reducing it by altering the frame so that the light isn’t in the centre.
Also, you can play with the flare by moving the camera. Be careful you don’t just end up looking at the flare and nothing else. The flare adds an extra level of complexity, so you also need to up your game a bit.
Sometimes we make the mistake of buying an anamorphic lens, then go out and film some street lights and forget about everything else. You bought this lens to make your video more cinematic, so don’t get distracted by lens flares and forget about the main ingredients.
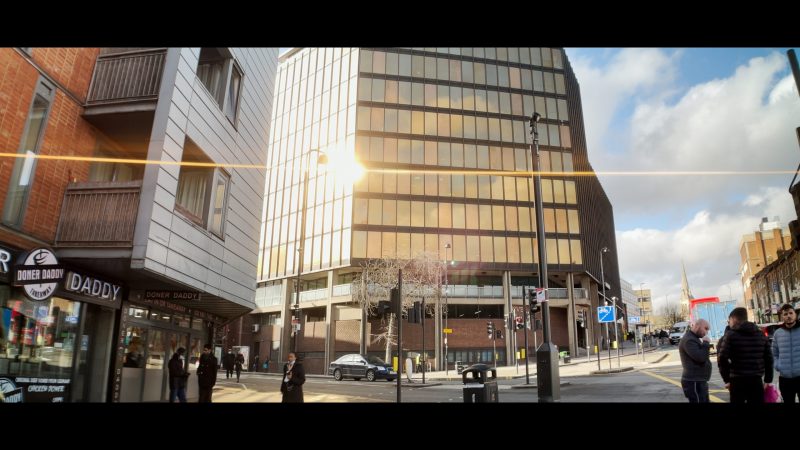
I had some fun looking for reflections to use. Like this building with brown mirrored windows.
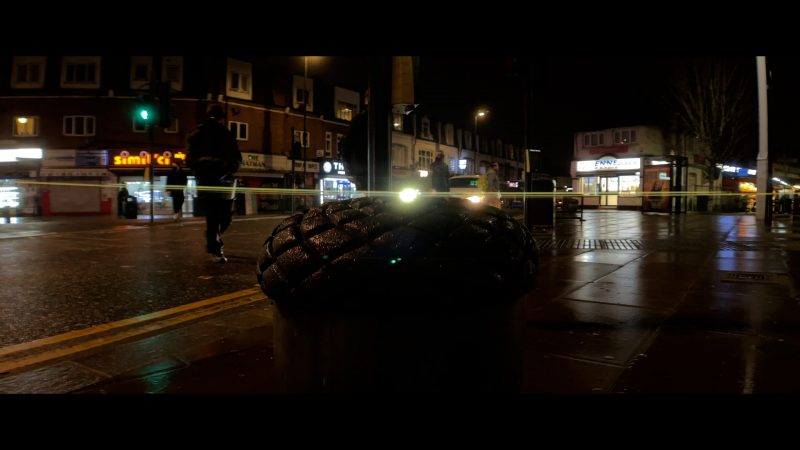
Create Star Trek Lens Flares with your Smartphone
Hollywood director J.J. Abrams became notorious for filling his Star Trek movies with lens flares. In fact, he even apologised for overdoing it.
This movie was actually shot using anamorphic lenses. Not all the flares are created by the lens. Some are added later, in post production.

But we can also create this effect with any smartphone. All you have to do is add an anamorphic conversion lens. I’m also using the Tiffen diffusion filter to create the softness and the light blooms you can see in these clips.
The brighter the light or lights, the greater the effect. You’ll get more exaggerated flares and more light bloom.
These flares look great when the subject in the frame is moving across the light source, so that the flares kind of flicker and change. As well, move the camera to add to this effect.
You need lights that appear in the frame then have the subject move across the light. See above how the Tiffen diffusion filter softens the flare and helps the light spread across the edges of the subject.
Cinematographer’s use this to turn a clinical digital image into something more messy, blurry and with more life.
K&F Variable ND
Cinematographers and photographers use ND (neutral density) filters to enable slower shutter speeds. In daylight, the sun is so bright we can’t keep the shutter at 1/48 or thereabouts that we need for “film look” motion blur. So we need to stop down that light with an ND filter.
Now I have the 67mm adapter, I can use a photographer’s ND filter, rather than the 37mm Neewer ones I had before. So this is more expensive and better quality.
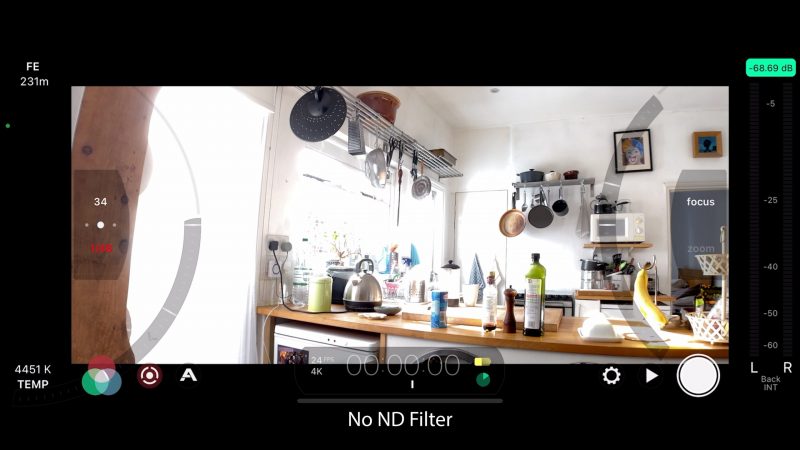
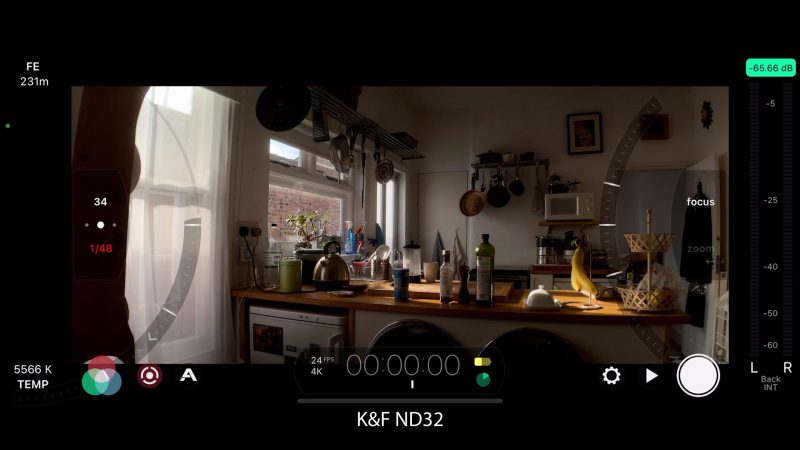
This one only goes up to 32 ND, and I found I needed the next step up to keep the shutter down to 1/48. So in some of these shots, I used a slightly faster shutter. Thing is, unless you have exaggerated movement in the shot, you’re probably not going to notice too much unless you use very fast shutter speeds.
And then, when I watched the footage back, I noticed a problem.
Stabilization + Anamorphic Problem?
In some shots I got a “jelly” effect. It’s like you are looking through water. The image is getting distorted and my guess is that this is down to the anamorphic, which distorts the image in a way which confuses the digital stabilization.
Anamorphic lenses can cause problems for digital effects, like motion tracking. As well, software like Warp Stabilizer in Premiere is more likely to have problems.
But there is a fix. Basically, use an app which allows you to switch off stabilization. In FiLMiC Pro, I found when I switched off stabilization, the problem went away. Of course it means your footage is less stabilized.
Desqueeze Reduces Resolution
When using FiLMiC Pro desqueeze, I found you actually get a smaller image file than if you don’t desqueeze in the app and desqueeze later. The FiLMiC Pro 4K desqueezed file has a resolution of 4030 × 1704 (which is 6867120 pixels). Regular 4K is 3840 × 2160 (which is 8294400 pixels).
Therefore, if you want to keep that extra image resolution, then use an app like FiLMiC Pro to remove stabilization but don’t use the desqueeze function. Instead, desqueeze in your editing software.
In Premiere for example, it’s pretty easy. All you do is go to Effects Controls for the clip. Uncheck “Uniform Scale” and then set height to 75%. This is if you want black bars, otherwise you will need a different method.
Of course, you will end up with the same number of pixels, either way. But if you start with more when recording, it can help reduce quality loss when mastering the final video. It’s usually best to keep as much image information as you can when editing.
This probably doesn’t make a huge difference on its own. But when you add all these things together, you get a better final image quality.
Eager to learn more?
Join our weekly newsletter featuring inspiring stories, no-budget filmmaking tips and comprehensive equipment reviews to help you turn your film projects into reality!