How to Use Samsung Pro Video Mode
Samsung’s Pro Video mode allows you to have more control over how your Samsung smartphone shoots video. In this article, I’ll go through the functions and give you some tips on how to get the most from the app.
While we can install 3rd party apps like FiLMiC Pro and McPro24fps to get manual control, some smartphone makers have their own version. Brands like Samsung, Sony and LG have their own native camera apps which allow you to set things like shutter speed, focus and more. Except for one notable exception *coughs* iPhone…
The advantage of using an app native to the device is greater reliability and compatibility. Though manual control is usually more complicated than having everything on auto, the reward for using Pro Video is… well… more pro-looking videos.
Features will vary depending on the device you have, but the majority of this article will be relevant to anyone using Samsung’s Pro Video mode. However, I’ll be using a Samsung Note20 Ultra.
Features
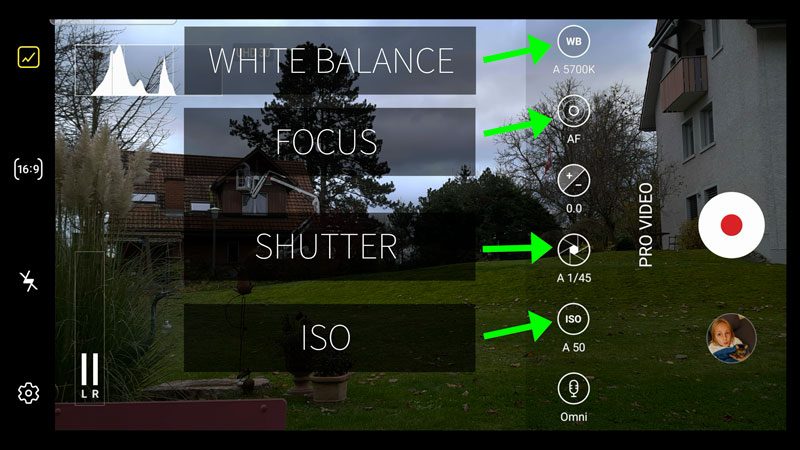
Pro Video allows you to control the 4 most important settings in a camera: white balance, focus, shutter speed and ISO. These settings are not available in auto mode, because the phone’s software is setting these for you.
Pro Video mode is accessed in the sub menu labelled “more”. When you first open the camera app, next to the record or shutter button you have 4 options: Single Take, Photo, Video and More. Tap “more” to open up all the extra options.
One of those options is Pro Video, so tap that and enter Pro Video mode.
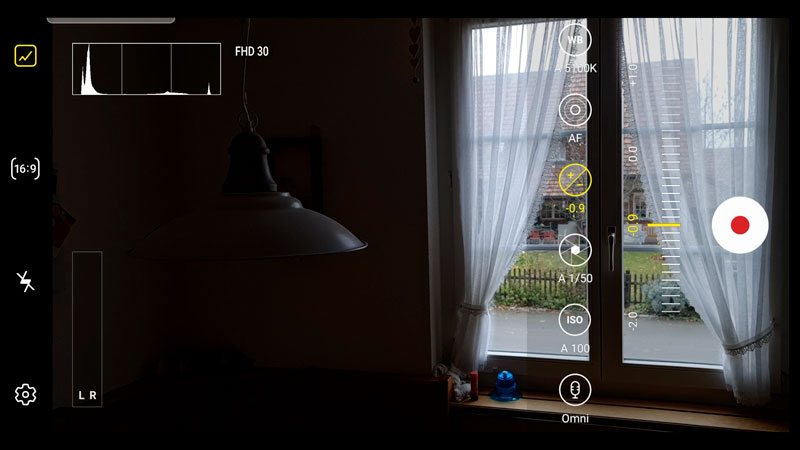
All the manual controls are in this long column of buttons on the right of the screen. You can scroll this list up and down to access all the settings. At the top is the zoom button and at the very bottom is a reset button.
So, if you get in a mess with the settings, just hit that reset and everything will be restored.
White Balance
Of these 4 settings, I would say white balance is probably the least important to set manually. And perhaps the trickiest. However, you should probably try to lock white balance before pressing Record so it doesn’t change during a shot.
The way to lock white balance is to tap the button with the letters WB in a circle. At first it will be in auto. So tap auto to switch to manual or drag your finger up and down over the area to the right to set the exact colour temperature.
Once you have set white balance this way, it won’t move while you are shooting.
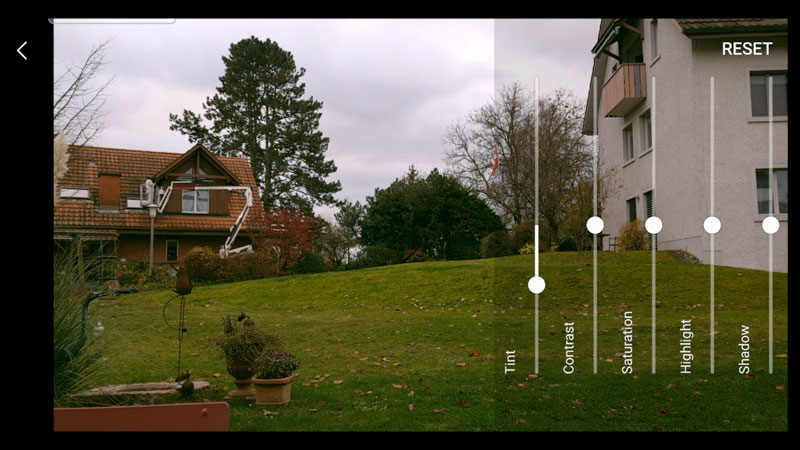
Above white balance is a button labelled “standard”. Tapping this button opens up a set of controls which allow you to alter the colour and tone of the image manually. The first setting, Tint, is usually used in combination with white balance to create the colour profile.
If you’ve used an app like FiLMiC Pro, you might be familiar with the kelvin – tint combination. Note that this button is not available in 4K or 8K, only in 1080 or lower.
Focus
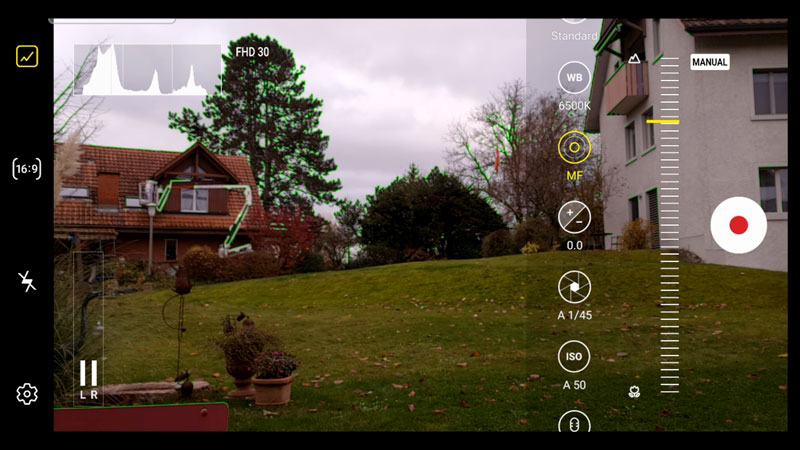
Below white balance is the focus button, with 2 circles within the button. At the moment, it is labelled AF for auto focus. But if I tap it to open the focus control, then swipe my finger up and down to adjust focus, it switches from auto to manual.
As you adjust focus, you will notice this green edging around objects in the frame. This isn’t a glitch, this is to tell you what’s in focus. The green edges indicate the in-focus edges in the frame.
You can try to create a focus pull shot, although Samsung hasn’t included features to help you with that (other than the live focus peaking, that is). It’s certainly easier to achieve a nice smooth focus change if the phone is fixed in place somehow, like mounted on a tripod.
So, get the first focus position in place, hit record and then adjust the focus slowly to the second focus point. You might want to practice this a few times, before hitting Record.
General Exposure Control
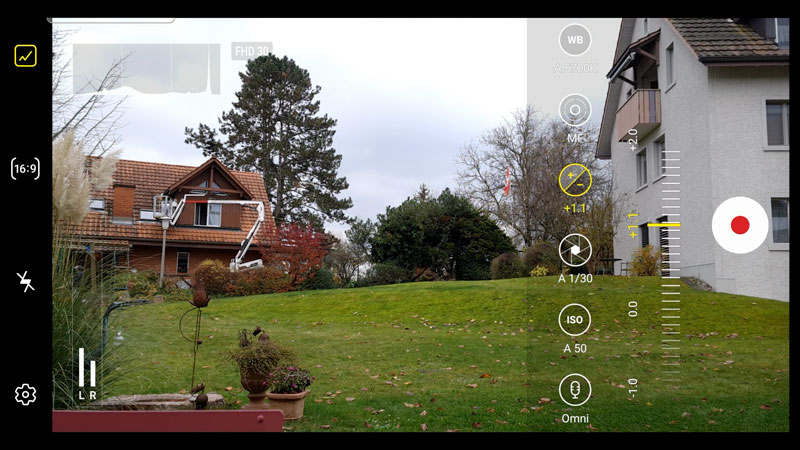
Below focus is an overall exposure control button: a circle with a plus and minus sign inside. Tap that to adjust the exposure with one control. So, this will adjust both ISO and shutter speed at the same time.
When the exposure setting is 0, the camera app considers this to be perfect exposure. Meanwhile, a plus number means overexposed and minus number means underexposed. But you don’t have to go with what the app says.
Sometimes we want to make a creative choice to expose the frame differently to how the app sees it. For example, we might be filming through a window and the app wants to expose the inside. But we might actually want the outside to be exposed correctly and the inside to be in shadow.
Or if we’re filming a subject and we want to create a look which is more about the highlights. See, the app will generally try to expose a scene to make as much visible as possible. But that might not be to your artistic taste.
And that’s why Pro Video is here, to give us more control.
Shutter Speed
Below exposure control is the shutter speed button. Tap this to access manual shutter speed. Why do we need to control shutter speed manually?
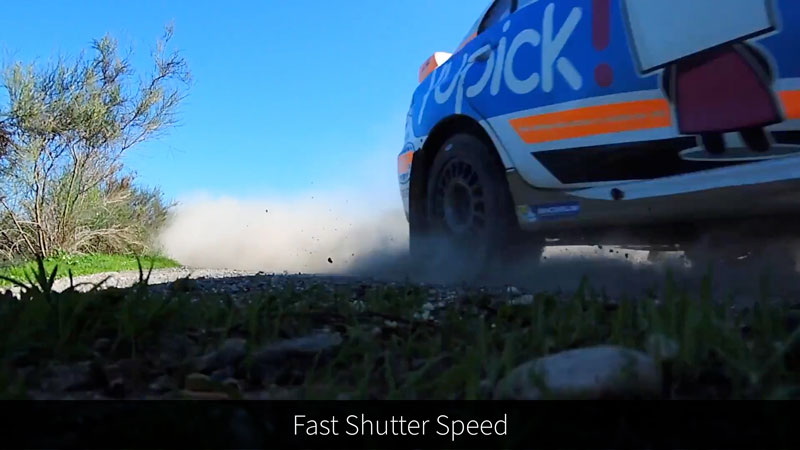
Well, if you’ve read any of my other articles about achieving the film look, you will know the answer. But, put simply, shutter speed controls the amount of motion blur in the image. And to get a nice smooth looking video, we generally want shutter speed to be about 1/50 – 1/60.
Although, there’s no harm in going lower to get even more motion blur. But once you start to use faster shutter speeds, the video will look less smooth and have a harsher look to it.
Having said that, there are times when a harsh look might be desirable. For example, when filming action sports and you want a more gritty look. So that’s a creative choice you can make there.
By adjusting shutter speed manually, or by toggling auto to manual at the top, the general exposure control greys out, it’s no longer accessible. But if you switch both ISO and shutter speed back to auto, the general exposure control becomes available again.
Another reason you might want to set shutter speed manually is to remove strobing caused by artificial lights. You can see here that certain shutter speeds cause this strobing while others don’t.
ISO
As we’ve seen, ISO generally combines with shutter speed to set exposure. So why would we want to set ISO manually? Well, one problem with ISO being too high is you start to see more digital noise in the image.
For that reason, it’s good practice to keep ISO as low as possible. Below 200 is usually good enough. 50 is the bottom setting and if you can keep it there, all the better.
Now, this is one little quirk I noticed with Pro Video mode. If you keep the shutter speed in auto, when you adjust ISO the shutter is adjusted at the same time, to compensate. So, I guess if you don’t care about shutter speed, then you’d use this method just to make sure ISO is kept as low as possible.
However, if you want to control shutter speed as well as ISO, then first make sure to put shutter speed into manual. Now when you adjust ISO, the shutter is locked to the speed you set.
Once you have it set this way, adjusting ISO will cause the image to look darker or brighter. Note, you’ll see that the below the exposure control button you now get a reading telling you if the app thinks the image is under or overexposed. Again, plus for over and minus for underexposed.
But, as I say, this is a creative choice. You don’t need to be ruled by that. However, you can use it as a guide to give you a sense of exposure. This might be useful when you’re filming in bright conditions and it’s hard to see the screen clearly.
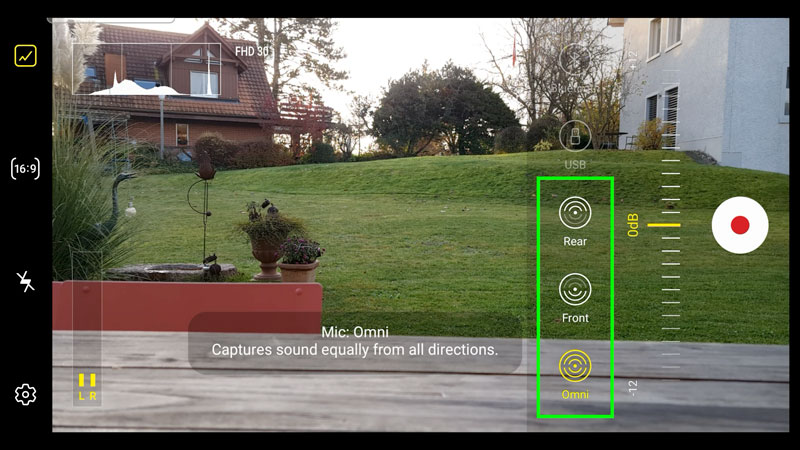
Microphone
The very last Pro Video mode setting allows you to set the direction of the microphones (if your device has multiple mics like the Note20 Ultra). Omni uses both front and back microphones. Then front uses the front facing mics and rear – obviously – uses the rear facing ones.
So, if you have you or your subject talking to the camera, it’s probably best to set the mic to the one facing them. Let’s hope that one day soon Samsung allows us to switch to the front facing camera in pro mode, so we can make the most of this feature.
Resolution
To switch video resolution in Pro Video mode, you need to go into camera settings by tapping the cog icon in the bottom left corner. Pro Video has its own setting separate from the regular camera mode.
You can select from a list of ratios: 16:9 or 21:9 for extra widescreen. Then there’s Full for FHD and 1:1 to shoot square videos. There’s also 8K versions for 16:9 and 21:9.
If we choose 16:9, there’s a 2nd menu to choose frame rate and resolution. The maximum we can shoot at is Ultra High Definition (or 4K) at 60fps. What you choose depends on what you want to do with the film after and the look you want.
So, if you choose 60fps and playback at 60fps, the video will have that video game look. It will look less like film. Some people prefer it, others hate it. But you will double the size of the video file shooting at 60fps over 30fps.
Most people shoot at 60fps so they can use it for slow motion. Shoot 60fps and playback at 30 or 24 fps and you should get nice slow motion.
In Pro Video mode, you also get to choose 24fps. Whereas in the regular video mode, 24fps is not an option.
8K?
The top range Samsung phones allow 8K video to be filmed. But should we use it?
8K video is 7680 x 4320 pixels. That’s quite a few extra pixels and extra pixels should mean extra detail. BUT… we need to remember that to watch 8K video and get the benefit of those extra pixels, we need an 8K TV or monitor.
Last time I looked, a Samsung 8K TV was about £5000. At that price, 8K TVs are still going to be rare items. Maybe in the future, when they come down in price, we will have one. But that could be many years from now…
One reason to shoot in 8K would be if you master in a lower resolution, like 4K, you can use the extra size of the video to reframe shots when editing. You can take 4K video and reframe it and still master in 4K, but you would lose quality.
Shooting in 8K you can zoom in and move the frame around and retain the same quality.
However, shooting in 8K will create bigger file sizes. Another big issue is the extra rolling shutter you get when shooting 8K.
The rolling shutter effect is created by digital camera sensors, which record video one line at a time, from top to bottom. When there is horizontal movement in the frame, straight lines become lopsided.
And with 8K video, the sensor uses roughly double the amount of lines, which means the rolling shutter effect is going to be about twice as bad.
Another thing to note is that when shooting in 8K, you are limited to 24fps. So no chance of shooting any slow motion.
Smartphone Video – Beginner to Advanced
If you want to know more about smartphone filmmaking, my book Smartphone Videography – Beginners to Advanced is now available to download for members on Patreon. The book is 170 pages long and covers essential smartphone filmmaking topics:
Things like how to get the perfect exposure, when to use manual control, which codecs to use, HDR, how to use frame rates, lenses, shot types, stabilisation and much more. There’s also my Exploring the Film Look Guide as well as Smartphone Colour Grading.
Members can also access all 5 episodes of our smartphone shot Silent Eye series, with accompanying screenplays and making of podcasts. There’s other materials too and I will be adding more in the future.
If you want to join me there, follow this link.
