How to Create Cinematic Video with iPhone 14 Pro
In this article, I’m going to talk about how to create cinematic looking video with your iPhone 14 Pro or Pro Max. I’m going to go through the best settings, pro shots, the film look, how to shoot and edit cinematic mode, camera movement and more. As well, I’ll talk about accessories which will help you out.
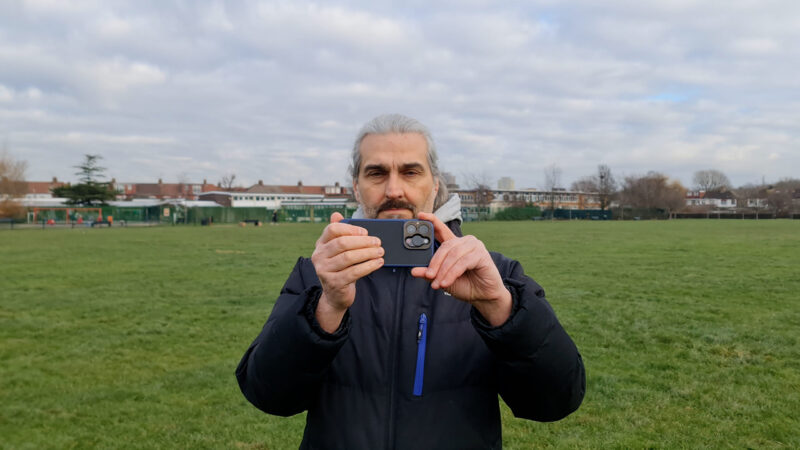
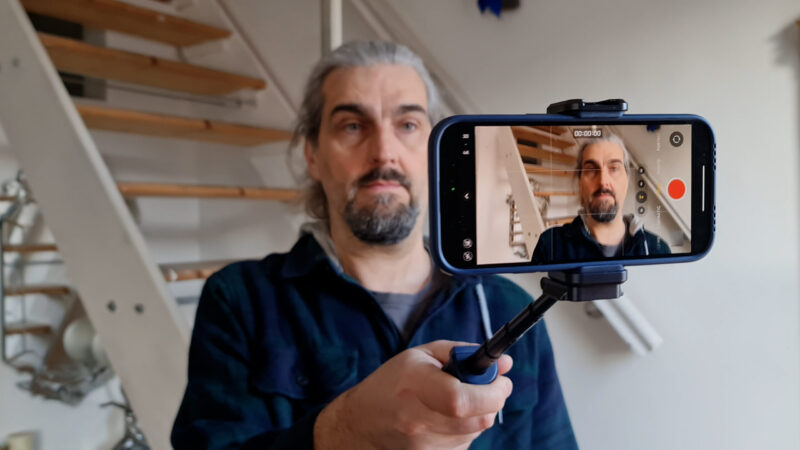
If you’re getting shaky shots, you might find you need to hold your iPhone differently.
How to Hold Your iPhone 14 Pro
Normally, we hold our iPhone at the corners with our fingers. But this is pretty unstable and even with the iPhone’s great stabilisation, the shot can come out less than perfect.
My tip is to hold one hand flat against the back of the iPhone. Now you’re more in control of the shot.
Another option is to get some kind of grip or rig for your iPhone. This way you get a more secure hold, plus you can add extras like lenses, filters, microphones and lights.
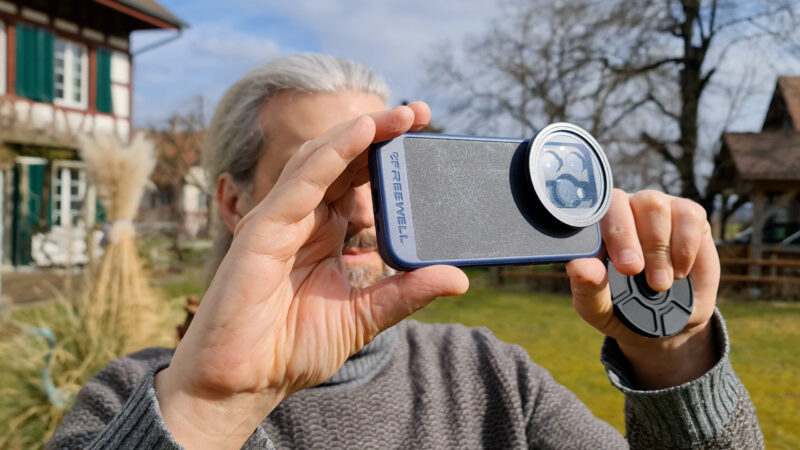
Freewell Grip
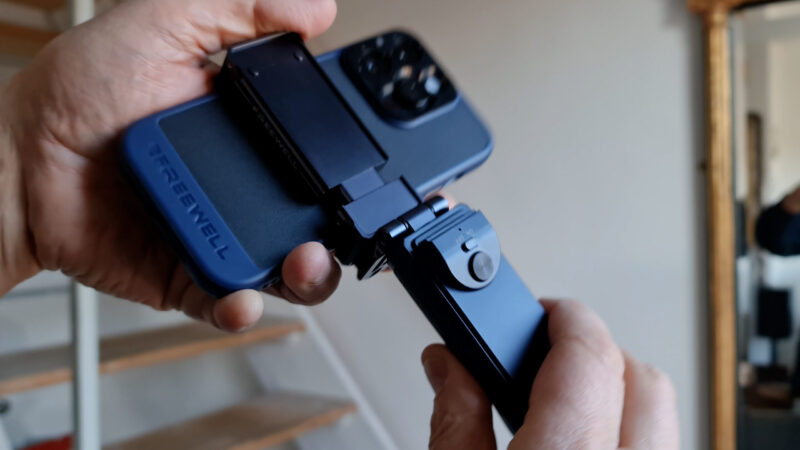
My new favourite grip is by Freewell and it comes in 2 main parts. First, there’s a case, which has bayonet and magnetic mounting options for filters and lenses. As well, they do a grip with a bluetooth button.
The case is very sturdy and well made. Although being so strong makes it slightly harder to take on and off, compared to the Moment case. Freewell also makes a grip with a bluetooth button.
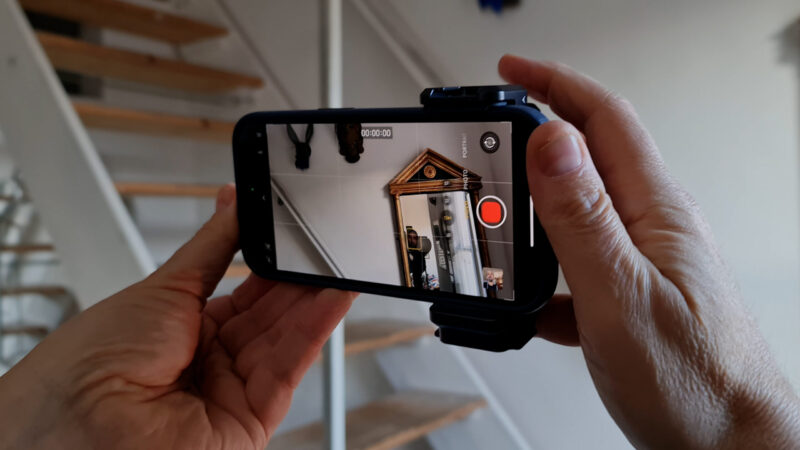
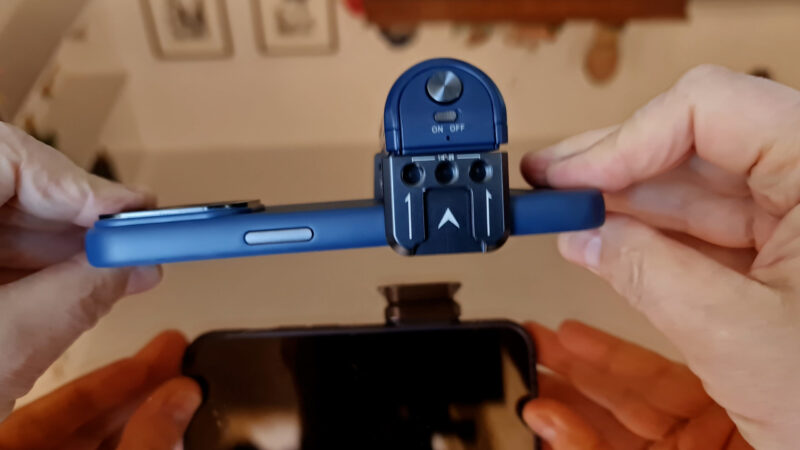
The grip has a spring-loaded clamp. So you clamp this around the phone and this gives you a more stable grip. But it’s more than just a grip.
There’s a bluetooth shutter button on the top of the handle. There’s 3 1/4” threads on the top and bottom to attach a selfie stick or a tripods, and also a cold shoe at the top.
Very Versatile
As well, the handle flips down and the base pivots, so now you have a handle. And the bluetooth button can then be removed from the end of the handle and placed here, where it’s kept in place magnetically.
Pull the handle and it extends. The angle at the end can be adjusted as well, for filming yourself. I don’t think I’ve ever tested a phone clamp that’s so versatile.
As well, you can use the grip as a desk stand for your iPhone. For example, if you’re editing a video, your iPhone is now at a more comfortable angle.
This is really like the Swiss Army knife of phone clamps.
This is all very well designed – it doesn’t feel cheap. Even the rubber and plastic parts are well finished. This is a solid piece of kit that feels like it’s made to last.
If you want to look at alternative grips and rigs, check out my video on accessories for iPhones.
But it doesn’t matter what kit you buy, or how many things you attach to your iPhone, if you make poor shot choices. Let’s talk about how to use this kit to get better shots.
Drop the Pan
When we’re not sure what to film, we often try to film everything in one shot. So we shoot a pan shot, and then another pan shot, and then another… because we can’t think of anything else. Or even worse, the aimless roving shot.
When you come to edit, your video is going to come out very wishy washy and unfocused.
If you’re going to use a pan shot, at least motivate the pan by following something moving. I have a whole lesson on motivating camera movement for members on Patreon. But here’s 3 shots you can use instead of a pan shot.
Tilt Shot
Hold your iPhone as I just showed you, press record and now make a tilt movement up or down. Nice and slow and as smooth as you can. Don’t tilt with your wrists, use your arms. Because using your wrists you will have less control.
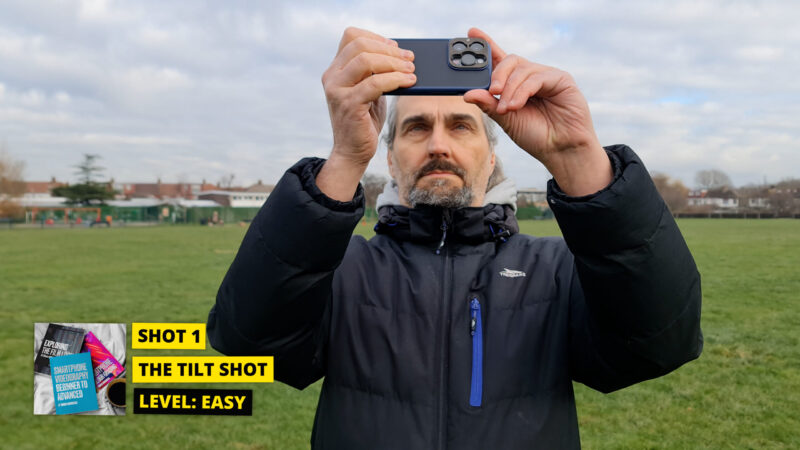
With this shot we can go from one subject to another subject. Or we can tilt to show a different part of a subject. For example, the bottom of a building to the top, or from someone’s feet to their head.
The tilt shot can be used in all kinds of different ways.
Push In Shot
Use the same grip, start recording and move forwards slowly and steadily. Try to keep the same speed through the shot.
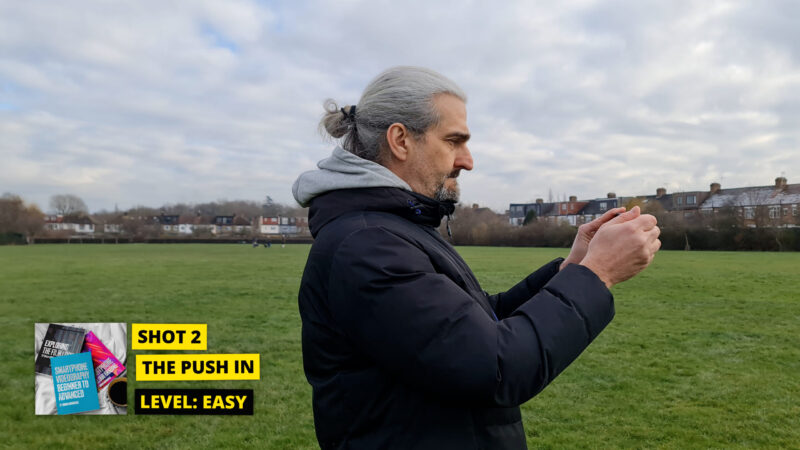
By getting closer to the subject with this shot, we can provide the audience with a clearer view, pulling them into the video and focusing their attention on the subject. It also adds visual interest compared to a static shot.
Easy Dolly-Zoom Effect
By reversing the shot and adding a zoom-in effect during editing, you can create a “dolly-zoom” effect. Again, it just makes the shot more interesting.
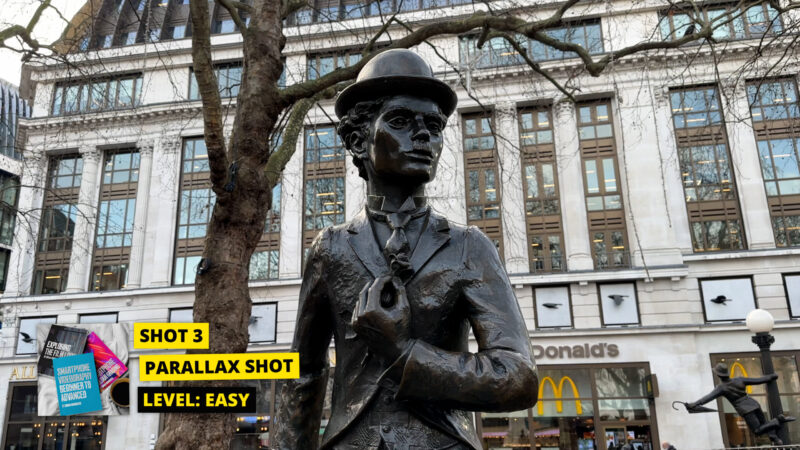
Parallax Shot
Using the same camera grip, we will circle around the subject to create the “parallax effect,” in which the background appears to move faster than the foreground. In contrast to the previous flat images, this shot provides a more dynamic and three-dimensional view of the subject.
Start recording and move slowly and steadily around your subject in an arc (a full 360-degree circle is not necessary).
iPhone 14 Pro (Max) – Best Video Settings
The settings for your iPhone 14 Pro or Pro Max will vary based on the type of video you are recording, the desired appearance, and your personal shooting preferences. However, there are certain settings that may be unfamiliar or unclear. Here are a few important ones to consider.
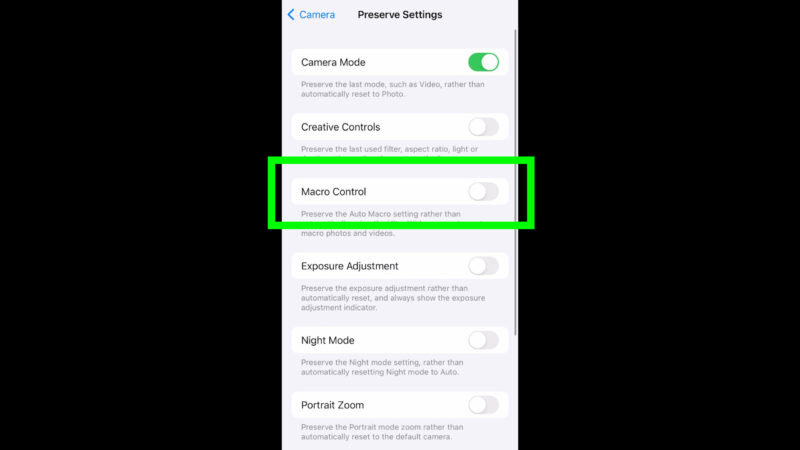
Preserve Settings
Open Settings, open Camera and then Preserve Settings. Here you can choose which settings you want the camera to return to when you open the app. Otherwise, the iPhone will reset every time.
The 2 important ones for me are Camera mode, so it doesn’t default back to photo mode each time, and Macro control, because I want control over which camera I’m using, including the macro camera.
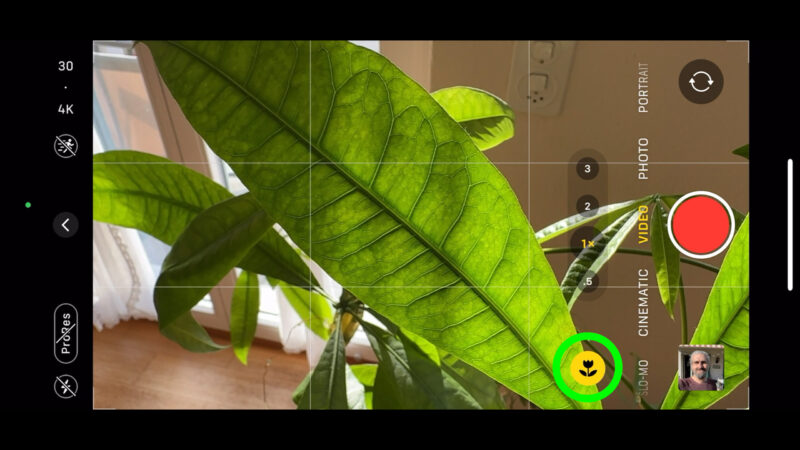
Back in Camera settings there’s Macro control. With this off, the camera app will automatically switch to Macro using the Ultrawide camera when it detects that the camera is very close to an object. As you move the camera closer to an object, you will see a jump as the camera switches.
Personally, I prefer to decide when the Macro camera activates. So back in settings I switch Macro control on. When the camera gets close to an object now, a button appears which you can tap to switch on and off. If this is yellow, it will switch to Macro. If this is grey, it won’t change until you tap it.
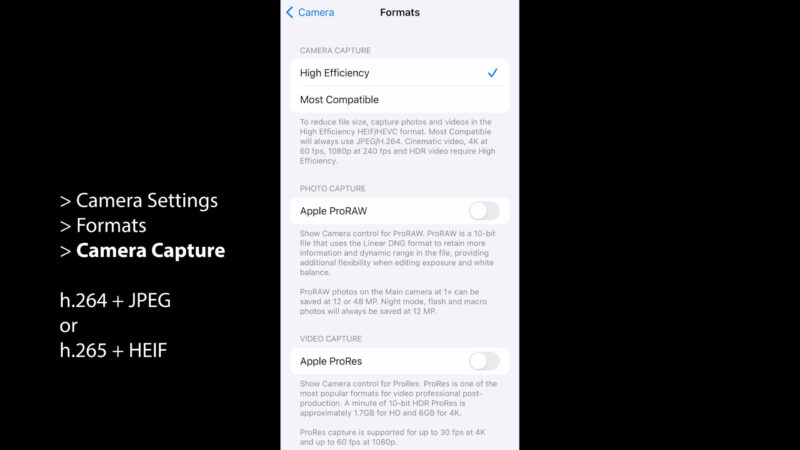
High Efficiency or Most Compatible?
Now, go back and go into Formats.
Here I always use High Efficiency so that I get smaller files. However, be aware this does mean that your photos will come out as HEIF instead of the much more user friendly jpg. Unfortunately, Apple doesn’t allow you to choose HEVC video and jpg photos.
Go into Record Video settings and choose the combination you will use most frequently. This means you will always get this as your default when you open the camera app. Choose 4K and 24fps if you want the movie look.
Below that, you can show PAL format if you need to shoot in 25fps for some reason. This might help you if you’re filming in a country with 50hz electricity and you are getting artificial light flicker. Otherwise, leave it off.
iPhone 14 Pro Stabilization Settings
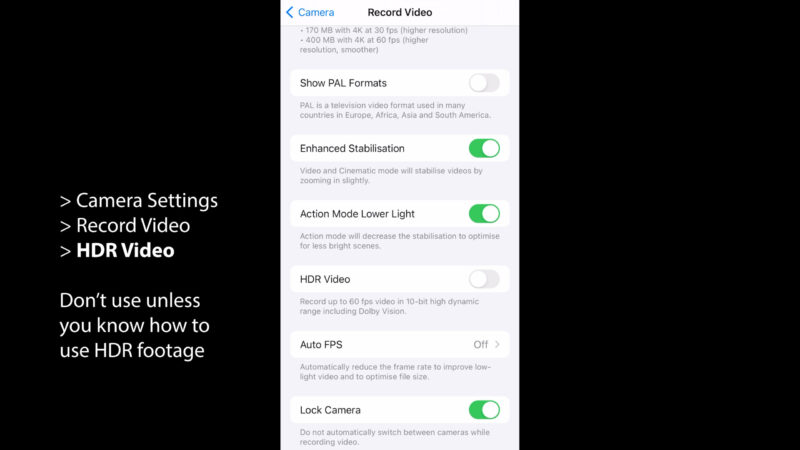
Below that we have Enhanced Stabilisation. If you switch this on, you will get more stable footage but the image will be cropped in slightly. In other words, this is the digital stabilisation switch. If you switch it off, you will just get the optical stabilisation but slightly higher quality images.
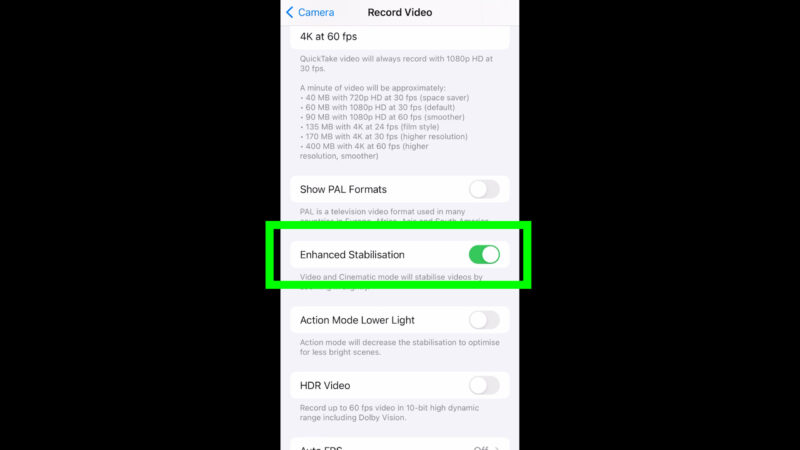
Next is Action Mode Lower Light. Action Mode is the extra digital stabilisation feature that came with the iPhone 14. Toggle this on if you want this to be less effective in low light situations but with better quality images.
Below that is Dolby Vision. This is usually on by default and can cause issues if you try to edit HDR video without understanding what you need to do. Toggle this off unless you know how to deal with Dolby Vision in post.
How to Shoot 10-Bit Color with iPhone 14 Pro
Even if you don’t want to export your final video in Dolby Vision, you can actually shoot in HDR and then do all your colour grading before exporting in regular SDR. This means you get 10-bit colour which has far greater colour information than normal 8-bit colour so it’s great for colour work in post.
The reason we don’t usually export Dolby Vision is because it can cause viewing issues for people who don’t have compatible monitors. If you are uploading to social media, YouTube supports Dolby Vision but not many other platforms do.
Next one down is Auto FPS. Now, some people get confused and mix this up with variable frame rate, which is something else. I go into more detail about all this technical stuff in my members’ lessons on Patreon.
But all you need to know right now is that if you have this on, your iPhone 14 Pro starts choosing your frame rate for you depending on the light conditions. And as you may have guessed, I don’t like that, which is why I switch this off.
Finally at the bottom of this list is Lock Camera, which I have switched on. Again, this stops my iPhone doing things I don’t want it to do. In this case that is automatically switching cameras in the middle of a take. Like with most auto settings, things changing during a shot look messy.
Which Format?
The iPhone 14 Pro can shoot regular 8-bit colour, 10-bit (if you switch to Dolby Vision) and the highest quality which is ProRes or even 10-bit ProRes. Just bear in mind that ProRes files are very big and therefore you need plenty of storage and plenty of time to transfer the files to a computer for editing.
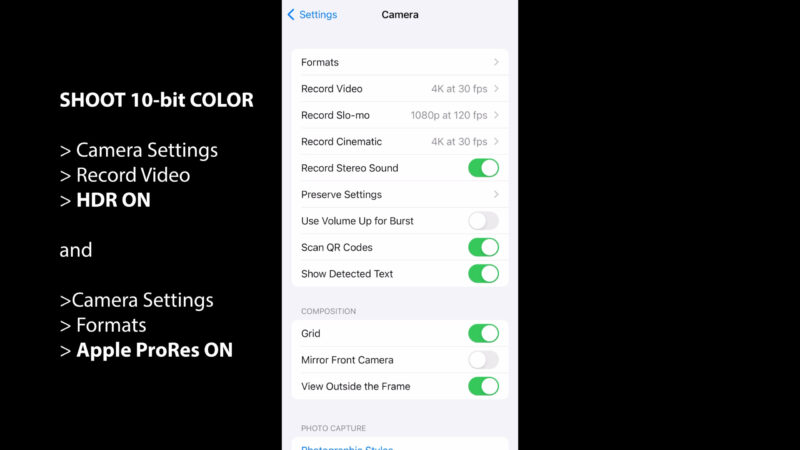
If you want to shoot 10-bit colour on your iPhone 14 Pro, then go into Record video settings and switch on HDR. If you want to record 10-bit ProRes, switch on ProRes in Formats as well as HDR. Then when you come to edit this HDR footage, you need to set your editing software to the correct colour space.
If speed is important to you and you’re happy with small adjustments to the colour of your video, then you can stick with the standard 8-bit video. Personally, I always shoot everything in 8bit at 4K resolution. For me, 4K is more important than shooting 10-bit, Dolby Vision or ProRes.
But is there a real advantage shooting in higher quality? And how about using an app to shoot Log footage with your iPhone? Well, you might want to consider these formats if you want the film look, for example.
Film Look
These days, there are some really cool options for getting the film look. But before you think about shooting in Log or 10-bit colour, there are some basic settings which can help you make your digital video look more like film.
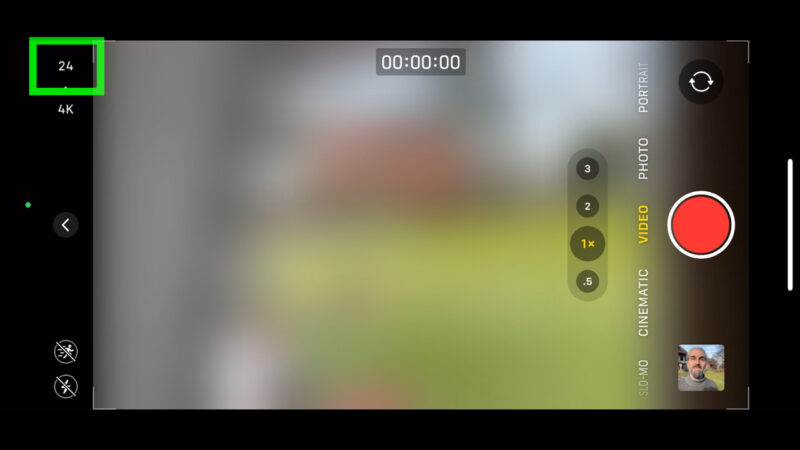
Pretty much every movie shot in the last 100 years was shot and played back at 24fps. So if you want the film look, the first thing to do is set your frame rate to 24fps. This is very simple to do with an iPhone, just tap in the corner here until it says 24fps.
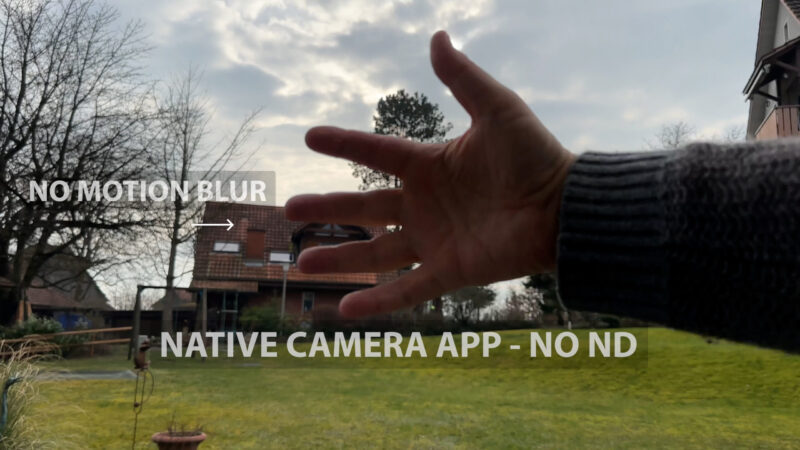
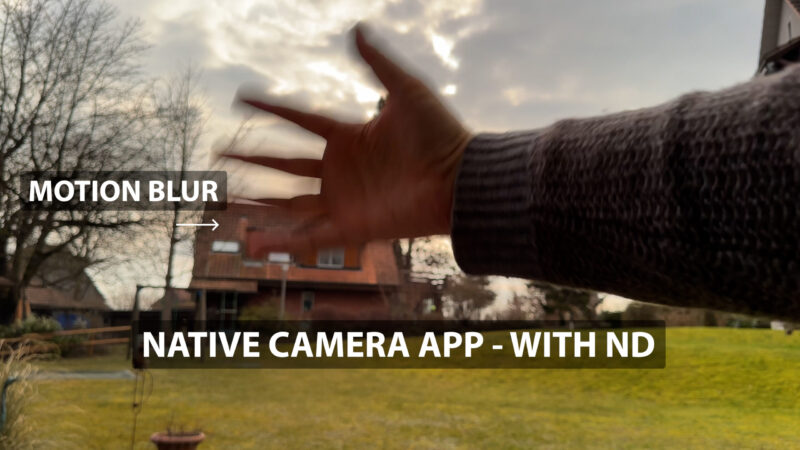
Another attribute connected to film is a slow shutter speed. Old movie cameras were generally set to shoot at 24fps and 1/48th of a second shutter speed. This shutter speed stops your video looking too harsh by allowing motion to cause the image to blur.
When you are taking photos, you usually want to avoid blur. But for video, we usually want blur.
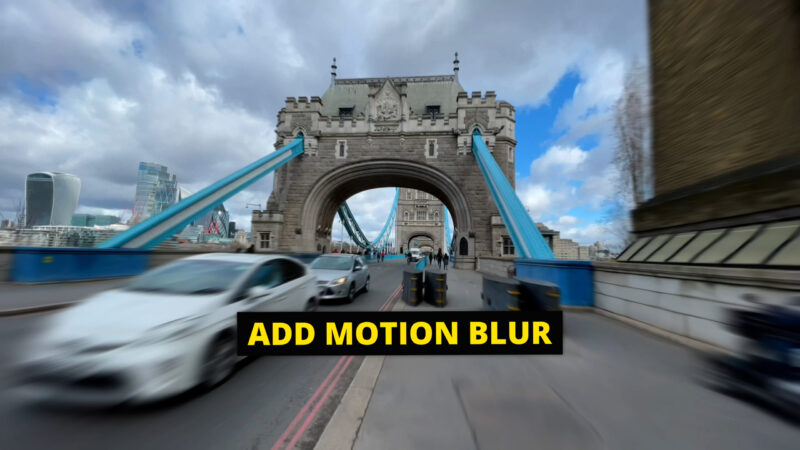
Add Motion Blur
Without motion blur, our videos can look less smooth and less cinematic. Especially if we’re filming at the movie frame rate of 24fps. When filming at higher frame rates, motion blur becomes less of an issue.
So how do we add motion blur?
The first and oldest method of adding motion blur is to set a slow shutter speed. Fast shutter speeds remove motion blur.
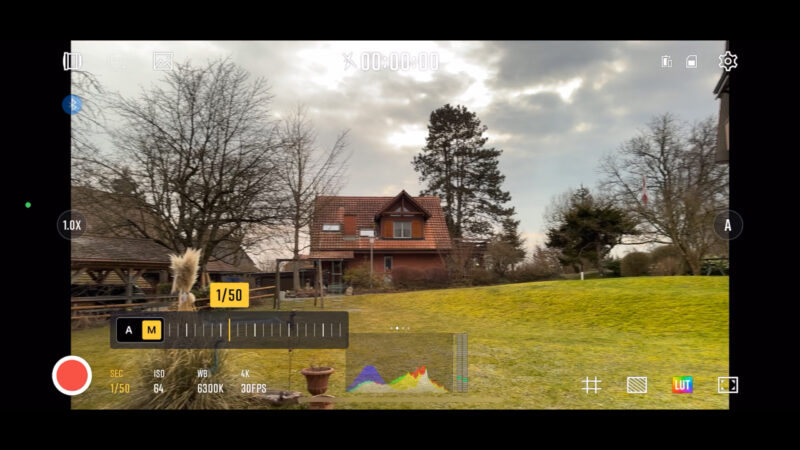
So how do we manually set the shutter speed of our iPhone camera? Unfortunately, Apple does not provide the ability to set shutter speed in an iPhone and so we need to download an app which will allow this.
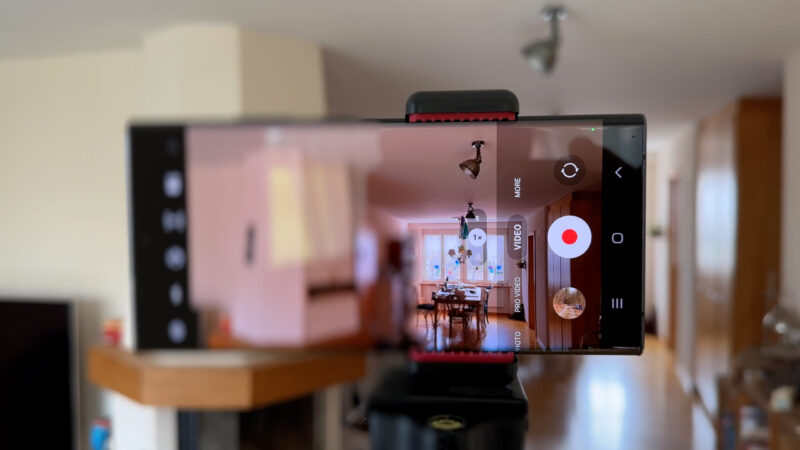
The most famous is FiLMiC Pro, but it’s now also the most expensive. There are alternatives. One I like is called StaCam and it’s totally free. The app is actually made by Zhiyun to use with their gimbals. But you can use it perfectly well without a gimbal.
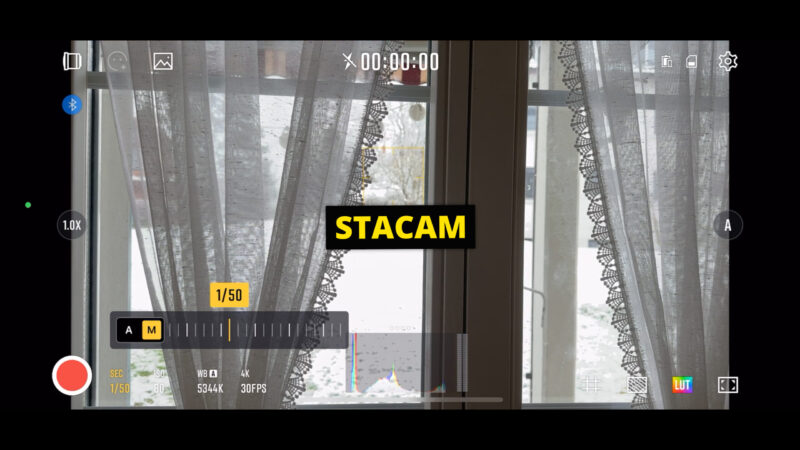
I just love the simplicity of this app. Tap the setting bottom left (shutter speed) and then switch it to manual (A – M button). Swipe the slider to set shutter speed. Anything under 1/100 is going to look fine.
So that’s how to set shutter speed. But what do you do if you bring shutter speed under 1/100 but it’s too bright and now parts of the image are overexposed? One option is to use ND filters.
ND Filters
It’s too bright so what do you do? That’s right – put some sunglasses on.
There are sunglasses for cameras called Neutral Density filters, or ND filters for short. They come in different strengths measured in stops. In photography terms, one stop is equivalent to a doubling or halving of the amount of light.
Therefore, an ND2 filter placed over your camera will halve the amount of light hitting the sensor.
That’s the difference between a shutter speed of 1/48 or 1/96.
For example, if you had a shutter speed of 1/192 and you wanted 1/48, you would need a 2 stop ND filter.
ND filters strengths double for each stop, so ND2 is 1 stop, ND4 is 2 stops and so on.
Now if you are going out filming in daylight, you will probably find ND4 is not strong enough. I find that an ND32 or an ND64 are required to bring your shutter down enough for smooth video.
By the way, you can certainly use ND filters to slow your shutter speed even if you aren’t manually controlling your shutter speed. By reducing the light hitting the sensor, you make the iPhone adjust shutter speed and I promise you will get smoother, more filmic looking footage.
Freewell VND
The Freewell case allows you to mount their ND filters. And this is one of the best systems I’ve tried. They attach magnetically which makes them very easy to mount.
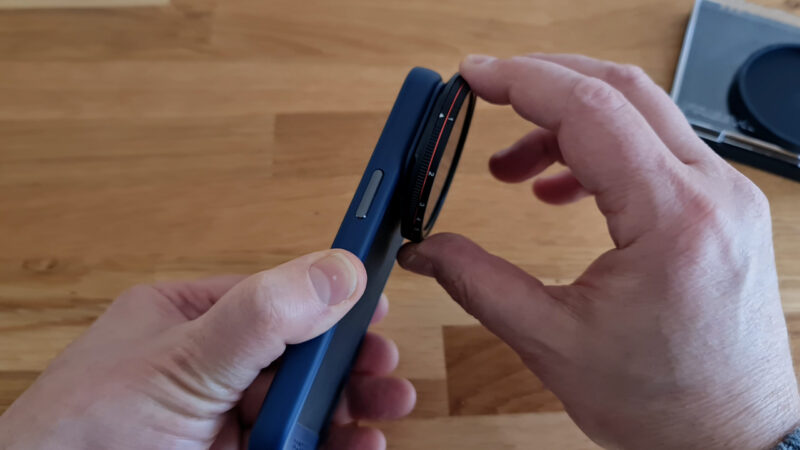
Above is their variable ND filter. Again, it’s well made, feels solid and well finished. I always enjoy using something if it feels pro.
This gives you 1-5 stops of light reduction. The good thing is that when you upgrade your phone, all you need to do is change the case and the filters will work with it. As long as Freewell stays in business and keeps making iPhone cases that is.
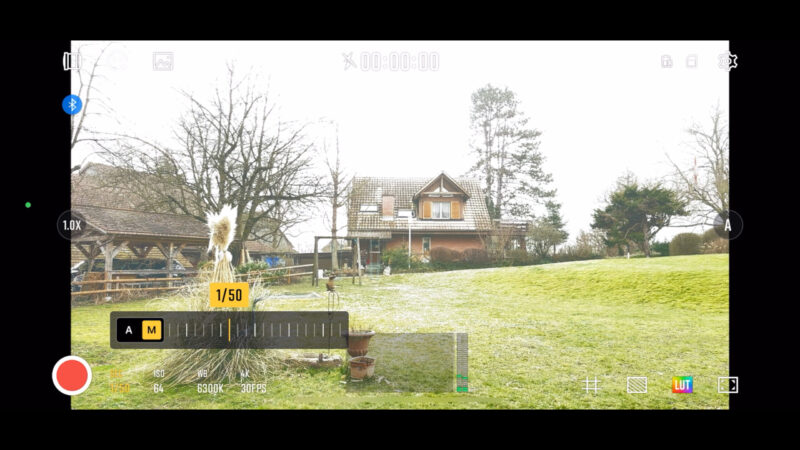
So you just turn the filter and it goes from 1 to 5. Compare the image below to the image above (without an ND filter).
For very bright conditions, you might want a stronger ND. The point is, whatever ND filter you use, the shutter speed will be slower than it is without it.
Add Motion Blur in Post
What if you really don’t want the bother of carrying ND filters around? Or what if mounting them is too much trouble?
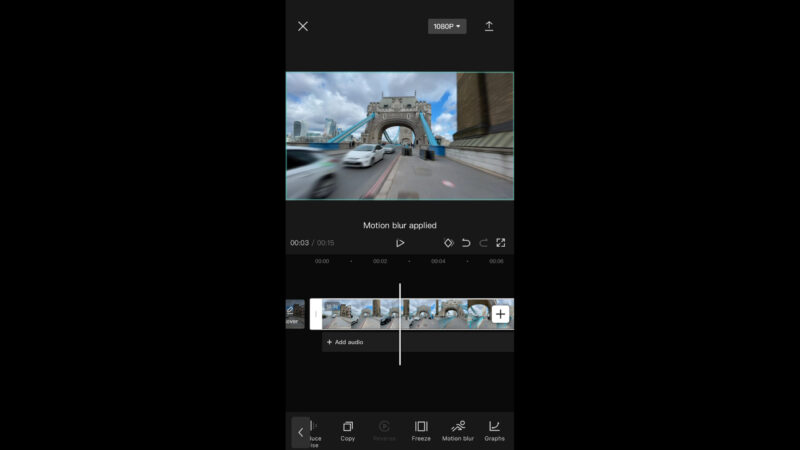
Well, there are other ways of fixing the motion blur problem using post production effects. There’s a plugin by Reelsmart which allows you to add motion blur to your videos in an editing system, like Adobe Premiere Pro. But it costs over $100.
However, there’s a free editing app called CapCut which has a motion blur effect. I tried it and to my eyes it works equally as well as the Reelsmart plugin. As well, if you add this effect to your motionlapse videos it can make them more smooth and cinematic.
One aspect of cinematic video where motion blur becomes important is when we use camera movement.
Camera Movement
A lot of people talk about the inbuilt stabilisation of the camera being a “gimbal killer“. I suspect they don’t understand what a gimbal is really for.
A gimbal doesn’t just stabilise your camera. It allows you to capture really cool, cinematic camera movements that you just can’t get holding the iPhone in your hands. Believe me, I’ve tried.
Simple camera movement is doable holding the phone in your hands. But anything more complicated and I find a gimbal to be invaluable.
For example, by using the extending handle of the DJI OM 6, I was able to get a low angle tracking shot with smooth camera movement.
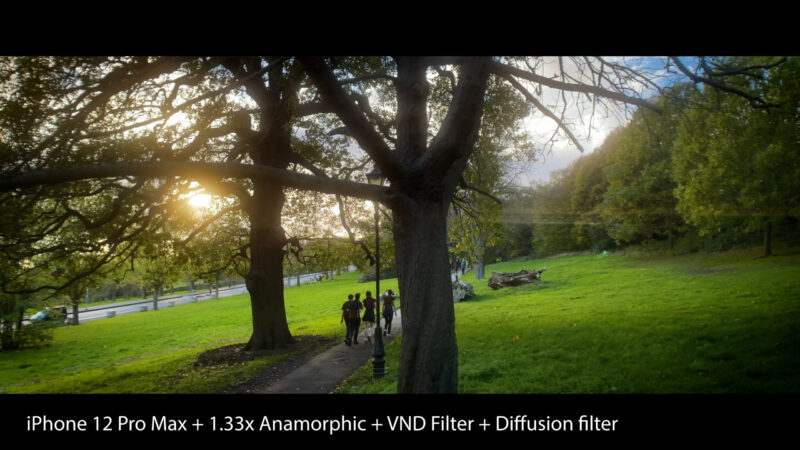
Using the Zhiyun Smooth 5 with a monopod added to extend the handle, I was able to swoop around in an arc and then up. As well, the Smooth 5 allows you to add extras like anamorphic lens, ND filter and black mist filter, which is what I used in the shot below.
Pro Tip: you will create much more engaging shots if you motivate your camera movement by following a subject. The subject can be a person, a vehicle, a train, or someone riding a skateboard. Basically, anything moving.
Shallow Depth of Field
Another tool which improves the look of your video is having a shallow depth of field. What this usually means is that only the subject is in focus, while the foreground or background are out of focus.
By doing this, those parts of the image become less distracting. The image as a whole is less busy and less cluttered. Most of all, it allows us to separate the subject of the frame from the rest of the image.
Normally, iPhones struggle with this aspect and some people go to great lengths to add this shallow depth of field. But since the iPhone 13, and now the iPhone 14 Pro (and Pro Max) we now have Cinematic mode.
iPhone 14 Pro (Max) Cinematic Mode
Cinematic mode is the iPhone’s way of faking a regular pro camera that allows you to get a shallow depth of field. It’s not perfect and I have noticed some situations where it struggles. But considering it’s a phone that you carry around in your pocket, I’m not complaining.
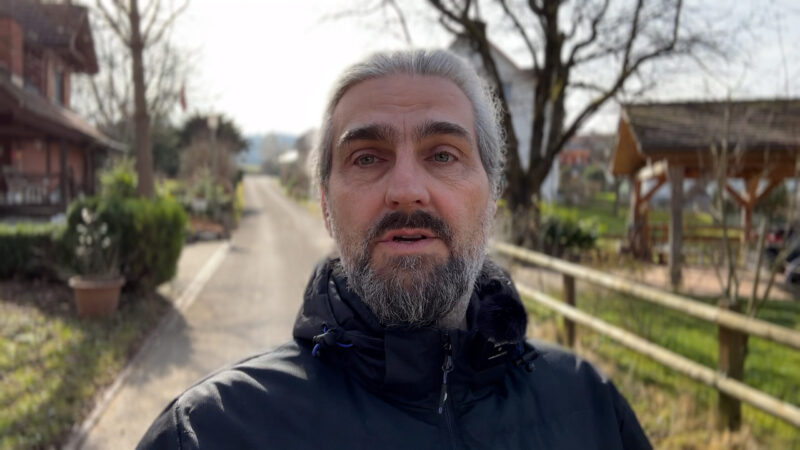
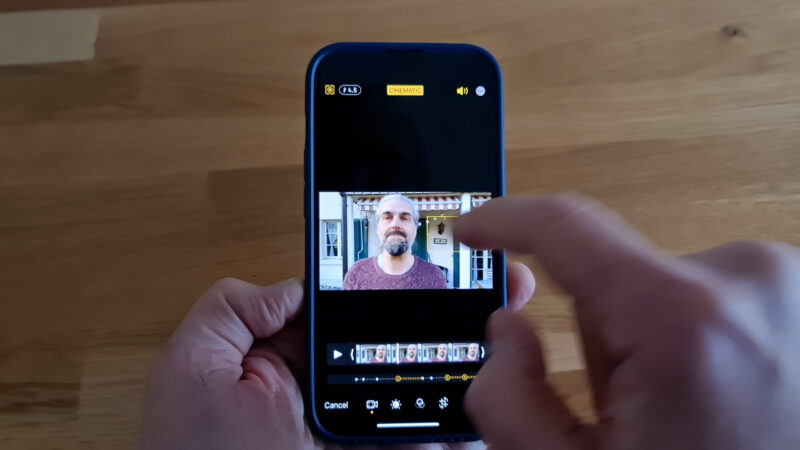
If there’s good light, I use the iPhone 14 Pro’s front camera, in 4K, with Cinematic mode. This means I can see myself so I know I’ve got the framing right.
Recording Cinematic Mode
Let’s look at some useful options we have when recording Cinematic Mode video.
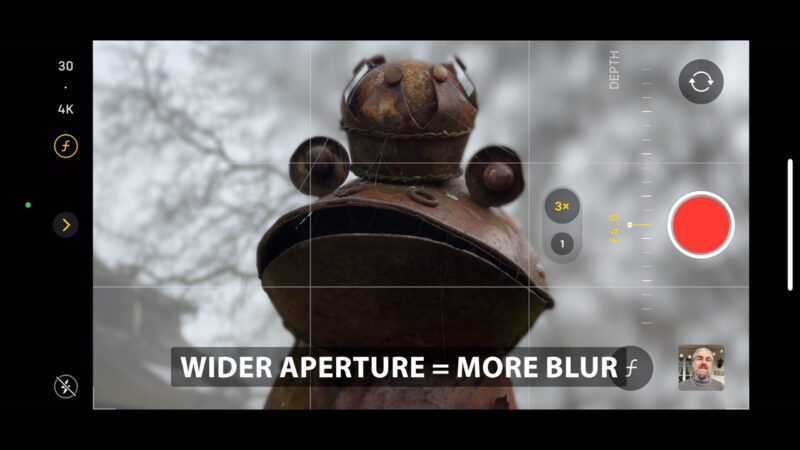
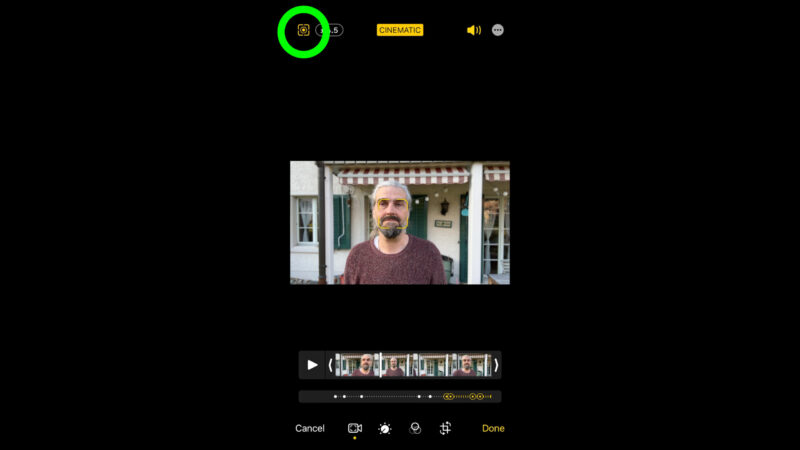
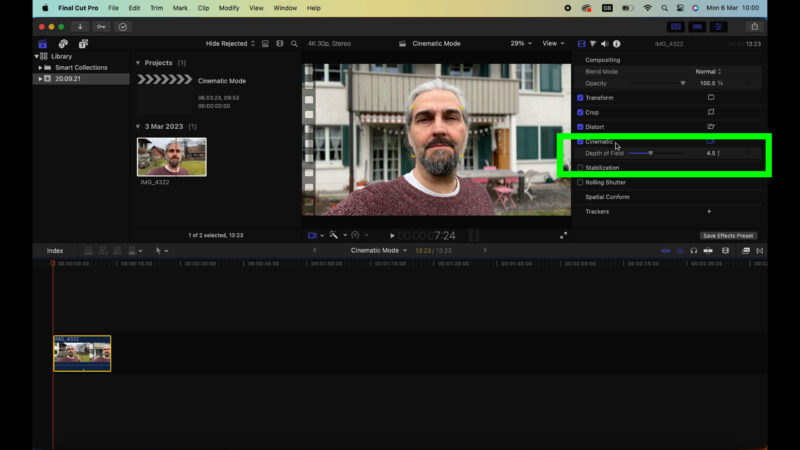
Set your F number
The F number in cinematic mode refers to the aperture setting you would have on a regular camera. Smartphones have fixed apertures so changing this number doesn’t change your actual aperture. Rather it mimics the look when you change the aperture on a regular camera.
Put simply, the wider your aperture the more blurry your background becomes. And, just to confuse us, a wider aperture has a smaller number.
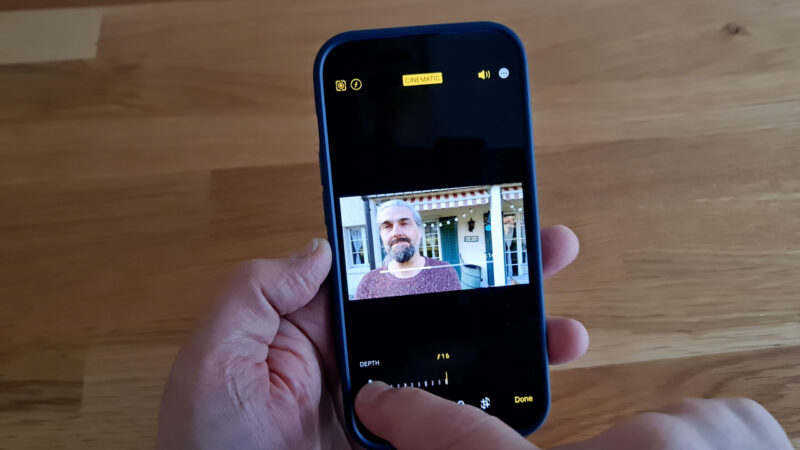
So if you tap the F button you bring up a slider. And the slider takes your F number from 2.0 to 16, where 16 is the smallest aperture and therefore less blurry. 2.0 gives you the maximum blurry background.
The white dot represents the default F number. In other words, it’s the F number Apple recommends you use. For the main rear camera, this default is F2.8, while for the 3x tele and the selfie camera it is F4.5.
You can change this later so you don’t need to worry about setting it wrong. In fact, you can edit the F number and also program in focus changes, like focus pulls. You can do this directly in your iPhone or you can edit Cinematic Mode clips in iMovie, Apple Motion and Final Cut Pro, as well.
Lock Subject Focus
Another great advantage of Cinematic Mode is that you can lock focus on a subject. The app will then try to keep focus on that subject, even if they move around. Just tap on the subject once to get the yellow box and then if you short tap again it will lock on and track the subject.
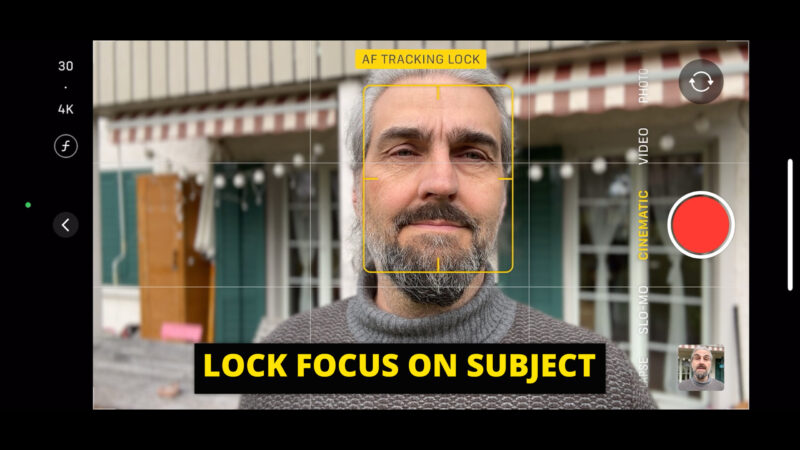
Long press on the screen and you get the small yellow box. Now it won’t respond to any movements in the frame, the focus is locked.
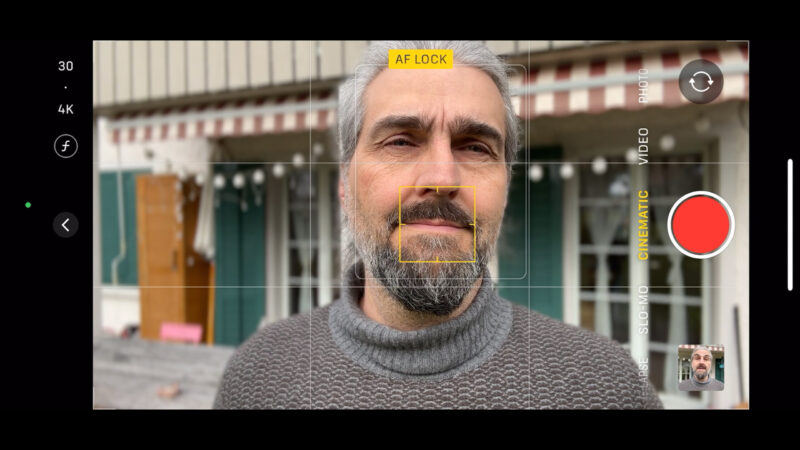
Note that the app looks for faces and uses them to make focus changes. Locking tracking onto a face is therefore the most reliable.
Change Focus
While you’re recording, you can switch focus from one object to another just by tapping the screen. All you’re doing is recording focus change points (keyframes), which you can edit later if you don’t like them.
Is Cinematic Mode Good for Vlogging?
When you’re vlogging and filming yourself, one common issue is getting focus right. For example, if you’re using a regular camera you might not have a screen to see whether you’re in focus or not. So you can film a whole bunch of stuff and then you find the focus is out and it’s unusable.
With Cinematic mode in the iPhone 14 Pro, this becomes much less of a problem because you can fix the focus later. Of course, it doesn’t quite match real shallow depth of field from a regular camera, but it’s not too far off. And this just makes filming yourself so much easier.
Below is a still frame from a vlog using the iPhone 14 Pro selfie cam, cinematic mode 4K, mounted to a DJI Osmo Mobile 6 gimbal.
That said, the main camera does have a physical limit when it comes to focus. Thing is, it has to set focus in the normal way a camera sets focus and then apply this fake shallow depth of field on top.
When you come to edit, if something is physically out of focus, you won’t be able to bring it into focus later. So, this might sound complicated, but most of the time this isn’t a problem. I think you’ll understand better when we look at how to edit Cinematic mode video.
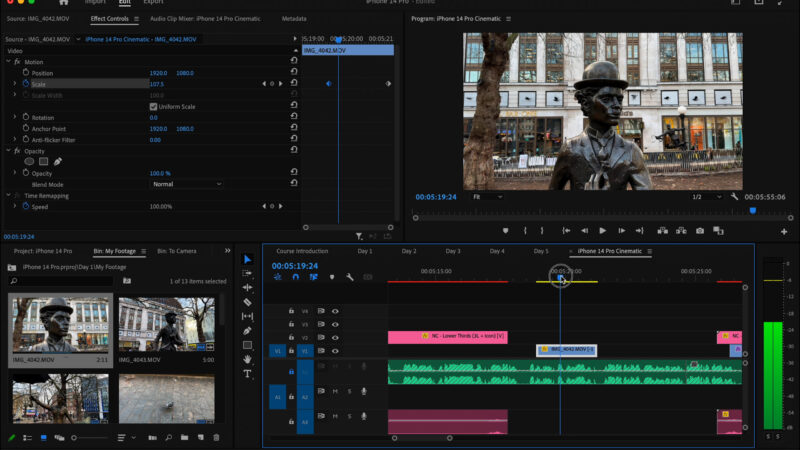
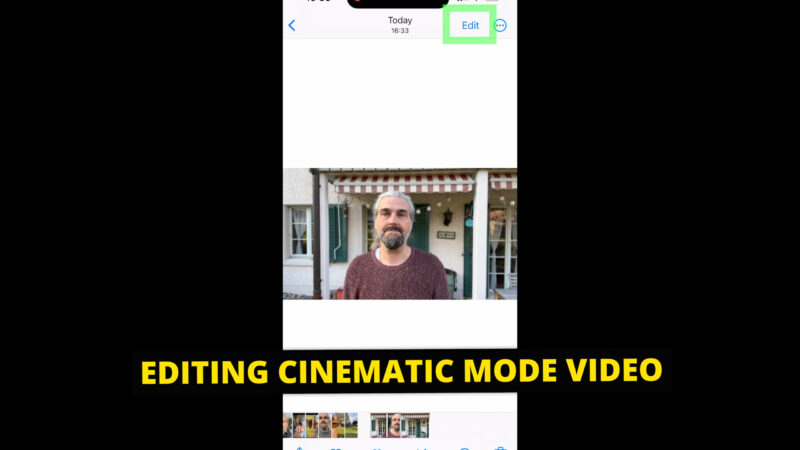
Editing Cinematic Mode video in your iPhone 14 Pro
Open the video you want to edit in the photos app. Tap edit.
You will now see the regular edit screen but with this extra line of dots. This line represents the focus control.
The grey dots and big circles are the focus changes created automatically by the camera app. The yellow dots and circles are those you created manually, either when you were recording the video by tapping the screen or when editing the video.
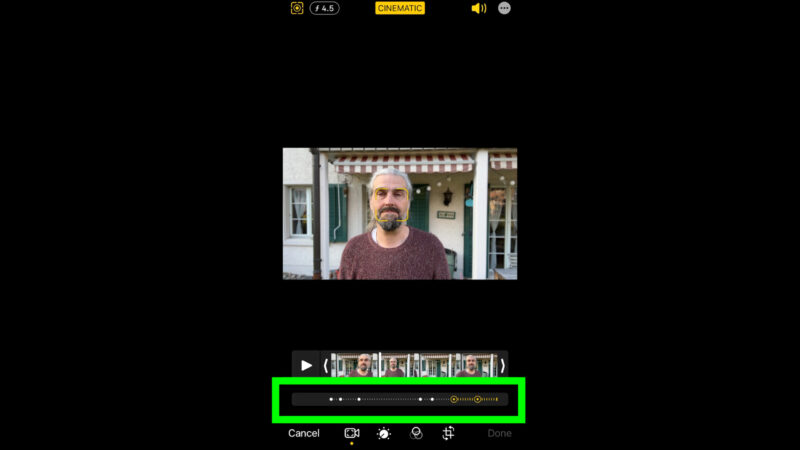
Now you can play the video or slide the white bar to the point where you want to change focus.
If you want the focus to be somewhere else or on someone else, just tap that position on the screen. A yellow square appears, which looks different depending on whether you are tapping on a subject or a background detail.
A yellow circle appears on the focus timeline which is a keyframe. When you play the video again, you will see an automated focus change (AKA focus pull or rack focus) occur. You can delete these keyframes by tapping to select and then tapping the trash can.
If you double tap on a subject, they will be tracked and focus will stay on them while they move around the frame.
If you tap and hold on the screen you can lock the focus at a certain distance. Now it will ignore any movement in the frame and keep a consistent focus.
So you can just keep repeating this process throughout a clip, switching focus from one distance to another.
Now, if you want to see what your clip looks like without the manual changes, just tap the button top left. This toggles the manual changes on and off.
Adjust Depth of Field
You can also change the F number when editing. Tap the f and the number at the top. This opens a slider which you can use to set the new F number.
Whatever number you choose is fixed for the whole clip. It only animates the focus changes, so you can’t have aperture changes during a clip.
When you’re finished editing your clip, tap Done to save your changes.
To undo any changes after you save, just re-open the video, tap Edit, then tap Revert.
How to Edit Cinematic Mode in iMovie
iMovie is a free editing app that comes with every iPhone, every Apple computer and every iPad. It is very basic, but if you just want to cut together some clips quickly it can be useful. You can also use it to edit Cinematic Mode video.
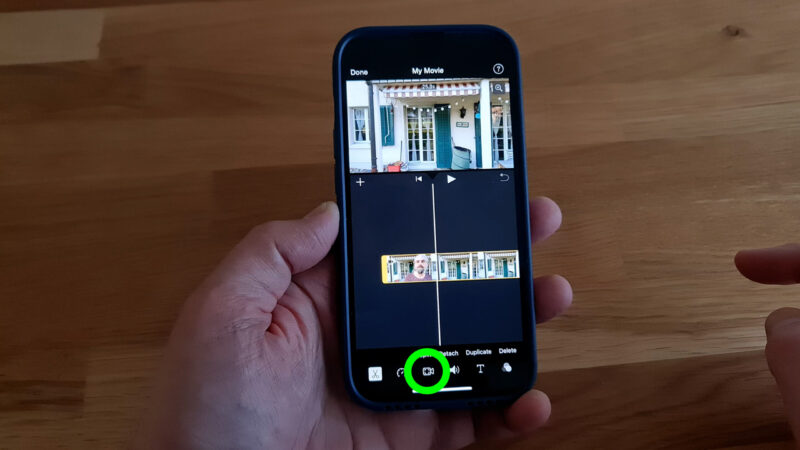
Open iMovie and start a project. Select one or more videos and then tap create movie. If the clip was shot in Cinematic mode, you will see a symbol in the top left corner of the clip on the timeline. Tap on a clip to edit it and you will now see that same symbol at the bottom.
Tap that symbol and you now have the same controls we saw earlier when editing in the Photos app. Using iMovie on my iPhone, it works exactly the same way.
iPhone 14 Pro Cinematic Mode Desktop Workflow
Cinematic mode clips can be edited using 3 programs: iMovie, Final Cut Pro and Motion. Motion is like Apple’s version of After Effects.
If you’re using AirDrop, which I do, if you simply share your cinematic mode video to another device, your iPhone will first render the cinematic mode effect. This will mean the blurry background effect is now baked in and you won’t be able to edit focus changes or the F number.
So this is how you share your cinematic mode videos via AirDrop so that they can still be edited.
Select all your cinematic mode clips, tap the share button. Now tap Options and toggle on All Photos Data. This means it won’t render out the blurry background before sending. Instead it will keep all that information for use in iMovie, FCP or Motion.
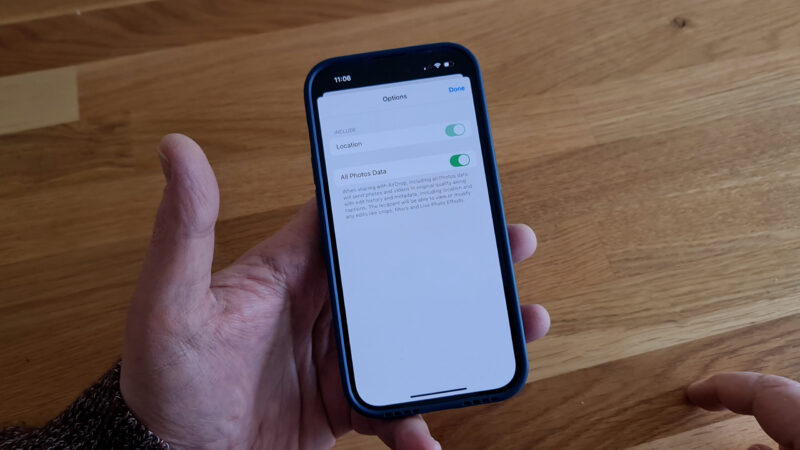
You will probably have to accept the file on the receiving device and you can choose where to save it. Either into downloads or import into your Photos app.
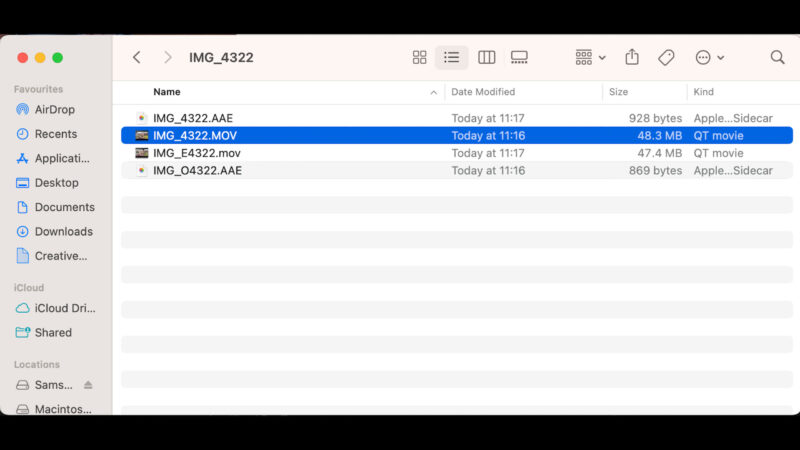
On your computer you will now get a folder containing the video clips. In the folder, locate the MOV file that does not begin with “IMG_E,”, then import it into your editing program.
Editing iPhone 14 Pro Cinematic mode in FCP
To import your cinematic mode files into a project, choose File > Import Media and then locate the file or files which do not have the E in the name of the file, as I explained in the previous section.
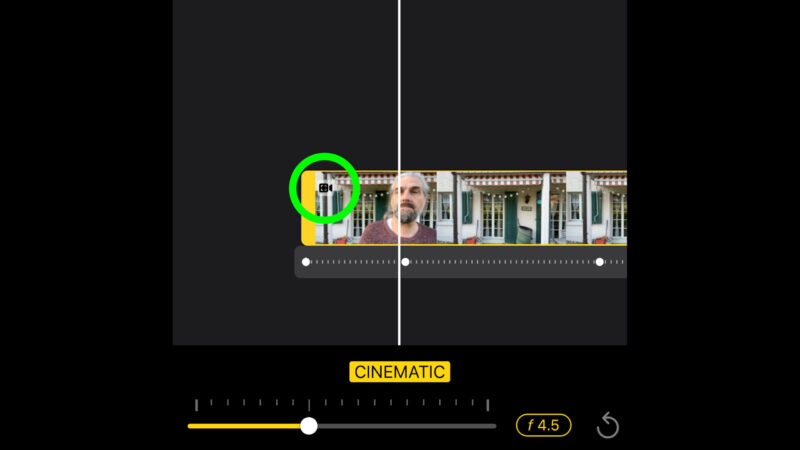
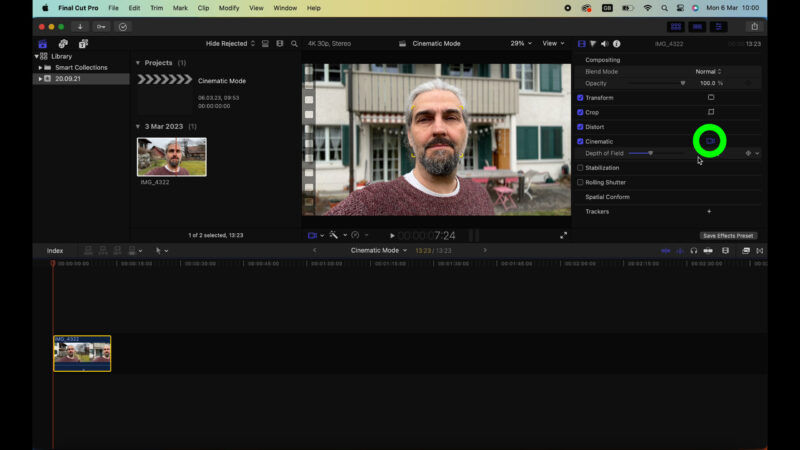
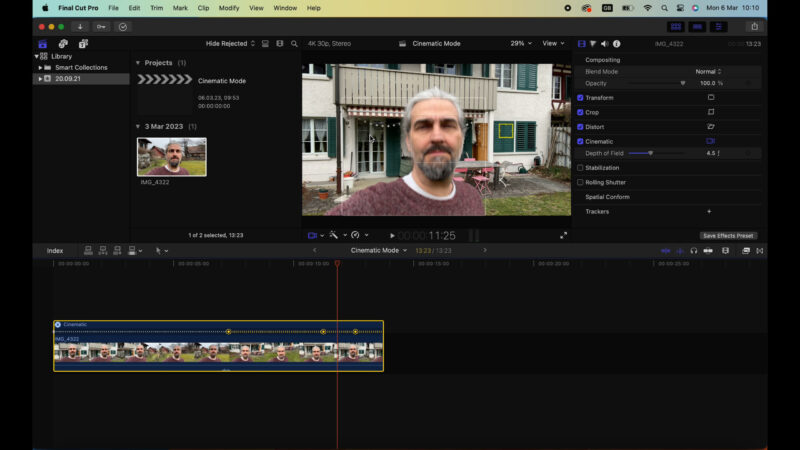
Drop this clip onto the timeline and select it. You now get this cinematic option on the right with the other clip settings.
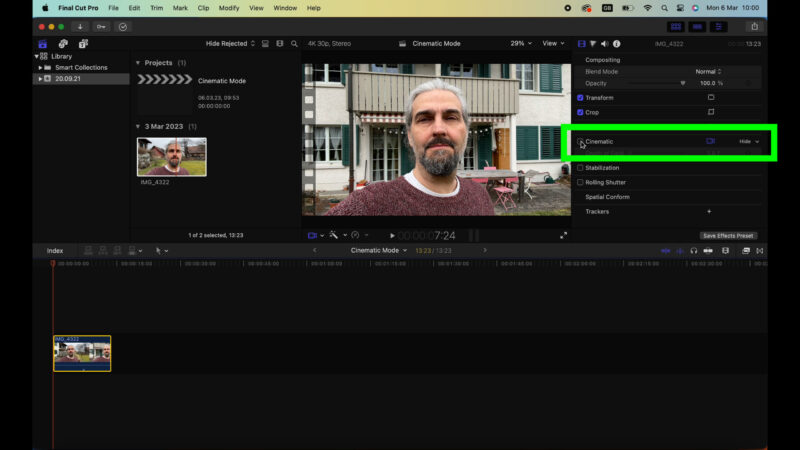
Click to check that and get the cinematic mode controls. First, we get a slider to change the F number. As I used the front camera, it’s currently set to the default f4.5.
Above the slider you will find this icon which is the cinematic mode icon. You can click this to toggle cinematic mode on and off. When it’s on you will see this yellow box around whatever object was focused on when filming. In this case, it’s my face.
This cinematic mode button is also below the preview window.
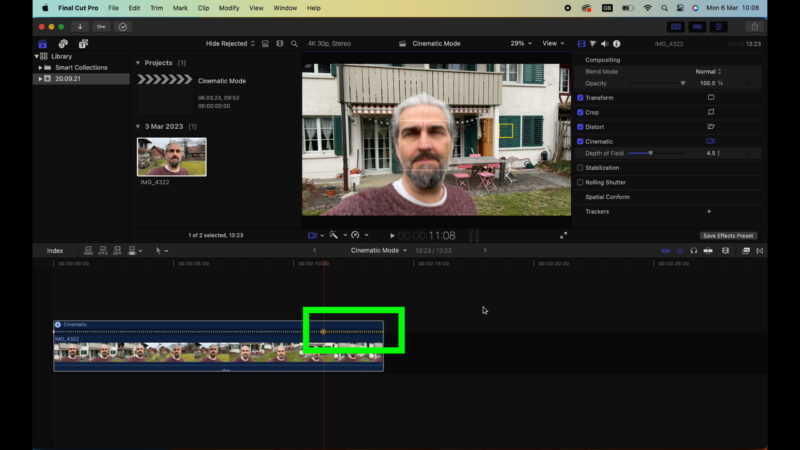
To open the cinematic editor on the timeline, right click the clip and select Show Cinematic Editor from the list. We now get that row of grey dots we saw previously. If you have made manual focus changes when recording you will see those here as yellow dots.
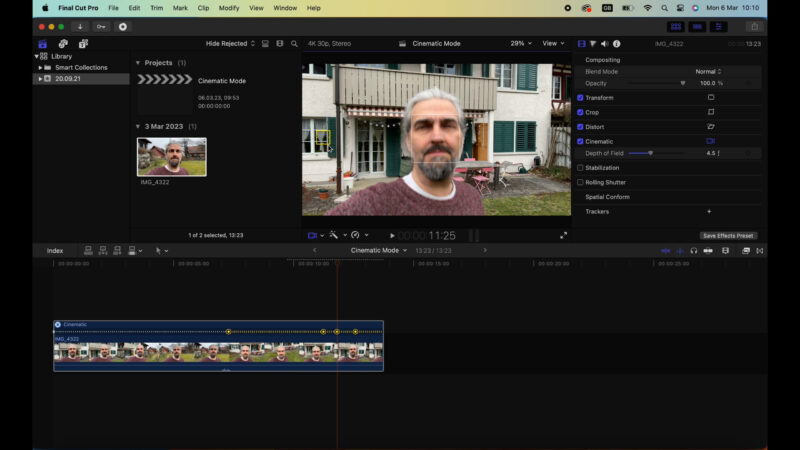
I’ll just click on the background here to make a manual focus change. The focus switches to the background and you can now see the yellow dots with the big yellow dot being the point at which the focus changes. So this big yellow dot is basically a keyframe.
To delete a keyframe, click on it and choose delete.
If I move the timeline along, I can click on my face to set another focus change point. Now you can see I have 2 big yellow dots.

When I play the video, the focus will change from my face to the background and back again. And it changes nice and smoothly, like a focus pull or rack focus should.
Apart from setting a focus change, you can also lock focus onto a subject. At the moment, the yellow frame is around my face, which means cinematic mode is focusing on it. If I click on my face again, I get a full square and a message which says AF (autofocus) tracking lock.
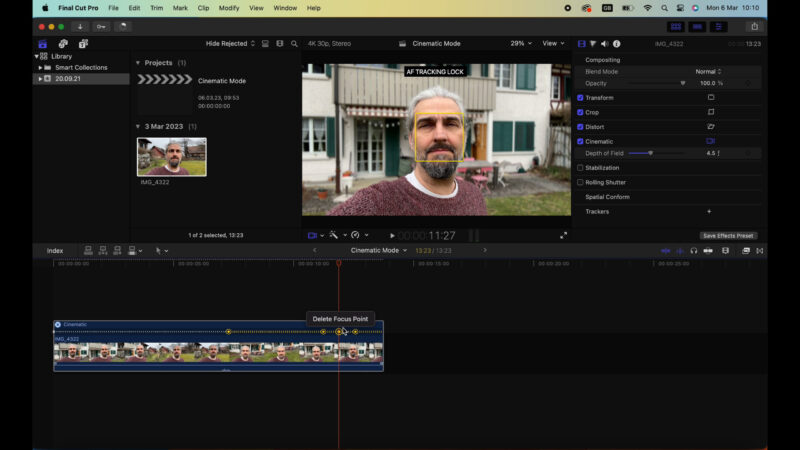
The clip will now use the tracking information recorded to keep focus on me. That is, up until another manual focus change tells it to do something else.
This might be useful if you have more than 1 subject in the frame and the clip switches automatically to another subject. If you would rather stay on one subject, use the tracking lock to tell the clip which subject to stay focused on.
When you move your mouse over the image in the preview window, you might see some light grey squares appear. These are placed around suggested objects to focus on.
In this case, there are 2 squares. And at the moment, my face is out of focus. If I click anywhere within either of these grey squares, it will add a focus change, moving from the background to my face. If I click again, it will start tracking.
But what if I want to focus on a point in the background that happens to be within this big grey square. If I click on the background, it will just focus on me and not the background. So I need to click outside of the grey square and now it will focus on the background.
The small yellow square with target lines means the focus will be locked at a certain distance. Again, until another big yellow keyframe tells it to do something else.
The Downsides of iPhone Cinematic Mode
There are some downsides to Cinematic mode. As I said, it can still have a slightly fake look. Especially if you set it to a very blurry background. If you go for something more subtle, it’s much more convincing.
I also found that the app struggles to work out what is what sometimes.
For example, I was filming in the snow and it couldn’t quite map out the edges correctly. It can also struggle if there are complicated objects in the frame to map. Another time, I was filming for a youtube tutorial and it blurred out the screen of my phone as if it was the background.
Another issue to consider is that your iPhone needs to process the footage before sharing it.
In my workflow, I shoot my “to camera” stuff and then send it from my phone to my laptop to be edited. Before you can use this for editing it needs to render the focus effect and this takes time. Especially if you shoot video in 4K.
It’s not a deal breaker, but it does mean there’s some extra waiting time. That said, if you’re editing in FCP you can bring it straight in and the effect will be rendered when you export from FCP.
Another downside is that you have less camera options. There’s no ultrawide or 2x tele in Cinematic Mode. As well, you can’t switch between cameras when recording as you can in regular video mode.
Finally, if you switch to Cinematic mode in a low light situation you will most likely get a message saying you need more light. However, I found that you can still use it and it seems to be able to set focus correctly. But just be aware it might not work as well.
So now we have our shallow depth of field and our motion blur sorted, what else can we do to add a cinematic element to our videos? We could try to add the anamorphic look.
iPhone 14 Pro – Anamorphic Lenses
These are what’s known as anamorphic lenses. They were first used in cinema in the middle of the last century, as a way to make movies look different from TV. They needed a reason to get people out of their living rooms and come to a movie theatre.
In short, they decided to make movies wider. And to do that, they would use a lens which squashed the image in at the sides, which would then be stretched out again by a conversion lens mounted on the projector. It was the 1950s version of IMAX 3D.
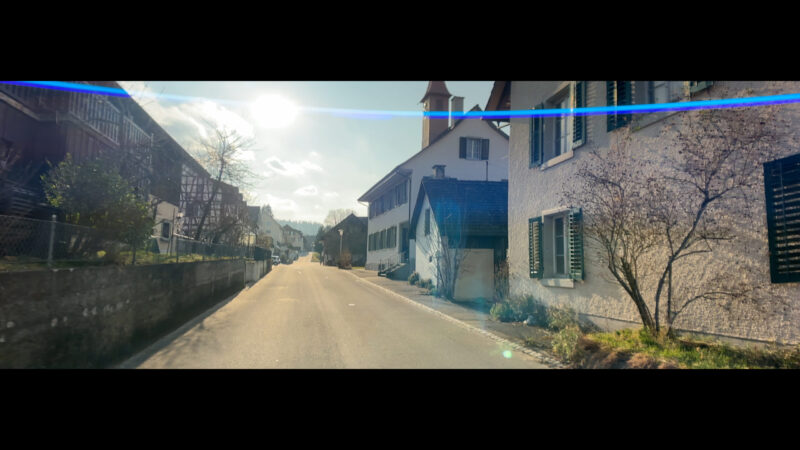
But later on, anamorphic lenses became cool. Filmmakers fell in love with the character the lenses added to their movies. And that’s what you have to remember when you use one of these lenses, you’re not just getting a wider view, you’re adding character.
For example, the distinctive long straight lens flares. The lenses also add chromatic aberrations and perhaps a bit of softness.
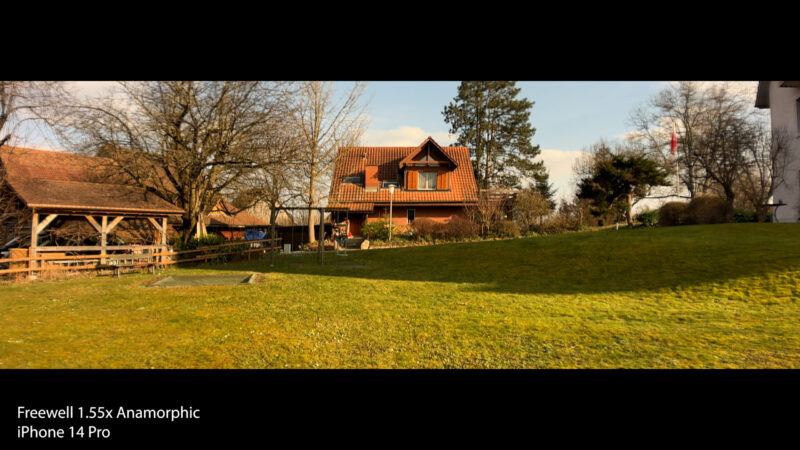
Anamorphic : 1.33x or 1.55x?
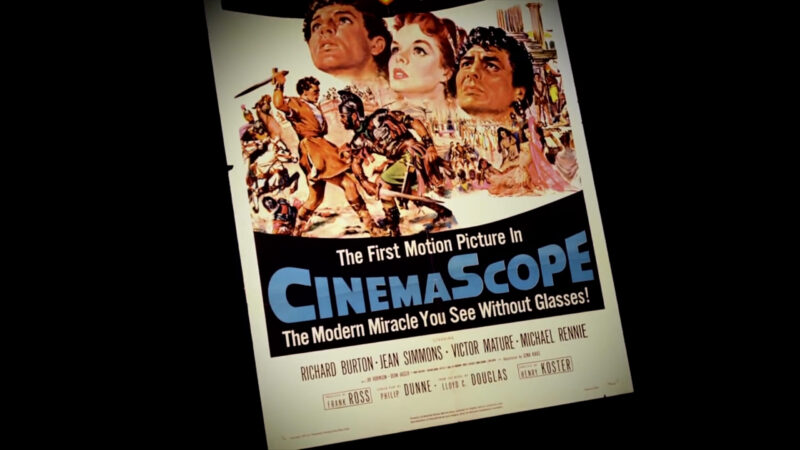
There’s 2 types of anamorphic available for smartphones. The more common 1.33x (which is like CinemaScope) and the Ultra Panavision style 1.55x anamorphic.
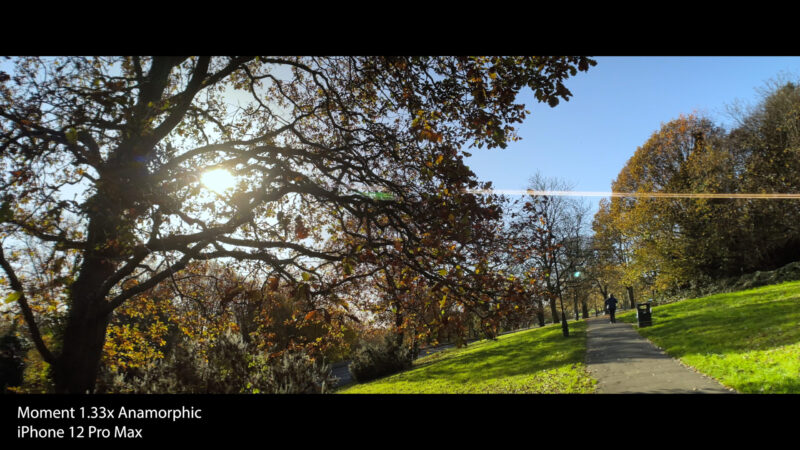
1.33x gives a 2.39:1 aspect ratio and has been used in cinema far more than the 1.55x, which gives a 2.76:1 aspect ratio. In fact, Ultra Panavision 70mm film was briefly used in the 50s and 60s before falling out of use, until Tarantino used it for The Hateful 8.
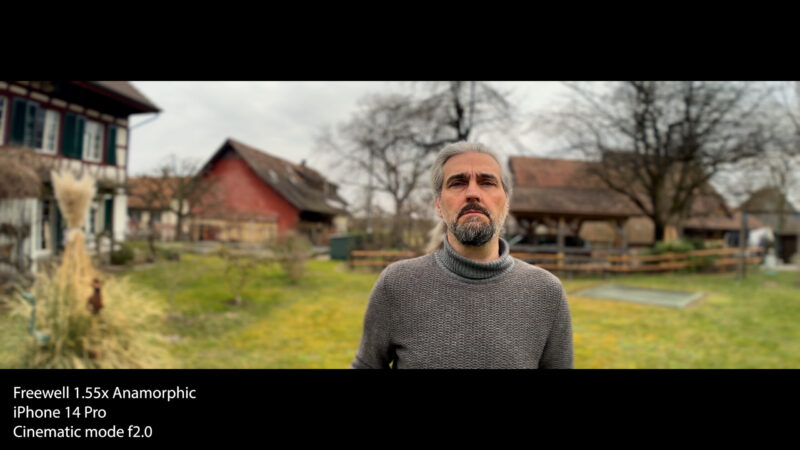
This is one by Freewell. It’s called a Cinemorphic Blue 1.55x, which means it creates blue light flares and has a very long aspect ratio. It comes in a pouch, it’s as well built as everything else by Freewell and you also get a series of filters for the lens.
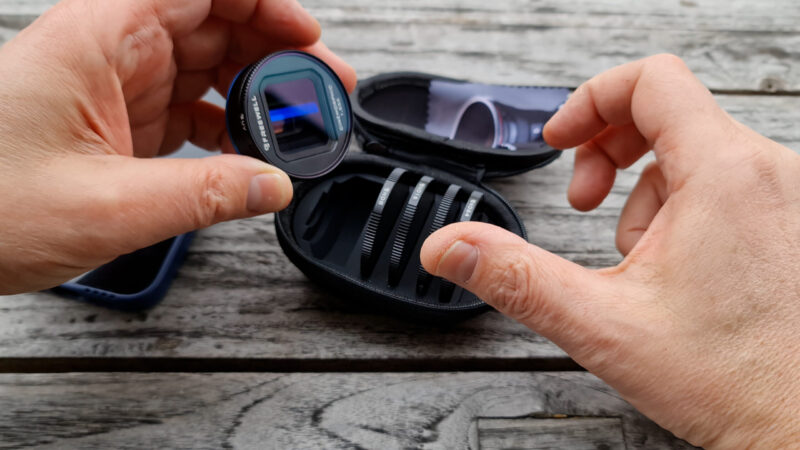
There’s ND8, ND16, ND32, ND64 and a basic UV filter. Oh and the tiniest lens cloth you’ve ever seen.
So which one should we use? Can we mix ratios?
1.55x is very wide and rarely used in cinema. You will get wide black bars on the top and bottom. In the right place it can look cool. As well, it’s fun to play at being Quentin Tarantino, isn’t it?
On the other hand, 1.33x is more easy to use. I’ve seen documentaries where they mix the 2.39:1 aspect ratio with regular 16:9 footage. It’s a style, it’s a creative choice. Just have fun with it, there’s no rules in movie making.
One question I’ve been asked is does Cinematic mode work with an anamorphic conversion lens. So let’s try it.
Do Anamorphic lenses work with Cinematic Mode
I did a quick test with the iPhone 14 Pro and the Freewell 1.55x and switched to Cinematic Mode on the main camera. I set the f number to the maximum f2.0. You can see it detects me as I walk into shot and it seems to work just as well as it does without the lens.
You can see that when I place my hands on my head, Cinematic mode can’t tell that this area inside my arms is actually the background. It just sees me and my arms as one object and so creates a mask around that area and blurs everything outside it.
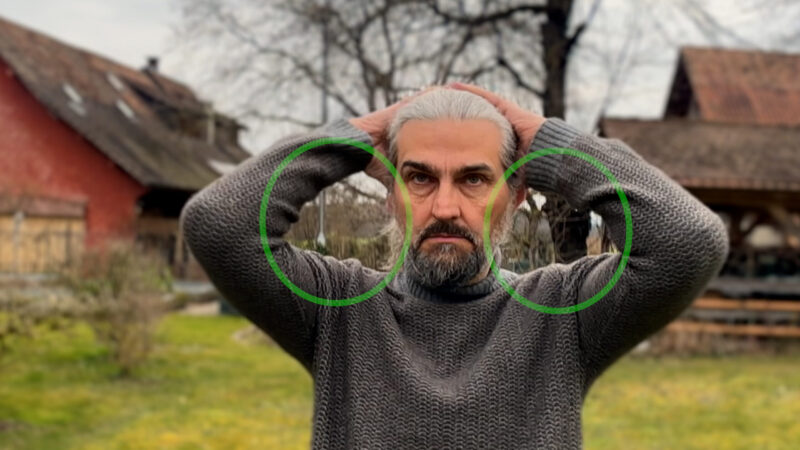
But that can happen whether you have a lens mounted or not. It doesn’t always happen though. When I stood nearer the camera, it was able to see the background correctly.
iPhone 14 Pro – Mist filters
Another way to add character to your iPhone videos is to use a diffusion filter. What this does is scatter the light before it hits the sensor. They’re used by photographers and cinematographers all the time.
You get a glow around light sources, they stop the shadows being crushed to black, they’re often flattering for your subject too. iPhone video can often look harsh and over sharpened and adding a diffusion filter helps to reduce that sharpness a bit.
Essentially, diffusion filters just make your images look more dreamy.
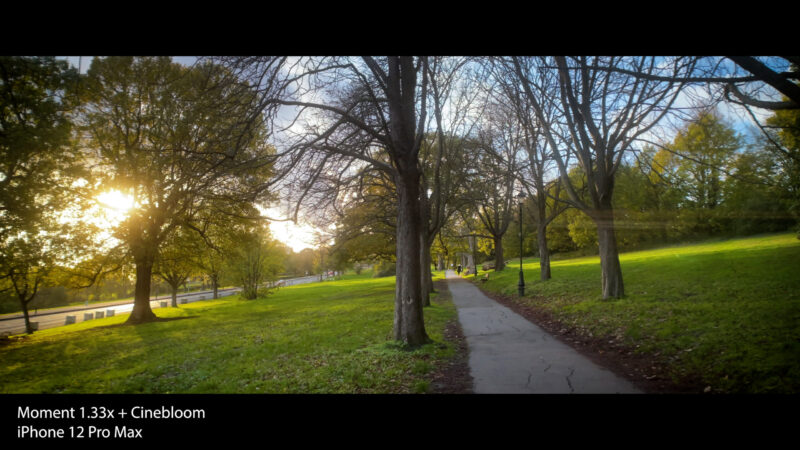
There’s hundreds of companies that make these. A famous one is Tiffen who make a range of them, including the well known Black Pro Mist. Moment do a series called Cinebloom. This one is by Freewell and works with the case I showed you earlier. Although, unfortunately, you can’t mount it to the anamorphic lens.
I found the mist effect from the Freewell to be quite subtle, which you might prefer. The thing about the Tiffen filters and the Cinebloom filters is that they come in different strengths. The Tiffen I showed you here is 1/2 strength. The Freewell is a 1/4 strength and as far as I can see there are no alternative strengths available.
Videography – Beginner to Advanced
If you want to know more about filmmaking, my book Smartphone Videography – Beginners to Advanced is now available to download for members on Patreon. The book is 170 pages long and covers essential smartphone filmmaking topics:
Things like how to get the perfect exposure, when to use manual control, which codecs to use, HDR, how to use frame rates, lenses, shot types, stabilisation and much more. There’s also my Exploring the Film Look Guide as well as Smartphone Colour Grading.
Members can also access my regular filmmaking podcast, as well all 5 episodes of our smartphone-shot Silent Eye series, with accompanying screenplays and making of podcasts. There’s other materials too and I will be adding more in the future.
If you want to join me there follow this link.
