Smartphone Gimbals Tutorial: 5 Do’s – 5 Don’ts
Smartphone gimbals like the DJI Osmo Mobile 3 or OM 4 make smartphone filmmaking easier and more fun. But creating great videos takes more than having a few stabilized shots cut together. So these are my Top 10 do’s and don’t to help you create something more professional and more cinematic.
1. DON’T – use it for every shot
When people get their first gimbal, one of the most common mistakes is thinking we have to use the gimbal for every shot. We mount our phone to the gimbal, spend some time filming, but with the phone always in the gimbal.
The problem is, when we come to edit this footage it all has a similar character. We end up with a final video made up of shots going left to right, left to right, right to left, tracking round things. So, mix it up.
If we take our inspiration from movies, most don’t have gliding shots all the time. Most use a shot like that sparingly, mixed with still shots or handheld shots. Take a moment and think about what you want to say with the gimbal shot.
With the DJI OM 4, the magnet mount means you can take the phone off easily, too.
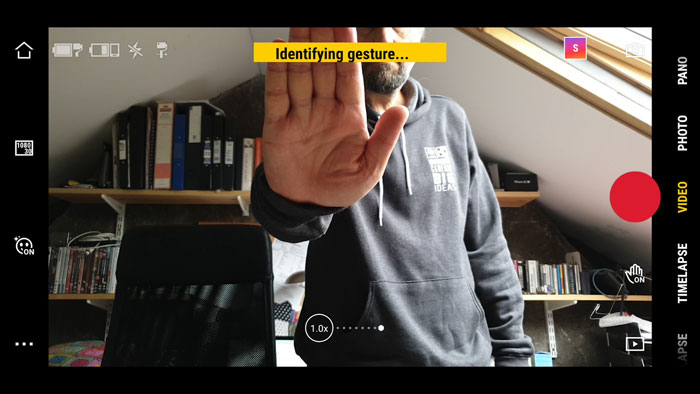
2. DON’T – always use the gimbal’s app
The apps which come with the gimbal often offer lots of fun features. Like story mode, barrel shots and so on. But, they often don’t give you the highest quality video or offer the most options in terms of frame rates and resolution.
For example, with my Samsung Note 20 Ultra, using the Mimo app I only get 30 fps. Using the Samsung app I can get 60fps. I can shoot slow motion and super slow motion. I can also use the Samsung Pro mode, shoot 24fps and 8K resolution. I can also access the phone’s tele lens, while the Mimo app can’t.
If you set the basic mode in the Mimo app, then switch to your phone’s native app, you can still shoot using gimbal. And with the Samsung man camera app I have found I can use the record button on the gimbal and the usual joystick controls.
3. DON’T – overdo it
Gimbals and their apps have so many fun features, it’s easy to get carried away. But if every shot is flying around, spinning here and there, it can be too much. The audience won’t be watching what’s in the frame, their attention will be on the camera movements themselves.
In a way, it draws attention to the person shooting the movie and not the content of the movie. But a professional filmmaker doesn’t want to draw attention to him or herself. They want you to be drawn to the images which go together to make up a story.
And I don’t just mean drama movies on Netflix. If you are making an advert, then the most important thing is the product. If your ad only sells the camera operator and not the product, you won’t get hired again. And if you’re making a real estate video, you are still telling a story – a story about how great the house would be to live in. And this goes for travel videos too.
The only reason to have a video full of crazy gimbal shots is if you’re trying to sell a gimbal.
If you watch Apple’s most recent shot on iPhone video, many shots were taken using a gimbal. But every shot was created and thought out beforehand to tell the story. Most of the shots are simple and subtle, to make the most of the location, the actors, the lighting and so on.
4. DON’T – use the wrong gimbal
If you have a DJI Osmo Mobile 3 or OM 4, these are small gimbals. They fold up and they’re light and convenient. But if you want to add extras, like a grip or a case, lenses, filters and so on, then you will probably find the gimbal is not big or powerful enough.
Overloading your gimbal can cause it to malfunction, motors to overheat and wear out quicker, and the battery to drain quicker. Also, while my Note 20 does work with this gimbal, the size of the phone compared to the gimbal restricts some shots. So I might be better off using a bigger gimbal in that case.
Also, why use a bigger gimbal when the smaller one will be enough? Of course, we don’t all have lots of gimbals to choose from. But if you want to use lots of extras, then think about alternative ways to get a shot. Quite often, using the inbuilt stabilization of the phone is enough anyway.
Mobile Filmmaking knowledge: How Much Weight Can Your Smartphone Gimbal Carry?
5. DON’T – shoot every shot the same
The easiest shot to achieve using a smartphone gimbal is moving forward. Then there’s panning around a subject. So these 2 shots are usually the most common shot you’ll see in people videos. There’s nothing wrong with these shots at all. But if every shot is the same or similar, your video will often come out a bit bland and boring.
So if you want to improve, try different shots. As filmmakers, what we’re aiming to do is compose a video that engages an audience, we want to keep things interesting. When you cut a video together from different shots, it’s just like telling a story.
If your story goes: “I walked down the street. Then I walked down the street. Then I walked left to right across the street while looking down it. Then I walked down the street…” and so on.
I think most of us would never think to bore our friends with such a story. So why do we do exactly that with our videos?
Mobile Filmmaking knowledge: True Cinematic Gimbal Moves
1. DO – shoot at a high frame rate
Don’t always shoot at 24 or 30fps. If you shoot at 60fp or higher, then you can slow it down in your editing software and create slow motion.
Slow motion makes our smooth videos even smoother. But it’s often impossible to achieve using the gimbal’s camera app if it doesn’t have access to those high frame rates.
This really relates back to my previous tips about using different shots. You don’t need to make every shot slow motion, but use it wisely and add some nice variety.
2. DO – think about the location
If you really want your videos to stand out, think carefully about your location. That doesn’t mean you have to go up a mountain or into an exotic jungle. Of course those locations are impressive, but what really counts is that you think about it.
When I turn up to film, I’m like a CIA agent scouting an area before the president visits, looking for danger. Except I’m looking for creative opportunities that can be derived from the location I’m filming in.
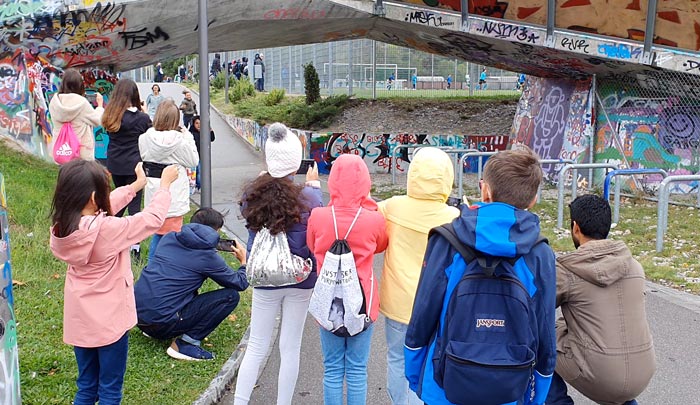
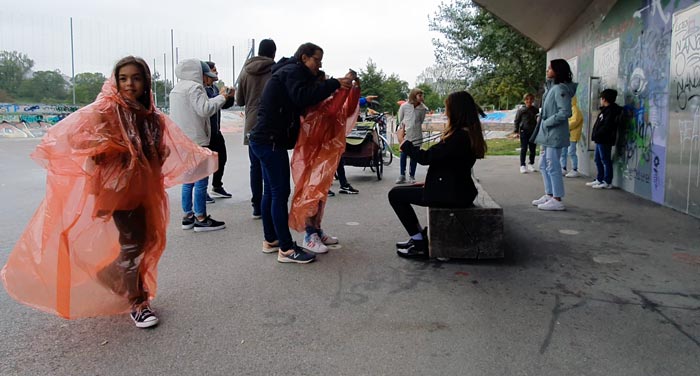
When we were commissioned by Generali to shoot a music video using smartphones, we were given a list of possible locations. We visited those locations and took lots of pictures. Then I spent the next few days thinking about how we could use the background and the architecture.
For example, the skate park had nice graffiti and a bridge. The graffiti would work to give us an urban, steel level feel to the video. We also had access to shoot inside a shopping mall. We had all sorts of ideas for using these stairs and escalators to get interesting angles and backgrounds.
3. DO – think about the lighting
People talk about resolution, they talk about Log profiles, about bitrate and high dynamic range and all these things to do with the technology of your device.
But the one thing which is way way more important than all those things is lighting. If you shoot 4K log video but the lighting is bad, your video will look bad. If you shoot 720p native video and your lighting is good, your video will look good.
One option is to completely control the lighting, like professional filmmakers do. A major reason why the latest shot on iPhone video looks so beautiful is because they control the lighting in every shot, in some way.
One of the easiest ways to control lighting is by using filters, like neutral density, polarising or diffusion filters. Another way is to have a big lighting setup.
Now, I realise most of us don’t have access to big lighting setups and lighting crew. However, you can still think about lighting.
For example, if you are filming a human subject, direct sunlight is often too harsh. The background gets washed out. The light on the face is unflattering.
So find a shady area, out of the direct light. Now the light will be indirect and therefore more diffused. Often it can be as simple as moving out of the direct sunlight.
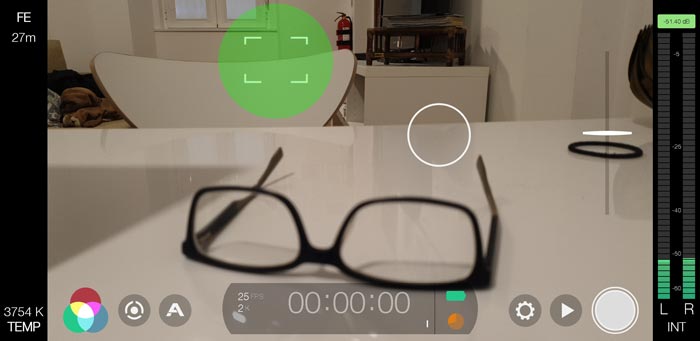
4. DO – lock exposure, focus and white balance
If you don’t lock settings, when you move the camera the exposure can change during the shot. And this usually looks less polished, less professional.
If you are using an app like FiLMiC Pro with your gimbal, then you can have complete manual control. Set shutter speed, ISO, white balance and so on. Also, most gimbal apps allow this too.
But if you don’t have time for that, it’s very easy just to make sure exposure, focus and white balance are locked.
Also, think about pulling the exposure down a touch. Often smartphones overexpose video because they are playing safe. They’re making sure your friends and family’s faces can be seen. But that doesn’t always create the best, most cinematic looking shot.
5. DO – think about the edit
A common beginner mistake with filming is to let our minds wander and the camera wanders with it. When we’re doing that, we’re not thinking about how we’re going to edit the video we’re filming. So we just film random shots, of whatever happens to catch our interest.
If you want to make the step to the next level, start thinking about how your shots will edit together BEFORE you shoot them.
If you really want to be professional, then make a storyboard first. But you don’t have to go that far. Again, this is what makes the difference between an interesting story and a boring story.
This is what our video stories would sound like, when we let our minds wander: “I went to the park. There were trees. And leaves. A park bench. This is how big the park is. There’s a gate as well. And a fence. People put their rubbish here.”
You see, in this story it’s just one random thing after another. That’s ok if you’re just making a camera test video and want to demonstrate its capabilities. But for everything else, if we want to engage our audience, we need to think more about how one shot goes to the next shot and to the next shot.
So, if you think about how your shots will edit together before you shoot them, this will help you create more exciting video stories.
Videography – Beginner to Advanced
If you want to know more about filmmaking, my book Smartphone Videography – Beginners to Advanced is now available to download for members on Patreon. The book is 170 pages long and covers essential smartphone filmmaking topics:
Things like how to get the perfect exposure, when to use manual control, which codecs to use, HDR, how to use frame rates, lenses, shot types, stabilisation and much more. There’s also my Exploring the Film Look Guide as well as Smartphone Colour Grading.
Members can also access my regular filmmaking podcast, as well all 5 episodes of our smartphone-shot Silent Eye series, with accompanying screenplays and making of podcasts. There’s other materials too and I will be adding more in the future.
If you want to join me there follow this link.
